Eclipse Testing Lab is an advanced, open-source platform designed to streamline testing and quality assurance (QA) processes. This comprehensive tool empowers developers and QA professionals to improve efficiency and deliver robust software solutions.
This article explores what Eclipse Testing Lab is and its features and significance.
What is Eclipse Testing Lab?
Eclipse Testing Lab is a versatile integrated environment built on the Eclipse platform. It supports various testing activities, such as manual and automated testing, performance monitoring, and debugging.
Its open source nature makes it accessible to organizations of all sizes, allowing users to customize and scale it to fit their specific needs. It also simplifies the software testing lifecycle with various plugins and tools.
Why Eclipse Testing Lab is Important
Eclipse Testing Lab offers numerous advantages making it an ideal choice for QA teams:
- Comprehensive Testing Tools: It provides a wide range of tools to support diverse testing requirements, including functional, integration, performance and regression testing.
- Seamless Workflow Integration: Eclipse Testing Lab integrates smoothly with continuous integration/continuous deployment (CI/CD) pipelines, enabling consistent testing throughout development.
- Cost Effective Solution: Being open source, it eliminates expensive licensing fees while delivering enterprise-grade features making it budget-friendly for businesses.
- Strong Community Support: A large community of developers actively contributes to the platform, ensuring regular updates, feature enhancements and support.
- Improved Efficiency and Collaboration: By combining development and testing in one environment, it simplifies workflows and promotes better collaboration between developers and QA teams.
How to Set Up Eclipse Testing Lab
Eclipse Testing Lab can be set up in a few simple steps:
Step 1: Download and Install Eclipse IDE
Go to the official Eclipse website and download the latest version for your operating system. Follow the installation instructions to set it up
Step 2: Install Required Plugins
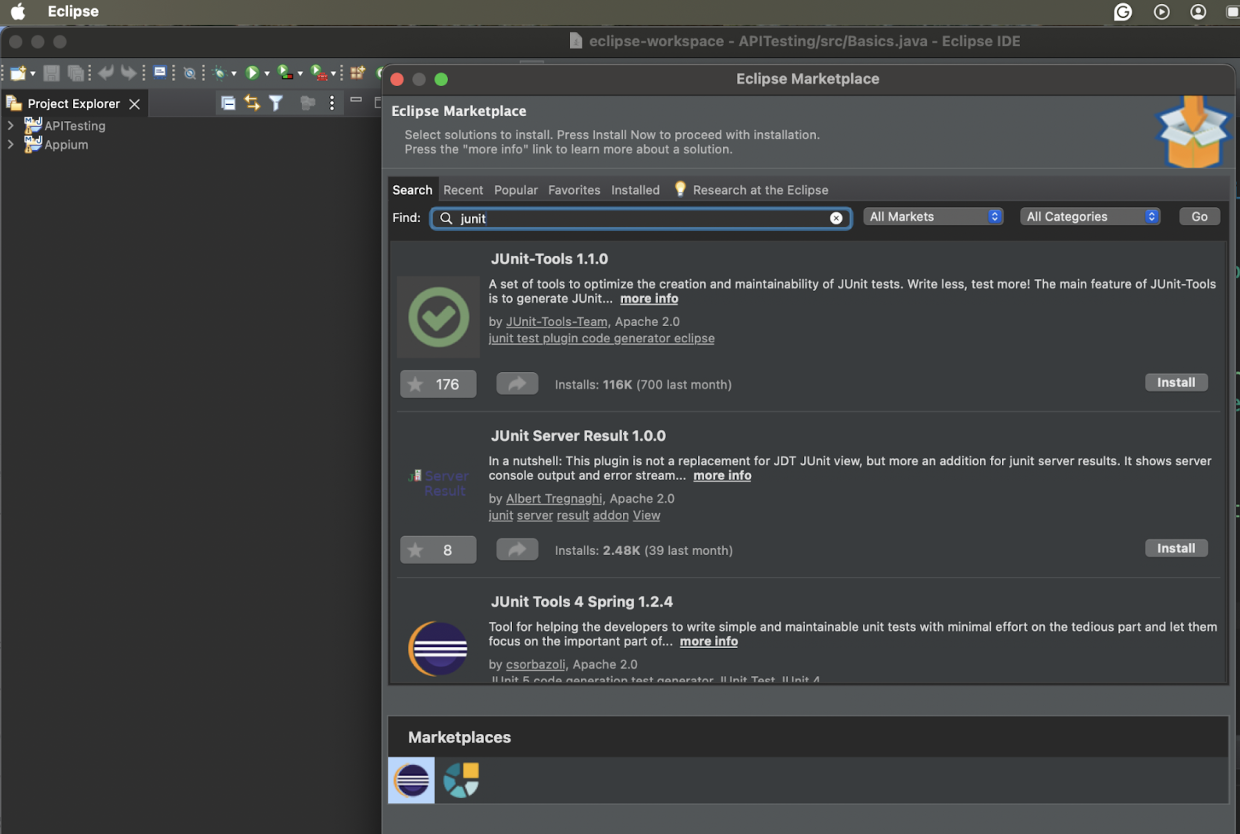
Open Eclipse and go to Help > Eclipse Marketplace. Search for JUnit, TestNG, or Selenium plugins, and click Install. Restart Eclipse if prompted.
Step 3: Set Up a Testing Project
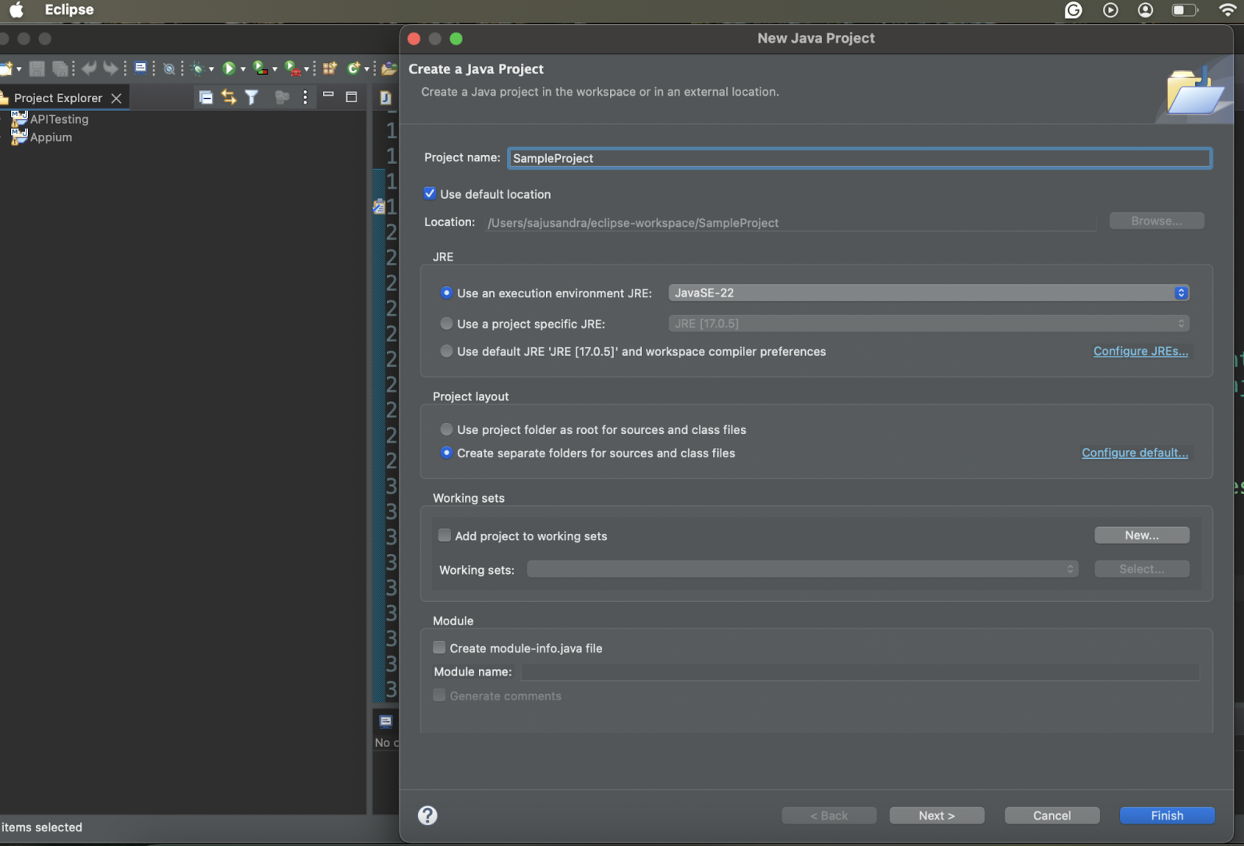
In Eclipse to set up a testing project, click File > New > Project, select Java Project or another type, name it, configure the settings (name, location, JDK), and add dependencies via Maven or Gradle (such as, Selenium libraries).
Step 4: Integrate Version Control
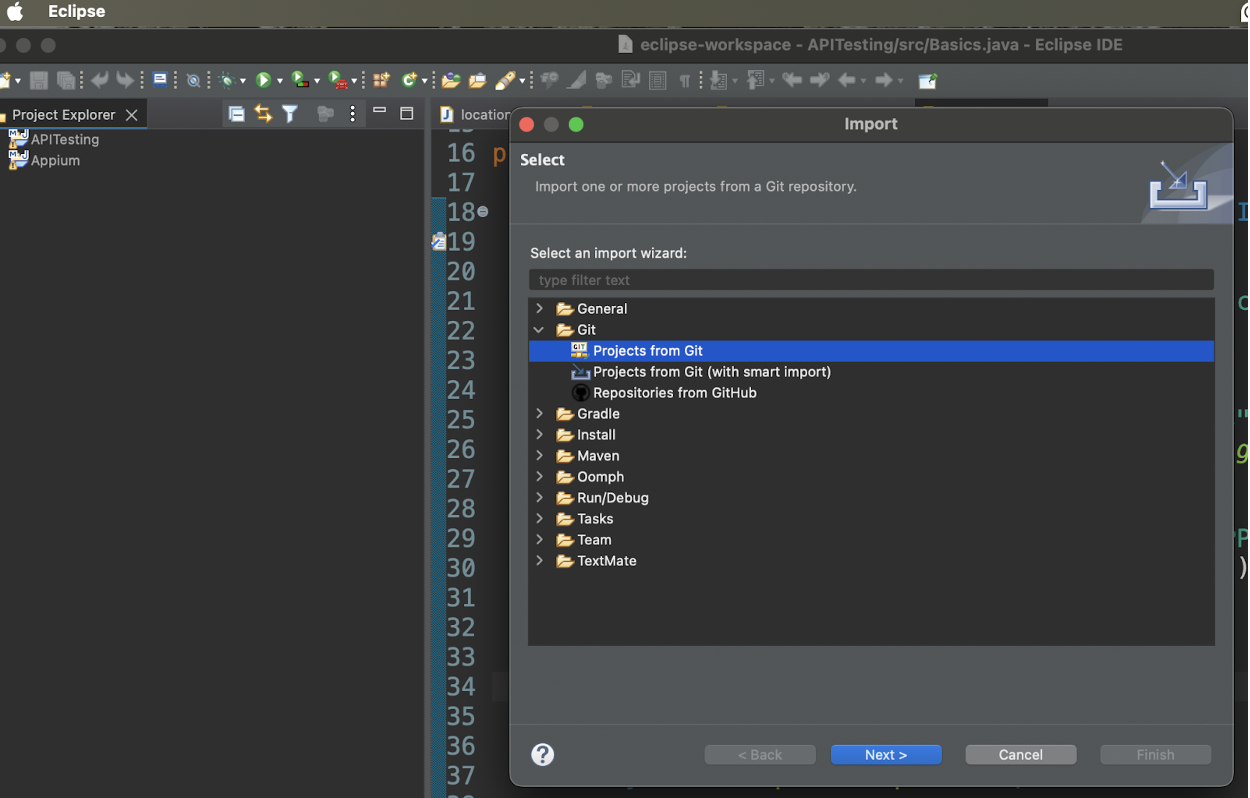
To use Git, go to File > Import > Git > Projects from Git, clone your repository or import an existing one, and manage your test scripts through Git in Eclipse.
Step 5: Enhance with Additional Tools
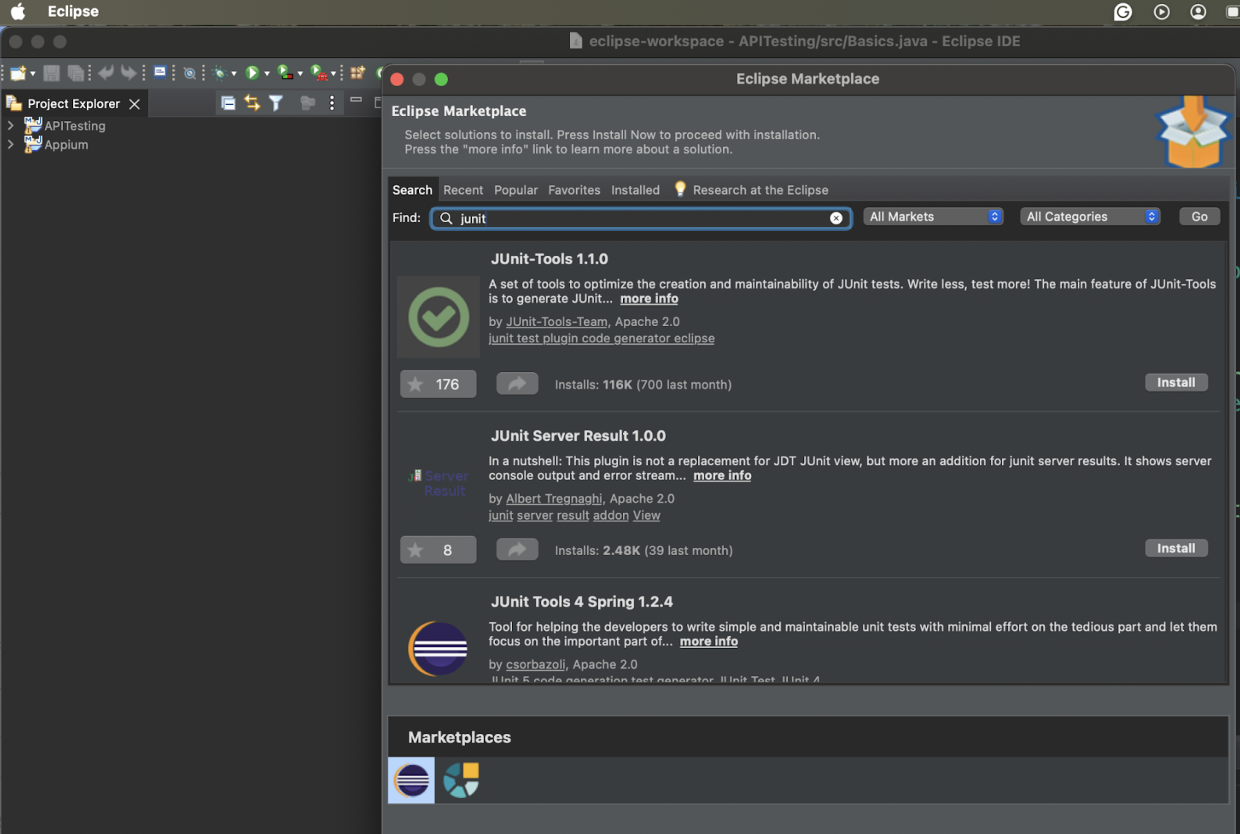
Go to Help > Eclipse Marketplace and install any debugging or reporting tools like LogViewer for logs etc.
Step 6: Configure Your Environment
Set up environment variables (e.g., PATH for Java or other tools) and ensure your JDK version matches your project requirements.
Testing Frameworks Supported by Eclipse Testing Lab
Eclipse Testing Lab supports the following frameworks:
- JUnit: JUnit is a widely used framework for unit testing Java applications. It provides annotations like @Test to create and organize test cases easily.
- TestNG: It offers advanced features such as data-driven testing, parallel test execution, and customizable test configurations. TestNG is ideal for both functional and end-to-end testing.
- Selenium: Selenium is a powerful tool for browser-based automation testing. It helps test web applications across different browsers and platforms.
- Cucumber: Cucumber supports behavior-driven development (BDD) using the Gherkin syntax. Writing tests in plain language helps bridge the gap between technical and non-technical team members.
- Mockito: It is a mocking framework used for creating and testing mock objects. Mockito is useful for validating dependencies in unit tests.
Types of Testing Performed in Eclipse Testing Lab
The following are the different types of testing supported by Eclipse Testing Lab:
- Unit Testing focuses on testing individual components or functions of the application. It ensures each part works correctly on its own, helping developers identify and fix issues early. Tools like JUnit and TestNG are commonly used for this.
- Integration Testing verifies how different parts of the application work together. It ensures smooth communication and data flow between modules, verifying that combined functionalities perform as expected.
- Functional Testing ensures the application meets business and user requirements. This type of testing focuses on user-facing features to confirm the software behaves as intended.
- Regression Testing verifies that new updates or code changes haven’t broken existing functionality. Re-running tests on updated software, ensures the application remains stable and reliable.
- Performance Testing evaluates how the application performs under different conditions like heavy traffic or large data loads. It ensures the system can handle real world usage effectively.
- End to End Testing validates the entire application workflow from start to finish. It makes sure all components and integrations work together seamlessly, mimicking real world usage.
Test Automation in Eclipse Testing Lab
Eclipse Testing Lab provides several features that make test automation efficient and effective:
1. Code Completion and Templates
- Writing test scripts is faster with features like code auto-completion and pre-defined templates.
- These tools help reduce errors and make it easier to create and manage tests.
2. Plugin Integration
- Eclipse Testing Lab supports popular automation tools like Selenium, Appium, and TestNG.
- These integrations make it possible to perform browser-based, mobile and functional testing seamlessly within the environment.
3. Parallel Testing
- The platform allows you to run multiple tests simultaneously.
- Parallel Testing reduces the overall testing time, especially for large test suites and speeds up feedback cycles.
4. Customizable Reporting
- It generates detailed reports that provide insights into test results, including pass/fail status, errors and trends.
- These reports can be tailored to meet project-specific requirements, making it easier to analyze outcomes.
5. CI/CD Integration
- Eclipse Testing Lab integrates effortlessly with CI/CD tools like Jenkins, Azure DevOps and GitHub Actions.
- Automated tests can be triggered during builds or deployments, ensuring continuous quality checks throughout the development lifecycle.
6. Debugging and Troubleshooting
- Features like breakpoints, log viewers and stack traces simplify identifying and fixing issues in test scripts.
- Interactive debugging allows on-the-spot adjustments for faster problem resolution.
7. Support for Multiple Frameworks
- It supports a wide range of frameworks like JUnit, TestNG and Cucumber for diverse testing needs.
- This flexibility allows teams to adopt the best tools for their specific requirements.
8. Cross-Browser and Device Testing
- With tools like Selenium integrated, the platform enables cross browser testing across various browsers and devices.
- This ensures that the application works smoothly for all users.
Also Read: How to Install and Add TestNG in Eclipse
Debugging and Troubleshooting in Eclipse Testing Lab
Eclipse Testing Lab provides a number of tools and features that simplify the process of debugging and troubleshooting test scripts:
- Breakpoint Support allows you to pause the execution of test scripts at specific points. This helps you analyze the program’s state step-by-step, making it easier to locate errors in your code.
- Log Viewers display real time logs of your test execution. These logs provide details such as successes, failures and warnings, helping you track the test flow and identify issues.
- Error Traceback provides detailed error messages and stack traces when a test fails. This feature helps you understand what went wrong and quickly find the source of the problem.
- Interactive Debugging lets you modify and test code during runtime. This hands-on approach is particularly useful for isolating and resolving complex issues.
- Step-by-Step Execution enables you to execute your test scripts one step at a time. By closely observing behavior at each step, you can detect subtle bugs that might be missed in full runs.
- Visualization Tools offered by some plugins provide graphical representations of test flows and results. These visual aids make it easier to analyze and debug issues effectively.
Best Practices for Using Eclipse Testing Lab
To make the most of Eclipse for Testing, follow these best practices:
1. Organize Test Cases: Arrange your test scripts into well-structured packages and classes. Clear organization makes tests easier to manage, update and reuse, saving time and effort.
2. Leverage Version Control: Store your test scripts in a version control system like Git. This allows you to track changes, collaborate with others and revert to earlier versions if needed.
3. Use Parameterization: Apply data-driven techniques to your test scripts. Parameterizing inputs lets you test multiple scenarios efficiently without duplicating code, improving test coverage.
4. Automate Repetitive Tasks: Identify repetitive or time-consuming test cases and automate them. This reduces manual effort, speeds up testing, and allows the team to focus on more complex issues.
5. Integrate with CI/CD Pipelines: Connect Eclipse Testing Lab with CI/CD tools like Jenkins or Azure DevOps. This enables automated testing during builds and deployments, ensuring consistent quality checks throughout development.
6. Monitor Test Execution: Regularly review logs and reports to track test progress and results. Analyzing these helps identify trends, recurring issues and areas for improvement.
7. Keep Dependencies Updated: Update all plugins, libraries and tools used with Eclipse Testing Lab regularly. This minimizes compatibility issues and ensures access to the latest features and improvements.
Why use BrowserStack Automate for Testing on Real Devices?
BrowserStack Automate provides several benefits for testing on real devices:
- Real Devices and Browsers: Access over 3500 real mobile devices and desktop browsers via BrowserStack’s Cloud Selenium Grid. Start testing instantly on any real device or browser, ensuring a broad test coverage.
- Day 0 Access to New Devices: Test on the latest devices as soon as they are launched globally, giving you the ability to ensure compatibility with cutting-edge technologies right from day one with BrowserStack’s real device cloud.
- Parallel Test Runs: Run hundreds of tests concurrently, speeding up your test execution time by more than 10x, helping you get faster feedback and improve efficiency.
- Seamless Integration: Integrate BrowserStack quickly with your testing workflows using popular languages and frameworks. Easily add it to your CI/CD pipeline with ready-to-use plugins for Jenkins, GitHub, and more.
- Comprehensive Debugging: Debug your tests with ease using features like video recordings, automated screenshots of errors, detailed text logs, console logs and network logs, providing everything you need to identify and fix issues.
- Zero Setup and Maintenance: BrowserStack’s plug-and-play solution eliminates the need for complex setups and ongoing maintenance, allowing you to focus on testing and not on infrastructure.
Conclusion
Eclipse Testing Lab is a powerful platform for efficiently managing and executing testing activities. Its support for various testing frameworks, integration capabilities, and cost-effectiveness make it a valuable tool for teams aiming to deliver high-quality software.
By adopting best practices and leveraging tools like BrowserStack Automate, QA teams can enhance their workflows, reduce errors, and meet the demands of modern software development. Embracing Eclipse Testing Lab is a step toward building reliable and robust applications.


