Web automation testing has a significant role in reducing the testing efforts and improving the quality of the web application by testing it in various devices and browsers. Selenium is one of the popular automation frameworks which testers can use to automate web applications.
Selenium WebDriver identifies the web elements on the web pages with the help of locators and XPath is one of the most flexible ways to find.
What is XPath and Why is it Important in Selenium?
XPath is an acronym for XML Path language which is a query-based language used to navigate and select nodes in an XML document using path-like syntax. When general locators such as ID, name, class are unable to find the element, XPath can be used to locate them.
XPath in Selenium is used to traverse and interact with the HTML structure of a web page. XPath plays a vital role in locating the web elements in the web page that can be later interacted such as click, mouse-keyboard actions, sendKeys, etc.
Syntax for XPath
XPath=//tagname[@attribute='value']
Where, // denotes the current node, tagname is the tagname of the desired node, @ is used to select the appropriate attribute, attribute is the name of the attribute and value is the attribute value.
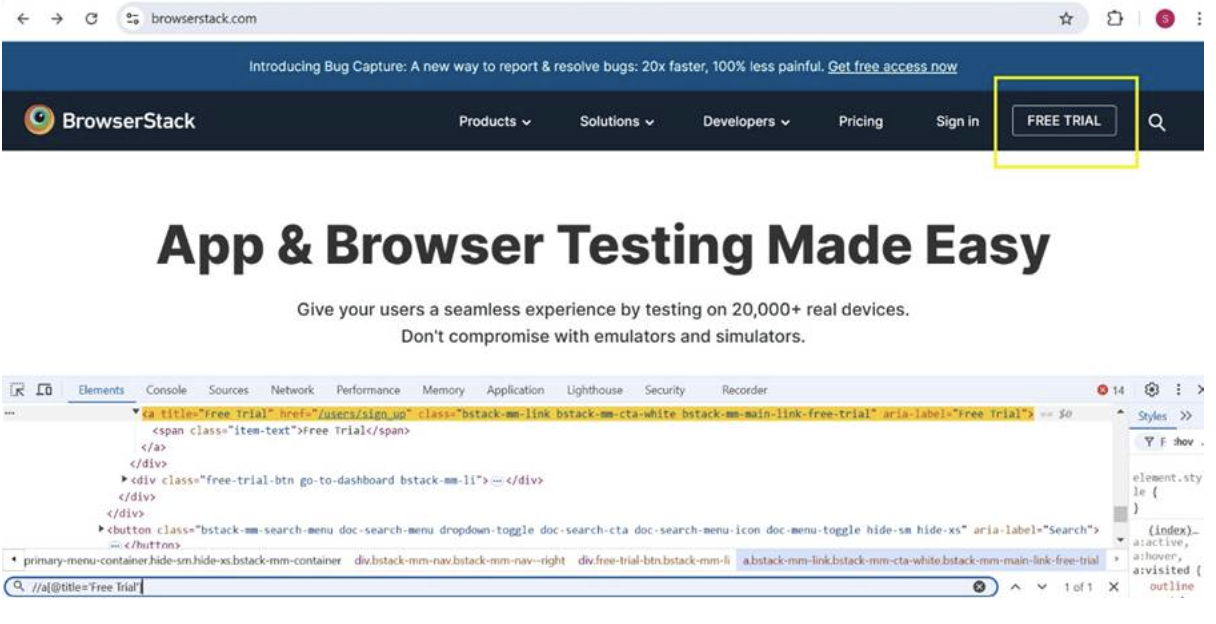
In the above example, to locate “Free Trial” button the XPath would be,
//a[@title='Free Trial']Read More: Quick XPath Locators Cheat Sheet
Why XPath is important in Selenium
Below are some of the main reasons why XPath is pivotal in Selenium:
1. Cross-browser fit: XPath locator works across various browsers without any exception in finding elements. This makes it the most reliable, efficient and robust way to locate and interact with the elements on the web page.
2. Supports complex queries: You can create XPath locators by combining different complex criteria of elements such as id, class and text function. XPath can also be used to locate elements via hierarchical relationships such as parent-child, ancestor and sibling elements.
3. Creates absolute and relative path: XPath helps locating web elements using absolute and relative paths where absolute XPath specifies the full path which starts from the root node and relative XPath uses a more refined approach in selecting the web elements.
Absolute path:
/html/body/div/div[2]/span/a
Relative path:
//button[@id=’cancel’]4. Locates elements dynamically: Some elements are dynamic in nature and cannot be easily located with an element’s single attribute. XPath can be used to create dynamic locators for such elements with the help of logical operations such as ‘AND’ and ‘OR’ and contains functions.
Example:
//a[contains(@class, ‘header’) and contains(@aria-label, ‘logo’)]Understanding Dynamic XPath
Dynamic XPath is a method of finding web elements on a webpage when their attributes change dynamically. It can be used to locate elements with dynamic attribute values and is more flexible as compared to static XPath which depends upon fixed attributes such as id and name.
Dynamic XPaths are especially beneficial for automating dynamic web applications where elements may change over time or where their attributes continuously change with each page load.
Dynamic XPath vs Static XPath
XPath is broadly classified into two types: dynamic and static XPath. Though both the ways are used to locate the web elements, they vary in how they handle changes in the web page’s structure and attributes.
A tabular difference between the two would provide more insight, making it easier to distinguish between them.
| Criteria | Static XPath | Dynamic XPath |
|---|---|---|
| Definition | Static XPath refers to the absolute path of elements which starts from the root of the DOM. It is based on the element’s attributes that do not change during the test execution. | Dynamic XPath is generally used to handle elements whose attribute may change at the time of execution. |
| Type of XPath | Absolute XPath | Relative XPath |
| Flexibility | Static XPath is less flexible as it may break in case of DOM structure change or attribute value change. | Dynamic XPath is more flexible and adaptable to changes in the DOM structure as it is based on the element’s attributes that are less likely to change. |
| Readability | Static XPaths are hard to read and understand as for some elements which are towards the end of the DOM, the XPath gets very long and complex. | Dynamic XPaths are easy to read and understand as it consists of the exact tag name of the element and the attribute value. |
| Syntax | Single forward slash “/” is used to denote the static XPath which means you can select the element from the root node. | Double forward slash “//” is used to denote dynamic XPath, which starts from the current node. |
| Example | /html/body/div/div[2]/span/a | //button[@id=’cancel’] |
Advantages of Using Dynamic XPath in Web Automation
Most modern web applications consist of dynamic web pages which change very frequently. Dynamic XPath can be used for such complex and ever-changing web pages, which offers flexibility, adaptability, and robustness in locating the web elements.
Below are some of the significant advantages of using dynamic XPaths in web automation.
1. Flexible and adaptable: Dynamic XPath is very flexible in terms of creating robust locators as it does not contain the full path of the element starting from the node of the DOM and instead it uses the exact tag name of the element along with the attribute(s). You can also use relationship, partial text matchers with contains functions to create them.
Example:
//a[contains(@aria-label, ‘logo_’)]here if the aria label value changes from “logo_123” to “logo_345”, still this locator will work.
2. Creates robust and accurate locators: Some elements on modern web applications are dynamic which keeps updating their attribute value on page load or refresh. Locating such elements via general locators such as name, ID and class would not be feasible as these attributes may change when the DOM structure changes.
Using dynamic XPath, you can create robust and accurate locators which consist of attribute’s partial value. So even if the attribute value changes for a page load, it will locate the element with the partial attribute value.
3. Easy to maintain and scale: As dynamic XPath expressions are flexible and adaptable; it is very easy to maintain even when the web page gets updated or changed in any circumstances. Dynamic XPaths are highly stable and unlikely to change, making them ideal for scaling automation tests across different browsers and supporting cross-browser testing.
4. Less likelihood of test breakage: Dynamic XPath leverages conditions such as contains(), starts-with(), ends-with(), text(), which makes the locator stable and resilient that are less likely to break when the page is refreshed or the elements are reordered.
5. Supports complex conditions: Dynamic XPath expressions support more complex and advanced query features such as parent-child/ sibling relationships, contains and text function, logical operators, etc.
Getting Started with XPath in Selenium
Selenium relies on locator strategies to find and interact with elements on a web page. Out of the 8 locator strategies, ID, class, and name are the most effective for uniquely identifying elements.
However, when an element is dynamic and its attribute value changes frequently, XPath is the best choice for testers.
To write XPath locators in Selenium, you have to use XPath expressions in the By.xpath() method to locate elements. Here are the common ways to write XPath expressions:
1. Locating by Tag Name: XPath can be used to select elements by their tag name.
Example:
//buttonThis will get a list of button elements present in the DOM
2. Locating by Attribute: XPath can be used to select elements based on an attribute’s value.
Example:
//button[@id=’submit’]This will locate a button with attribute value as ‘submit’
3. Locating by Text Content: XPath can be used to select elements by matching the exact text they contain
Example:
//button[text()='Register']This will locate a button which has text as ‘Register’
4. Using contains() for Partial Matching: XPath can be used to select elements based on the partial attribute value.
Example:
//input[contains(@id, 'password')]5. Using starts-with() and ends-with(): When the start of the attribute value is known and end is dynamic or when the end part of the attribute value is known and start is dynamic, starts-with and ends-with function can be used.
Example:
 //a[starts-with(@title, 'Free')]

//a[ends-with(@title, 'Free')]
Note: starts-with and ends-with functions are available in 2.0 and not in XPath 1.0
Read More: Locators in Selenium: A Detailed Guide
To use XPath in Selenium, you need to use the findElement() method to locate the element, followed by an action such as click(), sendKeys(), or any other Selenium interaction.
Here is an example in Java using Selenium WebDriver:
Locating an element by XPath and clicking it:
import org.openqa.selenium.By;

import org.openqa.selenium.WebDriver;

import org.openqa.selenium.WebElement;

import org.openqa.selenium.chrome.ChromeDriver;


public class XPathLocator {


           public static void main(String args[]) {

                          WebDriver driver;


                          driver = new ChromeDriver();

                          driver.get("https://www.browserstack.com/");

                          WebElement freeTrial = driver.findElement(By.xpath("//a[@title='Free Trial']"));

                          freeTrial.click();

                          driver.quit();

           }

}
Different ways to create Dynamic XPath in Selenium: Examples
You can create dynamic XPath in Selenium using different methods. Each of them has their own utility which is discussed below with example.
Ways to create Dynamic XPath in Selenium:
- Using single slash (/)
- Using double slash (//)
- Utilizing single attribute
- Utilizing multiple attribute
- Using Logical operators
- Using contains()
- Using text()
- Using starts-with()
- Using ends-with()
- Using contains() with text()
- Using parent and child relationships
- Using ancestor, descendant, following and preceding axes
1. Using single slash (/)
XPath created with single slash is known as absolute XPath.
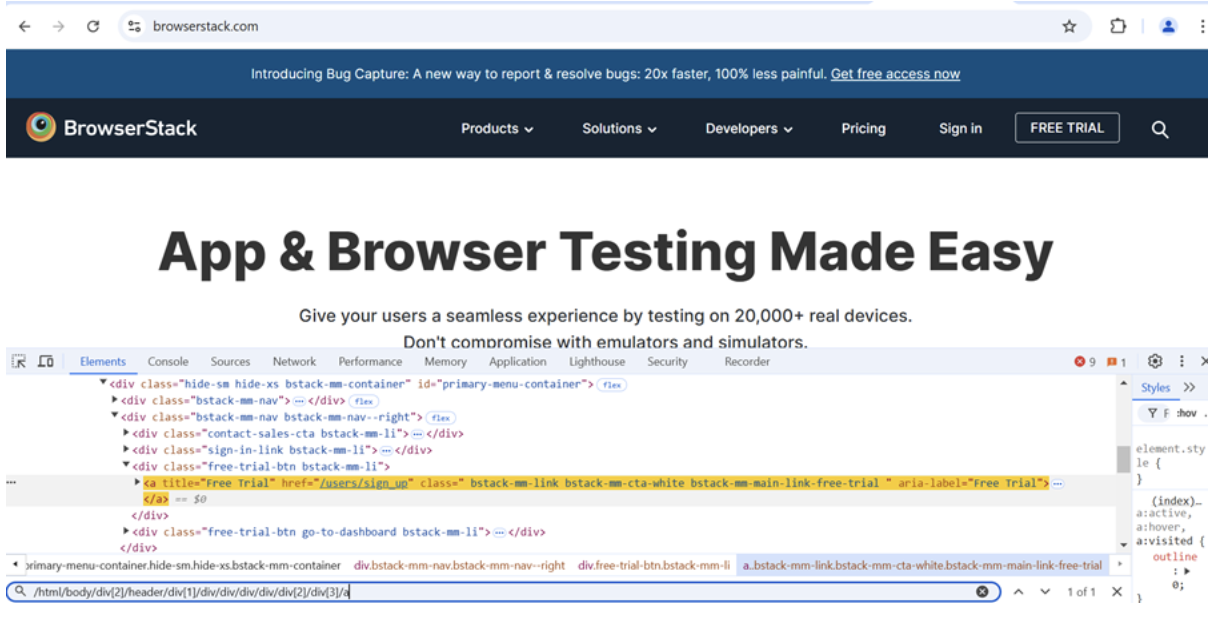
Absolute XPath for “Free Trial” button in BrowserStack home page is,
/html/body/div[2]/header/div[1]/div/div/div/div/div[2]/div[3]/a
2. Using double slash (//)
A double slash is used to create a relative XPath.
Example:
//a[@title='Free Trial']3. Utilizing single attribute
If you want to create a XPath with just one attribute along with the tagname or no tagname, it can be written in following ways,
//<tagname>[@attribute_name='attribute_value'] or //*[@attribute_name='attribute_value']Example:
//a[@aria-label='Logo'] or
//*[@aria-label='Logo']
4. Utilizing multiple attribute
If you want to create a XPath with multiple attributes along with the tagname or no tagname, it can be written in following ways,
//<tagname>[@attribute_name1='attribute_value1'] [@attribute_name2='attribute_value2'] or

//*[@attribute_name1='attribute_value1'] [@attribute_name2='attribute_value2']
Example:
//a[@title='Free Trial'] [@aria-label='Free Trial'] or

//*[@title='Free Trial'] [@aria-label='Free Trial']
5. Using Logical operators
Logical operators such as ‘AND’ and ‘OR’ can also be used to create dynamic XPaths.
Example:
//a[@title='Free Trial' and @aria-label='Free Trial']

//a[@title='Free Trial' or @aria-label='Free Trial']
6. Using contains()
The contains() function in XPath is used to match an element’s attribute value or text content that contains a specific substring. This is helpful when the entire attribute is dynamic but a part of it remains constant.
Example:
//button[contains(@id, ‘submit_’)]here it will match any button element whose id contains “submit_” and even if the id value changes to ‘submit_123’ or ‘submit_456’, it will still match it.
7. Using text(): The text() function matches the element based on its visible text content.
Example:
//span[text()='Free Trial']8. Using starts-with(): The starts-with() function matches an element whose attribute value starts with a specific string. This is useful when the initial part of the attribute value remains constant but the remaining part is dynamic.
Example:
//a[starts-with(@title, 'Free')]9. Using ends-with(): The ends-with() function matches an element whose attribute value ends with a specific string. This is useful when the trailing part of the attribute value remains constant but the initial part is dynamic.
Example:
//a[ends-with(@title, 'Free')]10. Using contains() with text(): You can combine contains() and text() functions to match an element that contains a specific text.
Example:
//span[contains(text(), 'Free')]
11. Using parent and child relationships: You can use parent-child relationship to navigate between elements in the DOM to locate parent or child elements that are relative to each other.
Example:
//a[@class='bstack-mm-logo']//img12. Using ancestor, descendant, following and preceding axes: XPath allows you to locate an element in relation to another element that has a consistent relationship with it.
- Ancestor: It selects all ancestors of the current node.
- Descendants: It selects all descendants of the current node.
- Following: It selects everything which comes after the current node.
- Preceding: It selects everything which comes before the current node.
Consider the below HTML code snippet to understand ancestor and descendant relationship.
<div id="header-habitat">

<div class="container">

     <img class="logo">Selenium</img>

</div>

</div>
To select all ancestors of the img tag, XPath would be,
//img[@class='logo']/ancestor::divTo select img tag inside the div with id=’ header-habitat’, XPath would be,
//div[@id=’header-habitat’]/descendant::imgConsider the below HTML code snippet to understand the following and preceding relationship.
<div id="lang1">

<button>Java</button>

</div>

<div id="lang2">

<button>Python</button>

</div>
To select the button that comes after div with id=’lang1’, XPath would be,
//div[@id='lang1']/following::buttonTo select the button that comes before div with id=’lang2’, XPath would be,
//div[@id='lang2']/preceding::buttonLocating Web Elements with Dynamic XPath in Selenium
Findling web elements with dynamic XPath in Selenium is an important skill when automating web applications which have dynamic elements. It helps in locating the elements with flexible strategies such as partial match, relative positions, and using logical operators.
With the help of the Java code example below (in Step 9) , run in BrowserStack’s Automate product, you will gain a detailed insight into how to locate elements using Selenium WebDriver.
To run the test scripts on BrowserStack Automate using BrowserStack SDK, follow the steps mentioned below:
Step 1. Download BrowserStack Project Zip from the GitHub page.
Step 2. Once it is downloaded, unzip it in a desired location in your local system.
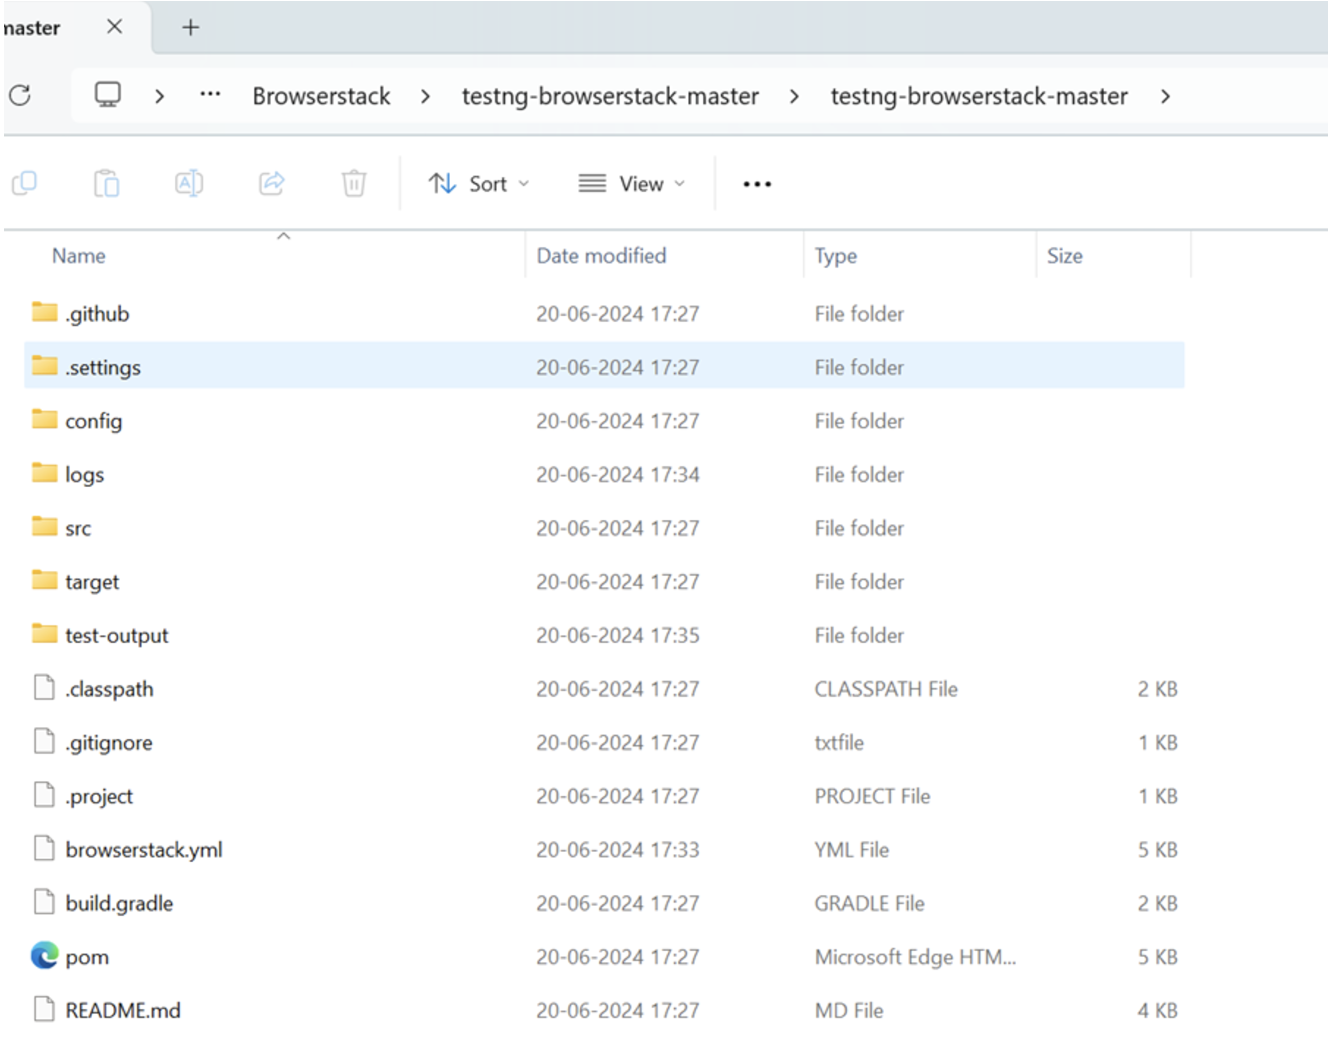
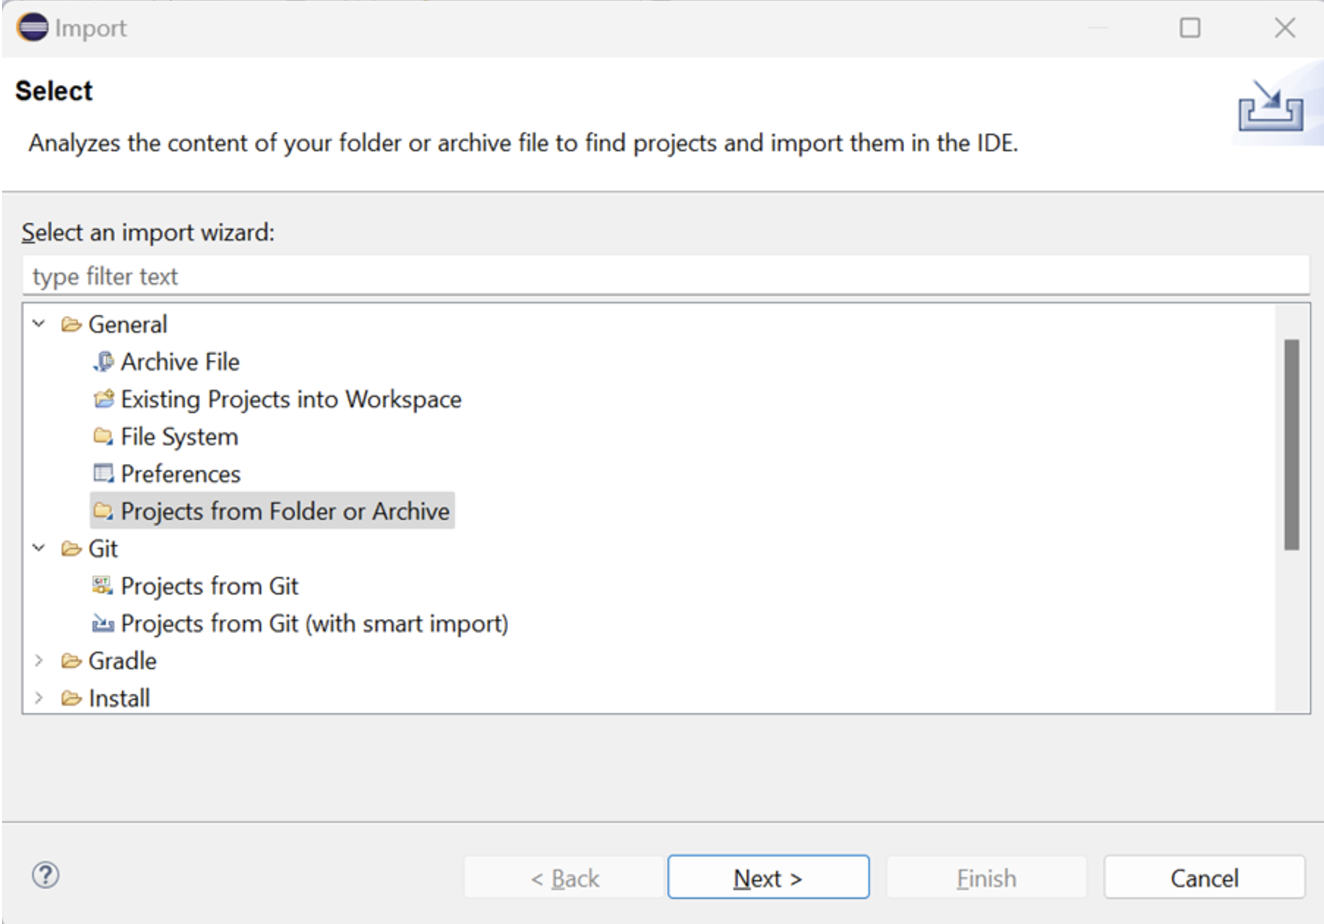
Step 3. Import the project in Eclipse via File-> Import -> General -> Projects from Folder or Archive in Eclipse.
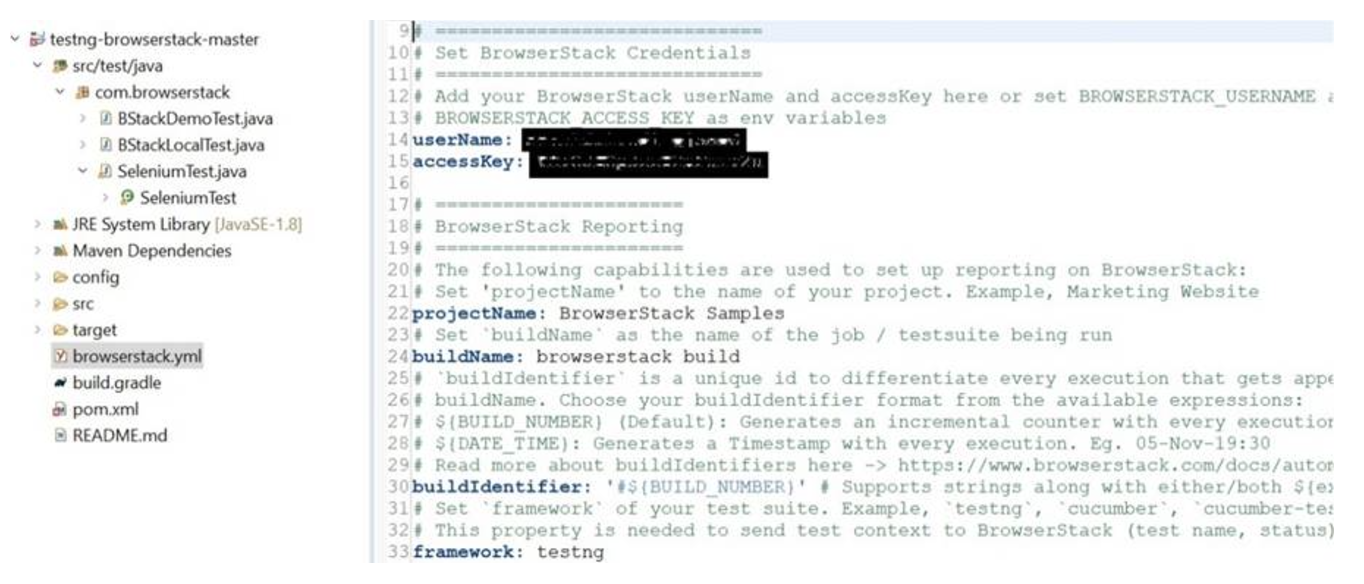
Step 4. Once the project is imported it should have a structure like below. Open browser.yml file which contains all the required capabilities to run the tests on BrowserStack platform.
Step 5. Set username and password in the browserstack.yml file available at the root directory.
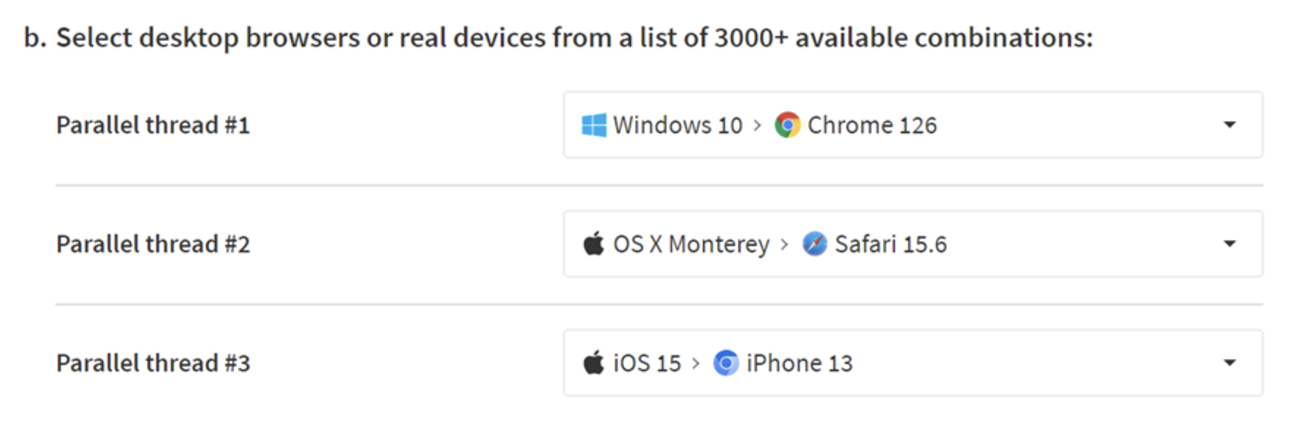
Step 6. You can run the testcases on multiple devices and browser combinations available at the BrowserStack Cloud Selenium Grid. To do so select the required combinations from the selection list using BrowserStack Capabilities Generator.
Step 7. Copy and replace the platforms object in the browserstack.yml file like below.
platforms:
- os: Windows

osVersion: 10

browserName: Chrome

    browserVersion: latest

  - os: OS X

osVersion: Monterey

browserName: Safari

    browserVersion: 15.6

  - deviceName: iPhone 13

osVersion: 15

browserName: Chromium

    deviceOrientation: portrait
This is for running the test cases on 3 combinations. If you wish to run only on a single device you may edit the platforms accordingly.
Step 8. Install BrowserStack plugin in Eclipse via MarketPlace.
Step 9. Add the XPathTest program under src/test/java folder and com.browserstack package. This class should extend
SeleniumTest as it has the setup and teardown methods.
public class XPathTest extends SeleniumTest{


       WebDriver driver = new ChromeDriver();


       @Test(priority = 1, description = "Verify BrowserStack page title")

       public void verifyBSLogo() {

                  driver.get("https://www.browserstack.com/");

                  driver.findElement(By.xpath("//a[@class='bstack-mm-logo' and contains(@title, 'BrowserStack Logo')]")).click();

                  Assert.assertEquals(driver.getCurrentUrl(), "https://www.browserstack.com/");

       }


       @Test(priority = 2, description = "Verify Get Started for Free click")

       public void clickGetStartedForFree() {

                  driver.get("https://www.browserstack.com/");

        driver.findElement(By.xpath("//a[contains(@id,'signupModalProduct')]")).click();

        Assert.assertTrue(driver.getCurrentUrl().contains("users/sign_up"));

       }


}
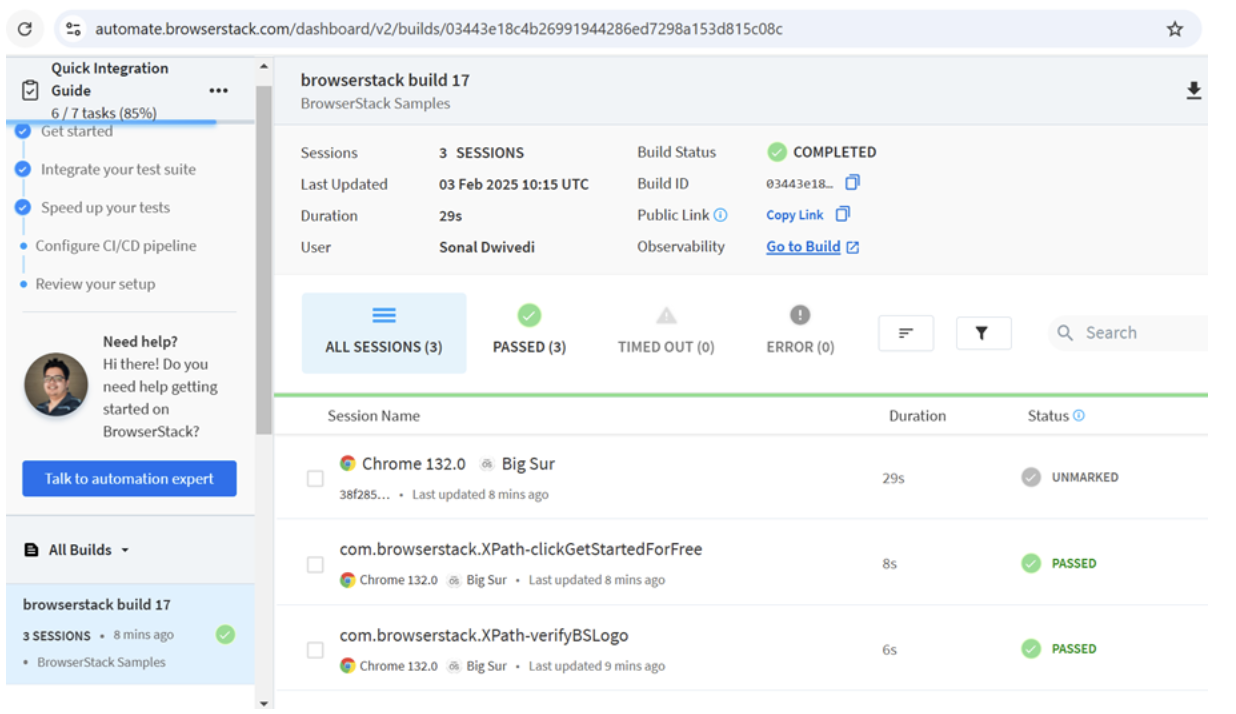
Step 10. Run ChromeTest as TestNG test and view the test result on Automate dashboard.
Best Practices for Dynamic XPath Selenium
Dynamic XPaths in Selenium helps to create robust test automation scripts that are resilient and do not break even when DOM structure or element’s attribute changes. To make it more robust and efficient, follow below best practices while creating and using dynamic XPath.
1. Avoid absolute and use relative XPath: Absolute XPath is extremely dependent on the structure of the DOM and if the structure changes, it will break and hence makes it less efficient. Relative XPath are more flexible and robust which makes it more preferable than absolute XPath.
2. Use contains() for dynamic attribute values: Use contains() function to match a part of the attribute value for dynamic elements. This ensures that even if the attribute value changes, it will find the element based on the static attribute value.
3. Always test XPath in browser console: It is always a good practice to test your XPath in browser’s inspect window to ensure its uniqueness before using it in the Selenium script. This helps catch invalid XPath early, rather than finding them only when the Selenium script fails.
4. Avoid hard coded indexes: Indexing in XPath depends on the exact position of the element in the DOM which makes it fragile. You should use other attributes or text to uniquely locate the element through XPath.
Avoid
“//div[2]/button[1]”
and use
“//div[@class='overlay']//button[@class='reset']”
Why run Selenium Tests on Real Devices?
BrowserStack Automate is a powerful cloud based platform that streamlines web and mobile app testing by running Selenium tests across real browsers and devices. Here are the key benefits:
- Real Devices and Browsers: Test web apps on 3500+ desktop and mobile browser combinations, ensuring compatibility across a wide range of real devices and browsers.
- Parallel Test Execution: Leverage parallelization to run hundreds of tests simultaneously, reducing execution time significantly.
- No Setup Required: Easily integrate test suites with BrowserStack using their SDK, without needing code changes. Testing can start in minutes.
- Internal Network Testing: Test apps hosted in private or internal environments using a secure, encrypted tunnel for added security.
- Advanced Debugging: Utilise detailed logging tools like Selenium and telemetry logs to collaborate and fix issues easily.
- Real World Conditions: Simulate different network conditions to test app behavior under varying circumstances.
Conclusion
Mastering dynamic XPaths in Selenium is crucial for building robust and flexible automation scripts. By leveraging techniques like contains(), starts-with(), and using variables, testers can effectively handle elements with changing attributes. You can use different methods to create dynamic Xpaths in Selenium.
By following best practices like using relative xpath over absolute xpath and testing xpath in browser console, it can help locate dynamic elements better.
This approach enhances script reliability, making it adaptable to frequent UI changes, ultimately improving the efficiency and maintainability of test automation.
Mastering dynamic XPaths in Selenium streamlines the testing process and contributes to delivering high-quality software that meets user expectations. Effective use of locators is key to ensuring accurate and efficient automated tests.
