Key Differences between Driver.Get and Driver.Navigate in Selenium
By Yogendra Porwal, Community Contributor - January 2, 2025
Selenium WebDriver is a powerful tool for automating browser actions, from navigating pages to testing complex workflows. However, mastering Selenium means understanding the nuances of its commands, especially those that deal with navigation. Two such commands are Driver.Get and Driver.Navigate, each with its own purpose and use cases.
This article dives into these commands, highlighting their differences, explaining when to use each, and offering practical examples to help you make the most of your Selenium scripts.
- The Importance of Understanding Navigation Methods in Selenium
- What is Driver.Get in Selenium?
- Page Load Strategy
- 1. Normal (Default)
- 2. Eager
- 3. None
The Importance of Understanding Navigation Methods in Selenium
When testing web applications, efficient navigation is crucial for replicating user workflows. Whether you’re loading a fresh page, refreshing the current page, or moving back and forth in browser history, choosing the right navigation command impacts script clarity, execution time, and reliability.
While both Driver.Get and Driver.Navigate can load URLs, their underlying functionality differs significantly. Misusing them can lead to flaky tests and unexpected behaviors.
Read More: Exception Handling in Selenium WebDriver
What is Driver.Get in Selenium?
The Driver.Get method is used to load a new URL in the browser. It is a blocking call, meaning Selenium waits until the page is fully loaded, including all its resources, like JavaScript, CSS, and images, before moving to the next command.
Syntax and example usage
import org.openqa.selenium.WebDriver;

import org.openqa.selenium.chrome.ChromeDriver;


public class GetExample {

    public static void main(String[] args) {

        System.setProperty("webdriver.chrome.driver", "C:\\WebDrivers\\chromedriver.exe");

        WebDriver driver = new ChromeDriver();


        driver.get("https://www.bstackdemo.com/");

        System.out.println("Page Title: " + driver.getTitle());

        driver.quit();

    }

}
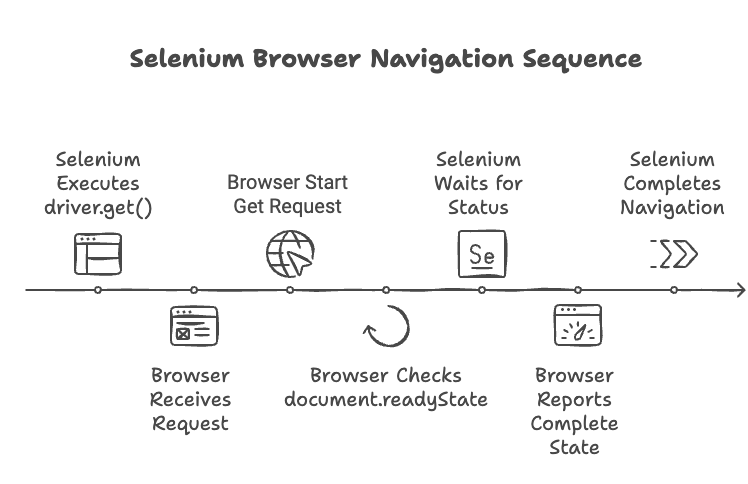
When the Driver.Get method is executed, it triggers the following steps:
- HTTP Request: Selenium sends an HTTP GET request via the WebDriver protocol to the browser driver (for example, ChromeDriver or GeckoDriver).
- Browser Action: The browser navigates to the specified URL and begins fetching all necessary resources (HTML, CSS, JavaScript, etc.).
- Blocking Nature: The method blocks further execution until the browser signals that the page is “loaded.” This ensures that the document is in a ready state before moving to subsequent commands in the script.
You can understand it better in the workflow diagram below.
Page Load Strategy
Although Driver.get() by default blocks execution till the document is fully loaded , or to be accurate document.readyState returns complete status. You can still control this behaviour with pageLoadStrategy.
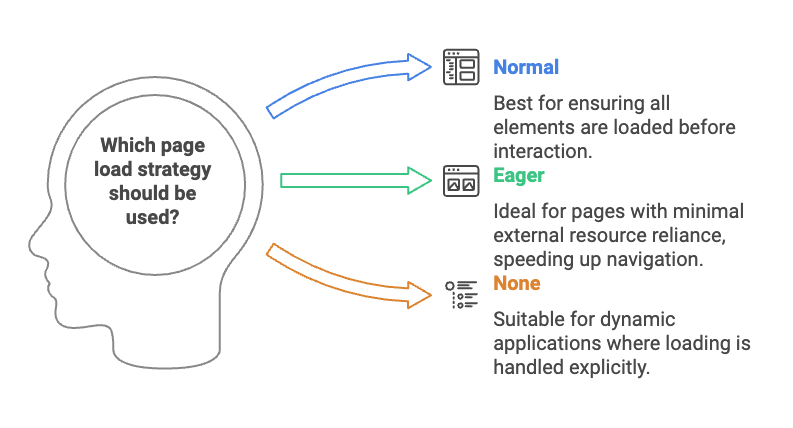
Selenium allows you to customize how the browser defines “page loaded” using the pageLoadStrategy capability. This setting determines the level of resource loading required before the Driver.Get method completes.
1. Normal (Default)
Waits for the entire page to load, including all resources like images, CSS, and JavaScript.
java
options.setPageLoadStrategy(PageLoadStrategy.NORMAL);Best For:
- Pages where complete loading is essential for testing.
- Ensuring all interactive elements are available before interaction.
2. Eager
Waits only until the DOM content is fully loaded (i.e., the DOMContentLoaded event is fired). Additional resources like images and stylesheets may still be loading.
Java
options.setPageLoadStrategy(PageLoadStrategy.EAGER);Best For:
- Pages with minimal reliance on images or external resources.
- Speeding up navigation when resource loading isn’t critical.
3. None
Don’t wait for the page to load at all. Selenium proceeds as soon as the navigation command is issued.
java
options.setPageLoadStrategy(PageLoadStrategy.NONE);Best For:
- Highly dynamic web applications where you handle element loading explicitly with waits.
- Scenarios where loading state doesn’t impact the test outcome.
What is Driver.Navigate in Selenium?
Driver.Navigate is a Selenium WebDriver method that provides a suite of navigation functionalities, enabling you to perform actions like loading a URL, navigating forward and backward in the browser’s history, and refreshing the current page.
Unlike Driver.Get, which is primarily designed for loading new URLs, Driver.Navigate offers more versatile navigation capabilities, making it ideal for testing scenarios that require interacting with browser navigation states.
The key difference is that the navigate API retains cookies with each use. Unlike the get() method, which clears the session state every time it is called, the navigate() method preserves the session state.
Syntax and Example Usage
Here’s how you can use Driver.Navigate for various navigation actions:
java
import org.openqa.selenium.WebDriver;

import org.openqa.selenium.chrome.ChromeDriver;


public class NavigateExample {

    public static void main(String[] args) {

        System.setProperty("webdriver.chrome.driver", "C:\\WebDrivers\\chromedriver.exe");

        WebDriver driver = new ChromeDriver();


        // Navigate to the initial URL

        driver.navigate().to("https://www.bstackdemo.com/");

        System.out.println("Page Title 1: " + driver.getTitle());


        // Navigate to another page

        driver.navigate().to("https://www.bstackdemo.com/signin");

        System.out.println("Page Title 2: " + driver.getTitle());


        // Navigate back to the previous page

        driver.navigate().back();

        System.out.println("After Back: " + driver.getTitle());


        // Navigate forward

        driver.navigate().forward();

        System.out.println("After Forward: " + driver.getTitle());


        // Refresh the page

        driver.navigate().refresh();

        System.out.println("Page Refreshed: " + driver.getTitle());


        driver.quit();

    }

}
The script demonstrates navigating between pages, moving forward and backward in browser history, and refreshing the page.
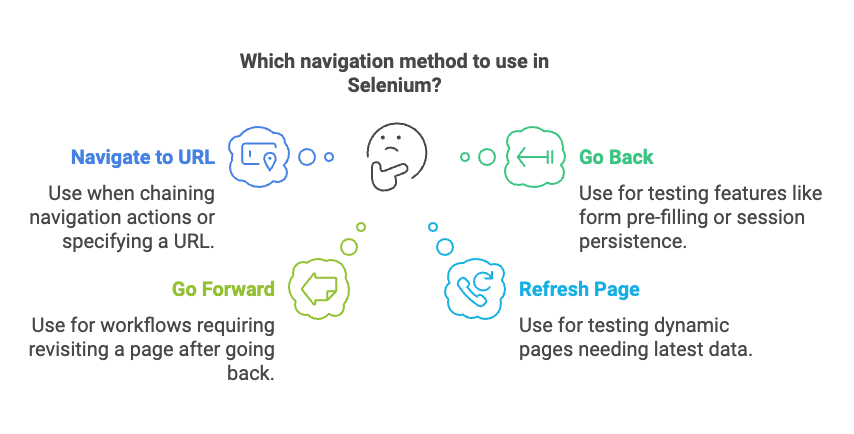
There are four Different Navigation Methods available with navigate().
1. navigate().to(String/URL)
Purpose: Similar to Driver.Get, it navigates to a specified URL. But it can take either String or URL as a parameter.
Syntax:
java
driver.navigate().to("https://example.com");When to Use: Use navigate().to() when chaining navigation actions (for example, loading a page followed by history traversal).
2. navigate().back()
Purpose: Moves to the previous page in the browser’s history.\
Syntax:
java
driver.navigate().back();When to Use: Use it for testing features like form pre-filling or session persistence when navigating back.
3. navigate().forward()
Purpose: Moves forward in the browser’s history if a back() action was performed earlier.
Syntax:
java
driver.navigate().forward();When to Use: Use this to test user workflows that require revisiting a previously visited page after navigating back.
4. navigate().refresh()
Purpose: Refreshes the current page, simulating a browser reload action.
Syntax:
java
driver.navigate().refresh();When to Use: Ideal for testing dynamic web pages or features that depend on the latest data updates (for example, stock prices, notifications).
Read More: Selenium WebDriver Architecture
Key Differences between Driver.Get and Driver.Navigate
Now that you have understood what Driver.Get and Driver.Navigate is, know what the key differences between them are.
| Feature | Driver.Get | Driver.Navigate |
|---|---|---|
| Primary Purpose | Load a new URL | Navigate between pages and perform refresh |
| Syntax | driver.get(url) | driver.navigate().to(url) |
| Browser History Support | No | Yes |
| Refresh Capability | No | Yes |
| Blocking Behavior | Waits for the page to fully load | Varies (blocking for to(), non-blocking for history actions) |
| Use Case | Fresh page load | Advanced navigation scenarios |
| Cookies/ Session | Clear after each use | Maintain/ Retain cookies and sessions from the previous state. |
Use Cases of Driver.Get and Driver.Navigate
Have a look at a few use cases for each of the methods to understand it better.
Use Case for Driver.Get
Scenario: Testing Login Functionality
When testing login workflows, Driver.Get is ideal for loading the login page as it ensures the page and all associated resources are fully loaded before the script continues.
Why Use Driver.Get?
- Ensures the login form is completely loaded and interactable.
- Provides reliability in scenarios where form elements or validation scripts may take time to initialize.
Example: The code snippet, below navigates to the BrowserStack Demo Page, waits for all the resources to be loaded, and then performs login.
Java:
public class LoginTest {

    public static void main(String[] args) {

        System.setProperty("webdriver.chrome.driver", "C:\\WebDrivers\\chromedriver.exe");

        WebDriver driver = new ChromeDriver();


        try {

            // Load the login page

            driver.get("https://www.bstackdemo.com/signin");


            // Interact with the login form

            WebElement username = driver.findElement(By.id("react-select-2-input"));

            WebElement password = driver.findElement(By.id("react-select-3-input"));

            WebElement loginButton = driver.findElement(By.id("login-btn"));


            username.sendKeys("demouser" + Keys.ENTER);

            password.sendKeys("testingisfun99" + Keys.ENTER);

            loginButton.click();


            // Validate successful login

            String title = driver.getTitle();

            if (title.equals("StackDemo")) {

                System.out.println("Login successful!");

            } else {

                System.out.println("Login failed!");

            }

        } finally {

            driver.quit();

        }

    }

}
Use Case for Driver.Navigate
Scenario: Testing E-Commerce Workflow
Simulate a user browsing an e-commerce website, navigating between product pages, and checking the browser’s ability to retain session data (like cart items) across back-and-forth navigation.
Why Use Driver.Navigate?
- Facilitates testing of browser history traversal (back and forward).
- Retains session data, cookies, and form states while navigating.
- Tests refresh functionality to validate dynamic content updates (for example, stock levels).
Code Snippet:
java
import org.openqa.selenium.By;

import org.openqa.selenium.WebDriver;

import org.openqa.selenium.chrome.ChromeDriver;

public class EcommerceNavigationTest {

    public static void main(String[] args) {

        System.setProperty("webdriver.chrome.driver", "C:\\WebDrivers\\chromedriver.exe");

        WebDriver driver = new ChromeDriver();


        try {

            // Step 1: Navigate to the homepage

            driver.navigate().to("https://www.bstackdemo.com/");

            System.out.println("Homepage Title: " + driver.getTitle());


            // Step 2: Navigate to a favourites page

            driver.navigate().to("https://www.bstackdemo.com/favourites");

            System.out.println("Product Page Title: " + driver.getTitle());


            // Step 3: Navigate back to the homepage

            driver.navigate().back();

            System.out.println("After Back: " + driver.getTitle());


            // Step 4: Navigate forward to the favourites page

            driver.navigate().forward();

            System.out.println("After Forward: " + driver.getTitle());


            // Step 5: Refresh the favourites page

            driver.navigate().refresh();

            System.out.println("Page Refreshed: " + driver.getTitle());


        } finally {

            driver.quit();

        }

    }

}
Best Practices for using Driver.Get and Driver.Navigate
- Choose Based on Purpose: Use Get for loading new pages and Navigate for history traversal and refreshing.
- Handle Dynamic Content: Use explicit waits to ensure elements are interactable after navigation.
- Minimize History Traversal: Avoid overusing Navigate().back() and Navigate().forward() unless necessary, as it may introduce flakiness.
How BrowserStack enhances Selenium Testing with Driver.Get and Driver.Navigate?
1. Real Device and Browser Coverage
BrowserStack provides access to over 3500 real devices and browsers, ensuring your Driver.get() and Driver.navigate() actions are tested in real-world environments. This eliminates the limitations of local setups and emulators, allowing you to replicate actual user scenarios effectively.
2. No Infrastructure Set Up
Validate the behavior of both methods across multiple browser versions and operating systems to ensure consistent functionality. BrowserStack Automate enables seamless cross-browser testing without the hassle of maintaining an in-house grid.
3. Optimized Performance Analysis
Test how Driver.get() and Driver.navigate() handle different pageLoadStrategy configurations across various network conditions using BrowserStack’s network throttling feature. This helps identify and optimize performance bottlenecks.
4. Debugging and Insights
BrowserStack captures screenshots, logs, and videos of every test session. This ensures that you can analyze how Driver.get() and Driver.navigate() perform in specific scenarios and debug issues faster.
Speed up your Selenium testing by running parallel sessions for workflows that use Driver.get() and Driver.navigate(). With BrowserStack Automate, you can significantly reduce test execution time and accelerate releases.
6. Seamless Integration with CI/CD Pipelines
Integrate your Selenium tests into your CI/CD pipeline using BrowserStack. Ensure Driver.get() and Driver.navigate() tests are executed automatically with every build, delivering reliable, continuous feedback.
7. Handling Dynamic Content with AJAX
Dynamic pages loaded via AJAX often pose challenges during navigation. BrowserStack’s real devices and debugging tools ensure you can test such scenarios effectively.
Conclusion
Both Driver.Get and Driver.Navigate are essential commands in Selenium WebDriver, each catering to specific needs. Understanding their differences and use cases improves test reliability and streamlines automation workflows. Mastering these navigation commands is a step towards building robust and maintainable Selenium scripts.
With tools like BrowserStack Automate, you can enhance these tests further by running them across real devices and browsers.
