The Document Object Model or DOM is a structure that represents the web page’s content. The web page’s visual appeal depends on how DOM is rendered in the browser.
Selenium uses this DOM structure to identify web elements such as buttons, links, input fields, and images. Identifying these web elements allows Selenium or any other automation tool to interact with the browser or simulate the user behavior. The DOM is a foundational concept in web development and web application test automation.
Overview
What is DOM?
The Document Object Model (DOM) is a programming interface for web documents that represents the structure of a webpage as a tree of nodes. It allows browsers and automation tools to access, manipulate, and dynamically update content, attributes, and styles.
Importance of DOM in Automation
- The DOM enables tools like Selenium to interact with web elements, ensuring accurate automation.
- Facilitates testing dynamic elements that change during runtime.
- Ensures consistent rendering across devices and browsers.
- Simplifies identification of issues in element visibility or behavior.
DOM Methods to Access Web Elements
- getElementById(): Finds elements by their unique ID.
- querySelector(): Uses CSS selectors to locate elements.
- childNodes: Retrieves child nodes of an element.
- nextSibling/previousSibling: Navigates between sibling elements.
These methods allow testers to traverse and interact with the DOM for efficient automation.
Selenium Locators with DOM
- By ID/Name: Quickly locate unique elements.
- By XPath: Flexible locator for attributes, text, and hierarchy.
- By CSS Selectors: Target elements using styles and attributes.
What is DOM?
The Document Object Model (DOM) is a programming interface for web documents. It represents the structure of a webpage as a tree of nodes, where each node corresponds to a part of the webpage, such as elements, attributes, and text.
The DOM provides a way for programs (like web browsers or JavaScript) to access, manipulate, and update a webpage’s content, structure, and style dynamically.
DOM structures are created when a web page is rendered into the browser. Based on this model, the browser interprets and displays the component. It also allows the automation tester to uniquely identify the specific elements and interact with them.
Read More: Selenium WebElement Commands
Importance of the DOM in Web Automation
The DOM is the backbone of web automation, and a solid grasp of its structure and functioning is essential for creating efficient, reliable, and scalable automated tests. Here are the reasons why it is important:
1. Foundation for Web Interactions
- The DOM represents the structure and content of a web page as a tree of elements, enabling automation tools like Selenium to interact with web elements effectively.
- It acts as the bridge between web developers’ HTML/CSS and the automation framework.
2. Element Identification and Manipulation
- Automation scripts use DOM locators (for example, id, class, xpath, cssSelector) to pinpoint specific elements on a page.
- Actions like clicking buttons, filling forms, and verifying content rely on accurate DOM navigation.
3. Dynamic Content Handling
- Modern web applications often generate content dynamically. Understanding the DOM enables testers to interact with dynamically added or modified elements effectively.
4. Debugging and Troubleshooting
- Accessing the DOM helps identify and fix issues, such as element invisibility, incorrect locators, or timing problems, during test execution.
5. Customization and Optimization
- Testers can directly modify the DOM during runtime to test edge cases or validate specific behaviors.
6. Universal Applicability
- Since all modern browsers use the DOM to represent web pages, understanding it ensures automation scripts are cross-browser compatible.
Read More: Understanding Testing Library Jest DOM
Structure of the DOM
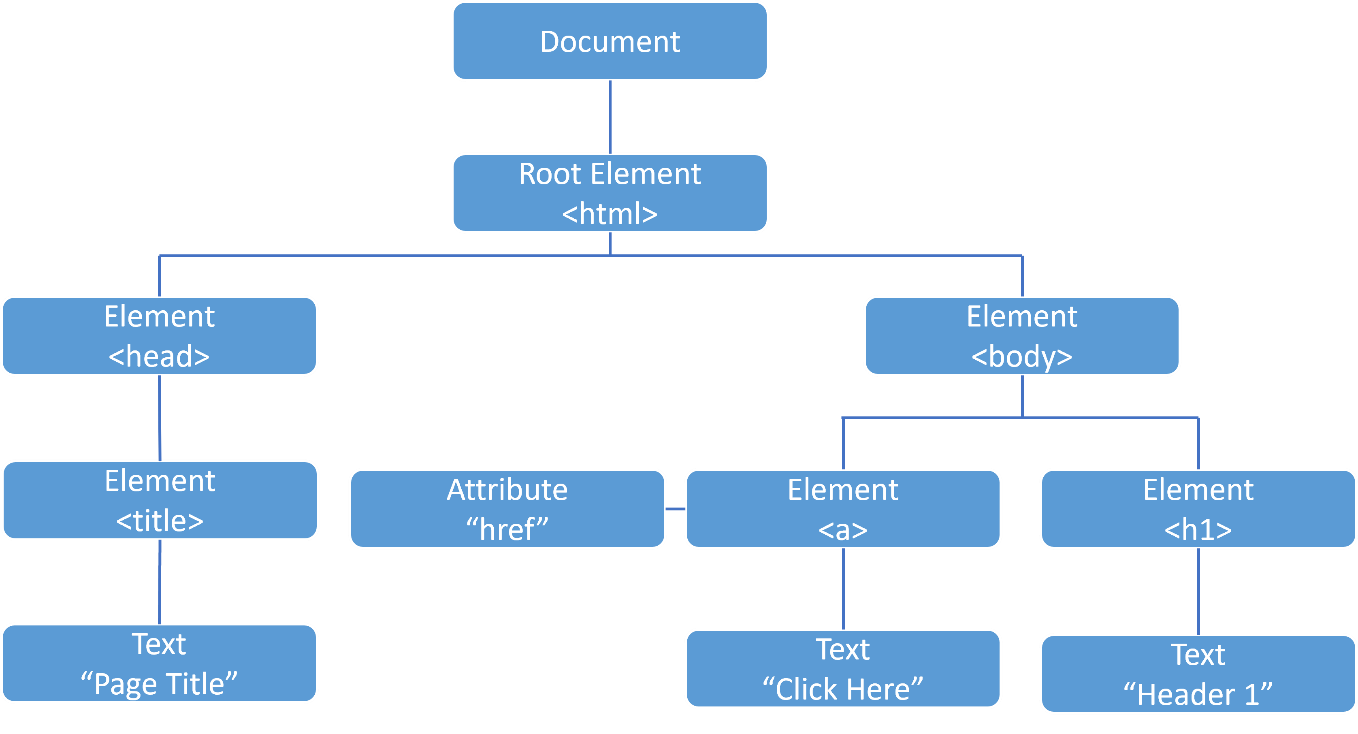
The DOM follows a hierarchical and tree-like structure. Each node corresponds to a part of the page, such as elements, attributes, or text, and these nodes are organized in a parent-child relationship. The Document Node, Element Nodes, Text Nodes, Attribute Nodes, and Comment Nodes are a few different types of nodes available on the DOM tree.
Understanding Parent-Child Relationships in the DOM
The parent-child relationship in the DOM Tree refers to the hierarchical structure in which elements and nodes are organized. This relationship allows for a relationship between the nodes.
- Parent Node: A parent node is a node that contains one more child node.
Example
<div>

  <p>Hello</p>

  <span>Hi</span>

</div>
Considering the above example <div> is the parent node. It can have multiple child nodes, such as text nodes, or comments, forming a nested structure.
- Child Node: A child node is an element within a parent node. Considering the example above, <p> and <span> are child nodes. Each parent can have multiple child nodes, and child nodes can have multiple child nodes, creating a tree-like structure.
- Sibling Nodes: Sibbling nodes are nodes that contain the same parent. In the above example, <p> and <span> are called siblings as they belong to parent node <div>
This relationship allows for the selection, navigation, and manipulation of elements in the DOM. DOM elements can be traversed bidirectionally, like parent to child or child to parent, as they are interconnected. By understanding this, developers can also add, remove, and update the nodes dynamically using programming languages.
Here is a DOM representation in Tree Format:
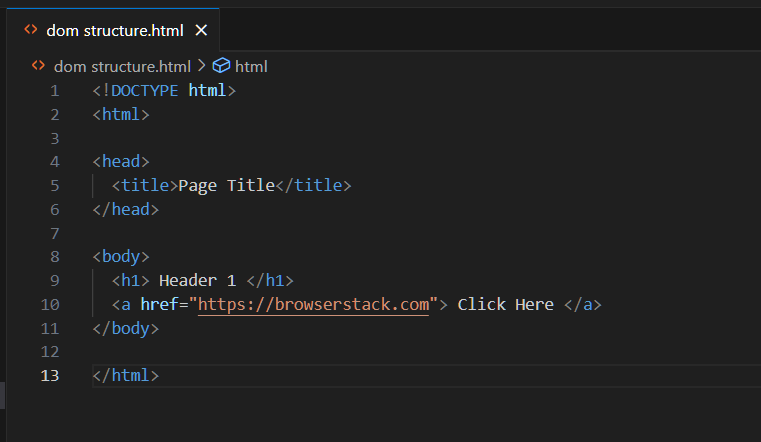
Here is a representation of DOM In HTML Code:
Read More: Page Object Model in JavaScript and Selenium
Attributes, Elements, and Nodes
In the Document Object Model (DOM), attributes, elements, and nodes are fundamental components that represent the structure and content of a webpage. Understanding these concepts is important to write automation scripts.
Elements
Elements are basically HTML tags or components of web pages such as <p>, <div>, <a>, etc. Each element can consist of one or more child elements, nodes, and attributes.
Example
<a href="https://browserstack.com">Click Here</a>
In the above example
<a>: is an element that represents a link. It has text Click here, which is a text node and attribute “href”.
Attributes
Attributes are associated with the element that provides additional information about the element.
Example
<a href="https://browserstack.com">Click Here</a>
In the above example:
The attribute name is href, and the value is https://browserstack.com, which will be interpreted by the browser when you click on the text ‘Click Here’ you will be navigated to the https://browserstack.com page.
Nodes
In DOM, everything is represented by a node. Below are a few different types of nodes
- Element Nodes: HTML elements such as <div>, <a>, <p> etc
- Text Nodes: Text content inside the element, for example <div> My name </div>. My name is represented as a text node
- Attribute Nodes: Attributes of the elements such as href, class, name, id, etc.
- Comment Nodes: HTML comment, For example, <!– This is a comment –>
Accessing Web Elements via DOM Methods
The DOM provides various ways to interact with the elements. Using DOM methods, you can also manipulate the elements dynamically. These methods are typically accessed through JavaScript, allowing you to identify, modify, or perform actions on specific elements. Additionally, these methods can be used in automation tools like Selenium to perform actions.
1. getElementById()
This method allows access to the HTML element using the unique id attribute. This is a fast and efficient way to access the DOM element
Example
var element = document.getElementById("submitB");
2. getElementsByClassName()
This method allows access to the HTML elements using the class name. Multiple elements can belong to the same class, so it returns the collection of elements.
Example
var elements = document.getElementsByClassName("customer-names");
3. getElementsByTagName()
This method allows access to the HTML elements using the HTML Tags. This method also returns the collection of elements
Example
var divs = document.getElementsByTagName("div");
4. querySelector()
Using this method, you can use any valid CSS selector to target elements. It returns the first match element
var firstButton = document.querySelector("button.expand");
5. querySelectorAll()
This method returns all elements that match the CSS selectors. That means it returns the collection of elements rather than a single element.
var allLinks = document.querySelectorAll("a[href^='https://']");6. parentNode
This is a property available in DOM, which can be used to access the parent node of a specific element
Example
var parent = document.getElementById("submitBtn").parentNode;
7. childNodes
This property returns a live NodeList of a specific element’s child nodes, which can consist of element nodes, text nodes, and comment nodes.
Example
var children = document.getElementById("container").childNodes;
8. nextSibling
This property allows to fetch the next available siblings of the specific element
Example
var next = document.getElementById("submitBtn").nextSibling;
9. previousSibling
This property allows fetching the previous sibling of a specific element
Example
var next = document.getElementById("submitButton"). previousSibling;
Using Selenium Locators with the DOM
Selenium, as a framework, provides various ways to access the element similar to DOM methods. As Selenium supports multiple languages, the signature might differ slightly depending on the programming languages. Since Java is commonly used with Selenium, below is the list of methods available in Java.
1. ID and Name Attributes
Selenium provides methods like driver.findElement() and driver.findElements() using this you can access elements with ID, name, or attribute values.
driver.findElement(): is a Selenium WebDriver method used to locate and return the first matching web element on a webpage based on a specified locator strategy.
driver.findElements(): is a Selenium WebDriver method that locates and returns a list of all matching web elements on a webpage based on a specified locator strategy.
- Using ID to access the elements in Selenium
Syntax
WebElement element = driver.findElement(By.id("element_id"));
Example
WebElement usernameField = driver.findElement(By.id("email"));
- Using Name to access the elements in Selenium
Syntax
WebElement element = driver.findElement(By.name("element_name"));
Example
WebElement passwordField = driver.findElement(By.name("password"));
- Using Attribute to Access the Elements in Selenium
Syntax
WebElement element = driver.findElement(By.cssSelector("[attribute='value']"));
Example
WebElement searchBox = driver.findElement(By.cssSelector("[type='text']"));
- Fetching the Attributes in Selenium
The getAttribute() method in Selenium is used to fetch the value of a specified attribute from a web element.
Syntax
String attributeValue = element.getAttribute("attribute_name");
Example
WebElement emailField = driver.findElement(By.id("homepageLink"));

String attributeValue = homepageLink.getAttribute("href");
2. Using Class Name and Tag Name Locators in Selenium
The className and tagName methods are used to get the locator based on the class name and tag name respectively
- Access elements using the class name in Selenium
Syntax
WebElement element = driver.findElement(By.className("class_name")); Example:
Example
WebElement button = driver.findElement(By.className("submitBtn"));
- Access elements using tag name in Selenium
Syntax
WebElement element = driver.findElement(By.tagName("tag_name"));
Example
WebElement spanElement = driver.findElement(By.tagName("span"));
3. CSS Selectors
CSS Selectors allow access to the Elements using the CSS values. It is the most flexible and easy-to-use type of selector in Selenium. This will allow you to use attributes, classes, IDs, and access elements in the DOM.
Syntax
WebElement element = driver.findElement(By.cssSelector("css_selector"));
Example
//Access by id using cssSelector, # is used to indicate ID

WebElement element = driver.findElement(By.cssSelector("#element_id"));

//Access by class name using cssSelector, .(dot) is used to indicate classID

WebElement element = driver.findElement(By.cssSelector(".elementclass "));

//Access elements by attribute name. [] is used to indicate the css attributes

WebElement element = driver.findElement(By.cssSelector("[type=text]"));

//Combine CSS tag name, class name

WebElement heading = driver.findElement(By.cssSelector("h1.title"));
4. XPath
XPath stands for XML Path Language. It allows you to navigate the HTML element using the Selenium. Like CSS, XPath is flexible in accessing elements based on ID, Tag, attribute value, and text.
- Access Elements Using Any attributes in XPath
Considering XPath, you can access elements using any HTML attributes such as class, id, name, etc.
Syntax
WebElement element = driver.findElement(By.xpath("//tagName[@attributeName='value']"));
Example
WebElement element = driver.findElement(By.xpath("//input[@type='text']"));

WebElement element = driver.findElement(By.xpath("//input[@id='myBtn']"));
- Access ElementsEelemts by Text using XPath
Syntax
WebElement element = driver.findElement(By.xpath("//tagName[text()='text value']"));
Example
WebElement element = driver.findElement(By.xpath("//a[text()='Learn More']"));
- Access Elements with Partial Text or value (Contains)
The contains function can be used along with any attributes or text to find the elements in XPath ContainsContais with Attribute
Syntax
WebElement element = driver.findElement(By.xpath("//tagname[contains(@attribute, 'value')]"));
Example
WebElement element = driver.findElement(By.xpath("//input[contains(@id, 'username')]"));
- Contains with Text
Syntax
WebElement element = driver.findElement(By.xpath("//tagname[contains(text(), 'text')]"));
Example
WebElement element = driver.findElement(By.xpath("//button[contains(text(),'Click Here')]"));
- Conditions in XPath
XPath allows filtering the query using the logical operations like AND, OR, =, etc.
Syntax
WebElement element = driver.findElement(By.xpath("//tagname[condition1 and/or condition2]"));
Example
// Using And

WebElement element = driver.findElement(By.xpath("//input[@type='text' and @name='username']"));

//Using Or

WebElement element = driver.findElement(By.xpath("//input[@type='text' or @type='password']"));
Read More: Selenium Locators: A Detailed Guide
Inspecting the DOM for Web Automation using Browser Developer Tools
To construct a locator, it is important to understand how to view the DOM tree and inspect it using the browser. Modern browsers come with Developer Tools (DevTools) that help you view and interact with the structure, attributes, and styles of web elements.
Steps to Inspect the DOM using the Chrome Browser:
- Step 1. Open Developer Tools
You can right-click on the web page and click on inspect the elements to open the DevTools. Alternatively, you can also use the keyboard shortcuts Ctrl+Shift+I (Windows) / Cmd+Option+I (Mac) to open.
- Step 2. Navigate to the Elements Tab
There are multiple tabs available in the Browser DevTools. The elements tab provides the structure of HTML. In the DevTools click on Elements Tab.
- Step 3. Inspect the Element
From the web page choose the specific component like button, header, menu, etc. and right click and then click on inspect element to highlight the elements in the Elements Tab.
- Step 4. Check for the ID, Class, Attributes, etc.
Selectors are always based on the unique values of ID, Class, attributes, etc. Check yourself which option is available for a specific element.
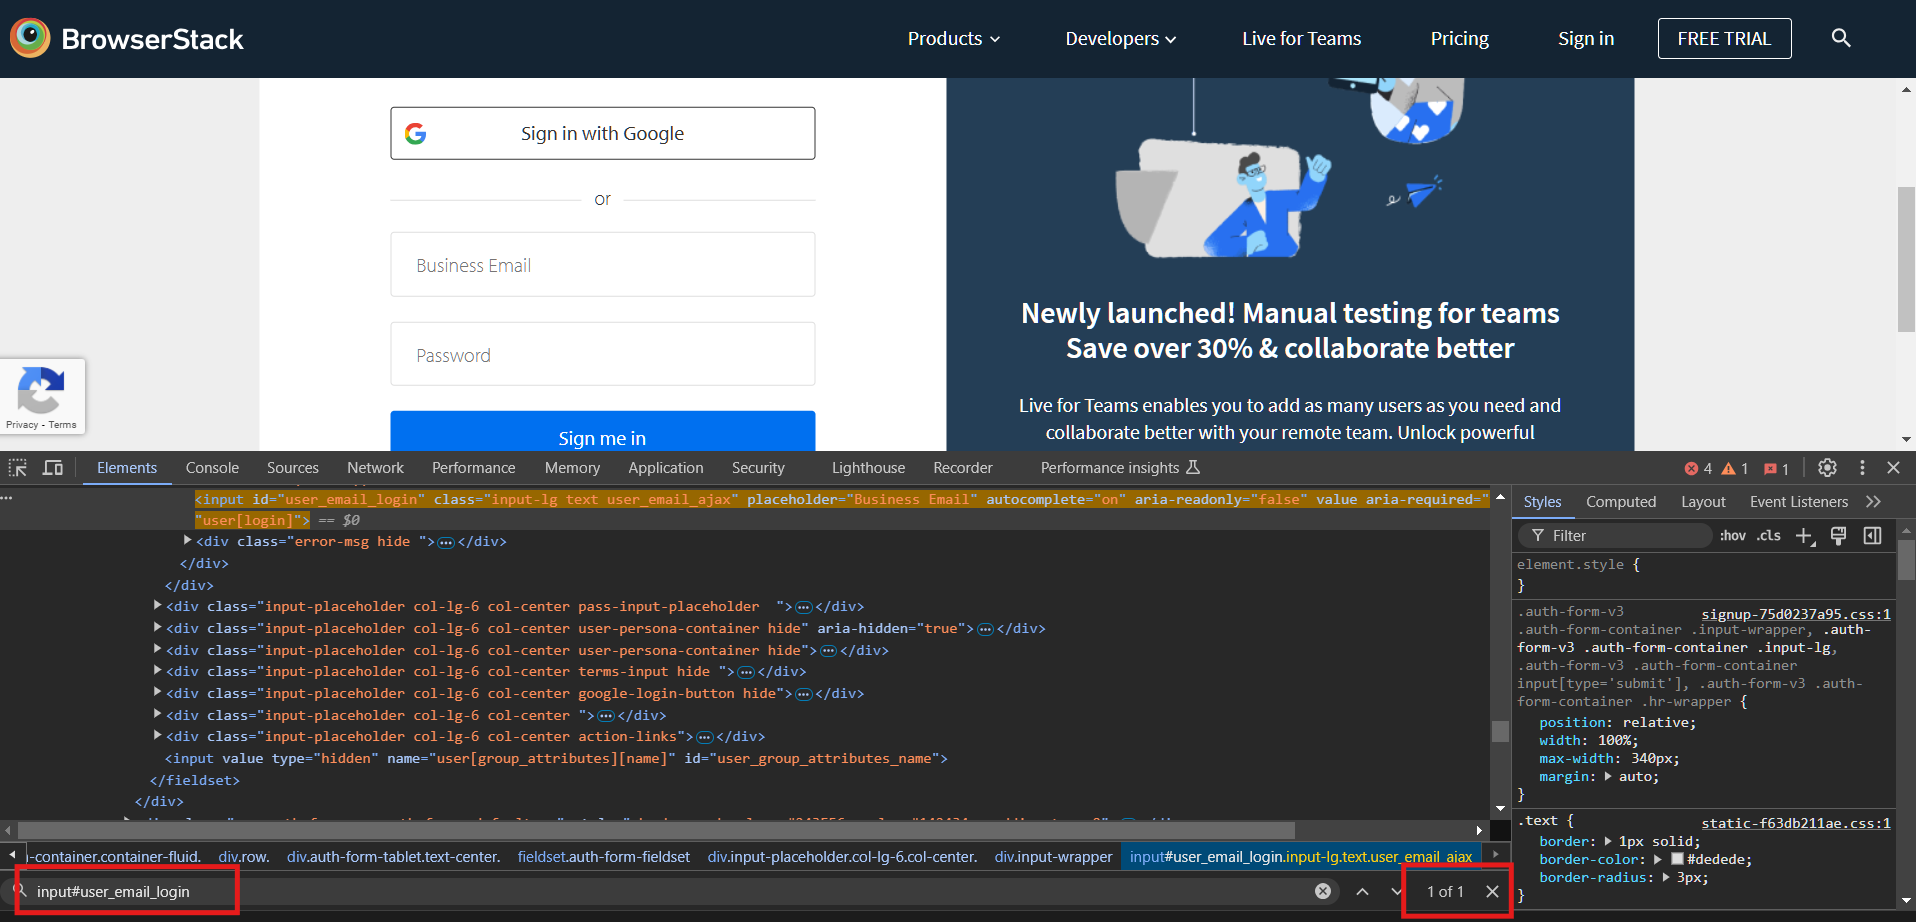
- Step 5. Test XPath or CSS Selectors
Based on the above step you might have constructed the selectors/locators. Using the search text box available within the Chrome Elements you can paste the selector to test. It should show at least 1 match.
Note: Chrome also provides copy Xpath and copy CSS Selector options when you right-click on the elements. However, it is for beginners and is not recommended for use. It may be helpful when you quickly want to test something.
Steps to Inspect the DOM using the Chrome Browser
1. Open Developer Tools
Right-click on the webpage and select Inspect Element or press Ctrl+Shift+I (Windows) / Cmd+Option+I (Mac).
2. Navigate to the Inspector Tab
The Inspector tab in Firefox allows you to view and interact with the DOM structure. Make sure you are in the Inspector Tab if not click on the inspector Tab to move the focus.
3. Inspect the element
Right Click on the specific element in the web page, and click on inspect it should highlight the specific element in the DOM tree
4. Check for attributes, classes, or ids
Check the element’s attributes like id, name, and class and create the Selenium locators
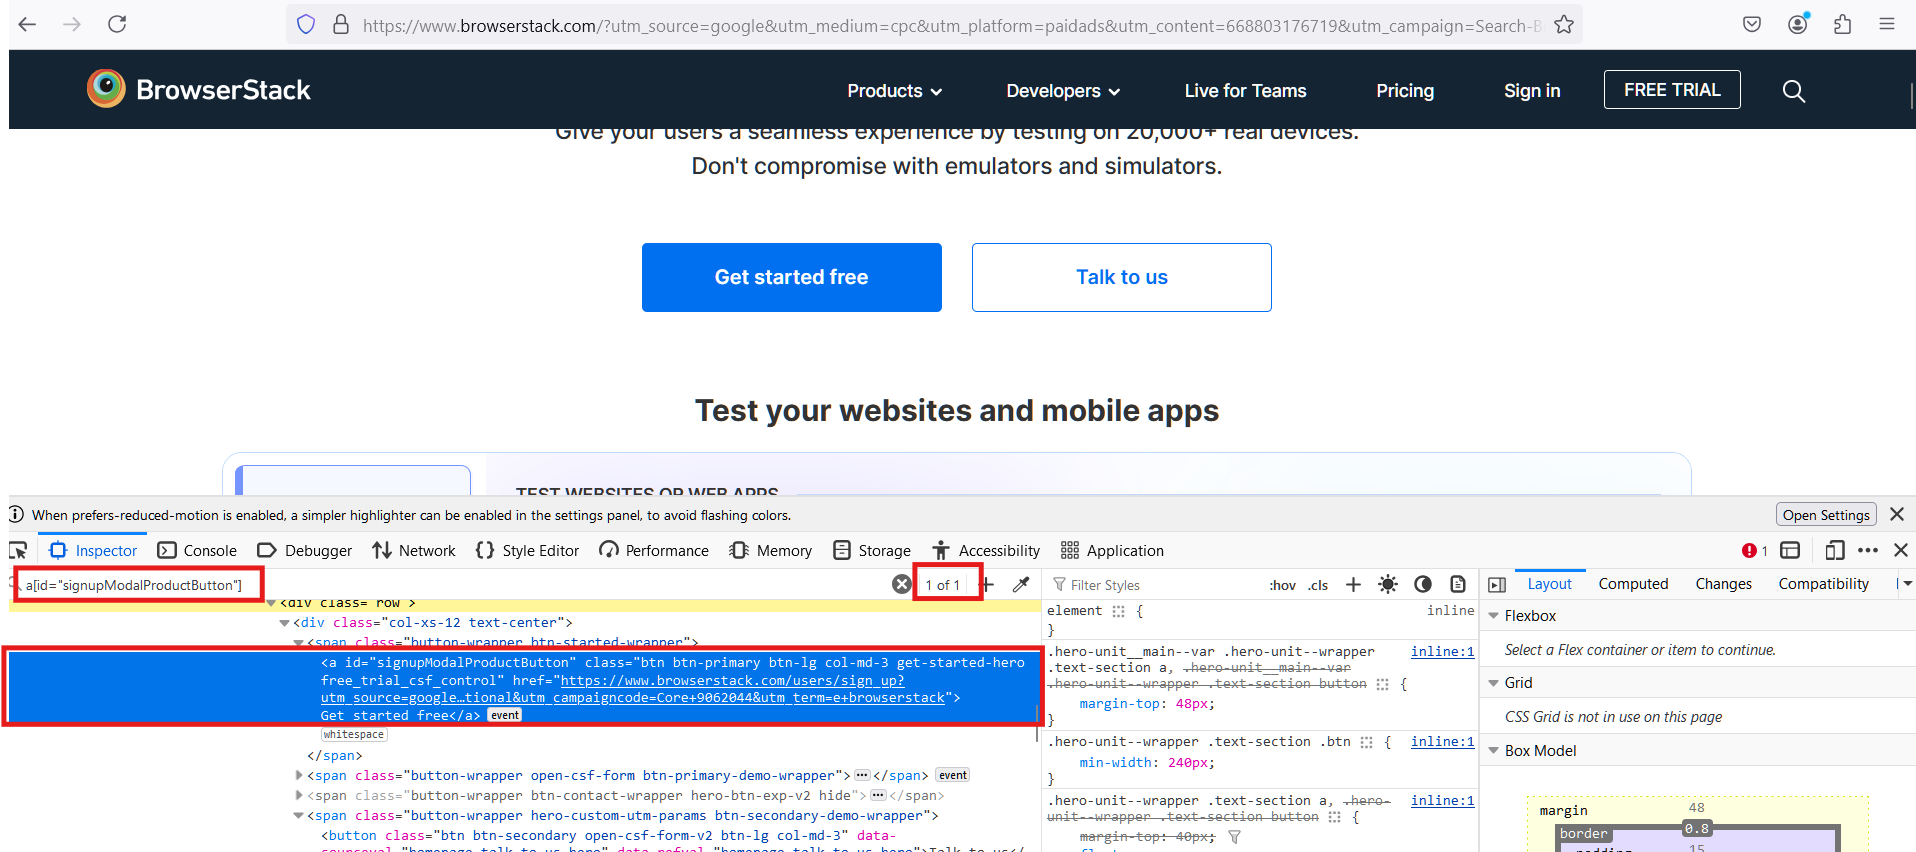
5. Test the Selectors
Like Chrome, Firefox also provides search functionality with selectors, so you can copy and paste the selectors into the search box to view the matches.
If it doesn’t work, you can also use the browser console tab to find the elements using JavaScript commands like document.querySelector() or document.evaluate().
Identifying Dynamic Elements in the DOM
Identifying the dynamic element can be challenging. The dynamic elements load as you perform the action after the initial load. Typically, dynamic elements do not have static IDs or class names. Because of that, you cannot use them to construct the selectors. The dynamic.
Using Partial matches
Dynamic elements often append the dynamic texts along with the static attribute names.
For example,
<button class="talktous-btn-92349wy3-btn btn-secondary"> Talk to Us</button>
In the above example, each time you load the page, the static part of the class talktous-btn remains the same. However, the dynamic part 92349wy3 may change.
In such situations, you can use partial matching locators like below
button[class*='talktous-btn']
In the above example, * is used to match any element that contains the text ‘talktous-btn‘. You can also use XPath, which contains the function to do the same.
Use Text-based Selectors
There might be a scenario where you may not find the partial matching attributes. The alternative option you can use is text-based selectors. For example, use XPath with text() function to generate the locators
Consider you have html like below
<button class="92349wy3-btn btsdn-dedww422ers">Talk to us</button>
In the above HTML you may not find any attributes to make a partial match in such cases, you can use the text() function in Xpath like below
//button[text()='Talk to us']Handling Shadow DOM and Nested Elements
The Shadow DOM is a web standard that enables developers to encapsulate and isolate CSS and JavaScript within web components. It works by attaching a hidden Document Object Model (DOM), known as the “Shadow DOM,” to a host element referred to as the “Shadow Host.”
While the Shadow DOM offers significant advantages for development, such as improved modularity and style encapsulation, it presents challenges for test automation. Traditional automation tools like Selenium cannot directly interact with elements within the Shadow DOM, making it difficult to locate and manipulate these components during testing.
Specialized techniques or tools that support Shadow DOM interaction are required to effectively handle Shadow DOM and nested elements, ensuring accurate and efficient automation.
Handling Shadow DOM
To access elements inside the Shadow DOM, you need to first locate the shadow host element, and then use JavaScript to access the shadow root.
Example:
WebElement shadowHost = driver.findElement(By.cssSelector(".my-shadow-host"));

WebElement shadowRoot = (WebElement) ((JavascriptExecutor) driver).executeScript("return arguments[0].shadowRoot", shadowHost);

WebElement shadowButton = shadowRoot.findElement(By.cssSelector("button"));

shadowButton.click();
In the above example,
- The shadowHost is accessed using the Selenium CSS locator.
- Next, Using the JavascriptExecution you will fetch the shadowRoot.
- Finally, the shadowButton is fetched using the shadowRoot that the JavaScript executor previously returned.
Handling Nested Elements
The Nested elements can be easily accessed by the CSS selectors or XPath selectors.
- CSS Selector for Nested Elements
CSS allows access to the nested elements. You can use the space descendant combinator to locate nested elements.
Example:
WebElement nestedElement = driver.findElement(By.cssSelector("div.parent-class input.child-class"));
In the above example, the input.child element is accessed, which is located under the parent element div.parent-class.
- Xpath for Nested Elements
Xpath also allows accessing the nested elements.
WebElement nestedElement = driver.findElement(By.xpath("//div[@class='parent-class']//input[@class='child-class']"));
In the above example, the (“//div[@class=’parent-class’]//input[@class=’child-class’]”) expression will search for the element input[@class=’child-class’] within the parent element div[@class=’parent-class’].
Interacting with Dynamic Content using Explicit Waits
Dynamic content in the web page is rendered after the initial load or after specific user interaction. Dynamic context may take time and it may not be instantly available. To handle this you need to use explicit wait.
Explicit wait is a waiting mechanism in Selenium that waits for specific based on the given condition, before performing action. This helps to ensure the dynamic element is in the DOM tree before performing action.
Example
WebDriverWait wait = new WebDriverWait(driver, Duration.ofSeconds(10));

WebElement element = wait.until(ExpectedConditions.visibilityOfElementLocated(By.id("myBtn")));

element.click();
In the above example,
- myBtn is the dynamic button, which may take time to load. To handle this, use the explicit wait.
- Create the wait object, specifying the duration; in this case, it is 10 seconds.
- Next, fetch the elements based on visibility. This condition waits for a maximum of 10 seconds before throwing an element not found exception.
- Finally, perform the click action.
There are many expected conditions available. Below are a few of the most frequently used conditions.
- elementToBeClickable: Waits for an element to be both visible and enabled
- visibilityOf: Waits for an element to be visible
- visibilityOfElementLocated: Waits for an element to be visible, given its locator
- presenceOfElementLocated: Waits for an element to be present in the DOM
- invisibilityOfElementLocated: Waits for an element to be not present in the DOM
- elementToBeSelected: Waits for an option element to be selected
Using JavaScript Executor to manipulate the DOM
JavaScript Executor in Selenium allows you to execute JavaScript code to handle complex scenarios. By using JavaScript Executor, you can manipulate the DOM tree such as clicking, scrolling, altering the text, getting attributes, etc.
Below are some of the common use cases of Java Script executors in Selenium:
Basic Syntax
JavascriptExecutor js = (JavascriptExecutor) driver;

js.executeScript("java script code here");
Clicking an Element
If your web driver clicks don’t work for any reason, you can use the JavaScript click to trigger the click event on the browser.
Example
WebElement element = driver.findElement(By.id("submitButton"));

JavascriptExecutor js = (JavascriptExecutor) driver;

js.executeScript("arguments[0].click();", element);
Scrolling the Page
You can use the JavaScript executor to scroll the page to a specific element
Example
WebElement element = driver.findElement(By.id("elementID"));

JavascriptExecutor js = (JavascriptExecutor) driver;

js.executeScript("arguments[0].scrollIntoView(true);", element);
Change the Text
You can also change the text of any element dynamically during automation execution.
JavascriptExecutor js = (JavascriptExecutor) driver;

js.executeScript("document.getElementById('elementID').innerHTML = 'New Text';");
You can build the logic for hiding the element or make it visible using the JavaScript executor.
JavascriptExecutor js = (JavascriptExecutor) driver;

js.executeScript("document.getElementById('elementID').style.display='none';");  // Hides the element
Get Attribute
Using JavaScript execution you can get the attribute value as shown below.
Example
JavascriptExecutor js = (JavascriptExecutor) driver;

String text = (String) js.executeScript("return document.getElementById('elementID').innerText;");
Reload the page
If Selenium default reload command works, using JavaScript you can simulate the same.
Example
JavascriptExecutor js = (JavascriptExecutor) driver;

js.executeScript("location.reload();");
Common Challenges working with DOM in Selenium
The following are some of the common challenges that occur when working with DOM in Selenium:
- Problem with Element Visibility
Elements are not often visible due to dynamic rendering, or they may appear after some time.
Solution: Use the dynamic locator mechanism with explicit timeout, as explained in the previous sections.
- StaleElementReference Exception
This occurs when you try to interact with an element that was previously located but has been refreshed or removed from the DOM.
Solution: Re-locate the element before interacting with it or use a try-catch block to re-find the element in case of this exception
Example:
try {

    WebElement element = driver.findElement(By.id("elementId"));

    element.click();

} catch (StaleElementReferenceException e) {

    element = driver.findElement(By.id("elementId"));

    element.click();

}
- Cannot access the iFrame Element
Elements within the iFrame cannot be accessed directory, which requires a special mechanism to handle. Selenium provides switchTo().frame() method to perform such actions
Example:
driver.switchTo().frame("iframeId"); // Switch to iframe

WebElement element = driver.findElement(By.id("elementId"));

element.click();
- The page is not scrolling to a specific element.
If you use selection scroll with action classes often, it may fail. The scroll depends on web architecture and implementation.
You can use the JavaScript scroll using the JavaScript executor as mentioned in the previous section to solve such problems.
Best Practices Selenium Test Automation
Here are some of the best practices to follow when performing Selenium Test Automation:
- Avoid Hard-Coded Waits: Avoid using Thread.sleep() or hard-coded waits as they slow down the tests unnecessarily. Use dynamic waits, also called explicit waits.
- Keep your locator simple: Generating complex XPath to locate the element can affect the performance of test suites. Try to find the other locators, and keep XPath as the last option.
- Use Try-Catch Blocks: Use appropriate exception handling mechanisms like try-catch blocks wherever required, which eliminates the flakiness of tests.
- Minimize Use of findElement in Loops: Avoid calling findElement in loops repeatedly. Instead, try to locate all the elements using the findElements method and iterate over it without calling findElements again.
- Use Page Object Model (POM): Implement the Page Object Model (POM) design pattern to separate the web page logic from the test scripts. This helps to increase the readability and reduce maintenance.
How BrowserStack helps with DOM Testing?
BrowserStack helps to interact with the DOM dynamically using the interactive session. It allows you to view, interact, and debug any ongoing test session on the Automate platform. Here’s how it helps in DOM testing:
- View live test execution on BrowserStack: You can observe how Application Under Test (AUT) behaves during test execution.
- Interact with the application: You can click buttons, pop-ups, or any other application element while the test is running.
- Inspect the source code: Often issues that occur remotely may not be reproducible locally, and may be due to DOM rendering based on the browser version, type, or operating system. This feature allows you to inspect the source code and check for rendered DOM etc.
Additionally, BrowserStack provides the following benefits:
- Cross-Browser Testing: DOM rendering can vary across browsers. BrowserStack Automate allows you to validate DOM behaviors on a vast range of browser versions to ensure consistency.
- Parallel Testing: BrowserStack’s scalable infrastructure allows large teams to run thousands of Selenium tests in parallel.
- CI/CD Integration: Integrate BrowserStack Automate into your CI/CD pipelines (e.g., Jenkins, GitHub Actions, CircleCI) for continuous DOM testing with every code commit.
- Debugging Tools: BrowserStack provides detailed logs, screenshots, and video recordings of every test session. These tools help identify DOM-related issues like incorrect element identification, missing elements, or inconsistent behaviors.
- Responsive Design Testing: Test DOM responsiveness by validating behavior across different screen resolutions and devices.
- Percy Integration: With Percy integration, automate visual regression testing to ensure DOM changes don’t break the visual layout.
Steps to Launch an Interactive Session in BrowserStack:
Step 1. Run your test script in your IDE.
Step 2. Navigate to your ongoing Automate session page and click Start an interactive session.
Step 3. After an interactive session starts, perform any manual testing task in the interactive window on the Automate session page.
Step 4. Stop the manual testing session by clicking Stop Interactive Session.
Check out this documentation for configuring real-time debugging
By integrating BrowserStack SDK, Automate, and Percy into your workflow, you can achieve comprehensive DOM testing that covers functional, responsive, and visual aspects, ensuring your web applications deliver a flawless user experience.
Refer to the following documentation for more information:
- Integrate functional and visual tests
- Visual testing with Percy on Automate
- Build your own SDK to run Percy tests
- Capturing responsive DOM snapshots
Conclusion
Understanding DOM concepts is important while performing the automation. DOM acts as a foundation for all automation tools. Modern applications incorporate advanced mechanisms like Shadow DOM, dynamic loading, etc. Though these features benefit application development, considering test automation it brings a lot of challenges.
Mastering DOM concepts can help to achieve such scenario automation using workarounds. Additionally, the DOM rendering may differ from browser to browser and platform to platform to ensure a smooth user experience, it is important to test them with different operating systems and browser combinations.
BrowserStack comes in handy while testing such scenarios. Furthermore, it also provides many advanced capabilities like interactive sessions, integration with Percy, effortless debugging, etc. This helps quickly identify the device, browser, or operating-specific issues and fix them before your code goes to production.

