Cypress makes it easy to test UI components in isolation and validate their behavior directly in the browser. Visual component testing in Cypress mounts a component, captures a screenshot, and compares it with a baseline to catch visual regressions. Using a cloud service like BrowserStack Percy, these snapshots are processed with an AI engine that filters noise and flags only meaningful UI differences.
Overview
How to Perform Visual Component Testing in Cypress?
Step 1: Install Cypress:
npm install cypress -D
Step 2: Open Cypress Test Runner:
npx cypress open
Step 3: Configure Cypress for Component Testing: Set component configuration in cypress.config.js
Step 4: Install Visual Diff Plugin:
npm i cypress-image-diff-js
Step 5: Configure Plugin and Support File:
Import the visual diff plugin in your Cypress config and enable its snapshot command in the support file so Cypress can compare component screenshots during tests.
Step 6: Write a Visual Component Test:
import { mount } from 'cypress/react';

import DemoComponent from '../../src/DemoComponent';


describe('Demo Component', () => {

  it('renders visually', () => {

    mount(<DemoComponent />);

    cy.get('[data-testid=demoButton]').should('contain.text', 'Demo Component Button');

    cy.compareSnapshot('component-testing', 0.2);

  });

});
Step 7: Run the Test:
npx cypress run --component
Step 8: Use Percy for Cloud Visual Testing:
Integrate Percy into your Cypress setup to capture AI-enhanced cloud snapshots and automatically detect meaningful visual regressions across browsers and viewports.
This guide explains how to set up and run visual component testing in Cypress.
What is Visual Component Testing in Cypress?
Visual component testing in Cypress focuses on verifying the visual appearance and layout of individual UI components within an application. This type of testing ensures that components render correctly and consistently across different states even after code changes, preventing visual regressions.
This process integrates Cypress’s component testing capabilities with image diffing tools like Cypress Image Diff or platforms such as Percy to compare component snapshots before and after changes, making it easy to spot regressions early in development cycles. This helps ensure that component behavior and appearance remain consistent across updates, especially in modern frameworks such as React, Angular, and Vue.
Steps to Perform Visual Component Testing in Cypress
Below are the steps to get visual component testing running in your project.
Pre-requisites
Before proceeding, ensure you have a development framework such as React, Angular, or VueJS set up as a prerequisite.
Also Read: Cypress Installation for Test Automation
Below are the key steps to perform Visual Testing in Cypress
Step 1: Install Cypress to your project
Using the command
npm install cypress -D
Step 2: Open Cypress
Open Cypress with command
npx cypress open
The above command will create the default directory structure for Cypress tests.
Step 3: Configure Cypress Component Testing
- Once you open Cypress, you will see the window, E2E and Component Testing.
- Choose Component Testing.
- Using the on-screen instruction, configure your project with Cypress Component Testing.
Step 4: Install the cypress-image-diff-js plugin
For the Visual Testing, you need to install cypress-image-diff-js, Use the below command to install the image comparison node package.
npm i cypress-image-diff-js
Step 5: Configure the Image Diff package
Navigate to your cypress.config.js usually located in your root project.
Import the cypress-image-diff-js/dist/plugin into your config file as shown below.
const setupNodeEvents = require('cypress-image-diff-js/dist/plugin')Navigate to component section in cypress.config.js file add the setupNodeEvents
The full cypress.config.js file looks like below.
const { defineConfig } = require("cypress");
const setupNodeEvents = require('cypress-image-diff-js/dist/plugin')
module.exports = defineConfig({
component: {
devServer: {
framework: 'react',
bundler: 'vite',
},
setupNodeEvents
},
e2e: {}
});
Step 6: Configure the Support file
Navigate to cypress/support/component.js and add the below code
const compareSnapshotCommand = require('cypress-image-diff-js/dist/command')
compareSnapshotCommand()
Ensure that import ‘./commands’, is already present in the component.js file, if it doesn’t exist, then add it.
Optional Step: Create Simple React Component
This step is optional, if you are already having a component created then you can skip this step.
Below is the sample component created for Demo Purpose
We have created DemoComponent.jsx in my-react-app/src folder
The code looks like the below
import { useState } from 'react'
import {Button, Alert} from 'react-bootstrap';
import './App.css'
import 'bootstrap/dist/css/bootstrap.min.css';
export default function DemoComponent() {
return (
<div data-testid="demo-page">

<div data-testid="demoButton">
<Button variant="primary" size="lg">
Demo Page
</Button>
<p></p>
</div>

<div data-testid="infoalert">
<Alert key="info" variant="info">
This is a test Alert!
</Alert>
</div>
</div>
)
}
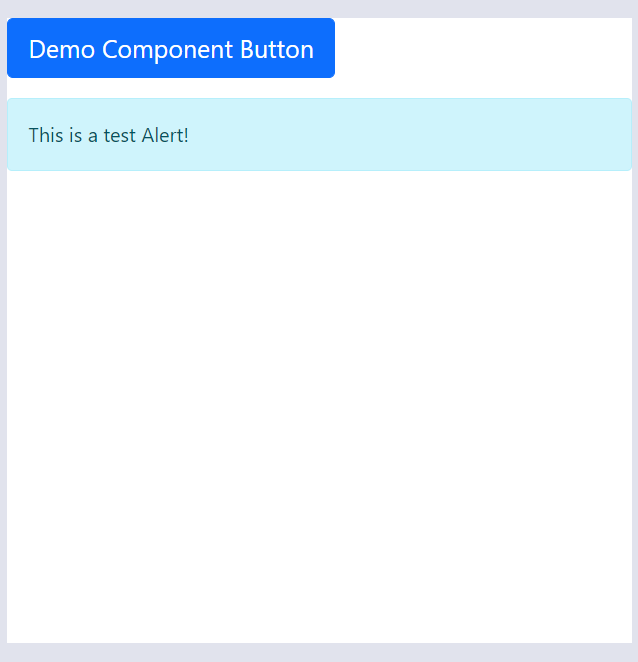
The above is a simple component that has a button and simple alert like the below.
Step 7: Create Visual Test for Component
Let’s create a simple visual test for the above component,
Navigate to cypress/component folder and create a simple .jsx file name it as visual-test.jsx
Also Read: How to run UI tests in Cypress
The code looks like the below:
import { mount } from 'cypress/react'
import DemoComponent from '../../src/DemoComponent'
const demoButton = '[data-testid=demoButton]'
describe('Demo Component', () => {
it('Visual Testing Cypress', () => {
mount(<DemoComponent />)
cy.get(demoButton).should('contain.text', 'Demo Component Button')
cy.compareSnapshot('component-testing', 0.2)
})
})- In the above code, mount(<Stepper />): Mounting DemoCompenent for testing, which is imported using import DemoComponent from ‘../../src/DemoComponent’
- cy.get(demoButton).should(‘contain.text’, ‘Demo Component Button’),: This line is an assertion to ensure that our component button is rendered correctly.
- cy.compareSnapshot(‘component-testing’, 0.2): This line takes the screenshot and compares it against the base screenshot, 0.2 is the threshold which is the tolerance of pixel difference of the screenshot.
Try Visual Testing using Percy
Step 8: Execute the test
You can execute the Cypress test, using both the command line and Cypress Test Runner window.
Using the Cypress Test Runner window
- Use npx cypress open command
- Choose the Component Testing and Browser
- Click on the test name in our case it is visual-test.cy.jsx
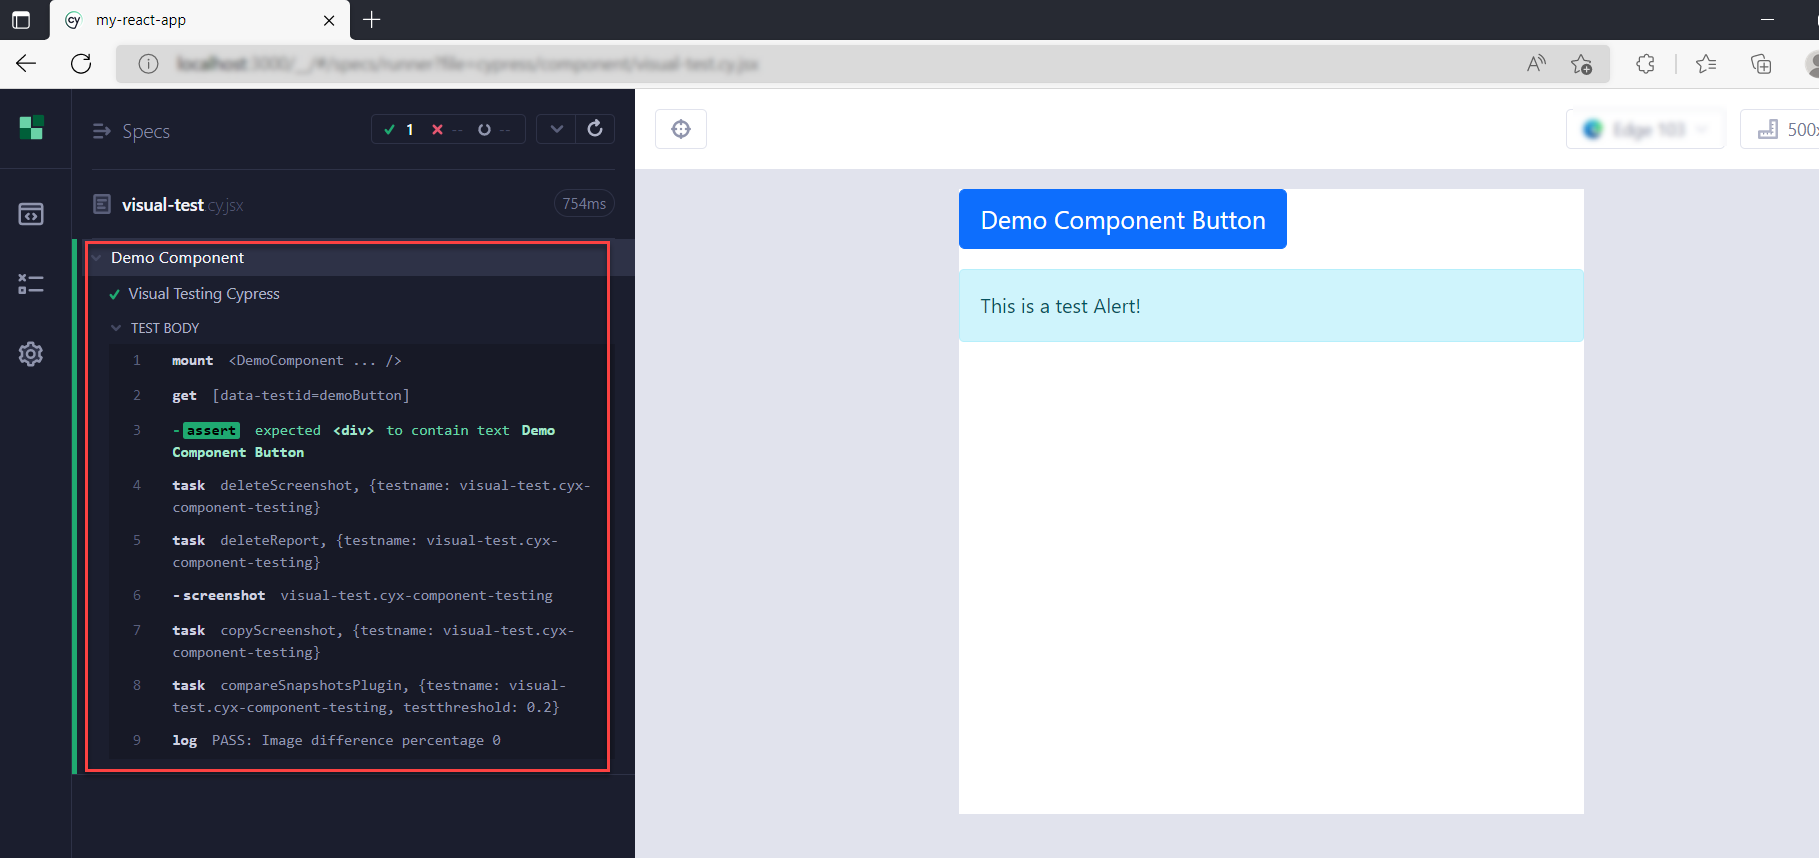
- Once you execute the test, Cypress shows the output pass or fail
- For cypress CLI execution you can use the below command
npx cypress run –component
Note: You need to execute the test at least two times, the first run captures the base screenshot, and the subsequent run captures the actual screenshot and compares it against the base screenshot.
In our case there was no difference, so tests are marked as passes.
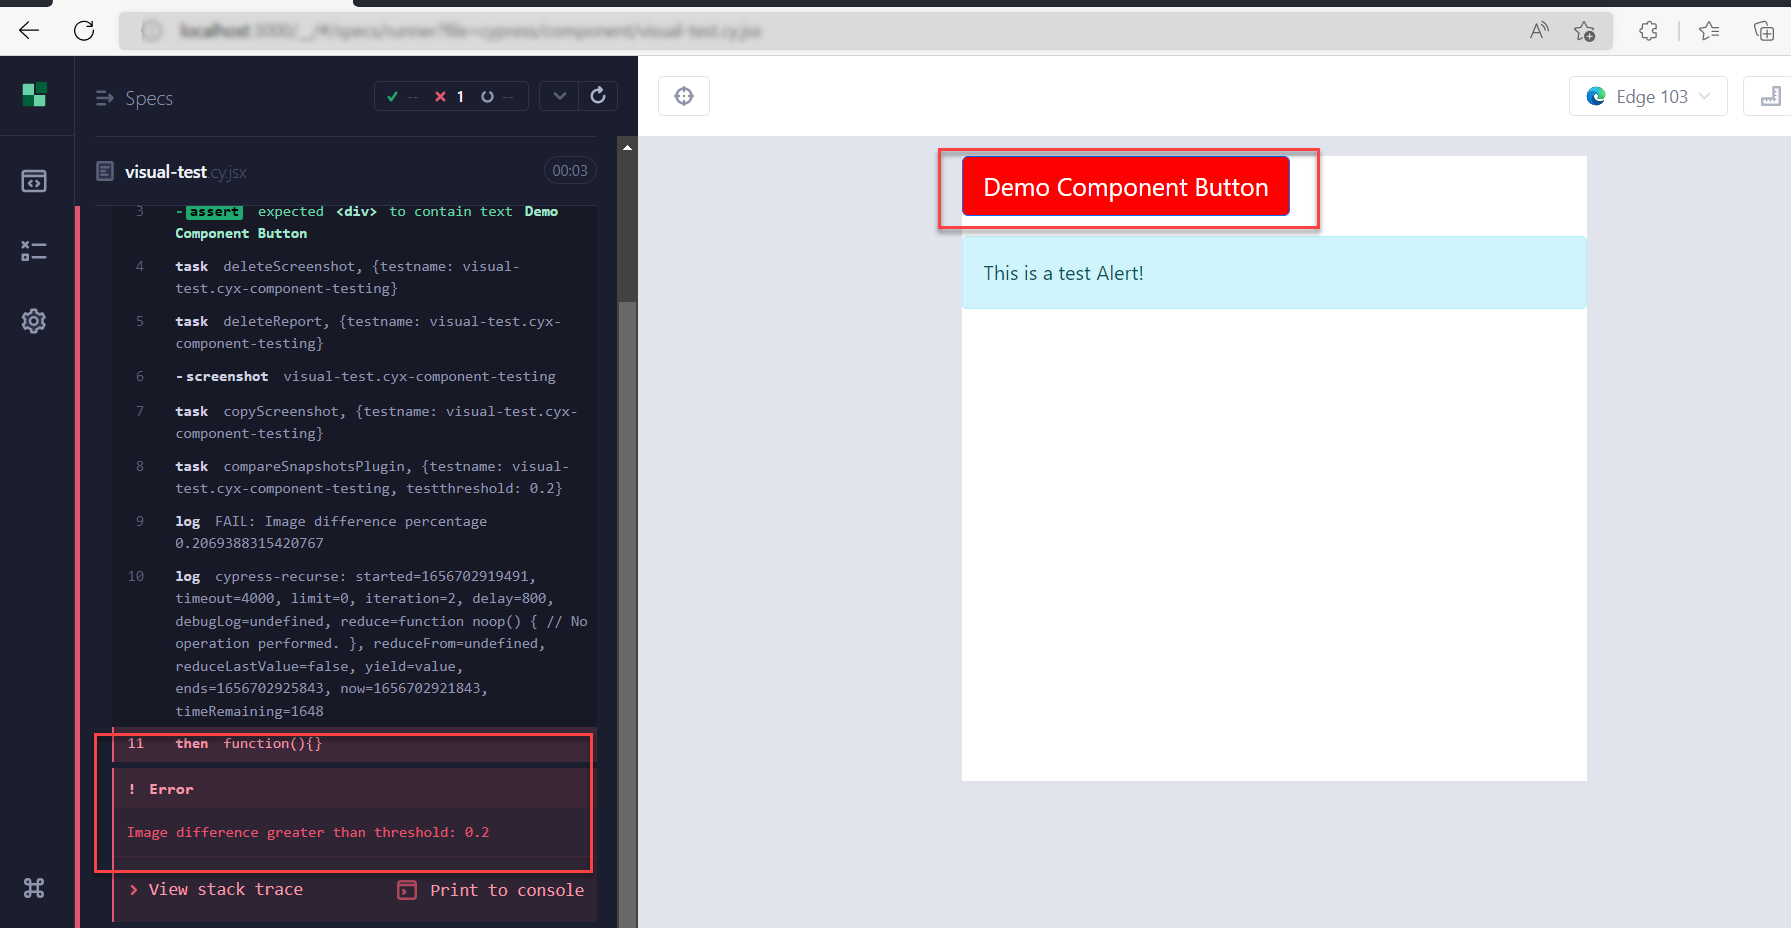
Let’s modify the component by changing the button background color from blue to red
Execute the test again.
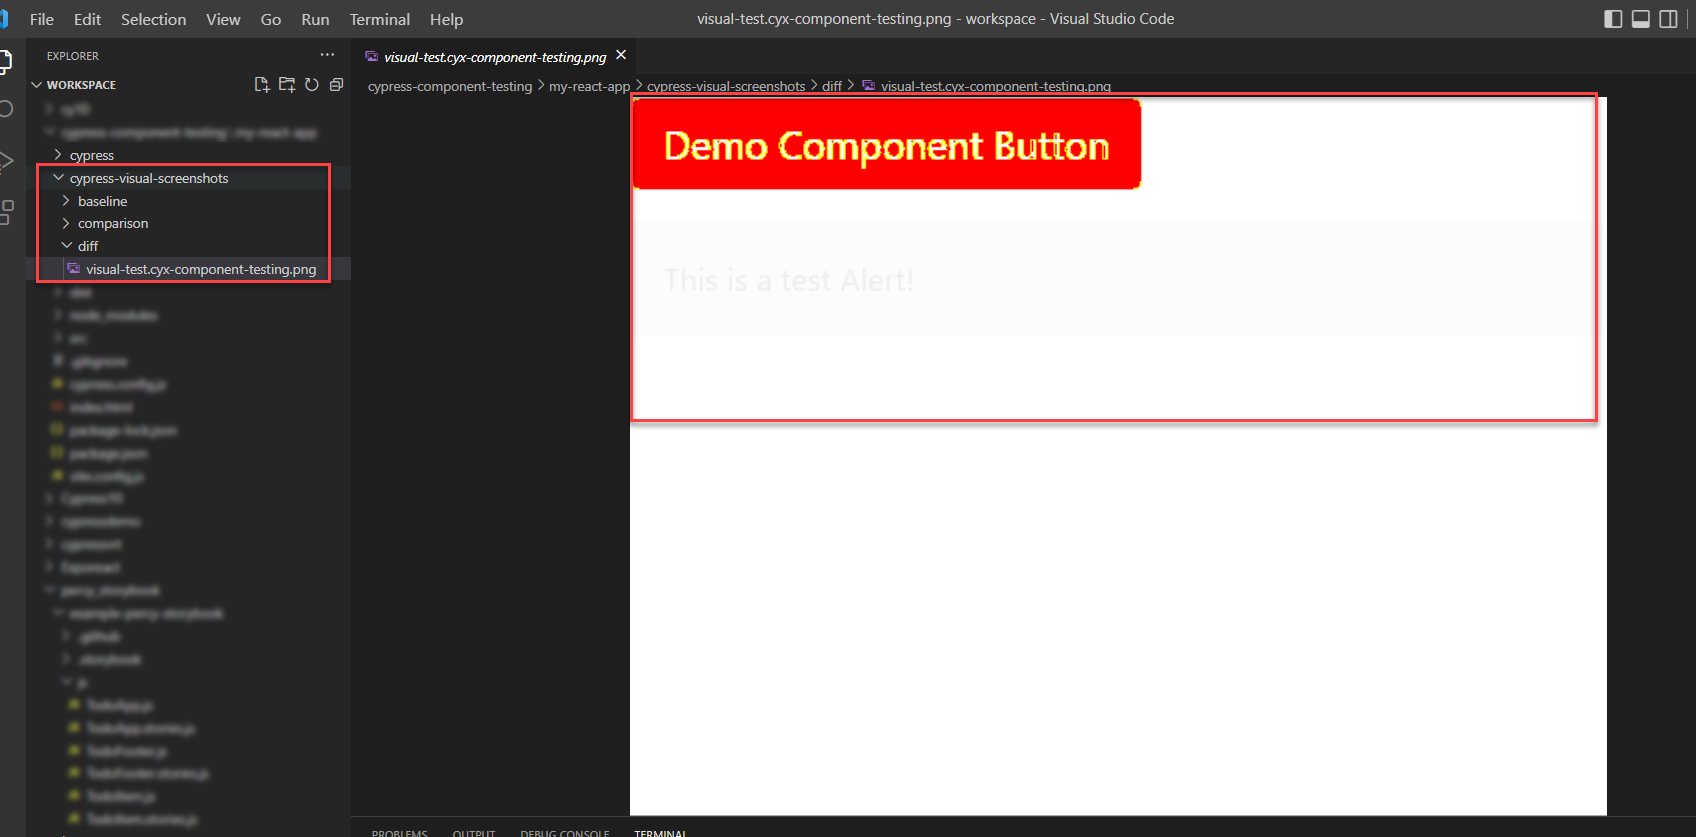
You can see that the test has failed since there is a difference between the base screenshot and the actual screenshot.
You can view the difference, by navigating to the diff folder under the cypress-visual-screenshots folder
Cypress Component Visual Testing using Percy
The Percy is the most popular cloud based visual testing tool. Percy provides a dedicated dashboard to compare the visual differences. One of the unique features of Percy is you can visually check how the components are rendered across multiple browsers such as Edge, Chrome, Safari, etc. Percy provides a feature to accept, and reject the changes.
Use Step 1 to Step 3 to configure Cypress to your project, after that follow the below instructions
Install Percy for Cypress
- Using the command below install Percy for Cypress
npm install --save-dev @percy/cli @percy/cypress
- Configure cypress/support folder
Navigate to cypress/support/command.js file and add the import statement
import '@percy/cypress';
Create a component (Optional, if you have already created a simple component skip this step). Below is a simple react component to test the Percy visual testing.
import { useState } from 'react'
import {Button, Alert} from 'react-bootstrap';
import './App.css'
import 'bootstrap/dist/css/bootstrap.min.css';

export default function DemoComponent() {

//style={{background: "red"}}
return (
<div data-testid="demo-page">

<div data-testid="demoButton">
<Button variant="primary" size="lg" >
Demo Component Button
</Button>
<p></p>
</div>

<div data-testid="infoalert">
<Alert key="info" variant="info">
This is a test Alert!
</Alert>
</div>
</div>
)
}- Write a simple Percy Visual Test for Component using Cypress
- Navigate to cypress/component folder create a visual-test.cy.jsx file
import { mount } from 'cypress/react'
import DemoComponent from '../../src/DemoComponent'
const demoButton = '[data-testid=demoButton]'
describe('Demo Component Testing Percy', () => {
it('Visual Testing Cypress Percy', () => {
mount(<DemoComponent />)
cy.get(demoButton).should('contain.text', 'Demo Component Button')
cy.percySnapshot('percy-component-visual-test');
})
})
In the above code,
- mount(<Stepper />): Mounts the DemoCompenent for testing, which is imported using import DemoComponent from ‘../../src/DemoComponent’
- cy.get(demoButton).should(‘contain.text’, ‘Demo Component Button’): This line is an assertion to ensure that our component button is rendered correctly.
- cy.percySnapshot(); : This is a Percy command to take the DOM snapshot and then Percy CLI uploads the snapshots to the Percy dashboard.
Set the PERCY_TOKEN Environment Variable:
- Navigate to Percy Project. Refer to this help documentation to know more.
Copy the PERCY_TOKEN. Read more.
Set the Environment Variable
# Unix
$ export PERCY_TOKEN="<your-project-token>"

# Windows
$ set PERCY_TOKEN="<your-project-token>"

# Powershell
$ $Env:PERCY_TOKEN="<your-project-token>"
Run Component Tests using Percy Cypress
npx percy exec -- cypress run –component
Once the execution is complete, the command line output will have the Percy build URL, you can navigate to the build URL to check the difference.
Note: you need to execute the Percy test at least two times to check the result, as you need to have a base screenshot and an actual screenshot to compare.
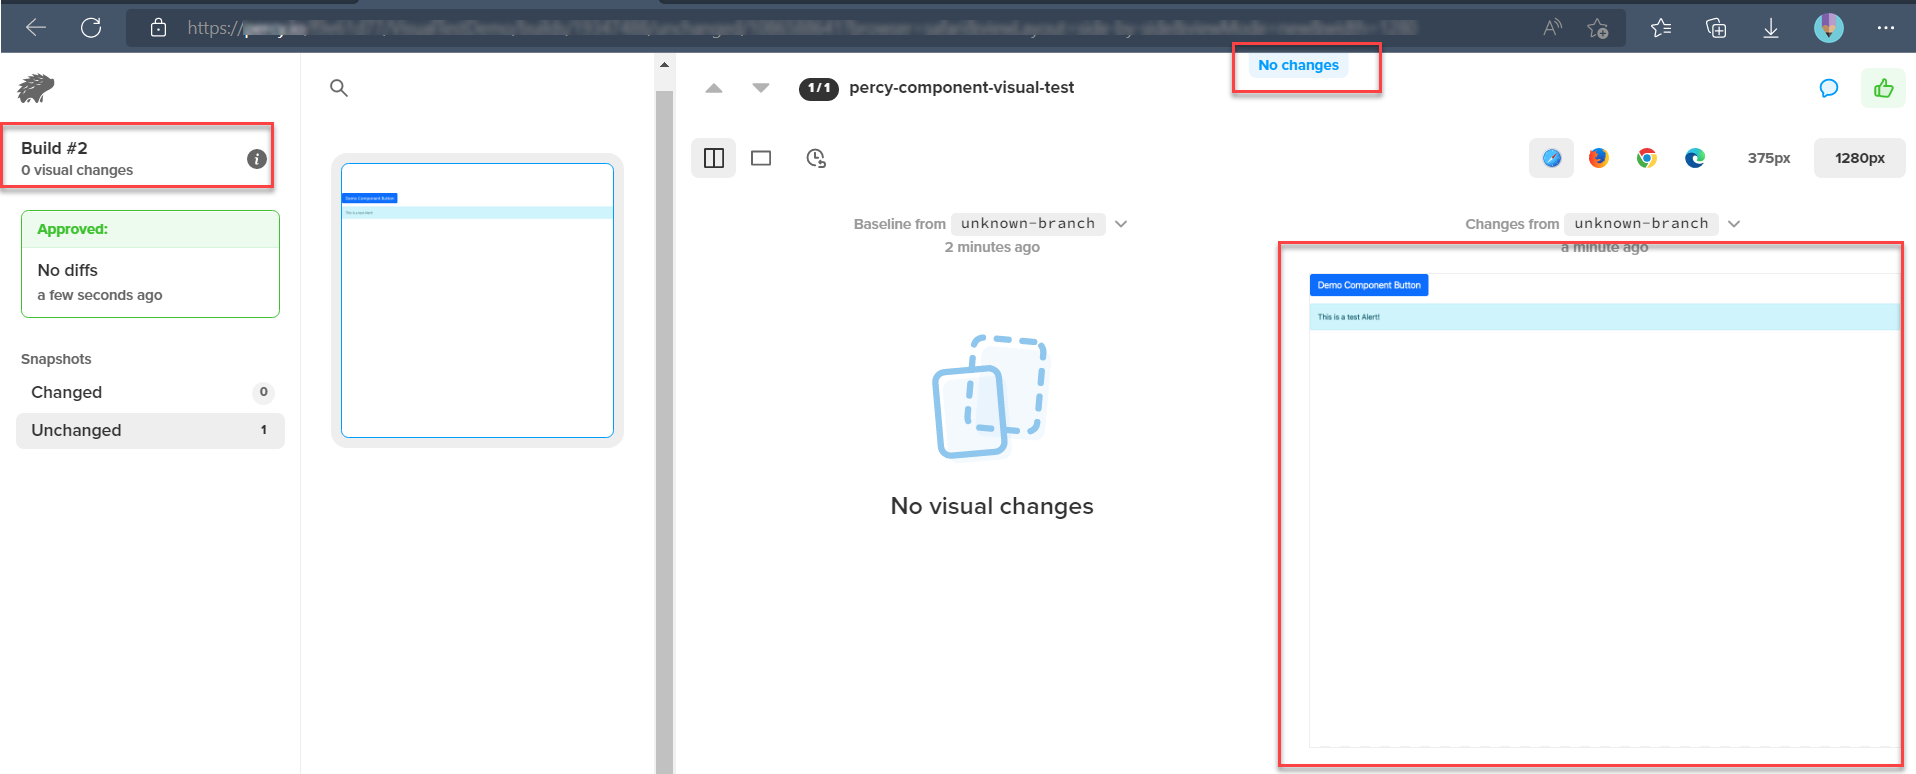
If there are no changes then Percy displays “No Changes.”
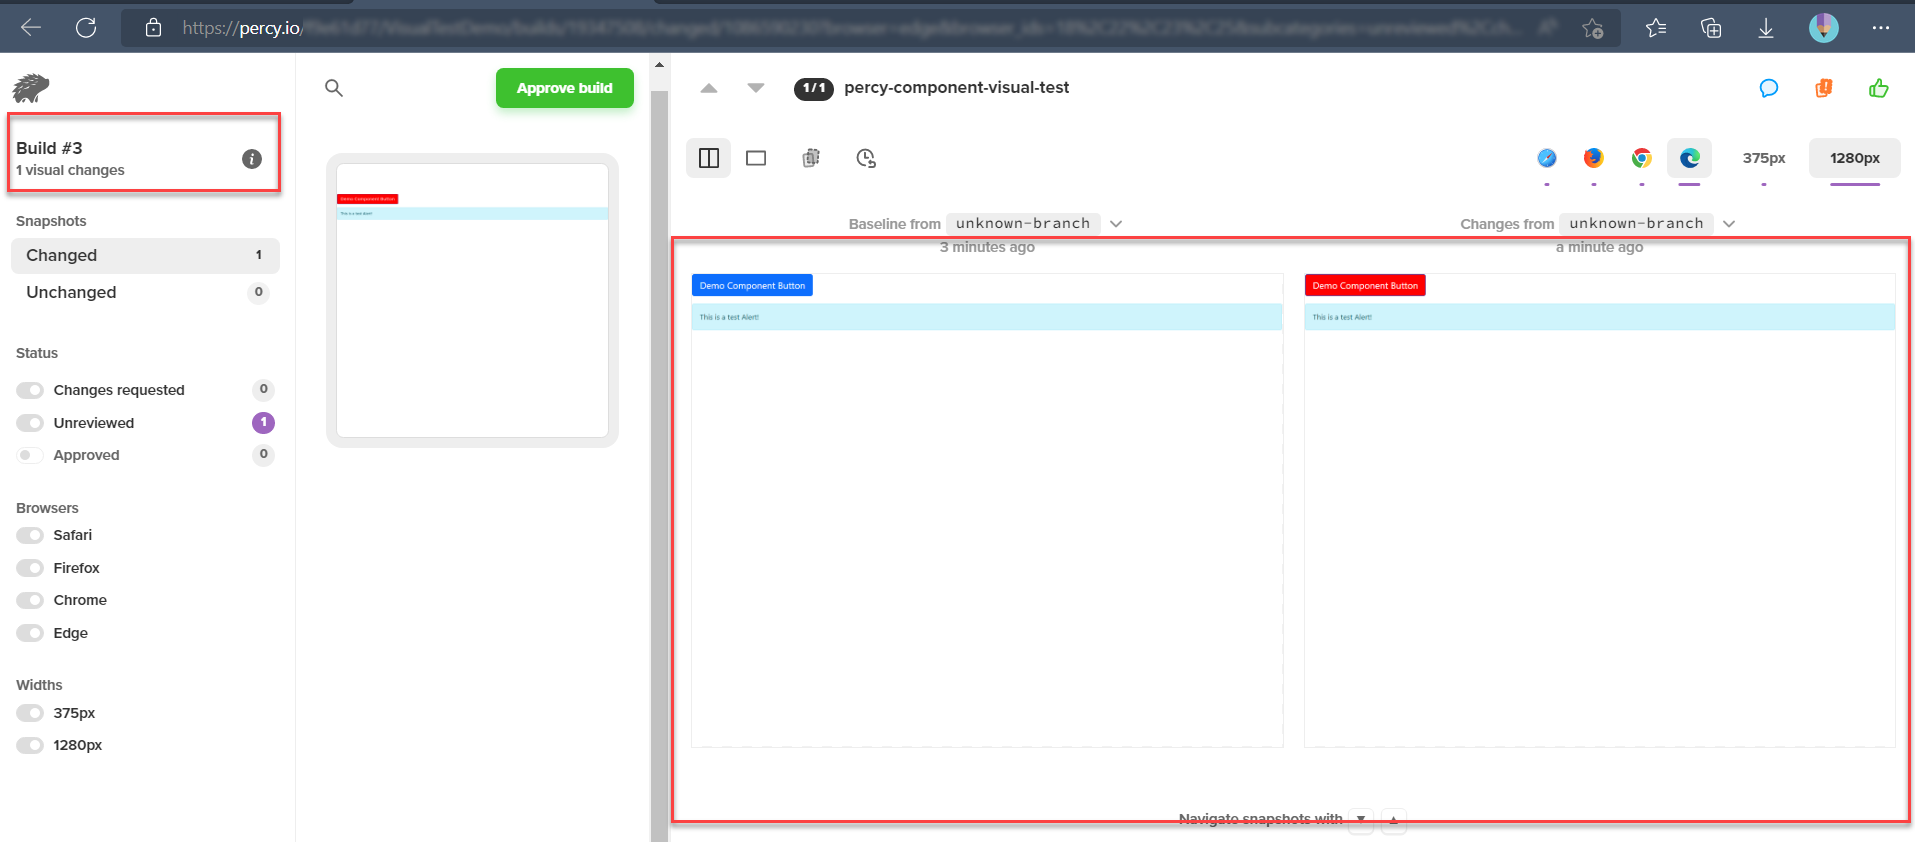
Let’s modify our code, change the button background color to Red from Blue and execute the test again.
You can see in the above image, that the difference is shown side by side.
Why Use Percy for Cypress Component Tests?
Cypress component tests are known to validate functionality, ensuring visual consistency across browsers, devices, however it can get challenging using local screenshot comparisons alone for the same purpose. Percy strengthens this workflow by providing reliable, AI-powered visual regression testing that integrates directly into your existing Cypress setup.
- AI-Stabilized Snapshots: Percy’s Visual AI Engine filters out noise from animations, rendering differences, and dynamic data. This helps reduce false positives, which is one of the most common issues in component-level visual testing.
- Cross-Browser & Responsive Rendering: Cypress typically runs component tests in a single browser, but UI regressions often appear only in specific browsers or viewports. Percy captures each component snapshot across multiple browsers and widths, ensuring that your UI stays consistent everywhere.
- AI-Assisted Visual Review: Percy’s Visual Review Agent highlights meaningful UI changes, adds clear summaries, and speeds up the review process so teams can quickly understand and approve visual updates.
- CI/CD-Friendly Scaling: Percy fits seamlessly into modern CI pipelines. Automated baselines, parallel renders, and status checks help teams detect visual regressions early and ship component updates with confidence.
Pricing
- Free Plan: Available with up to 5,000 screenshots per month, ideal for getting started or for small projects.
- Paid Plan: Starting at $199 for advanced features, with custom pricing available for enterprise plan.
Best Practices for Cypress Visual Testing
Adopting best practices ensures the reliability and efficiency of your visual tests. Here are some key guidelines to follow:
- Identify the Need for Visual Testing: Use visual testing when UI appearance is critical or when end-to-end tests rely heavily on verifying style properties like visibility, color, and layout.
- Ensure the Application is Fully Loaded: Capture visual snapshots only after confirming that all dynamic content, animations, and rendering processes are complete.
- Standardize Timestamps: Freeze timestamps during tests to maintain consistency in visual outputs, especially for components displaying date or time-sensitive information.
- Control Application State: Use consistent test data and mock external dependencies to ensure the application behaves predictably during visual testing.
- Focus on Targeted Elements: Test individual components or specific sections of the UI to avoid unrelated changes affecting the results.
- Combine with Component Testing: Perform visual testing alongside component testing to validate the appearance and functionality of individual UI elements in isolation.
- Update Snapshots Strategically: Regularly review and update snapshots to reflect intentional UI changes while avoiding unnecessary updates that could mask regressions.
- Integrate Visual Tests with CI/CD: Include visual testing in continuous integration pipelines to catch regressions early and maintain consistent visual quality across releases.
Conclusion
The modern development framework encourages the development of the components in isolation. Visual Testing is the most popular method for testing the Visual Changes in UI. Cypress and Percy make the visual testing much easier and effectively bring the visual testing to the component level. The component-level visual testing helps faster development.
Useful Resources for Cypress
Understanding Cypress
- Cross Browser Testing with Cypress : Tutorial
- Run Cypress tests in parallel without Dashboard: Tutorial
- Handling Test Failures in Cypress A Comprehensive Guide
- Cypress Test Runner: Tutorial
- Handling Touch and Mouse events using Cypress
- Cypress Automation Tutorial
- CSS Selectors in Cypress
- Performance Testing with Cypress: A detailed Guide
- Cypress Best Practices for Test Automation
- Test React Native Apps with Cypress
- Cypress E2E Angular Testing: Advanced Tutorial
- Cypress Locators : How to find HTML elements
- Maximizing Web Security with Cypress: A Step-by-Step Guide
- Conditional Testing in Cypress: Tutorial
- Cypress Web Testing Framework: Getting Started
- Cypress Disable Test: How to use Skip and Only in Cypress
- What’s new in Cypress 10? How it will change your current testing requirements
Use Cases
- How to Record Cypress Tests? (Detailed Guide)
- How to run your first Visual Test with Cypress
- How to Fill and Submit Forms in Cypress
- How to Automate Localization Testing using Cypress
- How to run Cypress Tests in Chrome and Edge
- How to use Cypress App Actions?
- How to Run Cypress Tests for your Create-React-App Application
- How to Run Cypress Tests in Parallel
- How to handle Click Events in Cypress
- How to Test React using Cypress
- How to Perform Visual Testing for Components in Cypress
- How to run UI tests in Cypress
- How to test redirect with Cypress
- How to Perform Screenshot Testing in Cypress
- How to write Test Case in Cypress: (with testing example)
Tool Comparisons
