Docker simplifies application deployment by packaging software with all its dependencies into a single container. Cypress, a widely used test automation tool, requires consistent version management for both the framework and the browser to ensure reliable test execution.
By running Cypress within Docker, teams can maintain a stable and reproducible test environment across local and CI/CD pipelines, eliminating version conflicts and streamlining test execution.
This guide explores how to set up and run Cypress tests using Docker efficiently.
Understanding Docker
Before delving further, it is essential to understand Docker architecture and the key concepts involved.
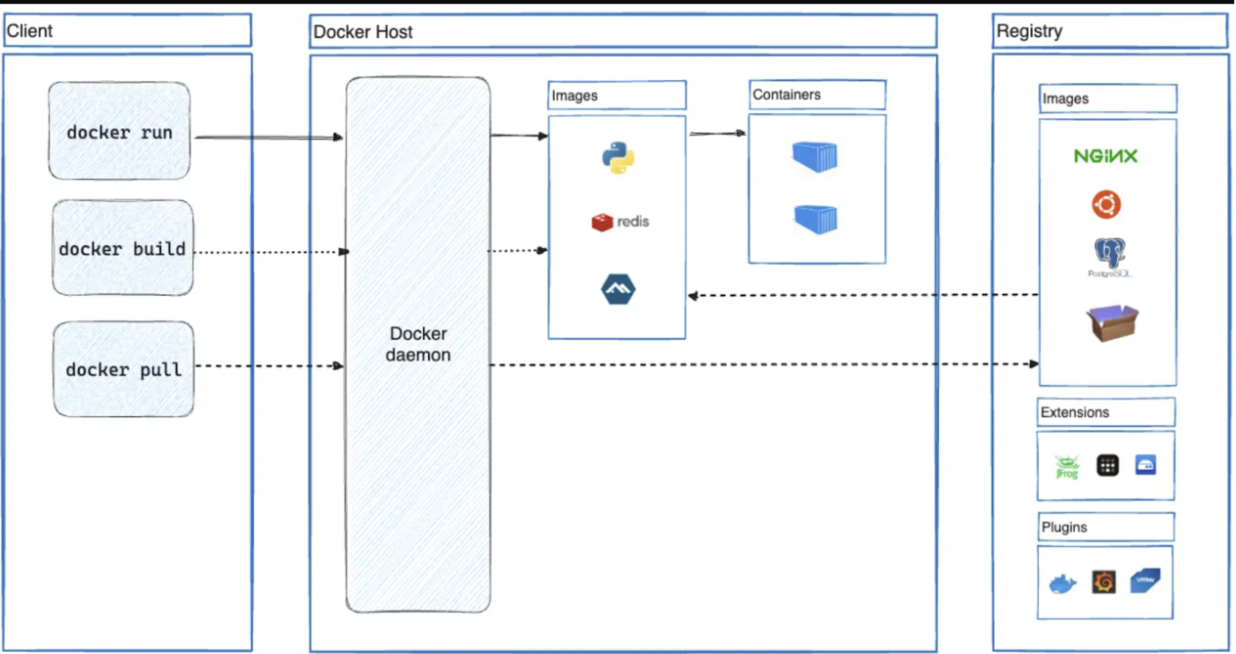
The architecture comprises of three key components
- Docker Host
- Client
- Registry
Docker Host
Docker host consists of
- Docker daemon
- Images
- Containers
Docker Daemon takes input from Docker clients and does all the heavy lifting of building, running, and distributing the Docker containers.
The Docker daemon and client interact using REST API. The Docker daemon listens for Docker API requests and manages Docker objects such as Images (blueprints of applications), Containers (runtime instances of images), Networks (connections enabling communication between containers), and Volumes (persistent storage for container data)..
Docker Client
Users interact with the Docker daemon using the client. The client takes the input commands such as docker run docker build docker pull. The docker command uses the Docker API and the docker client sends these commands to Docker Daemon using REST API.
Also Read: Top 10 Python REST API Frameworks in 2024
Docker Registry
Docker registry is the centralized place where images are stored. Docker Hub is a public registry that anyone can use.
By default, Docker searches for images in the Docker Hub. A private registry can be used as an alternative to Docker Hub.
Docker Desktop
Docker Desktop is an installation file for MAC, Windows, and Linux environments that enables the building and sharing of containers. It includes the docker daemon, docker client, docker compose, docker content trust, Kubernetes, and credential helper.
Dockerfile Overview
To run an application in Docker, an image must first be created, which can then be executed as a container.
To build the image, docker refers to the dockerfile which contains the instructions on how to build the image.
Below is a simple example of how a docker file looks
# Use an official Node.js image as the base
FROM node:14

# Set the working directory inside the container
WORKDIR /app

# Copy package.json and package-lock.json files to the container
COPY package*.json ./

# Install dependencies
RUN npm install

# Copy the rest of the application code to the container
COPY . .

# Expose the port the app runs on
EXPOSE 3000

# Command to start the application
CMD ["node", "app.js"]
After placing this file in the root directory, the following command can be executed to build the image.
docker build -t my-node-app .
- docker build will create the image
- -t my-node-app is to provide a tag for the image. In this case, the tag is my-node-app
- . at the end of the command specifies the build context. In this case, docker will use the current directory and all its content to build the image.
Docker image and Container
A docker image is an executable package that contains everything required to run the application.
- A typical example that a docker image would contain
- Application Code
- Runtime like Node.js, Python, etc.
- System tools
- Libraries/Dependencies
- Configuration Files
The docker image is built in terms of layers. Every command in the dockerfile is a layer. These layers are cached and reused, making the images efficient.
Note: The Docker images are Immutable, which means that if you create the Docker image once, you can edit that image, but any change must be made to the new image.
The running instance of the docker image is called Container. The application will be running inside the container.
Here’s a breakdown of the command:
- docker run: Runs the image as a container
- -d: Run the container in detached mode(Runs in background)
- -p 3000:3000: Maps the 3000 port on the machine where the container is running to the 3000 port inside the container.
- –name my-running-app: Assigns the name to the container
- my-node-app: name of the docker image
What is Cypress Docker
Cypress provides docker images with a browser and a Cypress test runner pre-installed.
Running the Cypress tests using the Cypress docker containers ensures that the tests’ execution remains consistent regarding browser, Cypress, and node.js versions.
Cypress provides below images:
- cypress/factory: A base image template which can be used with ARGs to create a custom docker image.
- cypress/base: All operating system dependencies, no Cypress, and no browsers.
- cypress/browsers: All operating system dependencies, no Cypress, and some browsers.
- cypress/included: All operating system dependencies, Cypress, and some browsers installed globally.
Out of these, the most popular and regularly used is Cypress/included ,as it comes with Cypress and has browsers installed.
Benefits of Using Cypress with Docker
Running Cypress in a Docker container ensures a stable, consistent, and scalable testing environment. Here are the key advantages:
- Environment Consistency: Ensures uniform Cypress and browser versions across local and CI/CD environments.
- Easy Setup & Maintenance: Eliminates the need to manually install and update Cypress or browsers on different machines.
- Scalability: Supports parallel test execution, optimizing test performance in large projects.
- CI/CD Integration: Seamlessly integrates with CI/CD pipelines, enabling automated testing in a controlled environment.
- Isolation: Runs tests in isolated containers, preventing conflicts with system dependencies.
- Cross-Platform Compatibility: Works across different operating systems without requiring additional configurations.
By leveraging Cypress with Docker, teams can enhance test reliability, reduce setup efforts, and streamline automation workflows.
Setting up and Running Cypress tests using Cypress Docker
The setting up of docker is straightforward.
- Download the docker desktop from here and install.
- After successful installation, open the docker desktop (This will run the docker daemon)
To run the Cypress tests in docker container, execute the below docker command from the root of your Cypress project
docker run -it -v $PWD:/e2e -w /e2e cypress/included:13.11.0
Note: $PWD works in Linux, macOS, GitBash. For window system replace the $PWD with %cd% (Ex: docker run -it -v %cd%:/e2e -w /e2e cypress/included:13.11.0)
Here’s a breakdown of the command
- docker run: This will start a new docker container(Note that this will look for existing images and if the specified image and version of the cypress is not found then it will download)
- -it: This will run the container in interactive mode and also show the output in real-time in the terminal
- -v $PWD:/e2e: This will mount the current directory on the host machine into the container at /e2e (Note that $PWD is an environment variable which points to current working directory from where the command is executed)
- -w /e2e: This will set the working directory inside the running container to /e2e folder where our tests resides
- cypress/included:13.11.0 : Specifies the type of image you want and its version. This image comes with Cypress pre-installed along with some browsers(Electron).
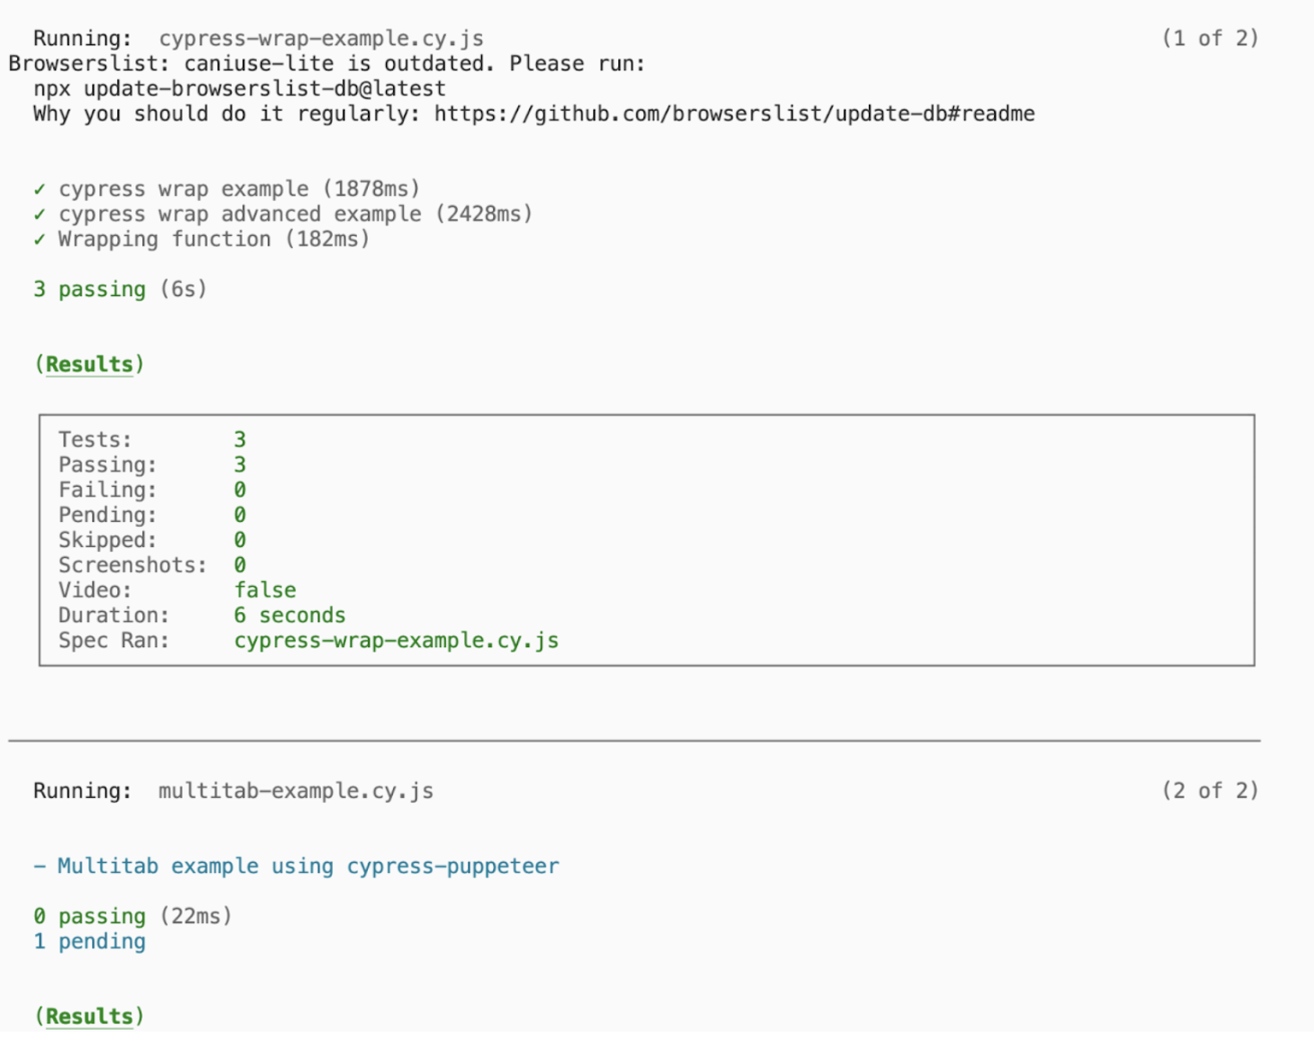
Once you execute the above command, the terminal will look similar to the one below.
Cross Browser Testing with Cypress Docker
Cypress provides different browsers in its image cypress/browser. Using this image, testing can be performed across all supported browsers running inside the container.
Below are the browsers supported in the cypress/browsers image.
- Google Chrome
- Mozilla Firefox
- Microsoft Edge
With cross browser testing the same functionality can be validated across different browsers and ensure the behavior is consistent.
To start with cross browser testing, the below items are required:
- dockerfile
- docker-compose file
- pipeline yaml file
Creating dockerfile
In the root of your cypress project, create a new file and name it as Dockerfile and add the below commands
FROM cypress/browsers:latest

WORKDIR /e2e

COPY ./package.json .
COPY ./cypress.config.ts .
COPY ./cypress ./cypress

RUN npm install &&\
   npx cypress info

ENTRYPOINT ["npx", "cypress", "run"]
Here’s a break down of the commands:
- FROM cypress/browsers:latest: This line specifies the base image and its version that must be used.
- WORKDIR /e2e : Sets the e2e folder as working directory
- COPY ./package.json . : copies the package.json file into the root of working directory
- COPY ./cypress.config.ts . : copies the cypress.config.ts file into the root of working directory
- COPY ./cypress ./cypress : copies the folder cypress into the root of working directory as a folder with same name
- RUN npm install &&\
npx cypress info : Installs the dependencies and then prints the information from cypress(This is helpful to check the cypress version and browser details) - ENTRYPOINT [“npx”, “cypress”, “run”] : This is the default command that will be executed when the container starts
Creating docker-compose file
Create a new file named docker-compose.yml and paste the below command
version: '3.8'

services:
 e2e-chrome:
   build: .
   command: "-b chrome"


  e2e-firefox:
   build: .
   command: "-b firefox -c video=false"
Here’s a break down of the commands
- version: ‘3.8’: This is the docker-compose file version
- e2e-chrome: This is the service name which will use the container to run the cypress tests
- build: This will ensure to use the Dockerfile to build the image for each service
- command : This is to pass the optional commands to the Entry point command specified in the Dockerfile. “-b chrome” is to ensure cypress uses browser chrome to run tests
Another service has been created to test on Firefox using the same command block.
Create github workflow to run the tests across browser in Github
In the root of the project, create a new folder named .github > workflows > crossbrowserTest.yml
Paste the below in the file and save
name: cross browser testing

on:
 push:
   branches:
    - 'main'

jobs:
 cypress-run:
   runs-on: ubuntu-latest
   timeout-minutes: 5

   steps:
     - name: checkout
       uses: actions/checkout@v3

     - name: run docker-compose
       run: docker compose up -d e2e-chrome e2e-firefox

     - name: wait for services to start
       run: docker compose logs -f
Here is a break down of the commands:
name: Specifies the name of the workflow
Below block specifies to trigger this workflow when any code is pushed to main branch
on:
 push:
   branches:
    - 'main'
- cypress-run: This is the job name
- Runs-on: This is to specify in which OS the tests need to be run
- timeout-minutes: Maximum time allowed to complete this job
Below block is a step within the job to check out the code
steps:
     - name: checkout
       uses: actions/checkout@v3
Below block is a step to create the image and run the containers under the services defined in the docker-compose file in parallel
- name: run docker-compose
       run: docker compose up -d e2e-chrome e2e-firefox
Below block is a step to create the image and run the containers under the services defined in the docker-compose file in parallel
- name: run docker-compose
       run: docker compose up -d e2e-chrome e2e-firefox
Below block is to wait for containers to start and then print the logs
- name: wait for services to start
       run: docker compose logs -f
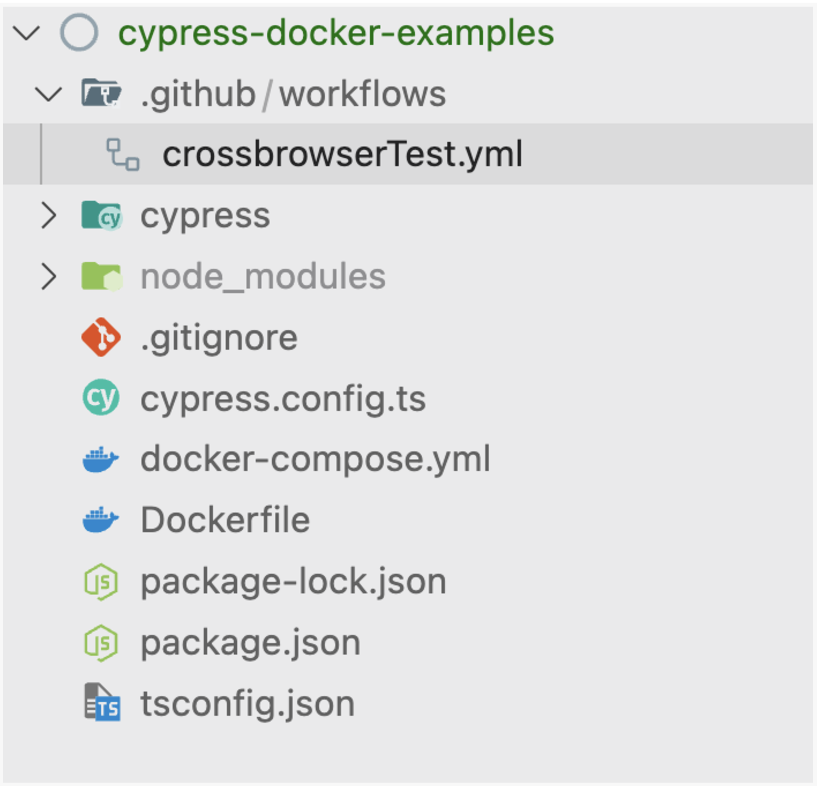
The file structure in the project should look like below
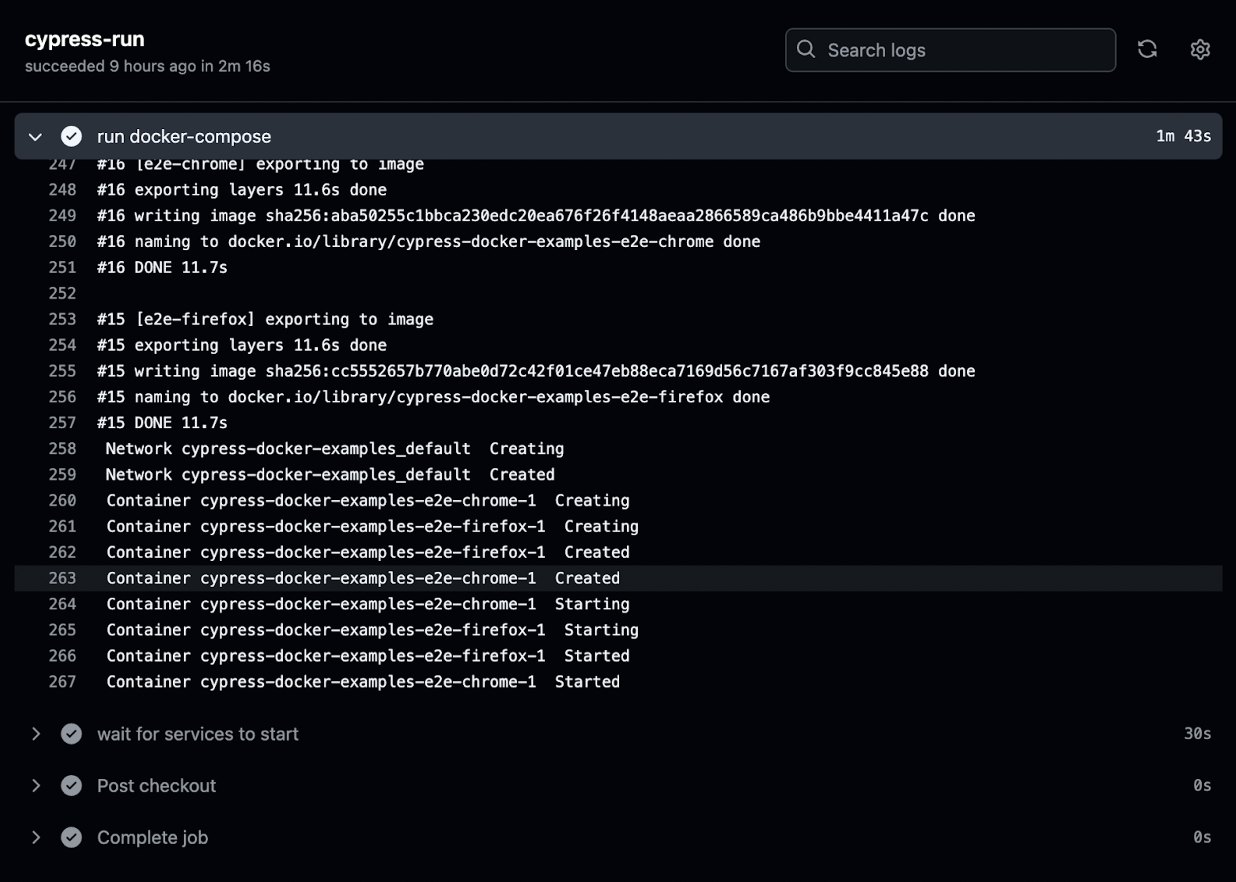
Once this is pushed to github and you navigate to Actions tab, the workflow will look like below
The log can be checked to ensure the services and containers have been created with the specified browser.
Why use BrowserStack Automate for Cypress Tests?
Here’s why you should run your Cypress tests on Real Devices & Browsers using BrowserStack Automate:
- Diverse Environment Testing: It enables the execution of Cypress tests across a broad selection of browsers and operating systems, eliminating the necessity for maintaining local testing infrastructure. This ensures consistent application performance across various platforms.
Read More: Cross-browser testing with Cypress
- Parallel Testing: BrowserStack Automate significantly reduces total testing time by allowing simultaneous execution of multiple Cypress test suites, facilitating quicker iterative feedback and accelerated deployment cycles.
Read More: Run Cypress tests in parallel
- CI/CD Integration: The platform seamlessly integrates with major CI/CD systems, including GitHub Actions, Azure Pipelines, GitLab CI/CD, CircleCI, Jenkins, and Bitbucket, automating the testing process within the development pipeline.
- Diagnostic Tools for Better Debugging: BrowserStack provides comprehensive diagnostic capabilities, including detailed logs, screenshots, and video recordings of test sessions, aiding in the swift identification and resolution of issues.
- Testing on Real Devices: Beyond simulated environments, BrowserStack also supports testing on real devices and browsers on the cloud, offering more precise and real-world test outcomes.
- Customizable Test Execution: Users can tailor test executions to meet specific needs through BrowserStack’s user interface or APIs, enabling adaptable and controlled test runs.
cy.wrap is a versatile and essential command in Cypress that allows you to handle non-Cypress objects, functions, and promises effectively. By wrapping objects or responses, you can seamlessly integrate Cypress’s native assertions and commands into your test scripts, enhancing both flexibility and readability.
Whether dealing with API responses, asynchronous operations, or external functions, mastering cy.wrap can significantly improve your test automation workflow and ensure more reliable results in your testing process.
BrowserStack Automate is an excellent choice for running Cypress tests because it offers a scalable, cloud-based infrastructure that eliminates the need for complex local setups.
BrowserStack supports real-time cross-browser testing, parallel execution, and integrations with CI/CD pipelines, ensuring faster test runs and streamlined workflows.
Top Useful Docker Commands
Here is a list of some of the most useful docker commands:
- docker inspect <container_or_image_name_or_id> : To view detailed information about docker image or Container
- docker stats: To view resource usage of all the running containers
- docker history <image_name_or_id>: To view the history of how the image is built
- docker volume ls: To view all the volumes within the container
- docker-compose down: To stop the running docker compose services
- docker run -it –rm –memory=”512m” –cpus=”1″ my-app : To limit the memory and CPU usage
Useful Resources for Cypress
Understanding Cypress
- Cross Browser Testing with Cypress : Tutorial
- Run Cypress tests in parallel without Dashboard: Tutorial
- Handling Test Failures in Cypress A Comprehensive Guide
- Cypress Test Runner: Tutorial
- Handling Touch and Mouse events using Cypress
- Cypress Automation Tutorial
- CSS Selectors in Cypress
- Performance Testing with Cypress: A detailed Guide
- Cypress Best Practices for Test Automation
- Test React Native Apps with Cypress
- Cypress E2E Angular Testing: Advanced Tutorial
- Cypress Locators : How to find HTML elements
- Maximizing Web Security with Cypress: A Step-by-Step Guide
- Conditional Testing in Cypress: Tutorial
- Cypress Web Testing Framework: Getting Started
- Cypress Disable Test: How to use Skip and Only in Cypress
- What’s new in Cypress 10? How it will change your current testing requirements
Use Cases
- How to Record Cypress Tests? (Detailed Guide)
- How to run your first Visual Test with Cypress
- How to Fill and Submit Forms in Cypress
- How to Automate Localization Testing using Cypress
- How to run Cypress Tests in Chrome and Edge
- How to use Cypress App Actions?
- How to Run Cypress Tests for your Create-React-App Application
- How to Run Cypress Tests in Parallel
- How to handle Click Events in Cypress
- How to Test React using Cypress
- How to Perform Visual Testing for Components in Cypress
- How to run UI tests in Cypress
- How to test redirect with Cypress
- How to Perform Screenshot Testing in Cypress
- How to write Test Case in Cypress: (with testing example)
Tool Comparisons
- Cypress vs WebdriverIO: Key Differences
- Cypress vs Selenium: Key Differences
- Playwright vs Cypress: A Comparison
- Cypress vs Selenium vs Playwright vs Puppeteer: Core Differences
Conclusion
Cypress docker effectively ensures that parameters like node.js, cypress, and browser version are used as needed and remain the same across test execution environments.
Effective pipelines can be built with Cypress Docker to ensure the application behaves consistently across various browsers during cross-browser testing.
