Cypress is a widely-used, modern end-to-end testing framework that provides an easy way to write and run tests for web applications.
While Cypress comes with powerful built-in commands, custom commands can further enhance your testing process by encapsulating repeated actions or complex logic.
Overview
What are Cypress Custom Commands?
- Extend built-in Cypress commands with your own logic.
- Keep test code clean, reusable, and maintainable.
- Defined in cypress/support/commands.js.
Types of Cypress Custom Commands
- Parent → Start a chain (e.g., cy.login()).
- Child → Called on a subject (e.g., .clickButton()).
- Dual → Can work as parent or child depending on usage.
Why Use Cypress Custom Commands ?
- Reusability → Avoid duplication across tests.
- Maintainability → Update once, apply everywhere.
- Readability → Use descriptive names to improve clarity.
- Efficiency → Faster test writing, easier scaling.
How to Create & Use Cypress Custom Commands
- Define with Cypress.Commands.add().
- Add logic in commands.js.
- Call inside tests just like Cypress built-ins.
When Not to Use Cypress Custom Commands
- If the logic is one-off and not reused.
- If a simple helper function would suffice.
- If it adds unnecessary complexity.
This article explores what Cypress custom commands are, how to create and use them effectively, and the benefits they bring to a testing workflow.
What are Cypress Custom Commands?
Cypress custom commands let you extend the built-in command set by adding your own functions. This feature is particularly useful when you reuse specific actions or perform complex operations not covered by default Cypress commands. Custom commands help keep your tests clean and readable, and they simplify updates since changes only need to be made in one place.
Read More: How to Perform Cypress Test Automation
Types of Cypress Custom Commands (Parent vs. Child vs. Dual)
Custom commands in Cypress are divided into three types:
- Parent Commands: Stand-alone commands that start a new command chain, such as cy.login() which handles user login.
- Child Commands: Commands chained off a previous command, such as .click() or .type().
- Dual Commands: Commands that can function as either parent or child commands, depending on their context.
Understanding these types helps you decide how to structure and use your custom commands effectively.
Read More: What is Cypress Test Suite
Examples of Cypress Custom Commands
Parent Command:
javascript
Cypress.Commands.add('login', (username, password) => {

    cy.get('#username').type(username);

    cy.get('#password').type(password);

    cy.get('#submit').click();

});
Child Command:
javascript
Cypress.Commands.add('clickButton', { prevSubject: true }, (subject) => {

    cy.wrap(subject).click();

});
Dual Command:
javascript
Cypress.Commands.add('customAction', { prevSubject: 'optional' }, (subject) => {

    if (subject) {

        cy.wrap(subject).doSomething();

    } else {

        cy.get('body').doSomething();

    }

});Advantages of Cypress Custom Commands
Cypress custom commands simplify and streamline test automation by reducing repetitive code, enhancing readability, and improving test efficiency. Here are the top advantages of Cypress custom commands:
1. Reusability: Custom commands simplify your tests by letting you reuse code for repeated actions, which reduces duplication and helps maintain consistency across tests.
2. Maintainability: Changes to a common action only need to be made in one place. This helps keep your tests more maintainable and prevents issues caused by inconsistencies.
3. Readability: Tests become more simple and readable when custom commands are named to describe what they do, improving the overall readability and clarity of the test suite.
4. Efficiency: By minimizing repeated steps, custom commands speed up the development of new tests and improve overall efficiency.
Read More: Cypress Web Testing Framework
How to set up Cypress to use Custom Commands?
Prerequisites (Configuration/Installations)
To create and use custom commands in Cypress, you need to ensure your development environment is properly configured. Here’s what you need:
- Node.js: Ensure you have Node.js installed. You can download it from nodejs.org.
- Cypress Installation: Install Cypress in your project by running:
bash
npm install cypress --save-dev
- Editor and Tooling: Use a modern code editor like Visual Studio Code to write and manage your Cypress tests. It’s also recommended that Git be used for version control.
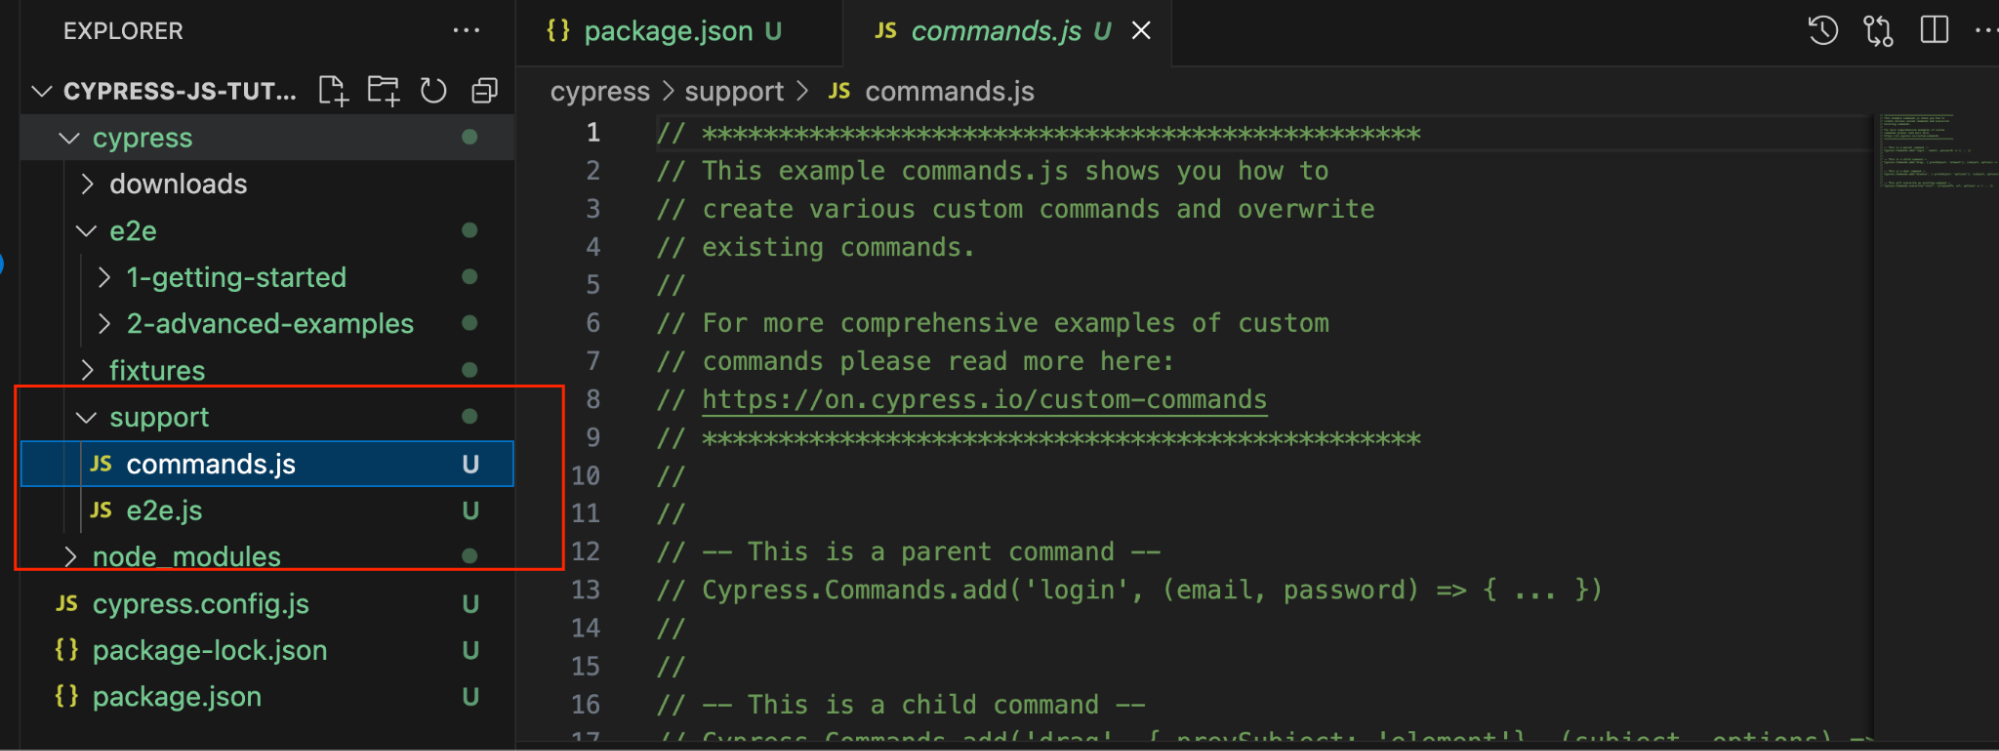
Once Cypress is installed, you’ll see a cypress/support folder, which includes the commands.js file. This is where you can define your custom commands.
You can refer to the guide How to perform Cypress Automation for a detailed instruction on installing and setting up Cypress.
Creating Cypress Custom Commands
1. Basic Structure of a Custom Command
To create a custom command, use the Cypress.Commands.add() function:
javascript
Cypress.Commands.add('commandName', (arg1, arg2) => {

    // Command logic here

});
2. Adding Commands to the commands.js File
Place your custom commands in the cypress/support/commands.js file to ensure they are loaded before any test runs. This allows your custom commands to be available globally across all your test files.
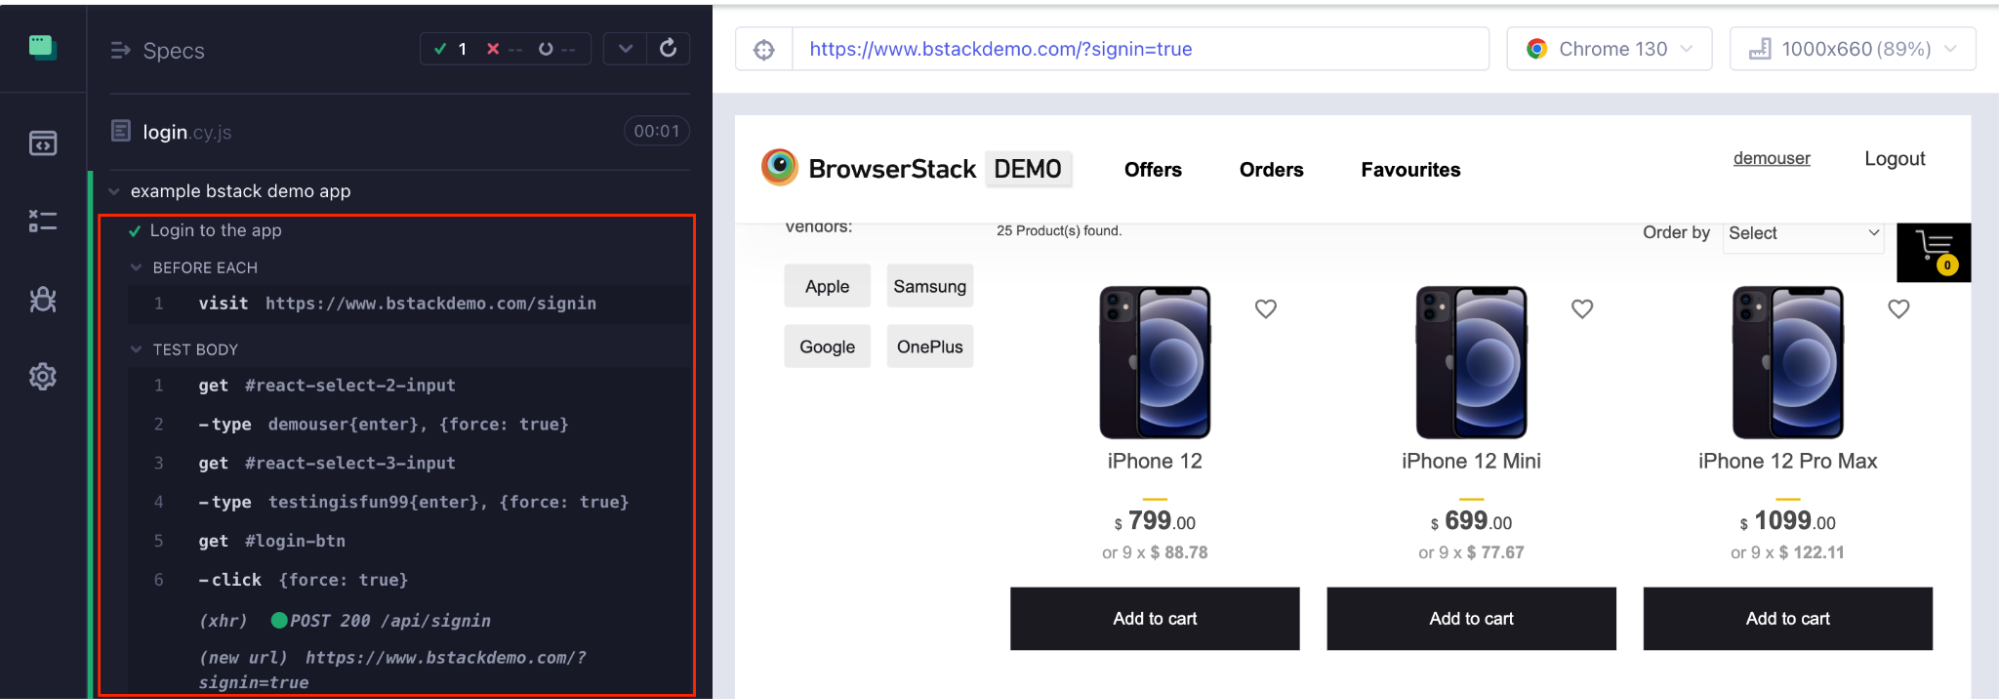
The example below demonstrates a basic login custom command that will enable login on BStackDemo.
Example: Writing Your First Custom Command
javascript
Cypress.Commands.add('login', () => {

    const username = 'demouser'

    const password = 'testingisfun99'

    cy.get('#react-select-2-input').type(`${username}{enter}`, { force: true })

    cy.get('#react-select-3-input').type(`${password}{enter}`, { force: true })

    cy.get('#login-btn').click({ force: true })

 })
Using Custom Commands in Your Tests
Once your custom command is defined in commands.js, you can use it in your test files like this:
javascript
describe('example bstack demo app', () => {

  beforeEach(() => {

    cy.visit('https://www.bstackdemo.com/signin')

  })


  it('Login to the app', () => {

    cy.login()

  })


})
Parameterizing Custom Commands
Parameterizing custom commands in Cypress enhances their flexibility and reusability by allowing dynamic inputs, making tests more efficient and versatile.
Adding Arguments to Custom Commands
Custom commands can accept arguments to make them more dynamic and flexible:
For example , In the previous section our custom command had username and password defined inside it which is not of best practice, let’s take them as arguments to the command.
Example: Custom Command with Parameters
javascript
Cypress.Commands.add('login', (username, password) => {

    cy.get('#react-select-2-input').type(`${username}{enter}`, { force: true })

    cy.get('#react-select-3-input').type(`${password}{enter}`, { force: true })

    cy.get('#login-btn').click({ force: true })


});
You can call this command in your tests like:
javascript
const username = 'demouser'

const password = 'testingisfun99'

cy.login(username, password)
When should Custom Commands not be used in Cypress?
Custom commands should be avoided when:
- They only add complexity without any clear benefit.
- The logic is specific to a single test and does not need to be reused.
- Simple helper functions would suffice for a particular task.
Read More: How to Record Cypress Tests
Best Practices for using Cypress Custom Commands
Implementing these best practices for Cypress custom commands ensures your test automation framework remains efficient, maintainable, and easy to scale.
- Keep Commands Simple: Ensure commands do only what’s necessary for reusability and simplicity.
- Keep Commands Modular: Write commands that perform specific, reusable actions to improve maintainability and scalability.
- Document Your Commands: Add comments to explain the purpose of each command for easy understanding.
- Name Commands Clearly: Use descriptive names so it’s immediately clear what each command does.
- Avoid Overcomplicating: Don’t create a custom command if a simple function would do.
Read More: How to run Cypress in Chrome and Edge
Importance of Testing on Real Devices for Cypress Tests
Testing on real devices helps ensure your web application behaves as expected across various environments. Simulated environments can only go so far; real device testing captures nuances that emulators may miss, such as performance issues, UI bugs, and compatibility problems.
Setting Up & Executing Cypress Tests on BrowserStack Automate
Step 1. Sign Up for BrowserStack: Visit BrowserStack and create an account.
Install BrowserStack CLI: Install the BrowserStack Cypress CLI:
bash
npm install -g browserstack-cypress-cli
Step 2. Configure browserstack.json: Create a configuration file named browserstack.json. You can also use the below command to create a boilerplate config file easily:
bash
browserstack-cypress init
Once the browserstack.json file has been created, update or include the necessary configurations required to execute the Cypress tests.
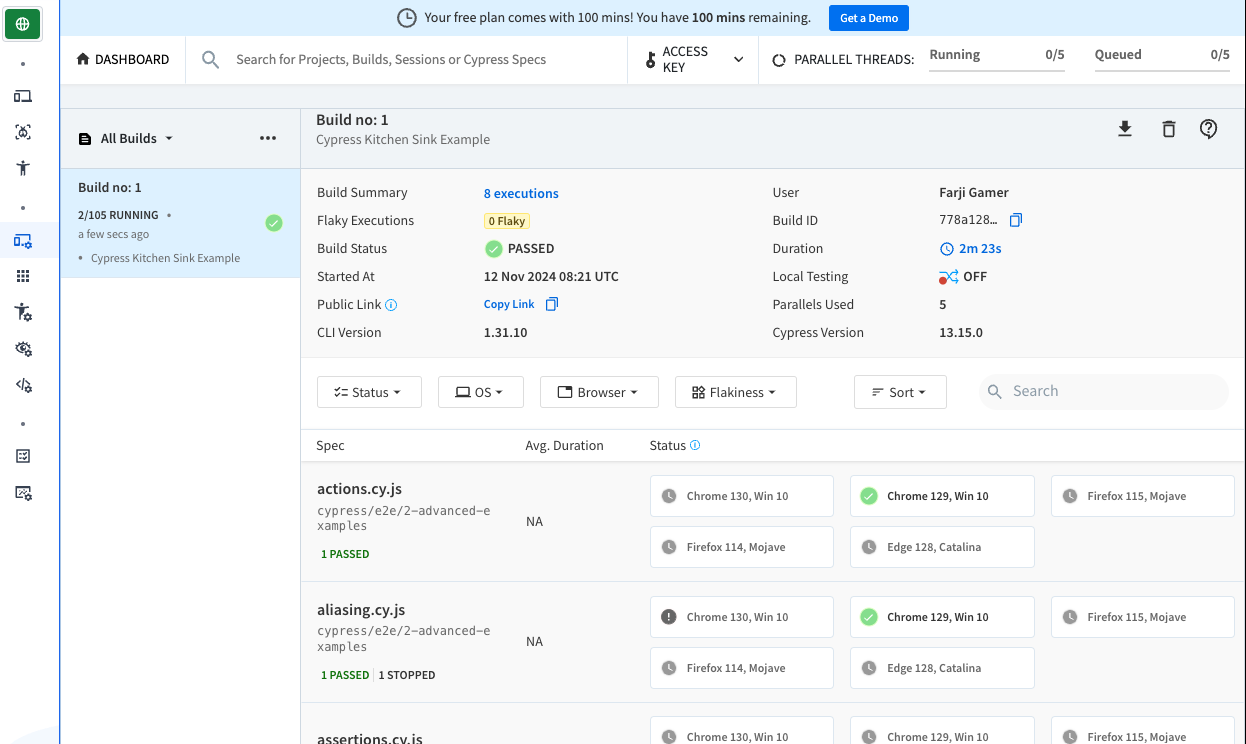
These essential configurations include BrowserStack credentials, the Cypress configuration file, browser and device combinations, and the number of parallel test runs, as demonstrated in the sample code below:
json
{

    "auth": {

      "username": "farjigamer_mHZ0IY",

      "access_key": "c8zy5Cyz8dnykShCSj6c"

    },

    "browsers": [{

        "browser": "chrome",

        "os": "Windows 10",

        "versions": ["latest", "latest - 1"]

      },

      {

        "browser": "firefox",

        "os": "OS X Mojave",

        "versions": ["latest", "latest - 1"]

      },

      {

        "browser": "edge",

        "os": "OS X Catalina",

        "versions": ["latest"]

      }

    ],

    "run_settings": {

      "cypress_config_file": "./cypress.config.js",

      "cypress_version": "13.latest",

      "project_name": "Cypress Kitchen Sink Example",

      "build_name": "Build no: 1",

      "parallels": 5,

    }

  }
Step 3. Run Cypress Tests on BrowserStack:
bash
browserstack-cypress run
Step 4. Monitor Results: Access your test reports, logs, and video recordings in the BrowserStack Automate Dashboard.
Why Choose BrowserStack Automate to Test Cypress Tests?
BrowserStack Automate offers a robust platform for executing Cypress tests, providing several key advantages:
- Automated Cross Browser Testing: Run Cypress tests on different browsers and OS versions, ensuring consistent behavior across platforms.
- Real Device Cloud: BrowserStack provides access to a wide range of real devices, helping identify issues that emulators or simulators might miss.
- Parallel Testing: Run Cypress tests in parallel to reduce execution time and get faster feedback.
- CI/CD Integration: BrowserStack can be seamlessly integrated into popular CI/CD tools like Jenkins, GitHub Actions, and more, automating your testing pipeline and ensuring quick, efficient releases.
Conclusion
Cypress custom commands empower developers to build cleaner, more maintainable test suites by encapsulating repeated actions and complex logic.
BrowserStack Automate lets you run Cypress tests at scale with parallel execution, cross-browser support, and real-time debugging tools. Coupling custom commands with BrowserStack ensures your application delivers a seamless experience across all environments and devices.
