Cypress Automation Tutorial
By Ganesh Hegde, Community Contributor - November 21, 2024
Test automation lets you verify and validate test scenarios via specific tools and frameworks. Cypress is one such open-source framework built on Javascript. It is made for end-to-end testing and facilitates the automation of web application testing.
This article explores Cypress automation in detail. It discusses setting up Cypress for automation, running automated tests, and more.
- What is Cypress Framework?
- Why use Cypress For Automation Testing
- The Working of Cypress Test Execution
- Cypress Installation Guide
- How to Set up Cypress for Automation
- Understanding Folder Structures in Cypress
- Writing your First Test Case for Cypress Automation
- Running First Automated Test with Cypress
- How to Run The Test Cases Locally
- Best Practices for Cypress Automation
- Tips for Efficient Cypress Automation Testing
- How to execute Cypress Test Automation Using BrowserStack
- Why use BrowserStack for Cypress Test Automation
- Useful Resources for Cypress
- Frequently Asked Questions
What is Cypress Framework?
Cypress framework is a NodeJS-based modern automation tool that supports JavaScript/Typescript as the programing language. There are many advantages and disadvantages of Cypress. However, despite its recency, it is the most popular and easy-to-use tool in the automation world, quickly becoming a favorite of devs and testers.
Why use Cypress For Automation Testing
Cypress is one of the most preferred frameworks for automation testing due to the following reasons:
- Cross-browser Testing: Cypress enables users to run their tests on multiple browsers concurrently as it supports cross-browser testing.
- Easy setup: Cypress can be easily included in new and current projects as it has a simple installation process that requires no extra dependencies.
- Integrations: It integrates seamlessly with popular Continuous Integration (CI) tools like Jenkins and cloud-based testing platforms like BrowserStack.
Read More: Devops CI: Continuous Integration in DevOps
- Automatic Waiting: Cypress automatically waits for the elements to show up on the page before executing any actions or assertions. As it smartly manages asynchronous actions, it eliminates the need for explicit waits or sleep statements.
- Real-time Reloads: Cypress accelerates the debugging process by automatically reloading the test runner as and when you modify your test files or application code.
- Time Travel: Cypress lets you travel forward and backward in time during test execution. Capture snapshots at various points in your test and manipulate the application’s state to debug failures.
- Flake Detection: Cypress lets you Identify and analyze unreliable tests with its flaky test management feature.
Read More: How to manage Cypress Flaky Tests?
- Interactive Test Runner: Cypress’s intuitive test runner interface displays the application being tested in real-time, letting you interact with it, analyze its elements, and view the assertions and command logs.
- Debugging Capability: Cypress’s built-in debugging tools let you pause test execution at any point and inspect the application state. For advanced debugging, leverage your browser’s developer tools along with Cypress.
Read More: How to start with Cypress Debugging?
- Network and XHR Control: Stub or mock network requests, change responses, and test different scenarios without having to make actual HTTP calls. Cypress gives total control over the network and XHR requests.
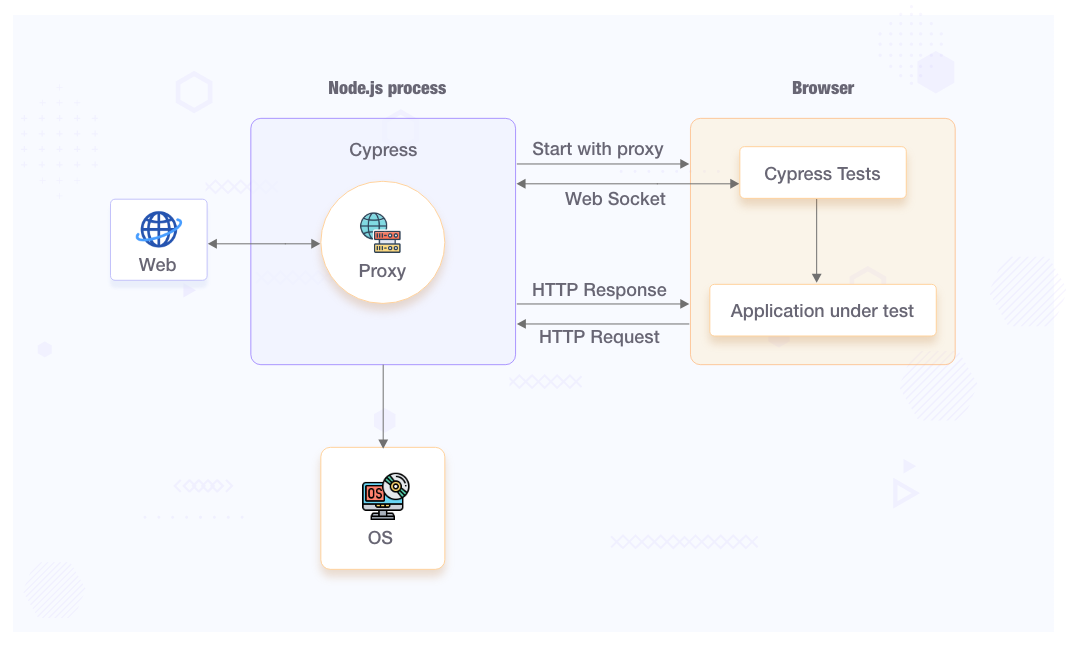
The Working of Cypress Test Execution
Here’s how Cypress Test Execution works:
- Once the user interacts with an app, the Cypress test scripts send commands to Cypress Runner.
- Cypress Runner then communicates with the proxy server, which sends requests to the application server.
- The application server processes these requests and returns the responses.
- Cypress Runner takes snapshots and videos during this test.
- Finally, the testers inspect the test results to verify the proper functioning of the application.
Cypress Installation Guide
Prerequisites:
- Install Visual Studio Code IDE [You can use any IDE]
- Install NodeJS
Here is the detailed installation guide for Cypress.
How to Set up Cypress for Automation
Cypress is shipped as an NPM package, so install the npm package from the repository and configure it to use Cypress.
Step 1: Navigate to the desired folder. Create New Folder (cypressdemo).
Step 2: Inside the cypressdemo folder, open terminal or command prompt.
Step 3: Enter the command: npm install cypress –save-dev
Step 4: Once the installation is complete, enter the command: npx cypress open
The npx cypress open command prepares Cypress for the first time and launches the Cypress test runners where you can see example tests and play around with them.
Understanding Folder Structures in Cypress
By default, Cypress comes with a folder structure. The main folder is cypress, within which there are subfolders.
- Integration: This folder contains the actual test scripts.
- Fixtures: If you are using external data inside your tests, your data can be organized inside the Fixtures folder.
- Plugins: The Plugins folder contains the special files that can execute the code before the project loads. If your project needs pre-processors, include them in this folder and configure them accordingly. By default, the plugins folder contains the index.js file, which can be customized to create your tasks.
- Support: The Support folder contains utilities, global commands, frequently used codes, etc. By default, this folder comes with two files – commands.js and index.js. Additional files and folders can be added as required.
- Assets: A folder called downloads will be created after the test run, including screenshots, videos, etc.
Writing your First Test Case for Cypress Automation
The cypressdemo folder contains
- node_modules folder
- cypress folder
- cypress.json file
- package.json file
- package-lock.json file.
To create your tests, navigate to cypress/integration and create a fresh new folder (eg: demo).
Inside the demo folder, create the test file (ex: firsttest.js) using the code below:
//firsttest.js

describe('My First Test', () => {

    it('Launch Browser and Navigate', () => {

        cy.visit('https://www.browserstack.com/');

        cy.title().should('eq', 'Most Reliable App & Cross Browser Testing Platform | BrowserStack')

    })

  })
Running First Automated Test with Cypress
BrowserStack allows you to run Cypress tests on the latest browsers. Get 30+ versions across Windows and macOS, with more to come. You can also run hundreds of Cypress tests in parallel without maintaining countless Docker images. It takes a few easy steps to start running Cypress tests on BrowserStack.
Run Cypress Tests on Real Browsers
Cypress Tests can be executed in two ways:
- Using Cypress Runner (UI)
- Using Cypress CLI (Command Line)
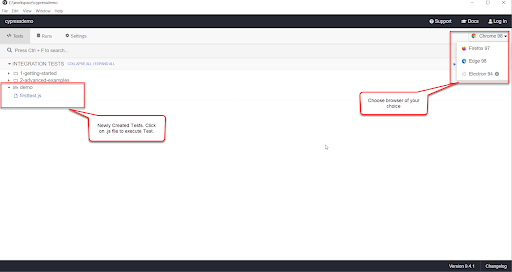
1. Execute Cypress Tests Using Cypress Test Runner
From your Visual Studio Code Terminal or Command-Line, run the command st the project folder level (cypressdemo).
npx cypress openThe command above opens the Cypress Test Runner. Choose the newly created test file.
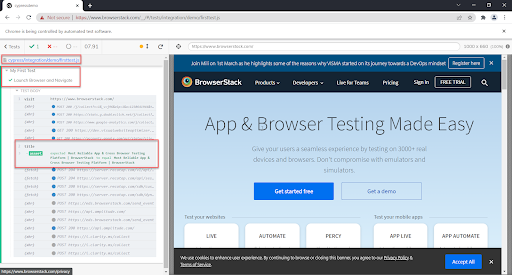
Click on the firsttest.js file under the demo folder to execute tests.
Test Result
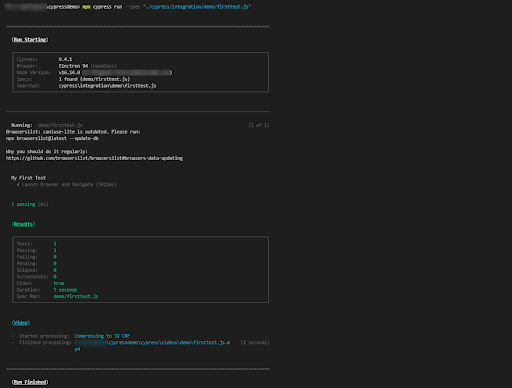
2. Running Cypress Tests Using Command Line
Syntax:
npx cypress run [--spec <path_to_spec_file]
Run firsttest.js using the command below:
npx cypress run --spec "./cypress/integration/demo/firsttest.js"
The command above executes tests in headless mode, so you will not see any browser launches or execution of tests, all of which happens in the background.
Cypress CLI Execution Result
Cypress Command Line Report
How to Run The Test Cases Locally
You can use Cypress commands in your terminal to execute the test cases locally. Cypress offers the provision to run tests in headed and headless modes.
Headed Mode
When it’s the headed mode, you can perform your tests in a visible browser window and see the execution process in real time.
To run your Cypress tests in headed mode, you can use the cypress open command to launch the Cypress Test Runner to select and run different tests in an interactive manner.
npx cypress openHeadless Mode
In headless mode, you perform tests in the background without having to open a visible browser. The headless execution is usually done in Continuous Integration environments. You can use the cypress run command to run all tests without opening a browser window.
npx cypress runBest Practices for Cypress Automation
- Create Independent Tests: Isolate the tests as much as possible. Don’t create tests dependent on each other.
- Authenticate applications programmatically: Authentication or Logging into your application should be handled programmatically (Example: Using API calls), reducing testing dependency.
- data-* attributes: Adding attributes to UI elements such as data-test, data-testid, or data-cy increases application testability and reduces dependency on selectors making the test stable.
- Utilize Cypress Architecture for easy and stable tests.
//Avoid

const myBtn = cy.contains('button', 'Click Me')

myBtn.click()

//Use

cy.contains('button', 'Click Me').as('myBtn')

cy.get('@myBtn').click()
5. Avoid using the after and afterEach hooks: There are chances that code inside the after and afterEach hooks may not execute as expected. In that case, Cypress may halt test execution and not execute remaining tests.
6. Avoid using cy.wait(): cy.wait() may slow down your test execution. Instead, rely on default wait mechanisms.
cy.intercept(...).as('req')

...

cy.wait('@req')
7. Do not start your web server using cy.task() or cy.exec(): Before test execution starts ensure your application is up and running.
8. cypress.json is a cypress configuration file. Set the correct baseURL inside the configuration file and/or create multiple configuration files as per the environment. You can also use the environment variable to execute tests as per the required environment.
Tips for Efficient Cypress Automation Testing
1. Use cypress.json file to configure baseUrl, browser type, etc.
2. Cypress captures videos and screenshots for tests which can be disabled using cypress.json entries.
"video": false,

"screenshotOnRunFailure":false
3. Create Shortcut command for executing your tests. Add entries to package.json scripts.
Example:
"scripts": {"test" : "cypress run --spec './cypress/integration/demo/firsttest.js'"},
4. You can override the default timeout settings as per requirements.
5. In the Cypress Test Runner UI, navigate to Settings, to view all configurations.
How to execute Cypress Test Automation Using BrowserStack
Step 1: Install BrowserStack CLI using npm install -g BrowserStack-cypress-cli
Step 2: Configure Browserstack CLI using npx browserstack-cypress init
Step 3: The command above creates browserstack.json in your Project Directory. Enter the fields:
- auth – specify your username and access key. Learn about different auth options.
- browsers – change the list of browsers and OS if you want to
- run_settings – specify the cypress_config_file, parallels, npm_dependencies, and any other options that you want to change
Step 4: Run Your Cypress Tests on BrowserStack using npx browserstack-cypress run –sync
Use BrowserStack’s real browsers to ensure that all tests return 100% accurate results, even when executing multiple tests simultaneously. Don’t limit your tests to the various inadequacies of emulators and simulators; only rely on the real deal to create customer-ready, meticulously optimized web applications.
Why use BrowserStack for Cypress Test Automation
Here’s why you should use BrowserStack for Cypress test automation:
- Cross-browser testing: Cypress runs on limited browsers, mainly Chrome-based ones. BrowserStack helps you expand your Cypress tests to many other browsers, such as Safari, Edge, IE, and more.
- Cloud Infrastructure: BrowserStack is a cloud-based platform that doesn’t require you to set up or maintain browsers or physical devices locally.
- Parallel Testing: With parallel testing, you can run multiple Cypress tests concurrently and speed up test execution and eventually the release cycles.
- Real-device testing: BrowserStack offers you a vast real-device cloud, letting you run Cypress tests on 3500+ real device, browser, and OS combinations, thus allowing you to test under real user conditions.
- Integrations: BrowserStack offers seamless integrations with several CI/CD tools like Jenkins, Travis CI, Circle CI, Bamboo and more.
- Scalability: By supporting real-device and parallel testing on a cloud-based infrastructure, BrowserStack lets you run hundreds of Cypress tests across different environments.
Useful Resources for Cypress
Understanding Cypress
- Cross Browser Testing with Cypress : Tutorial
- Run Cypress tests in parallel without Dashboard: Tutorial
- Handling Test Failures in Cypress A Comprehensive Guide
- Cypress Test Runner: Tutorial
- Handling Touch and Mouse events using Cypress
- Cypress Automation Tutorial
- CSS Selectors in Cypress
- Performance Testing with Cypress: A detailed Guide
- Cypress Best Practices for Test Automation
- Test React Native Apps with Cypress
- Cypress E2E Angular Testing: Advanced Tutorial
- Cypress Locators : How to find HTML elements
- Maximizing Web Security with Cypress: A Step-by-Step Guide
- Conditional Testing in Cypress: Tutorial
- Cypress Web Testing Framework: Getting Started
- Cypress Disable Test: How to use Skip and Only in Cypress
- What’s new in Cypress 10? How it will change your current testing requirements
Use Cases
- How to Record Cypress Tests? (Detailed Guide)
- How to run your first Visual Test with Cypress
- How to Fill and Submit Forms in Cypress
- How to Automate Localization Testing using Cypress
- How to run Cypress Tests in Chrome and Edge
- How to use Cypress App Actions?
- How to Run Cypress Tests for your Create-React-App Application
- How to Run Cypress Tests in Parallel
- How to handle Click Events in Cypress
- How to Test React using Cypress
- How to Perform Visual Testing for Components in Cypress
- How to run UI tests in Cypress
- How to test redirect with Cypress
- How to Perform Screenshot Testing in Cypress
- How to write Test Case in Cypress: (with testing example)
Tool Comparisons
- Cypress vs WebdriverIO: Key Differences
- Cypress vs Selenium: Key Differences
- Playwright vs Cypress: A Comparison
- Cypress vs Selenium vs Playwright vs Puppeteer: Core Differences
Run Cypress Tests on Real Browsers
Conclusion
Understanding Cypress can significantly enhance your automation testing. Thanks to its user-friendly interface and robust features, you can write, run, and debug tests seamlessly to validate the functioning of your apps.
To further enhance your automation testing on Cypress, you can run it on BrowserStack. The platform, with its vast real device cloud, lets you access 3500+ real device-browser combinations in real user conditions.
Frequently Asked Questions
1. Why is Test Automation Important
Test automation is important for the following reasons:
- Helps implement modern DevOps principles by injecting speed into the development pipeline.
- It reduces human error since machines do not make mistakes if they have the right input.
- Provides faster results.
- Allows for multiple tests to be run simultaneously through parallel testing.
Read More: Automation Testing Tutorial: Getting Started
