How to Change User Agent in Chrome: An Essential Guide
By Technocrat, Community Contributor - October 24, 2024
User agents are information labels that help websites customize their content and functionalities based on a user device’s capabilities.
It is essential to change user agents during testing to verify whether the browser user agent is correctly passing information about the user’s details to the server (that serves the web pages).
This will help in
- Ensuring cross-browser compatibility
- Verifying responsive design
- Understanding content adaptation
- Identifying security vulnerabilities
- Simulating real-world interactions
Overall, it enhances application efficiency and improves user experience across different platforms.
Therefore, learning how to change user agents in Chrome is essential. Dive in.
- What is a User-Agent?
- When and Why to Change User Agent in Chrome
- How to Change User Agent in Chrome
- Method 1: Changing User Agent via Network Conditions Panel
- Method 2: Change User Agent in Chrome with User-Agent Switcher and Manager
- Method 3: Change User Agent in Chrome using BrowserStack Live
What is a User-Agent?
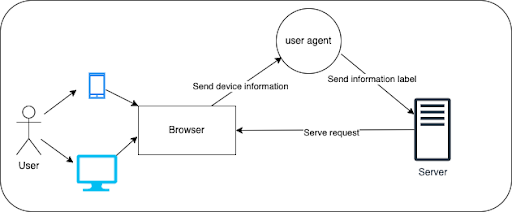
User agents are information labels that browsers send to websites. They provide information about the browser, operating system, and device used. This helps websites deliver the right content for the user’s specific setup, ensuring a better browsing experience.
The popular browsers, Chrome, Safari, and Firefox include the option to change user agents for testing browser behavior. When you change user agents, you are not altering the default behavior of the browser, but only varying information label content that the browser sends to the server varies accordingly.
The following image shows the flow of a request when a user tries to visit a website through their device.
When and Why to Change User Agent in Chrome
Though ideally, user agent testing should be scoped in as part of your testing strategy, consider the following reasons why you should change user agents:
- Cross-browser compatibility testing: By changing the user agent, you can test how your web application behaves across various browsers, ensuring a consistent user experience.
- Responsive design testing: Use a mobile user agent to test your website’s appearance and functionality on different devices without needing physical hardware.
- Bypass restrictions: Some websites restrict access based on the user agent. Changing it can help you bypass these restrictions and access content that would be unavailable otherwise.
- Simulate user behavior: By changing the user agent, you can simulate how users on different devices or browsers interact with your site, helping you identify potential issues and improve user experience.
- Isolate Browser-Specific Problems: If a feature isn’t working in a particular browser, changing the user agent can help identify if the issue is specific to that browser.
Read more: Chrome vs Chromium: Core Differences
How to Change User Agent in Chrome
You can change user agents in Chrome using one of the following methods:
- Network Conditions option
- User-Agent Switcher and Manager
- BrowserStack Live
Method 1: Changing User Agent via Network Conditions Panel
The Chrome developer tools provide Network Conditions options, which let you manage user agents and simulate different device and browser combinations.
To change user agent using the Network Conditions panel in Chrome Developer tools, do the following:
Step 1. Right-click on the webpage and click Inspect.
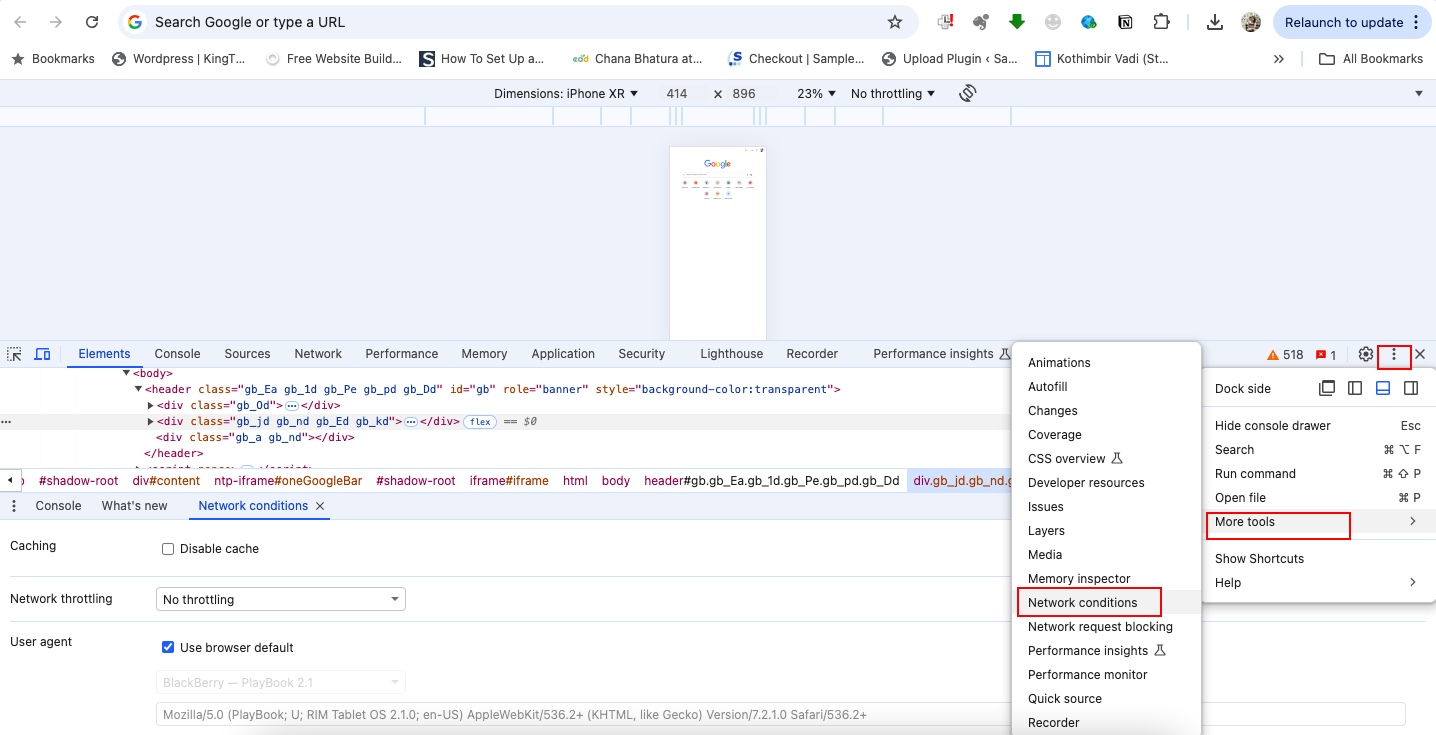
Step 2. Select the three vertical dots in the top-right corner of the Developer Tools window, go to More Tools, and select Network conditions.
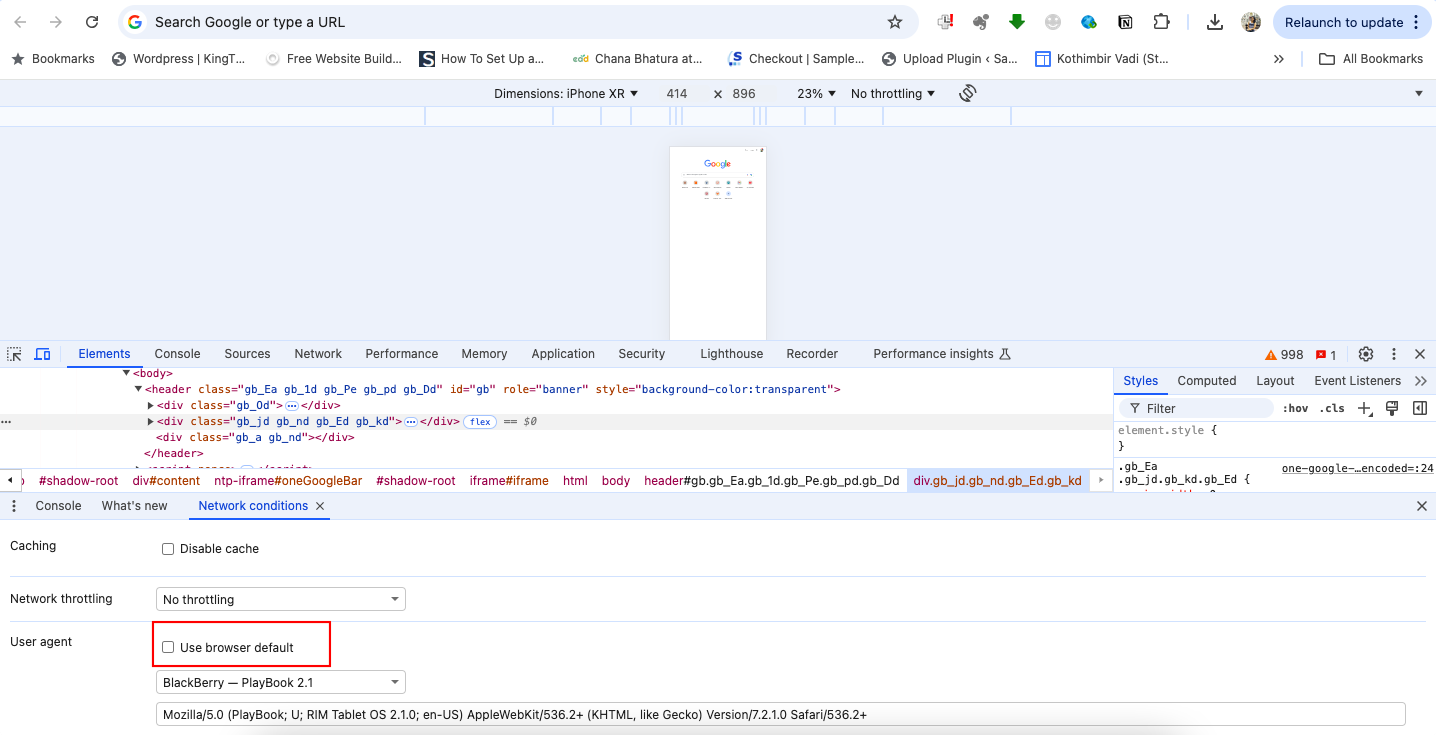
Step 3. In the User Agent section, uncheck the Use Browser Default option.
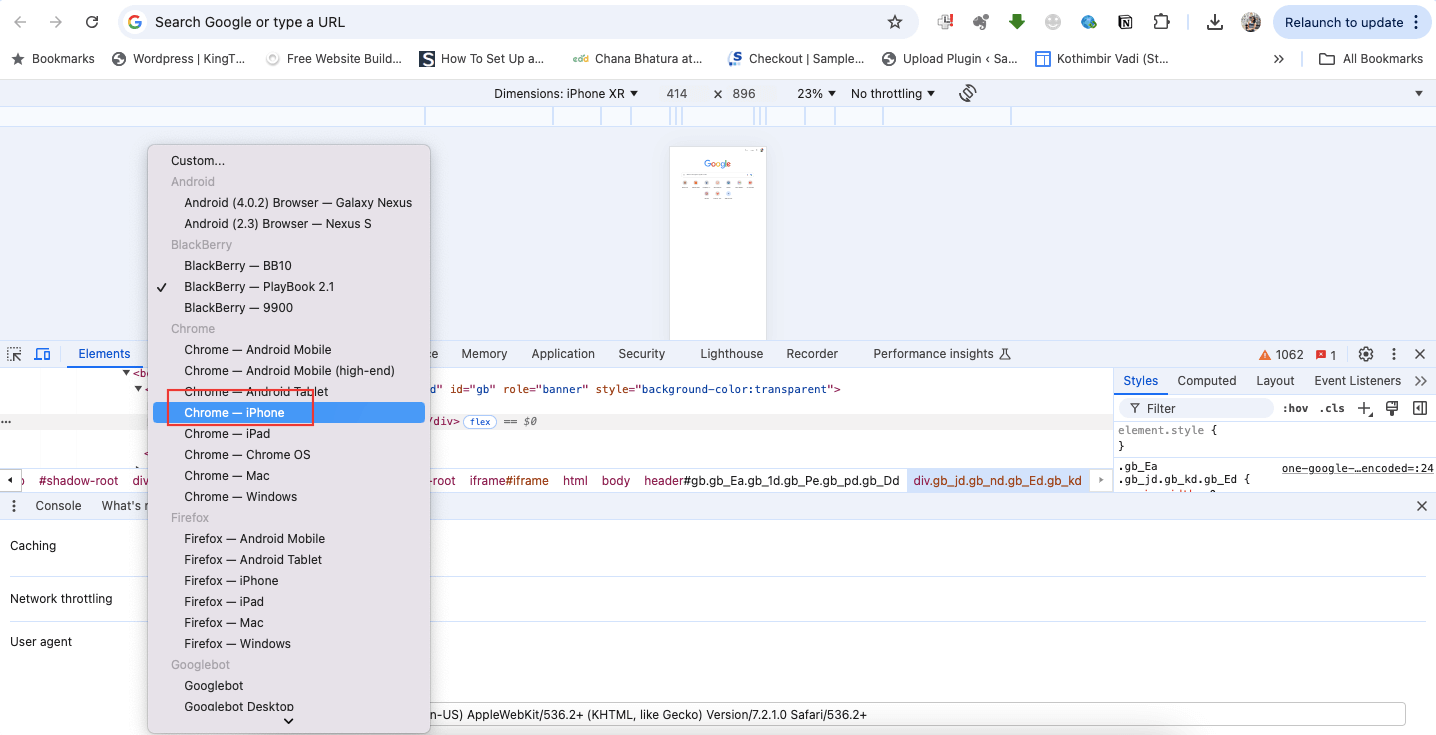
Step 4. Choose a user agent from the predefined list or enter a custom user agent string.
Step 5. After changing the user agent, refresh the page to see how the website responds.
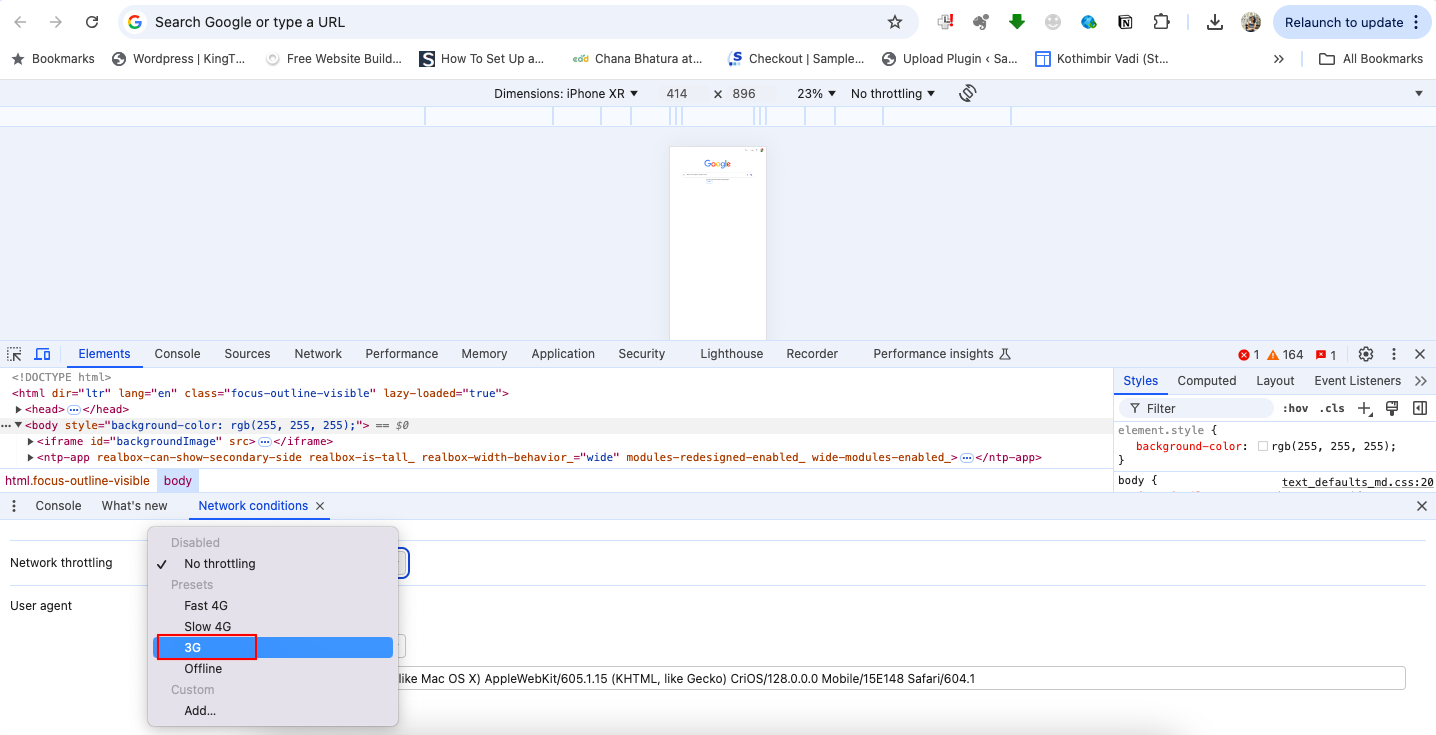
Step 6. In the Network Conditions tab, under Network Throttling, select 3G.
Step 7. Refresh the page and observe the speed at which the page loads.
Method 2: Change User Agent in Chrome with User-Agent Switcher and Manager
User-agent switcher is an extension that can be downloaded in your Chrome browser. The user agent manager is more nuanced and offers advanced options such as creating profiles apart from letting you switch user agents quickly.
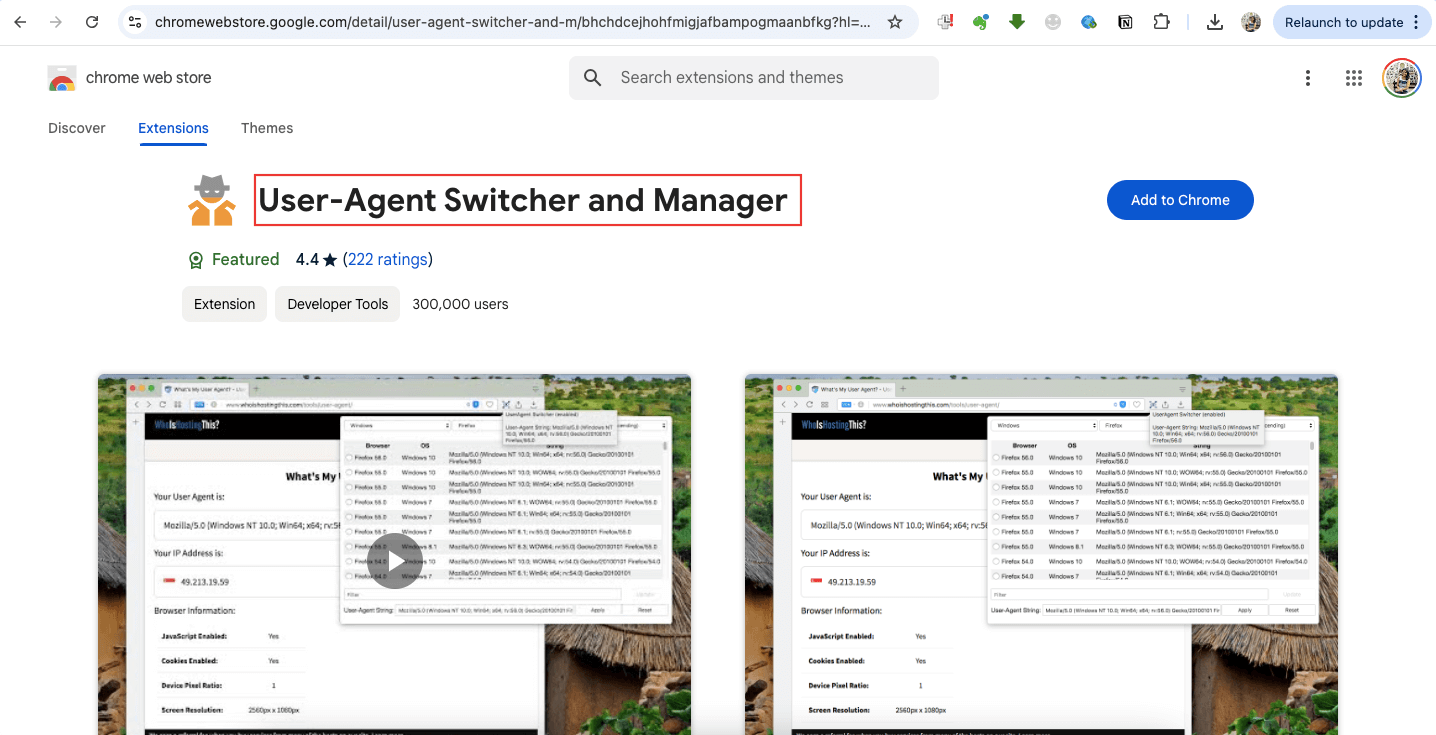
Step 1. Install the User-Agent Switcher and Manager app in your browser.
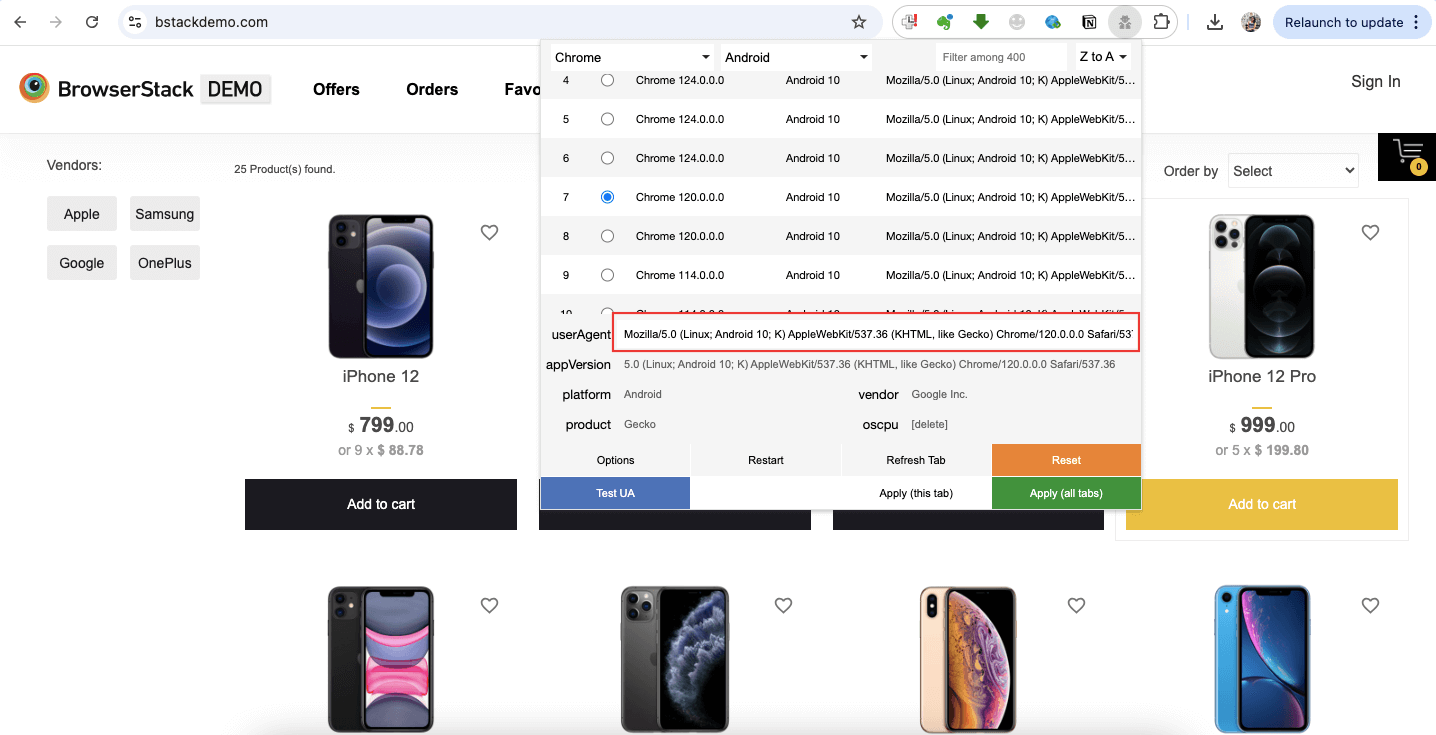
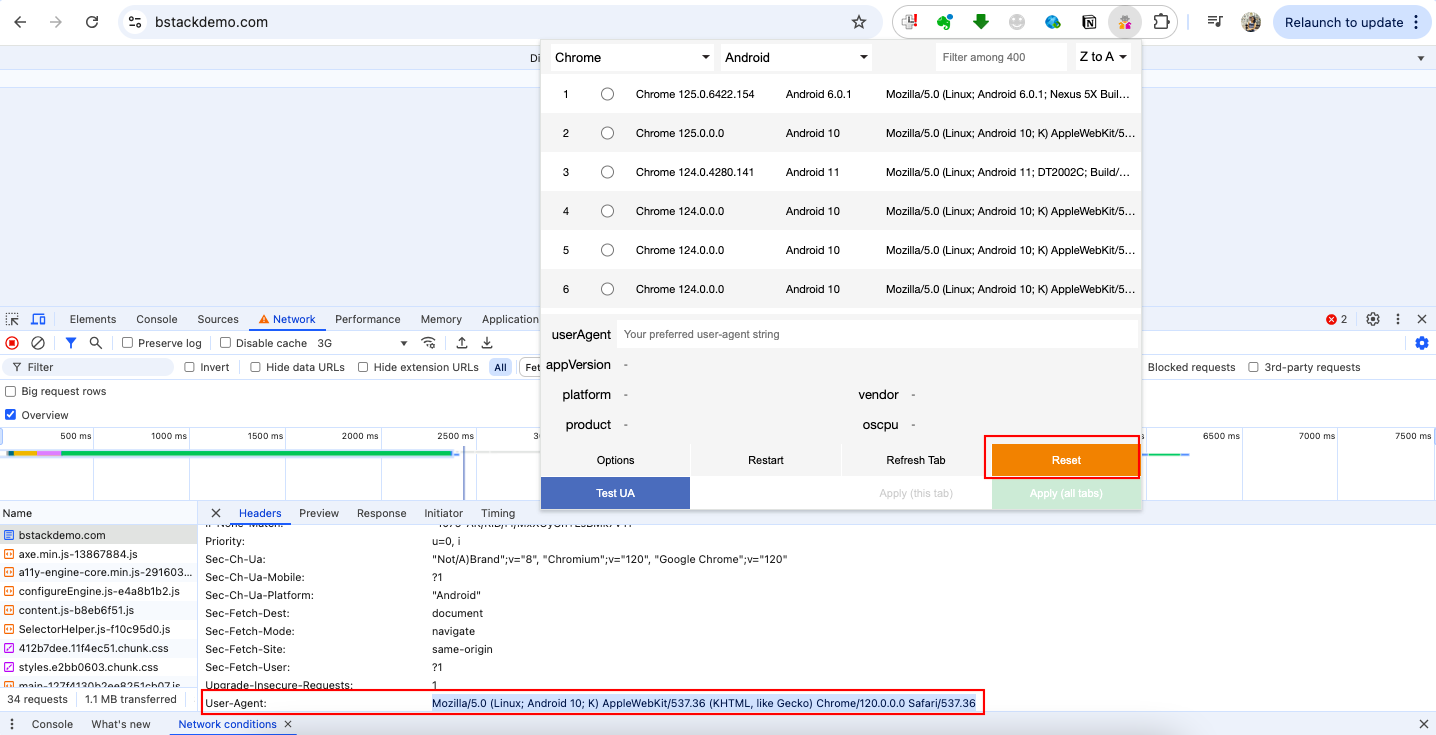
Step 2. Click the extension icon on your address bar to open the menu.
Step 3. Select the browser, device, and then select a user agent. The following user agent is applied.
Mozilla/5.0 (Linux; Android 10; K) AppleWebKit/537.36 (KHTML, like Gecko) Chrome/120.0.0.0 Safari/537.36
Step 4. Click Apply (this tab) or Apply(all tabs) to apply the user agent.
Step 5. Open bstackdemo.com in the browser.
Step 6. Right-click on the webpage and click Inspect.
Step 7. Click the three vertical dots in the top-right corner of the Developer Tools window.
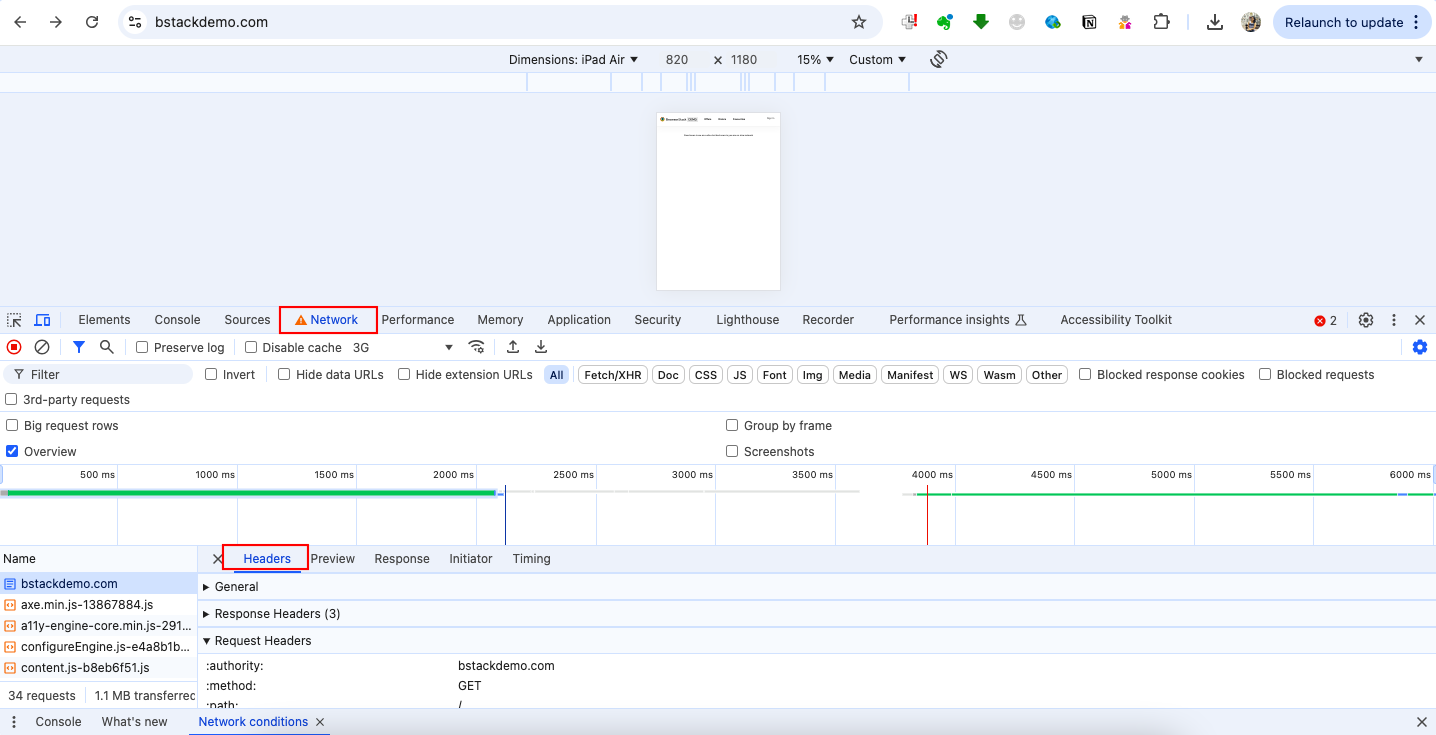
Step 8. Click the Network, and refresh the page to generate request headers.
Step 9. Select the first header request.
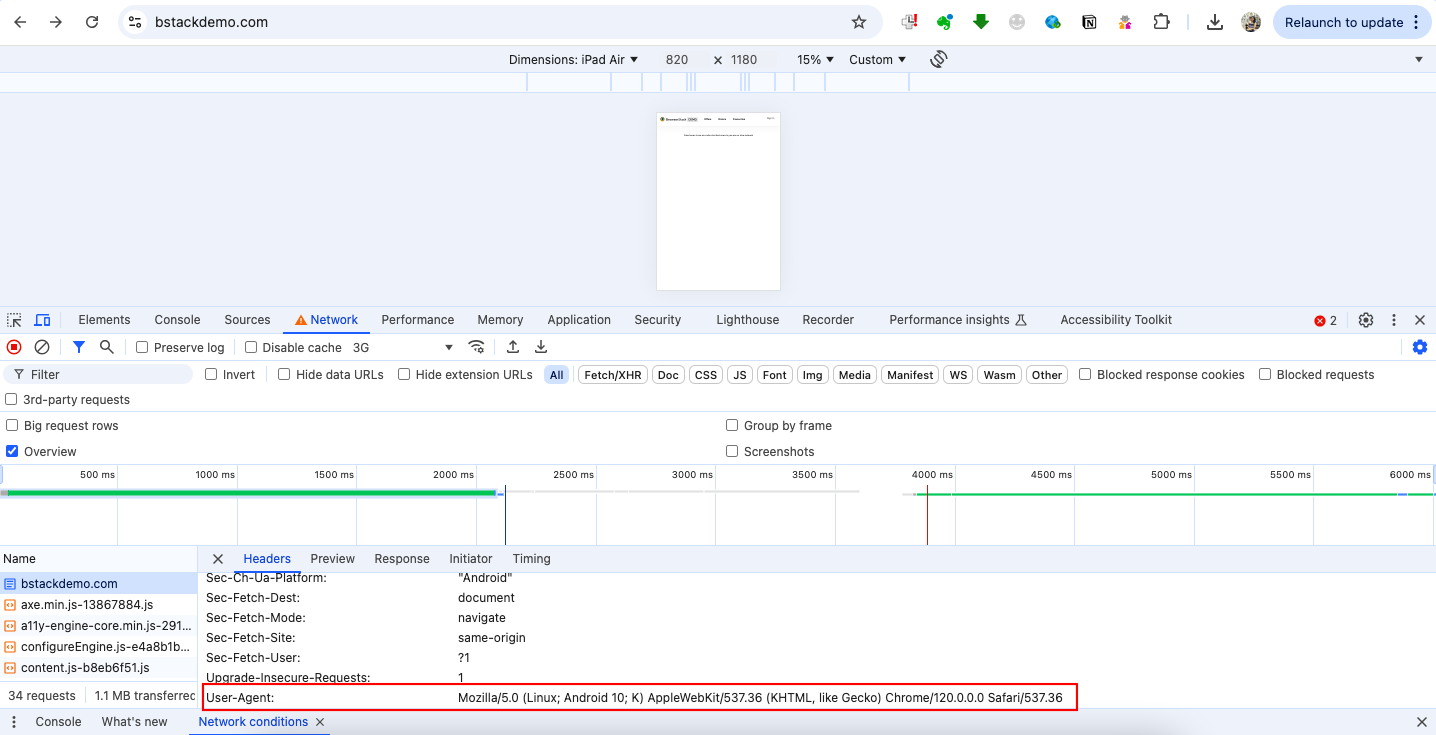
Step 10. Click the Header tab, expand the Request Headers, and look for the User-Agent field. It should also show the same agent that you selected earlier in the extension.
Mozilla/5.0 (Linux; Android 10; K) AppleWebKit/537.36 (KHTML, like Gecko) Chrome/120.0.0.0 Safari/537.36
Method 3: Change User Agent in Chrome using BrowserStack Live
BrowserStack Live gives you access to a real device cloud of 3500+ devices and browser combinations that you can use to test your user behaviors.
Unlike the User-Agent Switcher and Manager extension, which includes simulators, the key benefit here is the real devices that you get to test.
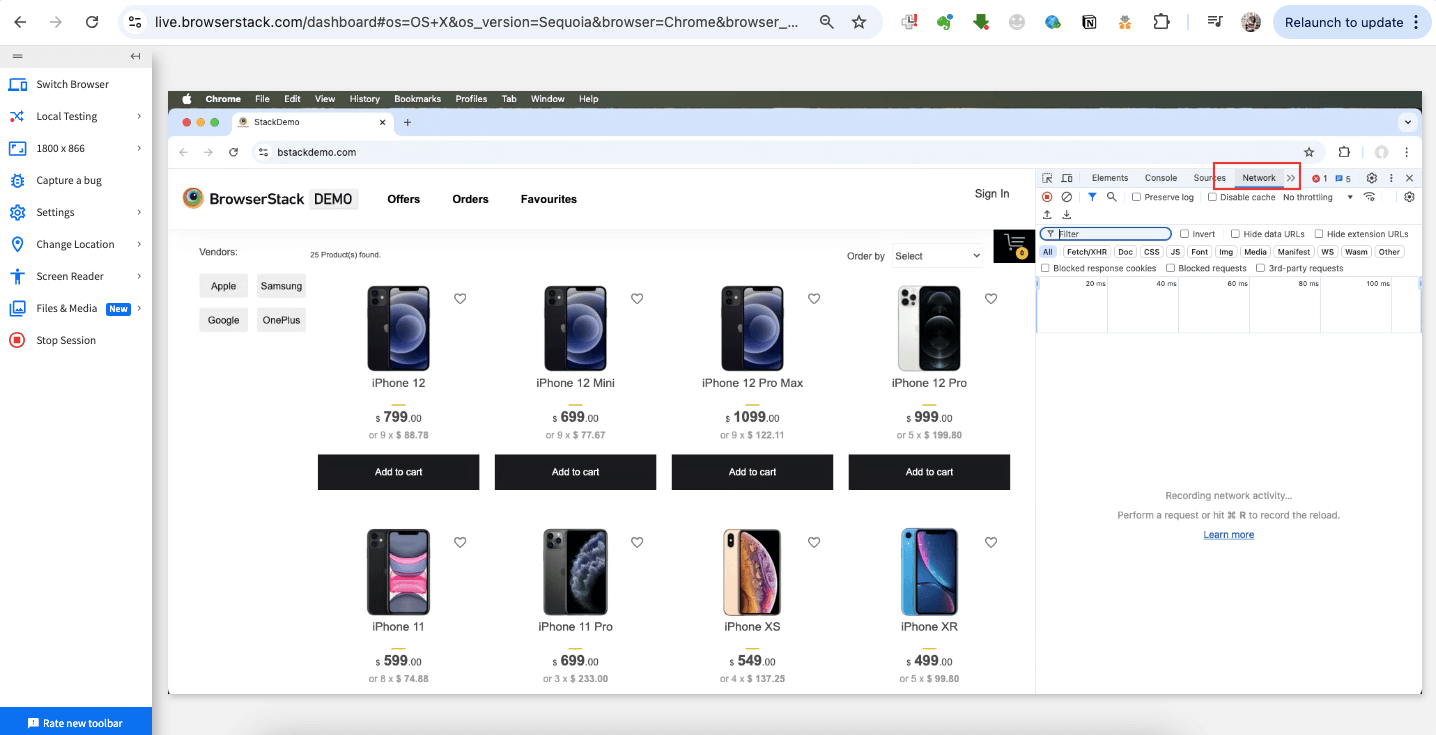
Step 1. Sign Up on BrowserStack. An operating system and browser selection menu are displayed.
Step 2. You can either directly view your website on different devices, such as Safari on iPhone 15, iPhone 15 Pro, etc, or you can view your website on macOS.
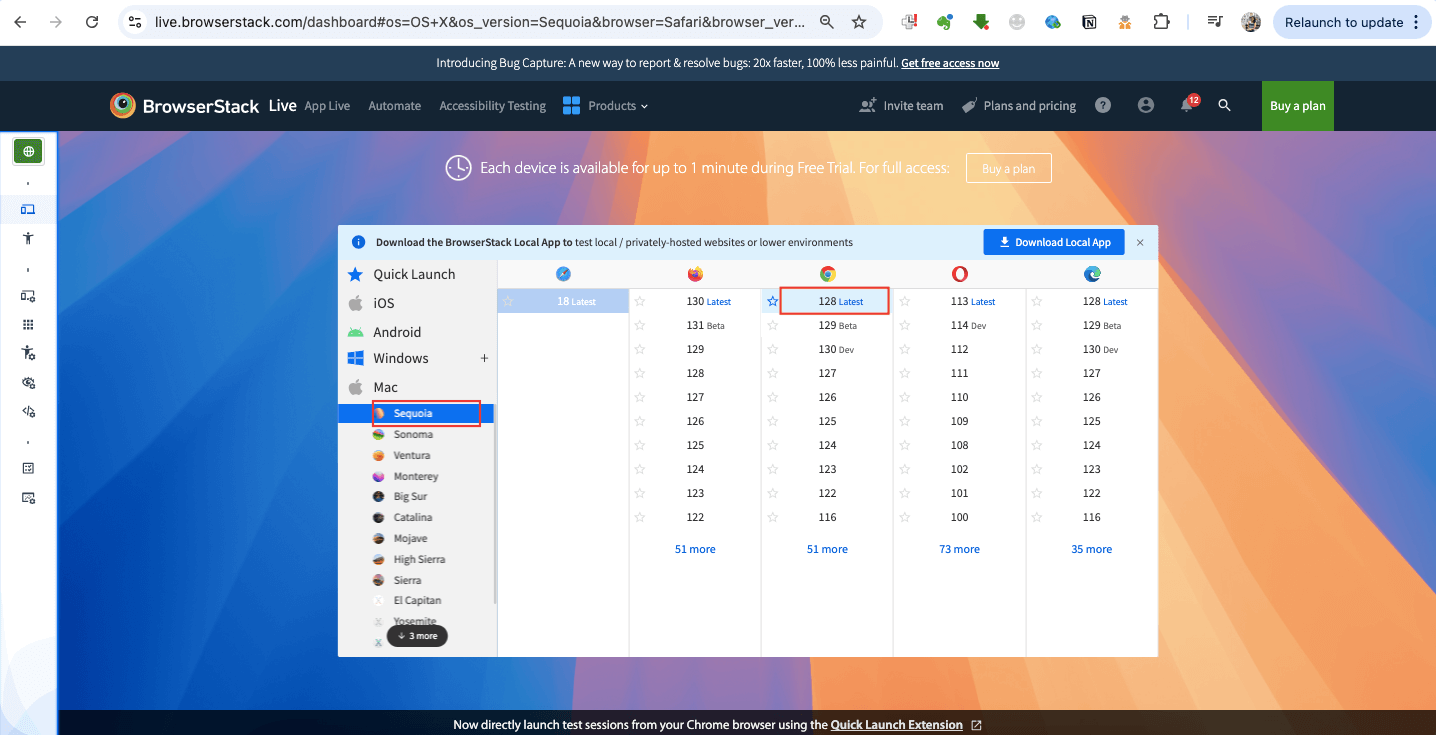
Step 3. Select the device-browser combination on which you want to perform the test. Since the testing is done on the macOS operating system, click Mac > Sequoia.
Step 4. Under the Chrome column, click 128.
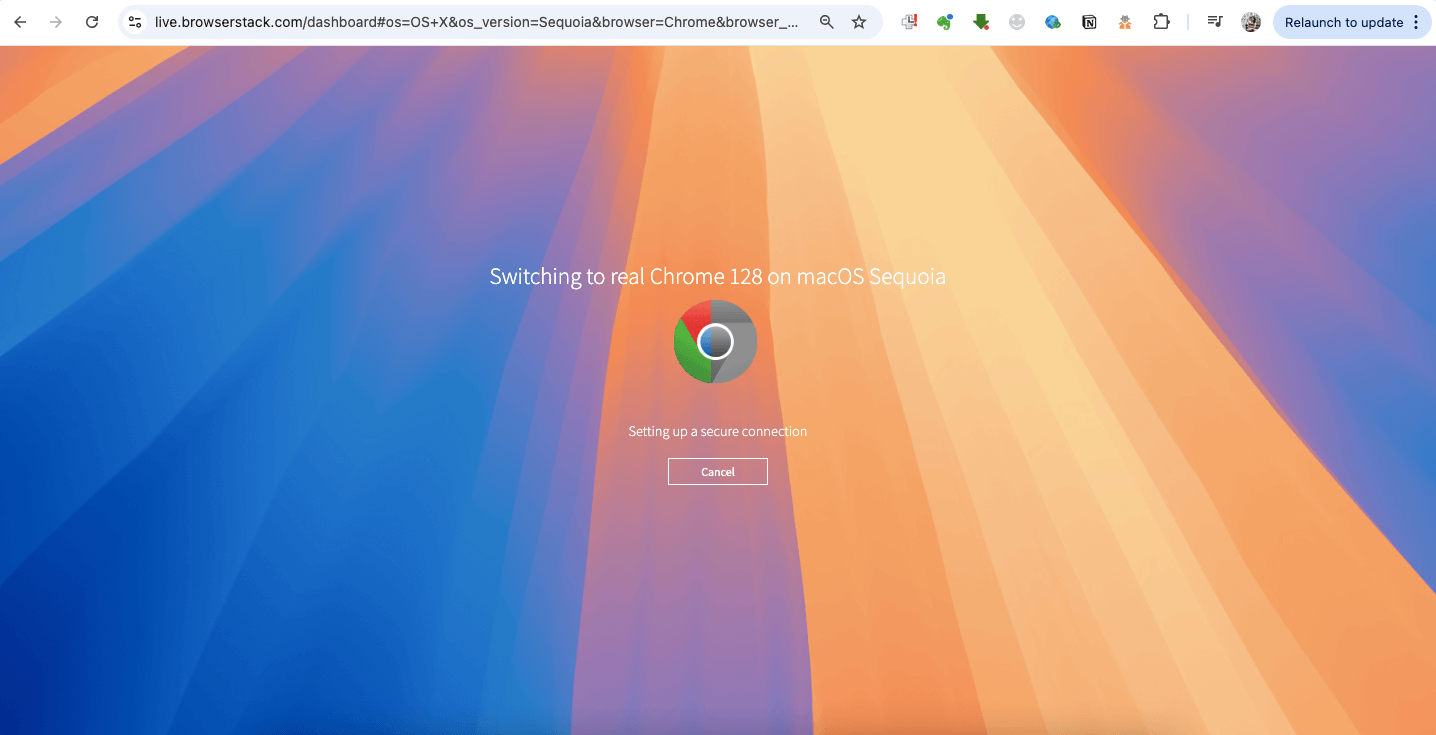
The device and browser start loading.
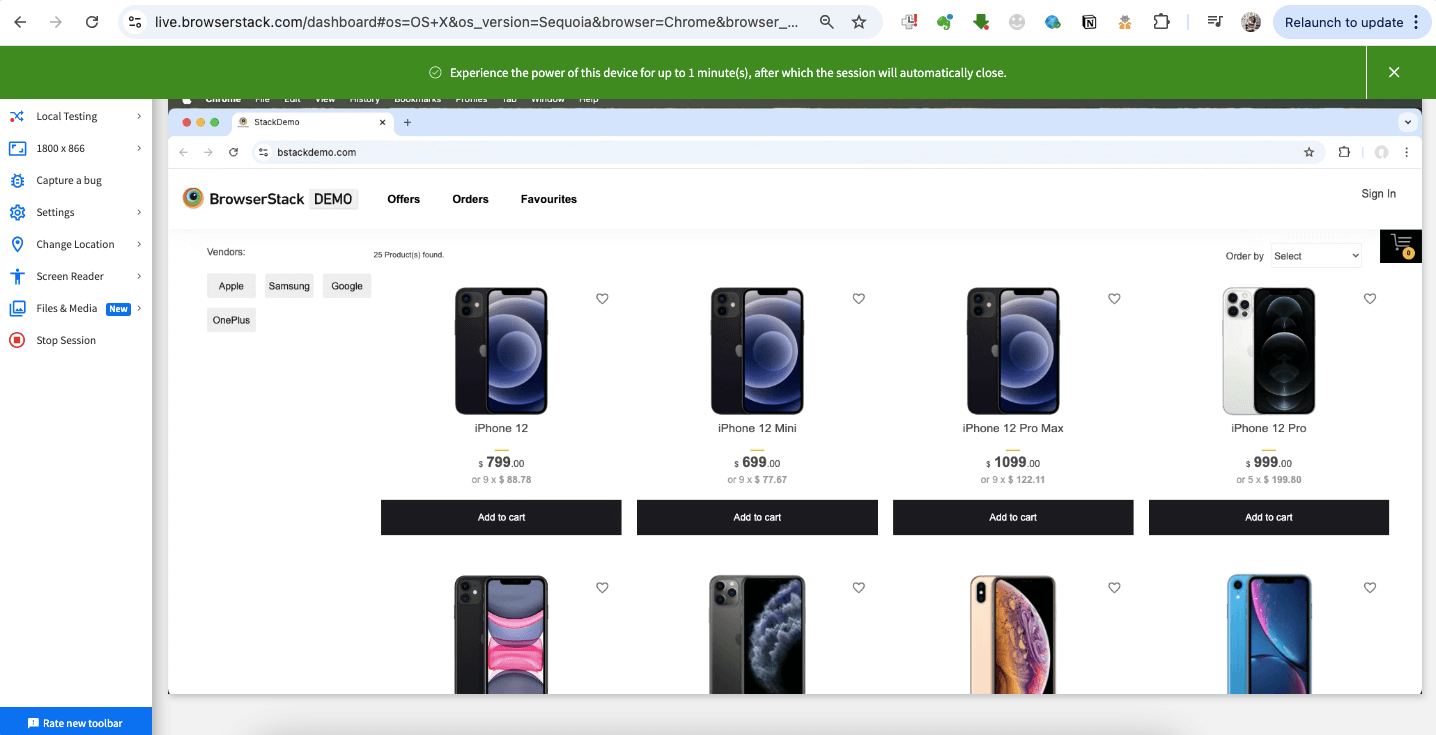
Step 5. In the browser, open bstackdemo.com.
Step 6. Right-click on the webpage and click Inspect.
Step 7. Click on the three vertical dots in the top-right corner of the Developer Tools window.
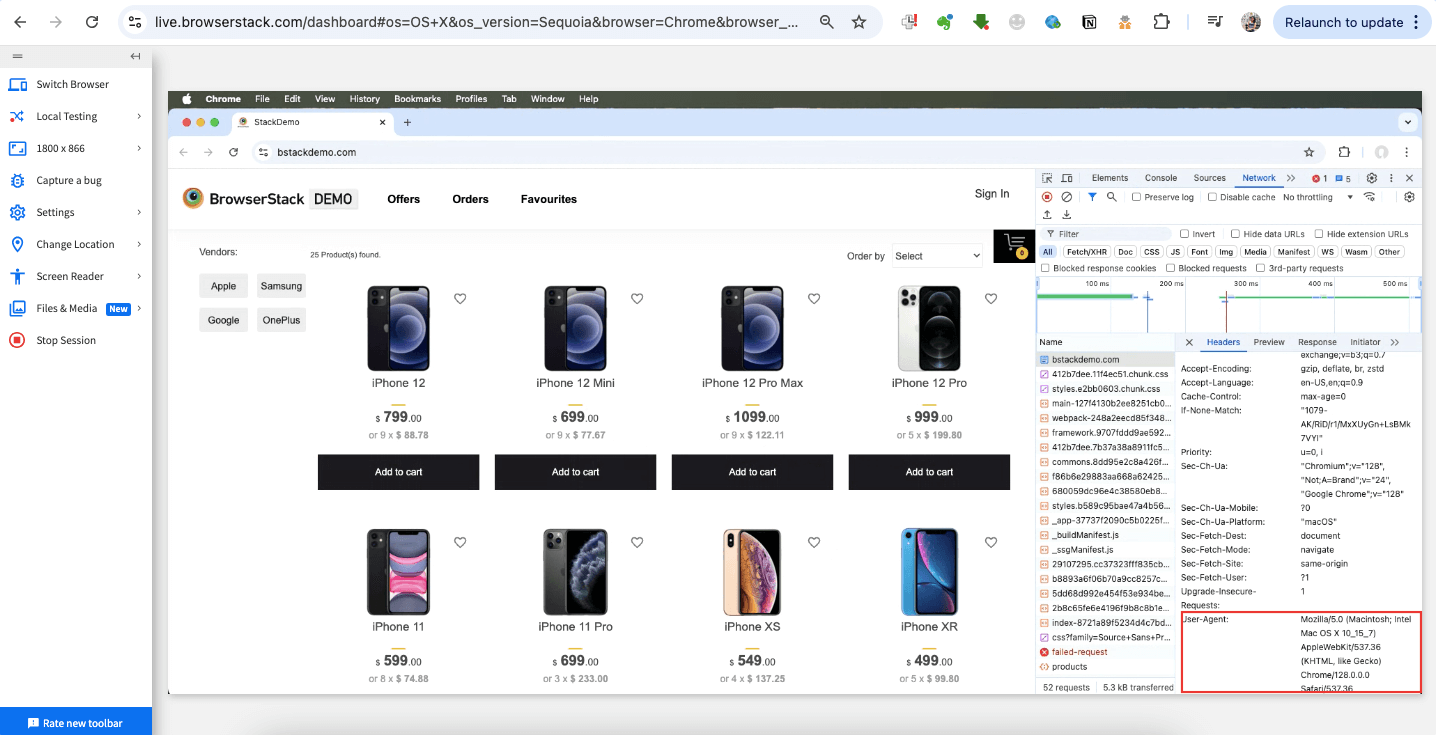
Step 8. Click the Network, and refresh the page to generate request headers.
Step 9. Select the first header request.
Step 10. Click the Header tab, expand the Request Headers, and look for the User-Agent field. It should also show the same agent that you selected earlier in the extension.
Mozilla/5.0 (Macintosh; Intel Mac OS X 10_15_7) AppleWebKit/537.36 (KHTML, like Gecko) Chrome/128.0.0.0 Safari/537.36
How to Restore to Default User Agent in Chrome
Due to the ease of availability, many developers tend to use User-Agent Switcher and Manager to manage user agents. Though applying different user agents is easy due to the UI, restoring to default can be glitchy.
To restore the default user agent in Chrome using the User-Agent Switcher and Manager, do the following:
Step 1. From the earlier steps, the agent applied to the tab is as follows:
Mozilla/5.0 (Linux; Android 10; K) AppleWebKit/537.36 (KHTML, like Gecko) Chrome/120.0.0.0 Safari/537.36
Step 2. Click the extension icon on your address bar to open the menu.
Step 3. Click Reset to apply the default user agent.
Step 4. Right-click on the webpage and click Inspect.
Step 5. Select the three vertical dots in the top-right corner of the Developer Tools window.
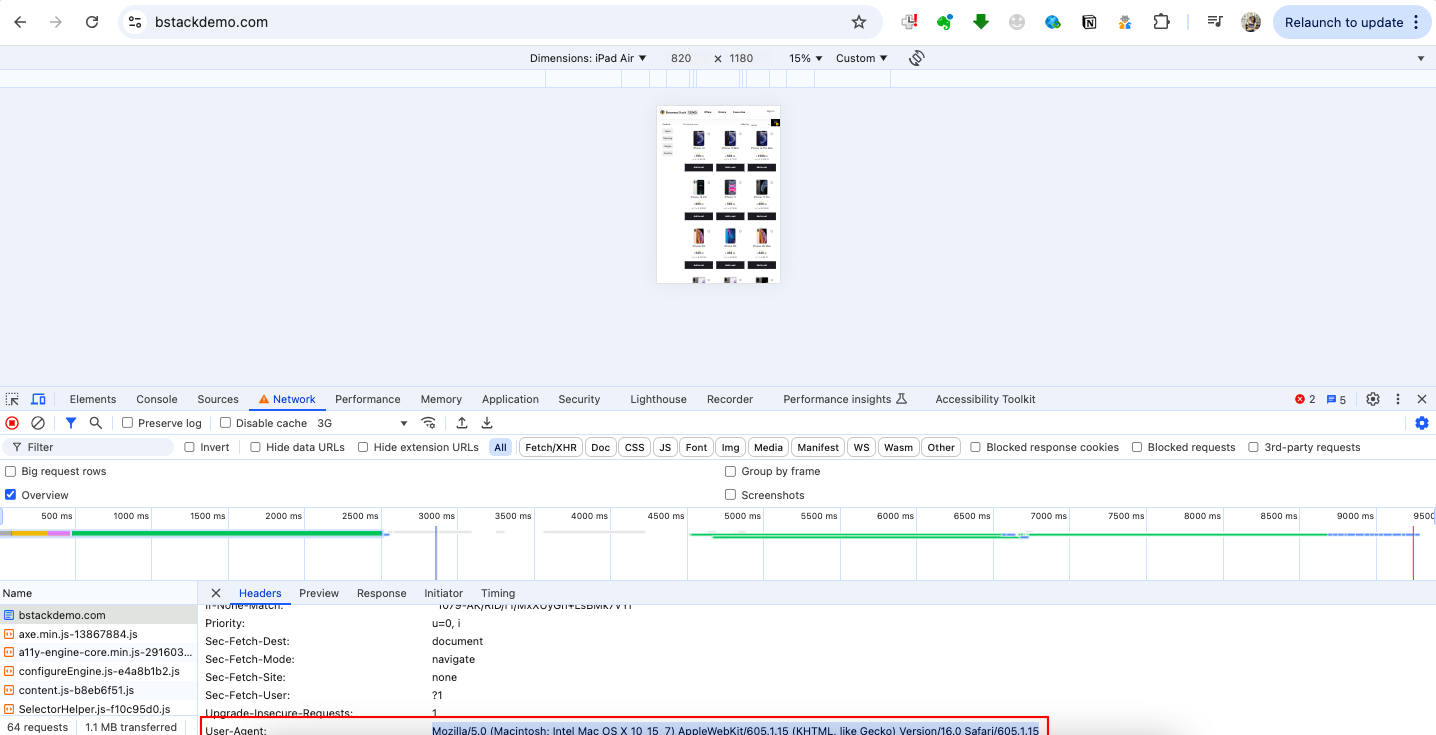
Step 6. Click the Network, and refresh the page to generate request headers.
Step 7. Select the first header request.
Step 8. Click the Header tab, expand the Request Headers, and look for the User-Agent field. It should also show the agent based on the default browser.
Mozilla/5.0 (Macintosh; Intel Mac OS X 10_15_7) AppleWebKit/605.1.15 (KHTML, like Gecko) Version/16.0 Safari/605.1.15
Some of the challenges faced with the extension are as follows:
- Limited Device Simulation: The extension doesn’t provide any flexibility in terms of selecting the screen size, inputs sources, etc to understand the impact of user agent in its completeness.
- Inconsistent Behavior: Some websites use more than just user agents to determine the user experience. Changing the user agent might not always guarantee the expected behavior.
- Extension Conflicts: Using multiple extensions or tools that interact with browser behavior can lead to conflicts and unexpected issues.
- Interference with Functionality: Continuously overriding user agents could interfere with legitimate web application functionality or debugging, resulting in a poor user experience.
Also Read : 22 Best Chrome Extensions for Developers in 2024
Why use Real Device Cloud for Testing instead of Changing User Agents
The User-Agent Switcher and Manager extension offers a basic way to change the user agent string, but it falls short of accurately simulating device-specific behaviors. It doesn’t account for factors like screen resolution, touch input, device performance, or hardware limitations, which can significantly impact a website’s functionality.
This can lead to incomplete or inaccurate testing results. BrowserStack Live provides a more comprehensive solution by offering access to real device cloud and browsers, allowing developers to test how websites perform in real-world conditions. This ensures better compatibility and user experience.
Some reasons why BrowserStack Live makes a suitable replacement for the extension are:
- Access to a real device cloud with 3500+ device and browser combinations
- Ability to change network conditions reliably across devices and browsers
- True responsiveness testing with features such as resolution variations.
- Enhanced debugging tools such as screenshots, test run recording, etc.
Try BrowserStack Live for Free
Conclusion
While User-Agent Switcher and Manager extension and similar extensions seem like a great addition for your staging and non-production setups, for web applications these extensions might not give a holistic understanding of how customers are experiencing your website.
With access to more than 3500+ browser combinations, a real device cloud can empower your developers to test your applications expansively. You can also use the free responsive design checker that BrowserStack offers to see how your applications perform on most popular devices.
