Building and running Selenium projects is a crucial aspect of test automation, enabling efficient test execution, report analysis, and bug tracking.
This process plays a key role in accelerating product delivery while maintaining high quality.
This guide covers the essential steps to build and execute Selenium projects effectively.
Building a Selenium project
Selenium projects can be built in different ways. This guide explains how to create a Selenium project using both a Java and Maven projects. Before getting started, ensure the following software is installed:
- Java (JDK): Required for building Selenium projects with Java.
- Maven: Necessary for managing dependencies in a Maven-based Selenium project.
- Eclipse IDE: Helps create, execute, and maintain tests efficiently. Other IDEs can also be used if preferred.
Read More: How to configure Selenium in Eclipse
Configuring Selenium using a Java Project
One of the simplest ways to build a Selenium project is by creating a Java project. To do so, first, all the necessary Selenium jars must be downloaded manually.
Note: Steps in this tutorial are written using Eclipse.
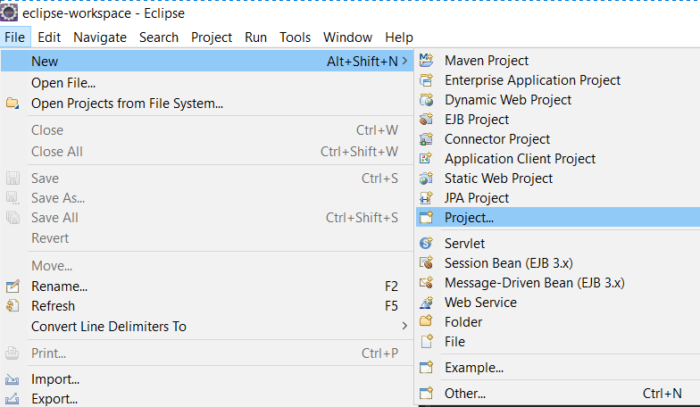
- Click on File in the Eclipse navigation menu. Select/Hover on New and click on Project
- Select Java Project and click on Next.
- Enter the Project Name. In this example, the name is Building_a_Selenium_Project-BrowserStack. Click on Finish.
- Java project Building_a_Selenium_Project-BrowserStack is successfully created in the package explorer of Eclipse.
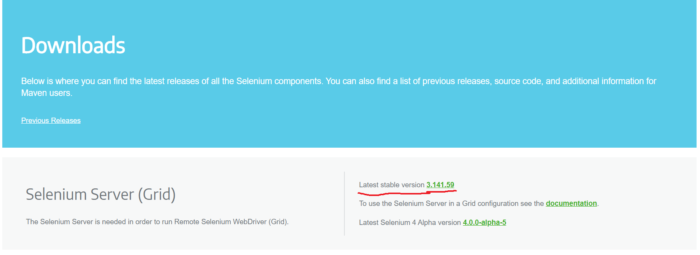
- Once the Java project is created, we need to download the necessary Selenium jars as well as a unit testing framework such as TestNG jars manually. Go to Selenium downloads page and click on Latest Stable Version.
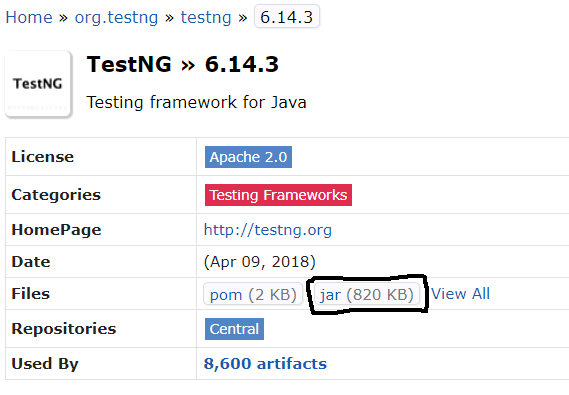
- Now, let’s download TestNG Jars
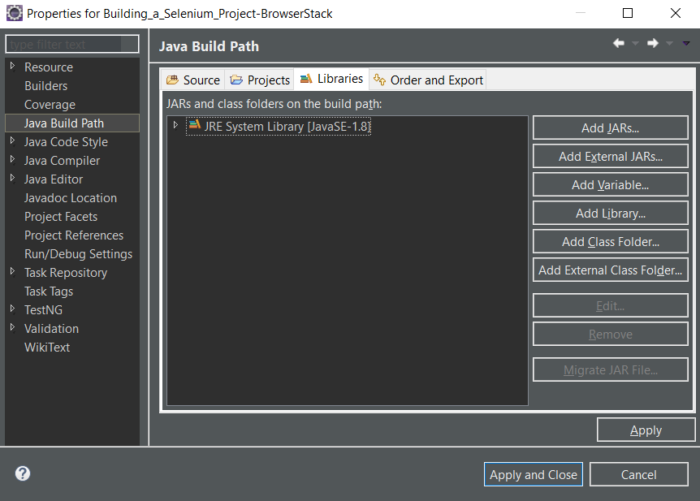
- Once the Selenium server standalone jar is downloaded, add it to the Selenium project. Right-click on the project created. Hover the mouse on Build Path and click on Configure Build Path…
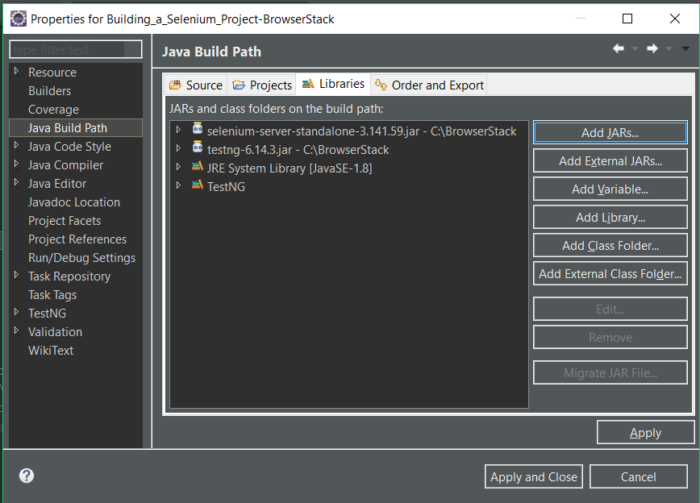
- Click on Add External JARs… This will add the downloaded jar to the Selenium project
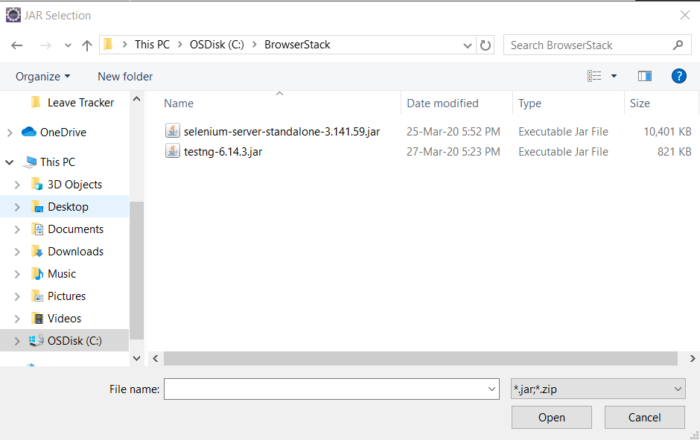
- Select the download jar selenium-server-standalone and TestNG and click on Open.
- Verify that the selenium-server-standalone and TestNG jars are added to the java build path. Then click on Apply and Close.
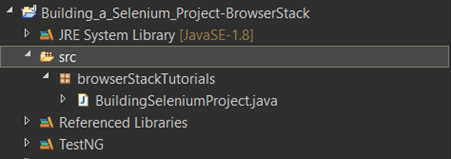
- Verify that the downloaded jar is added under Referenced Libraries
- Right-click on src and create a package. Once a package is created, create a java class under that package.
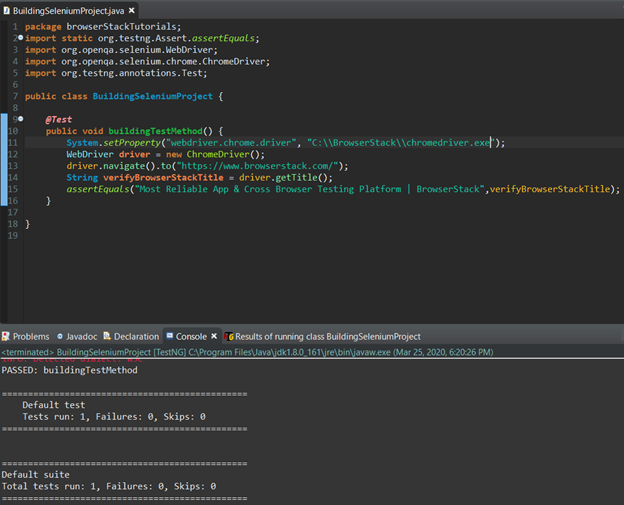
Now let’s try to create a simple program to validate that our project is successfully configured with Selenium.
Also Read: Selenium WebElement Commands
Sample Selenium Project using Java Project
Setting up a Selenium project using Java involves writing a basic script to automate browser actions. This example demonstrates how to build and execute a Selenium test case using Java and TestNG.
Here is the code snippet:
Code Snippet
package browserStackTutorials;

import static org.testng.Assert.assertEquals;

import org.openqa.selenium.WebDriver;

import org.openqa.selenium.chrome.ChromeDriver;

import org.testng.annotations.Test;

public class BuildingSeleniumProject {

@Test

public void buildingTestMethod() {

System.setProperty("webdriver.chrome.driver", " C:\BrowserStack\chromedriver.exe");

WebDriver driver = new ChromeDriver();

driver.navigate().to("https://www.browserstack.com/");

String verifyBrowserStackTitle = driver.getTitle();

assertEquals("Most Reliable App & Cross Browser Testing Platform | BrowserStack",verifyBrowserStackTitle);

}

}
Read More: How to Automate TestNG in Selenium
Explanation of Code
Code Line-13 to 15: It verifies the title of the website by navigating to the website and getting the actual website title. Then it compares the actual title with the expected title.
Configuring Selenium using a Maven Project
Apache Maven is a software project management and comprehension tool. It is built on the concept of the Page Object Model (POM). Maven can manage a project’s build and reporting from a central piece of information.
Now let’s see how to build a Selenium project using Maven.
Note: Steps in this tutorial are written using Eclipse.
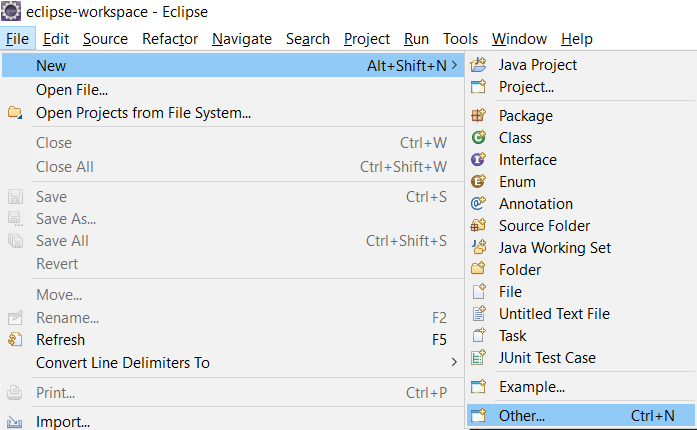
- Click on “File” in the Eclipse navigation menu. Click on “Others” and click on “Project”
- Expand the “Maven” module. Select “Maven Project” and click on “Next”
- Click on “Next”
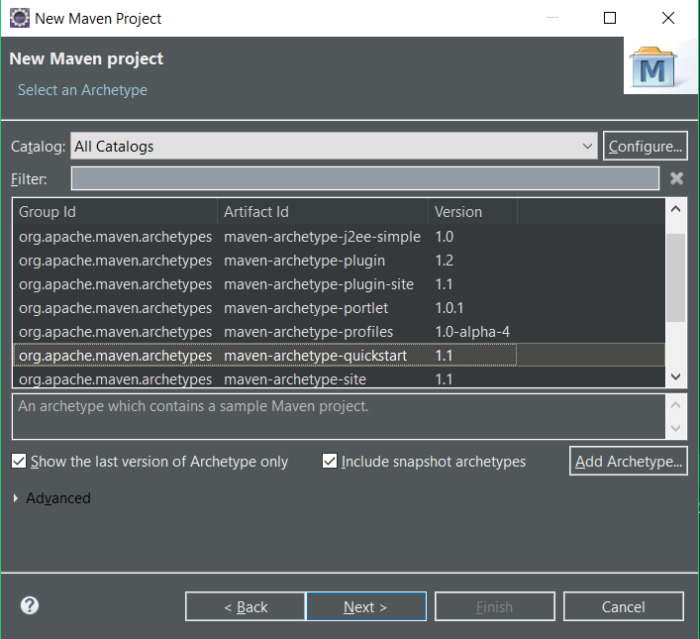
- Select “maven-archetype-quickstart” and click on “Next”. Maven archetypes are project templates which can be generated for users by Maven
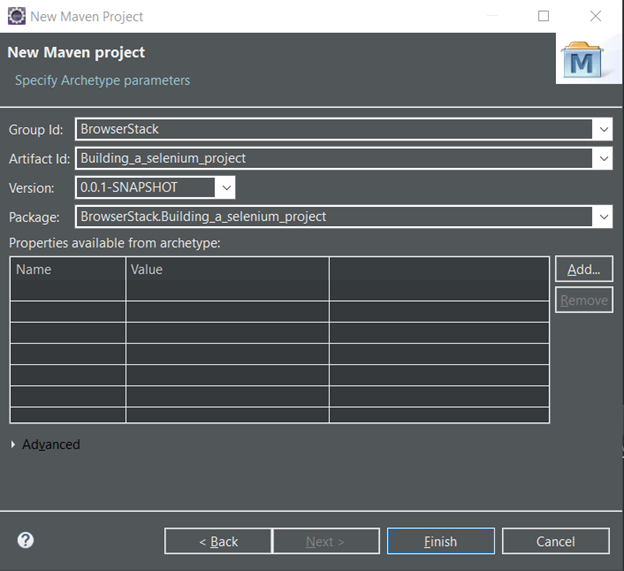
- Enter “Group Id” and “Artifact Id” and click on “Finish”.
Also Read: What is Maven in Java? (Framework and Uses)
Group Id: Will identify your project uniquely among all projects. It must follow the package name rules. This means that it must contain, at least, the domain name.
Artifact Id: It is the name of the jar without a version. If you create the jar then you can choose whatever name you want with lowercase letters.
- Verify that the “Maven Project” is created successfully with the name “Building_a_selenium_project”
Earlier we have configured Selenium using a Java project by downloading all the necessary Selenium jars. Then we have added the downloaded jars and placed them into the Java project through the configure build path.
This is not required in a Maven project. In this case, we must define the dependencies required to configure this Maven project with Selenium.
Maven pom.xml file
POM is stated or defined as a Project Object Model. The pom.xml file contains information related to the project such as configuration information for Maven to build the project. This includes dependencies, build directory, source directory, etc. Maven reads the pom.xml file, then executes the tests.
pom.xml file with elements
| Element | Description |
| packaging | Describes packaging type such as jar |
| name | Describes name of the maven project |
| URL | Describes URL of the project |
| dependencies | Describes dependencies for this project |
| dependency | Describes a dependency. It is used inside dependencies |
| Scope | Describes scope for this maven project |
Now let’s see how to configure the Maven project with Selenium.
Must Read: What is POM in Maven
- Navigate to “www.mvnrepository.com” and search for “selenium server”. Click on Search.
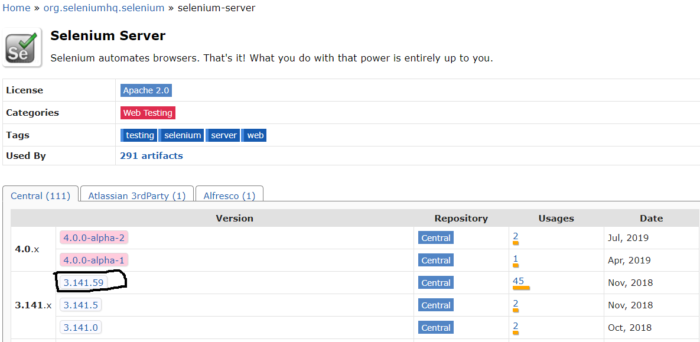
- Click on “Selenium Server” and select the latest stable version.
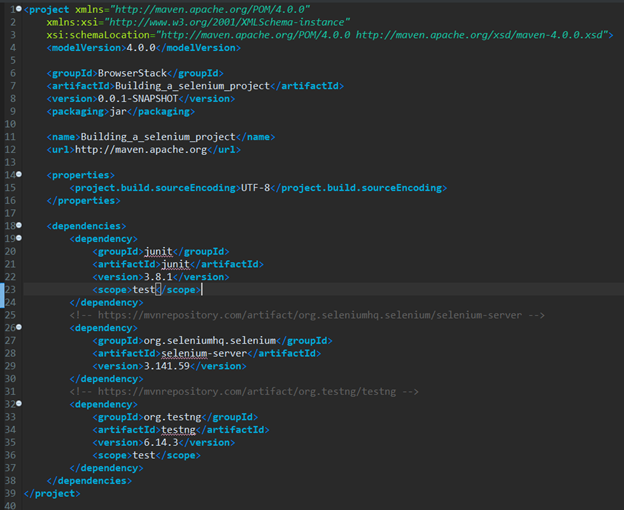
- Copy the dependency into pom.xml file under the dependency node.
Code Snippet: POM.XML
Below is the structure of POM.xml.
<project xmlns="http://maven.apache.org/POM/4.0.0"

xmlns:xsi="http://www.w3.org/2001/XMLSchema-instance"

xsi:schemaLocation="http://maven.apache.org/POM/4.0.0 http://maven.apache.org/xsd/maven-4.0.0.xsd">

<modelVersion>4.0.0</modelVersion>


<groupId>BrowserStack</groupId>

<artifactId>Building_a_selenium_project</artifactId>

<version>0.0.1-SNAPSHOT</version>

<packaging>jar</packaging>

<name>Building_a_selenium_project</name>

<url>http://maven.apache.org</url>


<properties>

<project.build.sourceEncoding>UTF-8</project.build.sourceEncoding>

</properties>


<dependencies>

<dependency>

<groupId>junit</groupId>

<artifactId>junit</artifactId>

<version>3.8.1</version>

<scope>test</scope>

</dependency>

<!-- https://mvnrepository.com/artifact/org.seleniumhq.selenium/selenium-server -->

<dependency>

<groupId>org.seleniumhq.selenium</groupId>

<artifactId>selenium-server</artifactId>

<version>3.141.59</version>

</dependency>

<!-- https://mvnrepository.com/artifact/org.testng/testng -->

<dependency>

<groupId>org.testng</groupId>

<artifactId>testng</artifactId>

<version>6.14.3</version>

<scope>test</scope>

</dependency>

</dependencies>

</project>
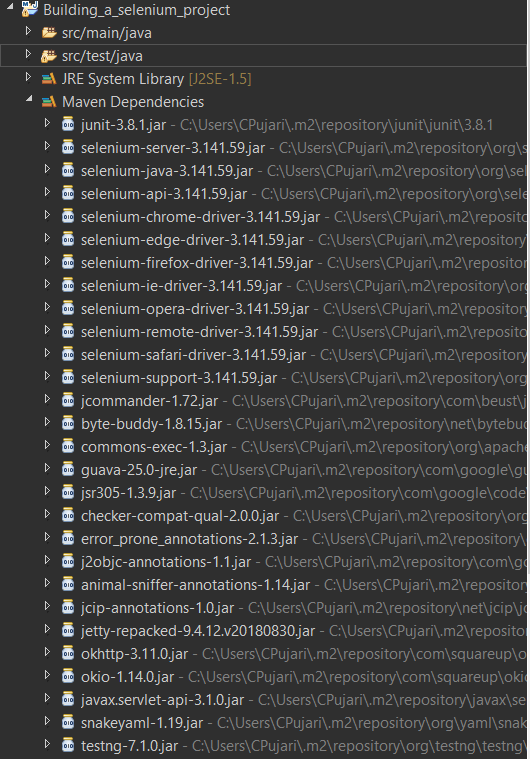
- Now let’s verify that all the required Selenium dependencies are added to our project.
Now let’s try to create a simple program to validate that our project is successfully configured with Selenium.
Read More: Best Practices for Selenium Test Automation
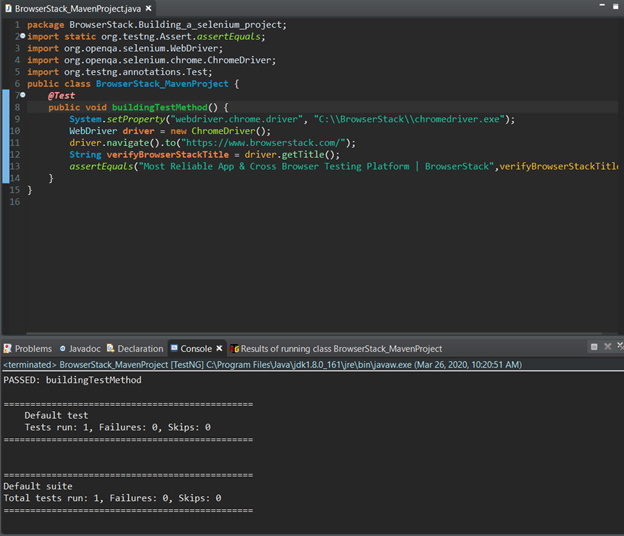
Sample Selenium Project using Maven Project
Maven simplifies managing dependencies and building Selenium projects. Using a Maven project for Selenium automation helps streamline the setup, execution, and maintenance of test cases.
Below is a code snippet demonstrating building and executing a Selenium project using Maven.
Code Snippet
package BrowserStack.Building_a_selenium_project;

import static org.testng.Assert.assertEquals;

import org.openqa.selenium.WebDriver;

import org.openqa.selenium.chrome.ChromeDriver;

import org.testng.annotations.Test;

public class BrowserStack_MavenProject {

@Test

public void buildingTestMethod() {

System.setProperty("webdriver.chrome.driver", "C:\\BrowserStack\\chromedriver.exe");

WebDriver driver = new ChromeDriver();

driver.navigate().to("https://www.browserstack.com/");

String verifyBrowserStackTitle = driver.getTitle();

assertEquals("Most Reliable App & Cross Browser Testing Platform | BrowserStack",verifyBrowserStackTitle);

}

}
Explanation of Code
Code Line-11 to 13: It verifies the title of the website by navigating to the website and getting the actual website title. Then, it compares the actual title with the expected title.
Thus, building and executing a Selenium project can be a bit complicated. But follow the instructions in these articles and you will be building your own projects flawlessly in no time.
Useful Resources for Automation Testing in Selenium
Methods, Classes, and Commands
- Selenium Commands every Developer or Tester must know
- Selenium WebElement Commands
- Desired Capabilities in Selenium Webdriver
- Assert and Verify Methods in Selenium
- Understanding System setProperty in Selenium
- Select Class in Selenium : How to select a value in dropdown list?
- SendKeys in Selenium WebDriver
- getAttribute() method in Selenium: What, Why, and How to use
- How does Selenium isDisplayed() method work?
- findElement vs findElements in Selenium
- Types of Listeners in Selenium (with Code Examples)
- How to set Proxy in Firefox using Selenium WebDriver?
Configuration
- How to set up Selenium on Visual Studio
- How to configure Selenium in Eclipse
- Maven Dependency Management with Selenium
- How to Build and Execute Selenium Projects
XPath
- How to use XPath in Selenium?
- How to find element by XPath in Selenium with Example
- Top Chrome Extensions to find Xpath in Selenium
Locators and Selectors
- Locators in Selenium: A Detailed Guide
- CSS Selector in Selenium: Locate Elements with Examples
- How to Create Object Repository in Selenium
Waits in Selenium
- Wait Commands in Selenium C and C#
- Selenium Wait Commands: Implicit, Explicit, and Fluent Wait
- Understanding Selenium Timeouts
- Understanding ExpectedConditions in Selenium
- Understanding Role of Thread.sleep() in Selenium
Frameworks in Selenium
- Data Driven Framework in Selenium
- Implementing a Keyword Driven Framework for Selenium: A Practical Guide
- Hybrid Framework in Selenium
Miscellaneous
- How to create Selenium test cases
- How to set Proxy in Selenium?
- Difference between Selenium Standalone server and Selenium server
- Exception Handling in Selenium WebDriver
- How to use JavascriptExecutor in Selenium
- How to run your first Selenium test script
- Parallel Testing with Selenium
Best Practices, Tips and Tricks
- Top 5 Challenges Faced During Automation Selenium Testing
- 5 Selenium tricks to make your life easier
- 6 Things to avoid when writing Selenium Test Scripts
- Best Practices for Selenium Test Automation
- Why you should pay attention to flaky Selenium tests
- How to start with Selenium Debugging
- How to make your Selenium test cases run faster
- How to upgrade from Selenium 3 to Selenium 4
- Why you should move your testing to a Selenium Cloud?
Design Patterns in Selenium: Page Object Model and Page Factory
- Design Patterns in Selenium
- Page Object Model and Page Factory in Selenium
- Page Object Model and Page Factory in Selenium C#
- Page Object Model in Selenium and JavaScript
- Page Object Model and Page Factory in Selenium Python
Action Class
- How to handle Action class in Selenium
- How to perform Mouse Hover Action in Selenium
- Understanding Click Command in Selenium
- How to perform Double Click in Selenium?
- How to Drag and Drop in Selenium?
- How to Scroll Down or Up using Selenium Webdriver
- How To verify Tooltip Using Selenium
TestNG and Selenium
- Database Testing using Selenium and TestNG
- How to use DataProvider in Selenium and TestNG?
- All about TestNG Listeners in Selenium
- How to run parallel test cases in TestNG
- How to use TestNG Reporter Log in Selenium: Tutorial
- Prioritizing tests in TestNG with Selenium
JUnit and Selenium
- Understanding JUnit assertions for Selenium Testing with Examples
- How to run JUnit Parameterized Test in Selenium
- How to write JUnit test cases
- JUnit Testing Tutorial: JUnit in Java
- How to create JUnit Test Suite? (with Examples)
Use Cases
- Handling Login Popups in Selenium WebDriver and Java
- How to Launch Browser in Selenium
- How to handle Alerts and Popups in Selenium?
- How to get Selenium to wait for a page to load
- How to Find Element by Text in Selenium: Tutorial
- How to Read/Write Excel Data using Apache POI Selenium
- How to handle Captcha in Selenium
- How to handle multiple windows in Selenium?
- How to handle Multiple Tabs in Selenium
- How to find broken links in Selenium
- How to handle Cookies in Selenium WebDriver
- How to handle iFrame in Selenium
- How to handle Web Tables in Selenium
- How To Validate Text in PDF Files Using Selenium Automation
- Get Current URL in Selenium using Python: Tutorial
Types of Testing with Selenium
- Different Testing Levels supported by Selenium
- How to perform UI Testing with Selenium
- Regression Testing with Selenium: Tutorial
- UI Automation using Python and Selenium: Tutorial
- How to Run Visual Tests with Selenium: Tutorial
- How to perform ETL Automation using Selenium
- Cross Browser Testing in Selenium : Tutorial
Conclusion
BrowserStack Automate enables seamless Selenium testing on a real device cloud, allowing teams to run tests across thousands of real browsers, devices, and operating systems.
Features like parallel testing, real-time debugging, and integrations with CI/CD pipelines ensure faster and more reliable test execution.
Building and executing Selenium projects is crucial in achieving efficient test automation. By setting up the right tools, following best practices, and leveraging cloud-based platforms like BrowserStack Automate, teams can confidently streamline testing processes and deliver high-quality software.


