Test websites hosted behind a proxy
Know how to use Local Testing when your website is hosted behind a proxy.
If the local website that you want to test is running behind a proxy, you can configure your proxy details for Local Testing to test your on BrowserStack devices with some additional steps.
For Local Testing, you can configure the following types of proxies:
- Proxy with no authentication or basic authentication
- MITM proxy with no authentication or basic authentication
- Proxy configured using a Proxy auto-configuration (PAC) file
Depending on whether you are using the BrowserStackLocal app or binary, see the relevant tab:
Prerequisites
- Complete the steps in Set up Local Testing.
- Obtain your access key from the Product page.
- Contact your network/IT team to obtain the following proxy details:
- Proxy host and port. If your proxy requires authentication, also obtain the username and password.
- Check whether your proxy is an MITM proxy such as BrowserMobProxy and obtain its host and port. If it requires authentication, obtain the username and password as well.
- For the proxies configured using a PAC file, obtain the absolute path of the PAC file. If the PAC file is a URL, download and store the PAC file on your machine and use the absolute path.
Configure proxy settings for Local Testing
Depending on the type of proxy you want to configure for Local Testing, expand the relevant section:
Proxy with no authentication or basic authentication
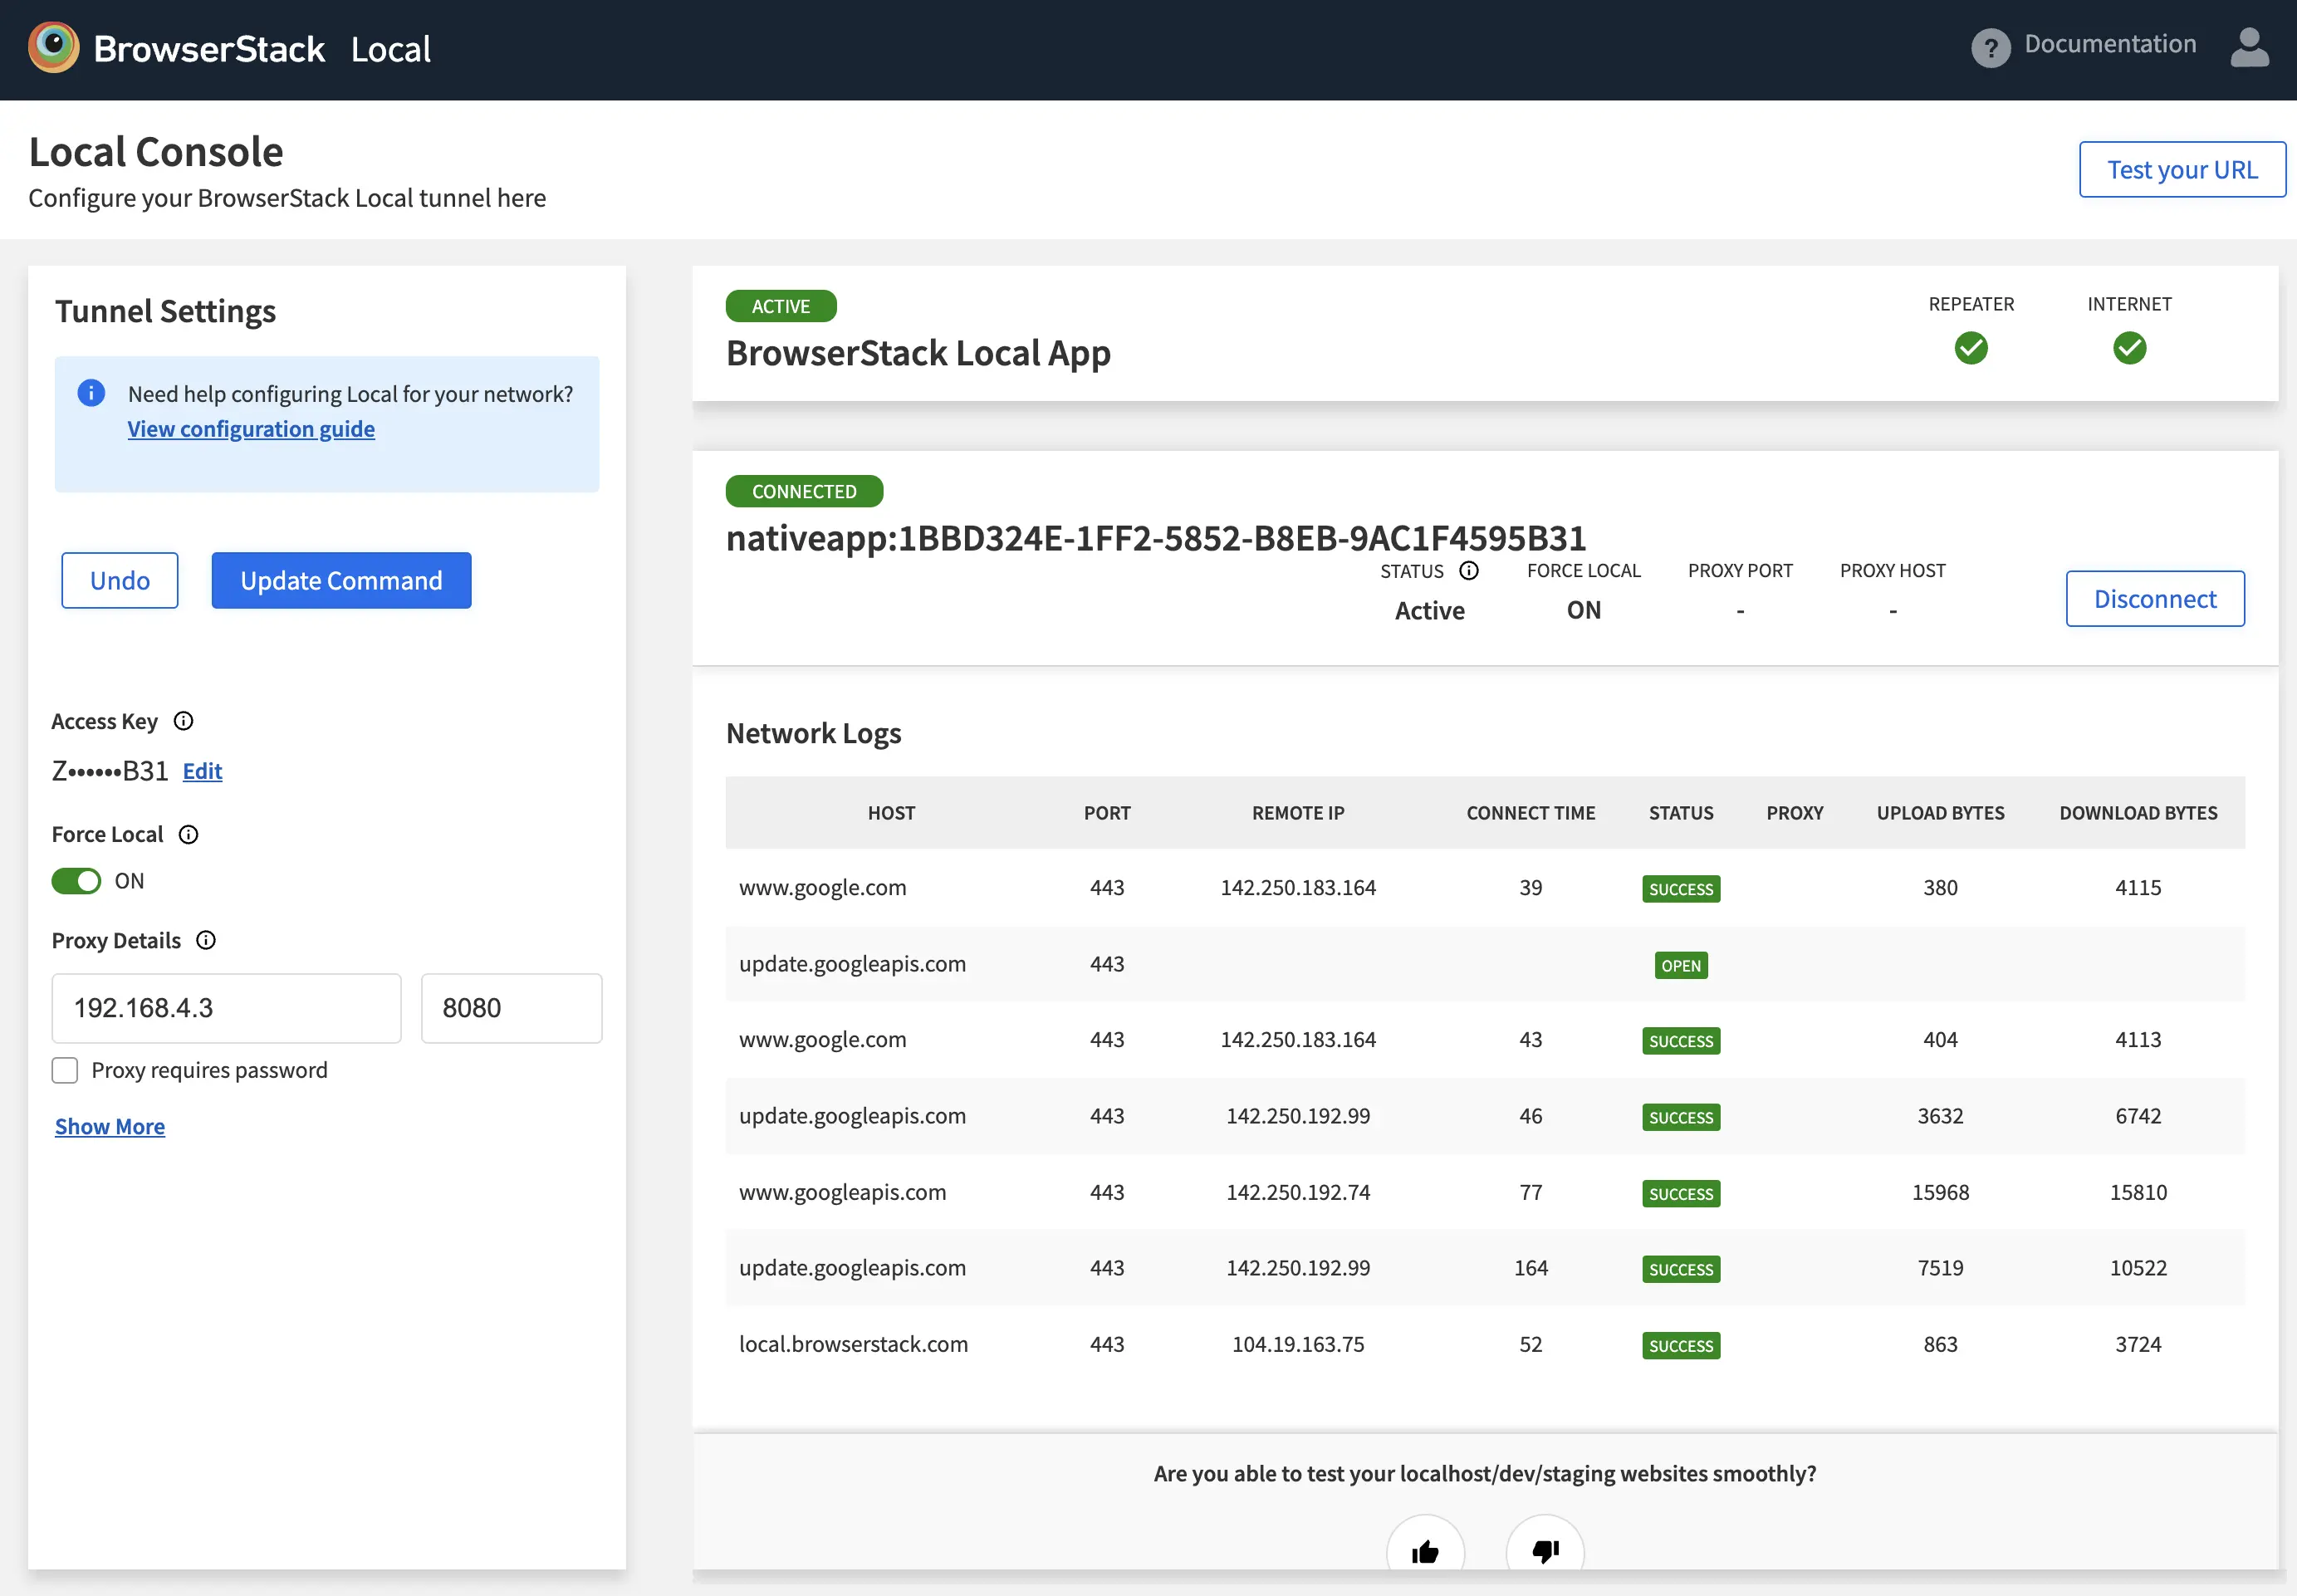
To configure your proxy on the Local Console, follow these steps:
- Open Local Console (
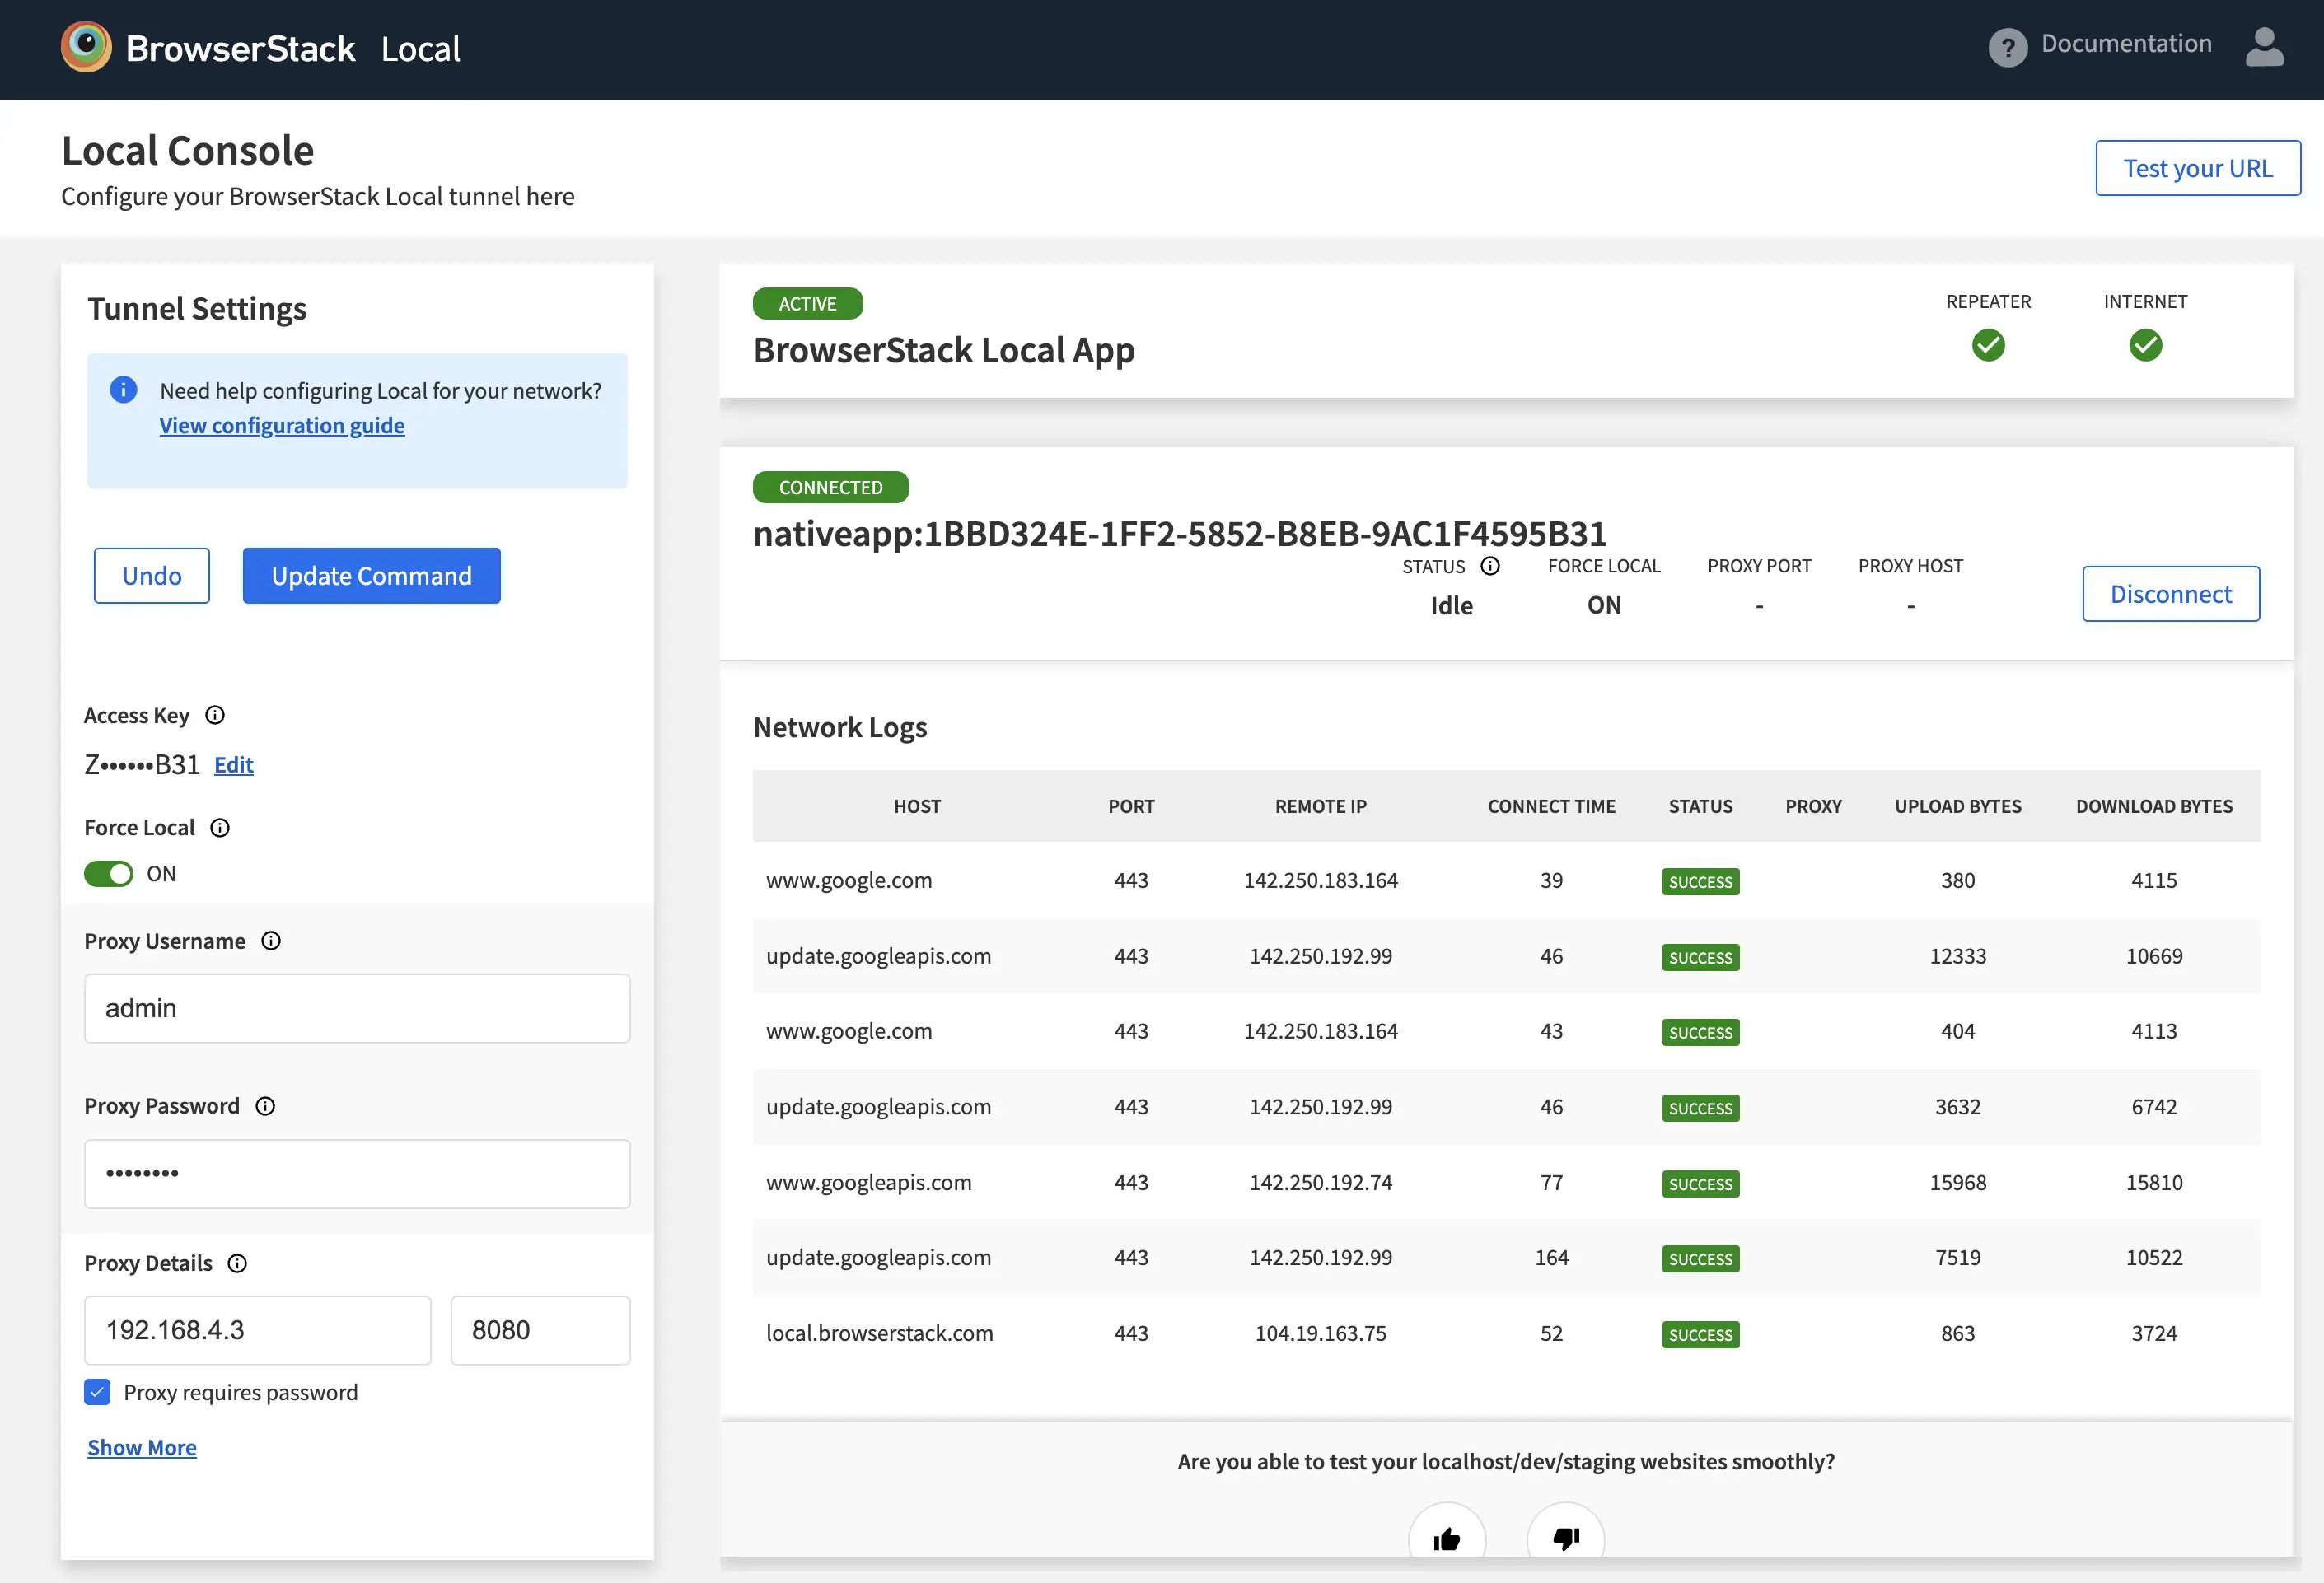
http://localhost:45454). - In the Tunnel Settings pane, for Proxy Details, enter the hostname and port of the proxy.

- If the proxy requires authentication, check the Proxy requires password checkbox.
Enter the proxy username and password.
- Click Update.
Your proxy is now configured. - (Optional) If you want to resolve all traffic through your local network or proxy to comply with your organization’s network restrictions, use the Force Local or Force Proxy flags.
MITM proxy with no authentication or basic authentication
If you are using an MITM proxy, follow these steps:
- Open Local Console (
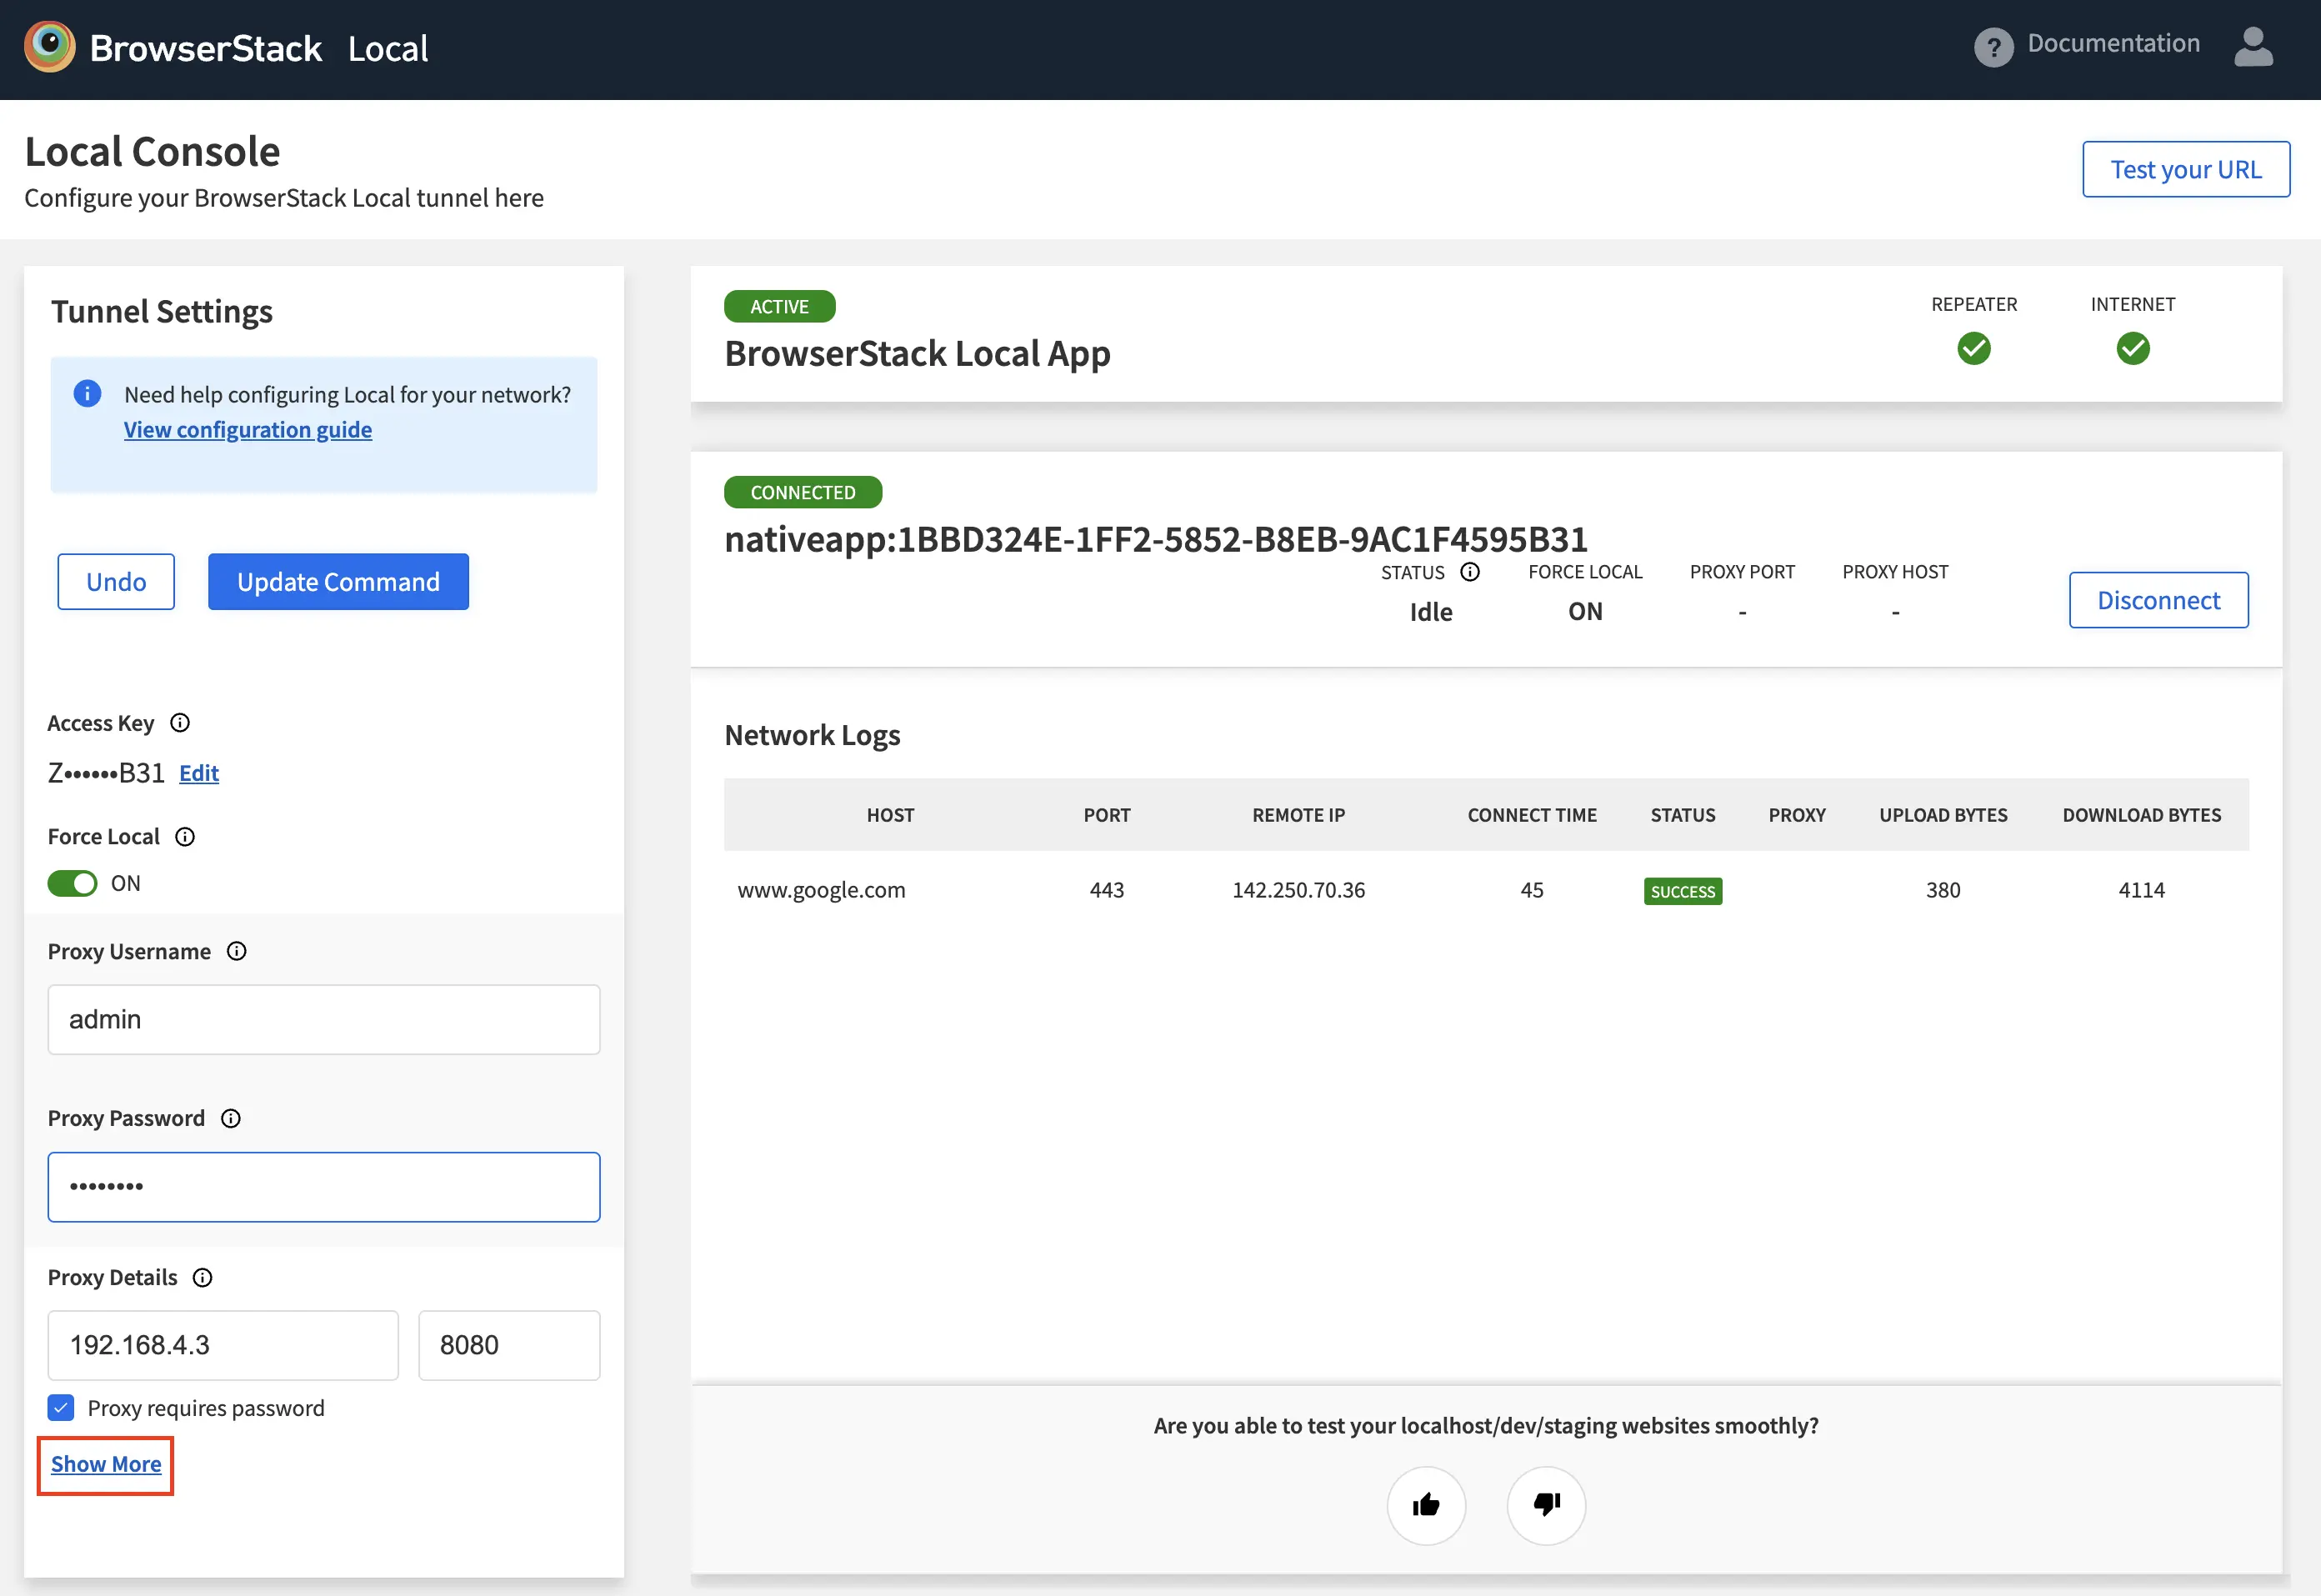
http://localhost:45454). - In the Tunnel Settings pane, for Proxy Details, enter the hostname and port of the proxy.
- If the proxy requires authentication, check the Proxy requires password checkbox.
Enter the proxy username and password. - In the Tunnel Settings pane, click Show More.

- In the Tunnel Settings pane, switch on the MITM proxy toggle.
- Click Update.
- (Optional) If you want to resolve all traffic through your local network or proxy to comply with your organization’s network restrictions, use the Force Local or Force Proxy flags.
Proxy configured with a PAC file
PAC file (Proxy auto-configuration file) contains a Javascript function that determines whether a request should be sent via the proxy server.
Once you have the absolute path of the PAC file, follow these steps:
- Open Local Console (
http://localhost:45454). - In the Tunnel Settings pane, click Show More.
- In the PAC File textbox, enter the absolute path to the PAC file.
- Click Update.
- (Optional) If you want to resolve all traffic through your local network or proxy to comply with your organization’s network restrictions, use the Force Local or Force Proxy flags.
Launch a test session
After you configure the proxy, you can launch a Live session and proceed with testing. If you already had a test session open, it reloads with the updated Local Testing settings.
Prerequisites
Before you begin, ensure the following prerequisites are met:
- Complete the steps in Set up Local Testing.
- Obtain your access key from the Product page.
Verify proxy auto-detection
To check if your proxy is auto-detected by BrowserStackLocal, follow these steps:
- Open a command-line interface.
- Change the directory to the directory that contains the BrowserStackLocal binary.
- Run the following command:
The output of this command confirms that your Local Testing setup is successful and indicates that you are using a proxy.

Configure proxy settings for Local Testing
Before you begin, contact your network/IT team to obtain the following proxy details:
- Proxy host and port. If your proxy requires authentication, also obtain the username and password.
- Check whether your proxy is an MITM proxy such as BrowserMobProxy and obtain its host and port. If it requires authentication, obtain the username and password as well.
- For the proxies configured using a PAC file, obtain the absolute path of the PAC file. If the PAC file is a URL, download and store the PAC file on your machine and use the absolute path.
Depending on the type of proxy you want to configure for Local Testing, expand the relevant section:
Proxy with no authentication or basic authentication
To configure a proxy, follow these steps:
Open a command-line interface.
Change the directory to the directory that contains the BrowserStackLocal binary.
Run the following commands to establish a connection between the BrowserStackLocal and the proxy:
If the proxy doesn’t require authentication, use the following command:
If the proxy requires authentication, use the following command:
(Optional) To resolve all requests to BrowserStack remote devices through your network or proxy, use the force-local or force-proxy flags.
MITM proxy with no authentication or basic authentication
To configure a MITM Proxy, follow these steps:
Open a command-line interface.
Change the directory to the directory that contains the BrowserStackLocal binary.
Run the binary using the following commands:
If the proxy doesn’t require authentication, use the following command:
If the proxy requires authentication, use the following command:
(Optional) To resolve all requests to BrowserStack remote devices through your network or proxy, use the force-local or force-proxy flags.
Proxy with PAC file
PAC file (Proxy auto-configuration file) is a Javascript function that determines whether a request should be sent through the proxy server.
The following is a sample PAC file:
The PAC file checks whether the hostname is a localhost. If true, it checks whether the connection is direct. If the hostname is not localhost, the connection is happens through the proxy.
To configure the proxy using a PAC file, follow these steps:
Open a command-line interface.
Change the directory to the directory that contains the BrowserStackLocal binary.
Run the binary using the following command:
(Optional) To resolve all requests to BrowserStack remote devices through your network or proxy, use the force-local or force-proxy flags.
Launch a test session
After you configure the proxy, you can launch a Live session and proceed with testing. If you already had a test session open, it reloads with the updated Local Testing settings.
We're sorry to hear that. Please share your feedback so we can do better
Contact our Support team for immediate help while we work on improving our docs.
We're continuously improving our docs. We'd love to know what you liked
We're sorry to hear that. Please share your feedback so we can do better
Contact our Support team for immediate help while we work on improving our docs.
We're continuously improving our docs. We'd love to know what you liked
Thank you for your valuable feedback!