
 Join our Discord
Run your first automated app test using XCUITest
Run your first test using XCUI on BrowserStack App Automate. Access the test results on the App Automate dashboard or use our REST API.
XCUITest is a mobile automation framework provided by Apple that helps you write UI tests for your iOS applications. BrowserStack App Automate supports XCUI testing on a wide range of real iOS devices. This guide helps you run your first XCUI test on BrowserStack.
Onboard faster with Test Companion
Launch in your IDE. Chat with the AI assistant to configure and run your first build instantly.

Prerequisites
- You need a BrowserStack
usernameandaccess-key. To obtain your access credentials, sign up for a free trial or purchase a plan. - XCUI tests are built into a separate
.zipfile. You need access to both the app (.ipafile) and the XCUI test suite (.zipfile).
If you do not have .ipa files and are looking to try App Automate, you can download our sample app and sample test suite:
| iOS Device OS | Download links |
|---|---|
Below iOS 14.0 |
Sample app and Sample test-suite |
For iOS 14.0 and above |
Sample app and Sample test-suite |
For sample app and sample test-suite, you can also refer to our XCUI sample GitHub repository.
Run your first test
Upload your app
Upload your iOS app (.ipa) file to BrowserStack servers using any of the following methods:
Upload app using the App Automate dashboard
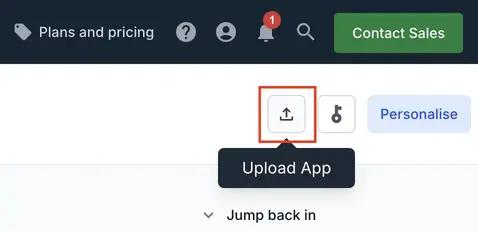
On the App Automate dashboard, click the Upload button on the top-right corner. Select the iOS app (.ipa file) you want to upload from your filesystem.
Upload app using App Management UI
To upload an app using the App Management UI, follow these steps:
-
On the App Automate dashboard, go to the sidebar and click App Management.
-
On the App Management UI, click Upload App.
-
Select the iOS app (
.ipafile) you want to upload from your filesystem. To upload using a public URL, paste the URL of your app in the or upload from URL box. -
After selecting the app, choose the App Automate framework you want to use for testing. You can optionally add flags and a custom ID.
-
Click Upload. The app is uploaded to the BrowserStack servers. You’ll receive an App ID, which you can use to run tests.
To view your uploaded apps, apply the My Apps filter.

Upload app using REST API
Upload an iOS app (.ipa file) from your filesystem or a public URL using the REST API. The following sample cURL command uploads an app from your filesystem:
curl -u "YOUR_USERNAME:YOUR_ACCESS_KEY" \
-X POST "https://api-cloud.browserstack.com/app-automate/xcuitest/v2/app" \
-F "file=@/path/to/app/file/app-debug.ipa"
A sample response for the request is as follows:
{
    "app_url":"bs://<hashed_app_id>"
}
The value of the app_url parameter in the response is used to specify the application under test when you execute your tests.
App upload takes a few seconds to about a minute depending on the size of your app. Do not interrupt the curl command until you get the response back.
Upload your test suite
Upload your XCUI test suite (.zip) file to BrowserStack servers using a REST API request.
The following sample cURL command shows how to upload a test suite:
curl -u "YOUR_USERNAME:YOUR_ACCESS_KEY" \
-X POST "https://api-cloud.browserstack.com/app-automate/xcuitest/v2/test-suite" \
-F "file=@/path/to/app/file/BrowserStack-SampleXCUITest.zip"
A sample response for the request is as follows:
{
    "test_suite_name":"BrowserStack-SampleXCUITest.zip",
    "test_suite_url":"bs://<hashed_test_suite_id>",
    "test_suite_id":"<hashed_test_suite_id>",
    "uploaded_at":"2022-05-13 06:17:50 UTC",
    "expiry":"2022-06-12 06:17:50 UTC",
    "framework":"xcuitest"
}
The value of the test_suite_url parameter in the response is used to specify the test suite when you execute your tests.
If you do not have a .zip file for your test-suite, follow step by step instructions in our Build and export test-suite guide to generate the zip file.
To execute tests on devices, refer to the Custom Device Lab using XCUITest documentation.
Execute XCUI tests
After you upload the app and test suite to BrowserStack servers, send an API request to start the test execution as shown in the following sample cURL request:
A sample response for the request is as follows:
{
    "message":"Success",
    "build_id":"4d2b4deb810af077d5aed98f479bfdd2e64f36c3"
}
The build_id is used to uniquely identify your build in App Automate.
If a test run stops due to a crash, you can stop the build by clicking the stop build button on the App Automate dashboard or using the REST API.
View test results
After you start an XCUI test suite execution using the REST API request, visit your App Automate dashboard to view your test results, debugging logs, and overall test details. You can also use API requests to view test results.
Related topics
-
Manage your uploaded app or test suite using the upload app REST API and upload test suite REST API..
-
Use the get app API endpoint and list test suites API endpoint to list your recently uploaded apps and test suites.
-
Delete your uploaded app or test suite using the delete app API endpoint and delete test suite API endpoint.
We're sorry to hear that. Please share your feedback so we can do better
Contact our Support team for immediate help while we work on improving our docs.
We're continuously improving our docs. We'd love to know what you liked
We're sorry to hear that. Please share your feedback so we can do better
Contact our Support team for immediate help while we work on improving our docs.
We're continuously improving our docs. We'd love to know what you liked
Thank you for your valuable feedback!