XMLTest in Java: A Detailed Guide
By Sourojit Das, Community Contributor - December 5, 2024
In Java testing, TestNG is renowned for its flexibility, with XMLTest being a vital component. It allows easy management of complex testing scenarios, enabling users to include parameters, listeners, and dependencies without modifying test code.
XMLTest is particularly useful for running tests across various configurations, such as testing a web application on different browsers and real devices.
- What is XMLTest in Java?
- Purpose of XMLTest
- Example of XMLTest in Java
- Key Features of XMLTest
- How are TestNG and XMLTest related?
- Setting Up XMLTest
- Execution of XMLTest
- XMLTest for Functional Testing
- XMLTest for Data-Driven Testing
- Integrating XMLTest with BrowserStack Automate
- Benefits of BrowserStack Integration for XML Testing
What is XMLTest in Java?
XmlTest in Java, within the TestNG framework, is a configuration element in the testng.xml file. It defines a single test setup, allowing testers to specify which classes to run, set parameters, and group tests into suites. This feature simplifies test case management by offering flexibility and control over how tests are executed.
For example, imagine you are developing a web application and want to test its functionality on different browsers. By creating multiple XmlTest entries in the XML file, you can easily run the same set of tests across various browser configurations without altering our test code, ensuring comprehensive coverage and simplifying the testing process.
Purpose of XMLTest
The XmlTest class in TestNG plays a crucial role in configuring and managing tests through XML files. It offers a structured way to define various test parameters and organize test execution, making it easier to maintain and run tests in different environments.
The purpose of XmlTest can be enumerated as:
- Test Configuration: Defines individual test setups within a suite using XML files for clarity and organization.
- Parameterization: Facilitates passing dynamic parameters to test methods, allowing for flexible execution.
- Test Organization: Groups tests into suites and enables the inclusion or exclusion of specific test classes based on requirements.
- Dependency Management: Supports defining dependencies between tests to ensure they execute in the correct order.
- Customization: Allows for the specification of listeners and settings that are specific to individual tests.
- Environment Flexibility: Simplifies running tests across various configurations and environments without altering the underlying test code.
Read More: How to run Parallel Test Cases in TestNG
Example of XMLTest in Java
Suppose you are testing the login functionality of a web application and want to run tests with different sets of user credentials defined in the XmlTest.
import org.testng.TestNG;

import org.testng.annotations.Parameters;

import org.testng.annotations.Test;

import org.testng.xml.XmlClass;

import org.testng.xml.XmlSuite;

import org.testng.xml.XmlTest;

import java.util.Arrays;


public class LoginTest {


    @Test

    @Parameters({"username", "password"})

    public void testLogin(String username, String password) {

        // Simulate a login attempt

        System.out.println("Attempting to log in with Username: " + username + " and Password: " + password);

        // Here you would add actual login logic

    }


    public static void main(String[] args) {

        TestNG testng = new TestNG();

        XmlSuite suite = new XmlSuite();

        suite.setName("Login Suite");


        XmlTest test = new XmlTest(suite);

        test.setName("Login Test");

        test.setXmlClasses(Arrays.asList(new XmlClass(LoginTest.class)));

        test.addParameter("username", "testUser");

        test.addParameter("password", "testPassword");


        testng.setXmlSuites(Arrays.asList(suite));

        testng.run();

    }

}
In this code snippet, a LoginTest class is defined with a single test method, testLogin, which accepts parameters for username and password. The main method initializes a TestNG instance and creates an XmlSuite, representing a test suite.
Within this suite, an XmlTest is defined as including the LoginTest class. The addParameter method is utilized to pass the username and password to the test method.
When the main method is executed, it runs the login test using the specified parameters, simulating a login attempt with the provided credentials. This illustrates how XmlTest facilitates parameterized testing, enabling the management of various test scenarios without the need to hardcode values into the test methods.
Key Features of XMLTest
Some key features of XMLTest are:
- Automated XML File Validation: XmlTest ensures that the XML configuration files are correctly formatted and free of syntax errors, facilitating smoother test execution.
- Schema and DTD Compliance: It adheres to defined schemas and Document Type Definitions (DTD), guaranteeing that the XML files conform to expected structures and standards.
- Error Reporting and Debugging: XmlTest provides detailed error reporting, enabling developers to easily identify and troubleshoot issues within the XML configuration files during test execution.
How are TestNG and XMLTest related?
TestNG is a testing framework that uses XML files to configure and manage test execution. XmlTest is a key component of this configuration. XmlTest represents an individual test within the XML suite, allowing for the specification of parameters, class inclusions, and test organization. This relationship enables flexible and dynamic test management in TestNG.
Consider a practical scenario, suppose you want to test a payment processing system. There are multiple test cases for different payment methods (for example., credit card, PayPal), and you want to run these tests with specific parameters for each payment method.
import org.testng.TestNG;

import org.testng.TestNG;

import org.testng.annotations.Parameters;

import org.testng.annotations.Test;

import org.testng.xml.XmlClass;

import org.testng.xml.XmlSuite;

import org.testng.xml.XmlTest;

import java.util.Arrays; // Import for Arrays


public class PaymentTest {


    @Test

    @Parameters({"paymentMethod", "amount"})

    public void testPayment(String paymentMethod, String amount) {

        // Simulate a payment attempt

        System.out.println("Processing " + paymentMethod + " payment of $" + amount);

        // Here you would add actual payment processing logic

    }


    public static void main(String[] args) {

        TestNG testng = new TestNG();

        XmlSuite suite = new XmlSuite();

        suite.setName("Payment Suite");


        XmlTest test = new XmlTest(suite);

        test.setName("Payment Test");

        test.setXmlClasses(Arrays.asList(new XmlClass(PaymentTest.class)));

        test.addParameter("paymentMethod", "Credit Card");

        test.addParameter("amount", "100");


        testng.setXmlSuites(Arrays.asList(suite));

        testng.run();

    }

}
In this code snippet, the PaymentTest class contains a test method, testPayment, which accepts parameters for paymentMethod and amount. The main method initializes a TestNG instance and creates an XmlSuite, serving as a test suite.
Within this suite, an XmlTest is defined that includes the PaymentTest class, with the addParameter method specifying the payment method and amount for the test. When the main method is executed, it runs the payment test using the provided parameters, simulating the processing of a payment.
This illustrates how XmlTest integrates with TestNG to facilitate parameterized testing, enabling flexible test configurations that can adapt to various scenarios without altering the core test logic.
Read More : How to Automate TestNG in Selenium
Setting Up XMLTest
Installation and Configuration
Step 1. Download TestNG: The latest version of TestNG can be obtained from the official website or through build tools like Maven or Gradle.
Step 2. IDE Integration:
- For Eclipse: Install the TestNG plugin from the Eclipse Marketplace.
- For IntelliJ IDEA: TestNG support is integrated; adding the TestNG library to the project is required.
Step 3. Java Setup: Ensure that the Java Development Kit (JDK) is installed (preferably JDK 8 or higher) and properly configured in system environment variables.
Required Dependencies
TestNG Library: Include the TestNG library in project dependencies:
For Maven: Add the following dependency in the pom.xml file:
<dependency>

    <groupId>org.testng</groupId>

    <artifactId>testng</artifactId>

    <version>7.5.0</version> <!-- Use the latest version -->

    <scope>test</scope>

</dependency>
For Gradle: Add the following to the build.gradle file:
testImplementation 'org.testng:testng:7.5.0' // Use the latest versionBasic Setup Steps
The below are the steps for a basic setup to create and execute the TestNG XML file:
Step 1. Create TestNG XML File:
A new XML file (for example., testng.xml) should be created in the project root directory to define the test suite and configurations.
<!DOCTYPE suite SYSTEM "http://testng.org/testng-1.0.dtd" >

<suite name="Suite1">

    <test name="Test1">

        <classes>

            <class name="com.example.YourTestClass"/>

        </classes>

    </test>

</suite>
Step 2. Define Test Classes: Java classes containing test methods annotated with @Test need to be created to ensure they are in the appropriate package as specified in the XML file.
Step 3. Run Tests: The execution of tests is discussed in the following section
Execution of XMLTest
Step 1. Running Tests from IDE
Eclipse:
- Open the testng.xml file in the project explorer.
- Right-click on the file and select “Run As” > “TestNG Suite” to execute the tests defined in the XML configuration.
IntelliJ IDEA:
- Locate the testng.xml file in the project view.
- Right-click on the file and choose “Run” to initiate the test execution based on the XML setup.
Step 2. Running Tests from Command Line
- Open the command prompt or terminal.
- Navigate to the project directory where the testng.xml file is located.
Use something like the following command to run the tests:
java -cp "path/to/testng.jar;path/to/your/classes" org.testng.TestNG testng.xmlThe above command is suited for Windows for MAC systems; use colon (:) as the classpath separator
java -cp "path/to/testng.jar:path/to/your/classes" org.testng.TestNG testng.xmlThe Maven command for this would be:
mvn clean test -Dtestng.groups=yourGroup -Dtestng.xml=testng.xmlPlease note that, Maven automatically handles classpath separators depending on the OS, so no need for manual changes.
For Gradle, it would be:
gradle clean test -Dtestng.groups=yourGroup -Dtestng.xml=testng.xmlAgain, Gradle adjusts the classpath separator based on the operating system.
Note: Replace path/to/testng.jar and path/to/your/classes with the actual paths to the TestNG JAR file and the compiled class files, respectively.
Step 3. Viewing Test Results
- IDE: The test results will be displayed in the console or a dedicated results panel, providing information on test execution status, including passed, failed, and skipped tests.
- Command Line: TestNG will generate a report in the output directory, typically under the test-output folder, containing detailed results and logs of the test execution.
Step 4. Analyzing Test Reports
The generated reports can be opened in a web browser to analyze test outcomes, view stack traces for failures, and gain insights into test coverage and performance.
XMLTest for Functional Testing
XMLTest is a powerful tool for functional testing, enabling precise validation of application behavior through structured XML test cases.
Step 1. Validating XML File Structure: This can be used to ensure that the XML file adheres to a defined structure, confirming that all required elements and attributes are present.
For instance, A sample XML configuration for a user profile might require elements like <username>, <email>, and <age>. Validating the structure ensures these elements are correctly defined and not missing.
<user>

    <username>testUser</username>

    <email>test@example.com</email>

    <age>30</age>

</user>
Step 2. Testing Against Schemas (XSD): It can be used to verify that the XML file conforms to a specified XML Schema Definition (XSD), which defines the allowed structure and data types.
For instance, An XSD for the user profile XML could specify that <age> must be an integer. Running a test to validate against this XSD would ensure the XML adheres to these rules.
<xs:schema xmlns:xs="http://www.w3.org/2001/XMLSchema">

    <xs:element name="user">

        <xs:complexType>

            <xs:sequence>

                <xs:element name="username" type="xs:string"/>

                <xs:element name="email" type="xs:string"/>

                <xs:element name="age" type="xs:int"/>

            </xs:sequence>

        </xs:complexType>

    </xs:element>

</xs:schema>
Step 3. Ensuring Data Integrity in XML Files: It can be used to validate that the data within the XML file meets specific integrity constraints, such as value ranges or formats.
For instance, In the user profile XML, ensure that the <age> element contains a valid positive integer. A test could check whether the age value is greater than zero.
<user>

    <username>testUser</username>

    <email>test@example.com</email>

    <age>-5</age> <!-- Invalid, should be a positive integer -->

</user>
XMLTest for Data-Driven Testing
XMLTest simplifies data-driven testing by allowing testers to create reusable, parameterized XML test cases for validating multiple data scenarios efficiently.
Step 1. Creating Test Cases with XML Data: XMLTest can facilitate the creation of multiple test cases by sourcing test data from XML files, allowing for varied inputs without altering the test code.
An XML file containing multiple user credentials for login tests can be created.
<testData>

    <user>

        <username>user1</username>

        <password>pass1</password>

    </user>

    <user>

        <username>user2</username>

        <password>pass2</password>

    </user>

</testData>
Step 2. Managing Test Data with XML Files: It can be used to organise and manage test data efficiently using XML files, making it easy to update or expand datasets without modifying test cases.
For example. A payments.xml file can be used to create a centralized XML file that can hold various configurations for different test scenarios, such as different payment methods and amounts
<payments>

    <payment>

        <method>Credit Card</method>

        <amount>100</amount>

    </payment>

    <payment>

        <method>PayPal</method>

        <amount>200</amount>

    </payment>

</payments>
This can now be saved as payments.xml for future reference.
Step 3. Parsing XML for Data-Driven Tests: XMLTest can enable dynamic extraction of test data from XML files at runtime, allowing tests to be driven by external data sources.
For instance, Using a parsing library (like JAXP or DOM) to read the above payments XML file and extract the payment method and amount for each test case
DocumentBuilderFactory factory = DocumentBuilderFactory.newInstance();

DocumentBuilder builder = factory.newDocumentBuilder();

Document doc = builder.parse("payments.xml");

NodeList paymentNodes = doc.getElementsByTagName("payment");

for (int i = 0; i < paymentNodes.getLength(); i++) {

    Element payment = (Element) paymentNodes.item(i);

    String method = payment.getElementsByTagName("method").item(0).getTextContent();

    String amount = payment.getElementsByTagName("amount").item(0).getTextContent();

    // Use method and amount in the test

}
Integrating XMLTest with BrowserStack Automate
BrowserStack’s Automate allows the testing of websites across various real mobile and tablet devices housed in data centers. This powerful cloud-based testing platform is designed to streamline and enhance the testing processes.
It allows testing websites on real devices rather than virtual ones, ensuring compatibility across a broad spectrum of devices and browsers. Automate helps reduce testing times by enabling parallel test execution, and it facilitates testing of internally hosted apps seamlessly, providing confidence in the user experience of applications.
Running TestNG XMLTest
Integrating BrowserStack Automate with TestNG while utilizing XMLTest allows for efficient and organized test execution across real devices and browsers.
Pre-requisites
The prerequisites for this are the same for Selenium with TestNG on BrowserStack Automate.
1. BrowserStack Username and Access Key: Log in to BrowserStack with your credentials. If an account is not yet created, sign up for a Free Trial.
2. Required Versions:
- TestNG: v6.8 or higher
- Java: v8 or higher (Java v9 or higher is required for Gradle)
- Selenium: v2.5 or higher (W3C/JSON Wire)
3. IDE Setup: For those using Eclipse or IntelliJ IDEA to run tests, ensure that the corresponding TestNG plugin is installed.
4. CLI Setup: If running tests via the command line interface (CLI), verify that Maven or Gradle is installed, environment variables are configured, and the bin directory is added to the system path ($PATH).
Step 1. Include the Required Dependencies
For Maven, the following snippet should be added to the project’s build file.
<dependency>

    <groupId>org.testng</groupId>

    <artifactId>testng</artifactId>

    <version>7.5.0</version>

</dependency>

<dependency>

    <groupId>org.seleniumhq.selenium</groupId>

    <artifactId>selenium-java</artifactId>

    <version>4.x.x</version> <!-- Use the latest version -->

</dependency>
For Gradle, the snippet below is relevant.
testImplementation 'org.testng:testng:7.5.0'

testImplementation 'org.seleniumhq.selenium:selenium-java:4.x.x' // Use the latest version
Once the dependencies are sorted, please create the testng.xml file to define the suite and test configurations, including BrowserStack capabilities.
<!DOCTYPE suite SYSTEM "http://testng.org/testng-1.0.dtd">

<suite name="BrowserStack Suite">

    <test name="BrowserStack Test">

        <parameter name="username" value="YOUR_BROWSERSTACK_USERNAME"/>

        <parameter name="accessKey" value="YOUR_BROWSERSTACK_ACCESS_KEY"/>

        <parameter name="browser" value="Chrome"/>

        <parameter name="browserVersion" value="latest"/>

        <parameter name="os" value="Windows"/>

        <parameter name="osVersion" value="10"/>

        <classes>

            <class name="com.example.BrowserStackTest"/>

        </classes>

    </test>

</suite>
Step 2. Write a Test Class to Implement the Tests
import org.openqa.selenium.WebDriver;

import org.openqa.selenium.remote.DesiredCapabilities;

import org.openqa.selenium.remote.RemoteWebDriver;

import org.testng.annotations.Parameters;

import org.testng.annotations.Test;


import java.net.MalformedURLException;

import java.net.URL;


public class BrowserStackTest {


    @Test

    @Parameters({"username", "accessKey", "browser", "browserVersion", "os", "osVersion"})

    public void testOnBrowserStack(String username, String accessKey, String browser, String browserVersion, String os, String osVersion) throws MalformedURLException {

        DesiredCapabilities capabilities = new DesiredCapabilities();

        capabilities.setCapability("browser", browser);

        capabilities.setCapability("browser_version", browserVersion);

        capabilities.setCapability("os", os);

        capabilities.setCapability("os_version", osVersion);

        capabilities.setCapability("name", "Test on BrowserStack");


        WebDriver driver = new RemoteWebDriver(new URL("https://" + username + ":" + accessKey + "@hub-cloud.browserstack.com/wd/hub"), capabilities);


        // Test steps (for example., driver.get("https://yourapp.com");)


        driver.quit(); // Close the browser

    }

}
This code defines a BrowserStackTest class that utilizes Selenium WebDriver to run automated tests on BrowserStack. It configures the test environment using parameters like username, access key, browser, and OS details and establishes a connection to BrowserStack’s cloud platform to execute the tests.
Step 3. Run Sample Tests on BrowserStack
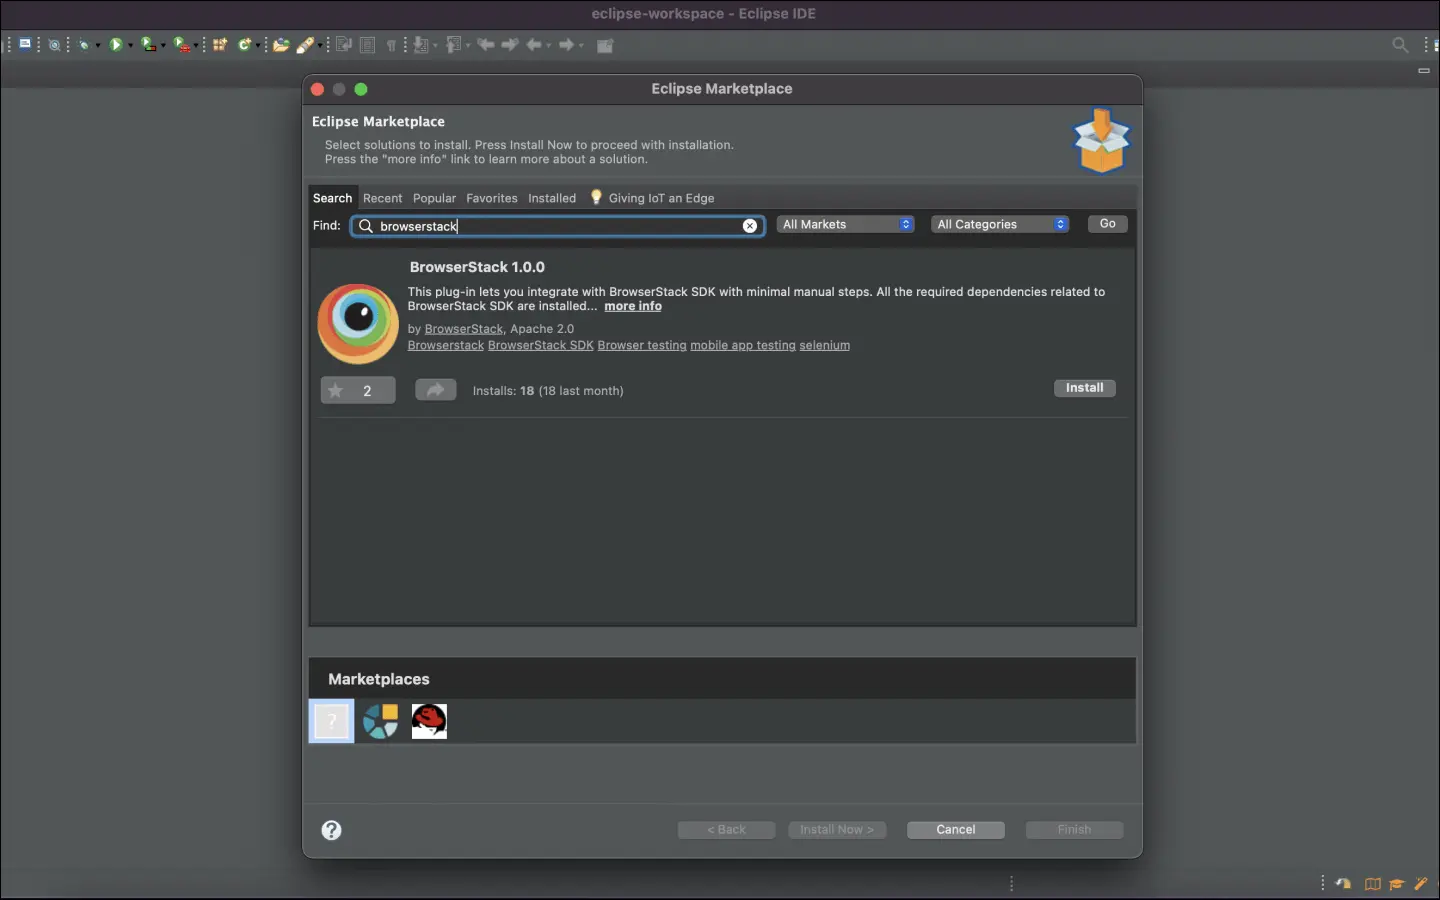
- To install the BrowserStack Plugin, click on Help in the Eclipse toolbar, then select Eclipse Marketplace.
- In the Eclipse Marketplace, search for “BrowserStack,” then click Install and select Finish.
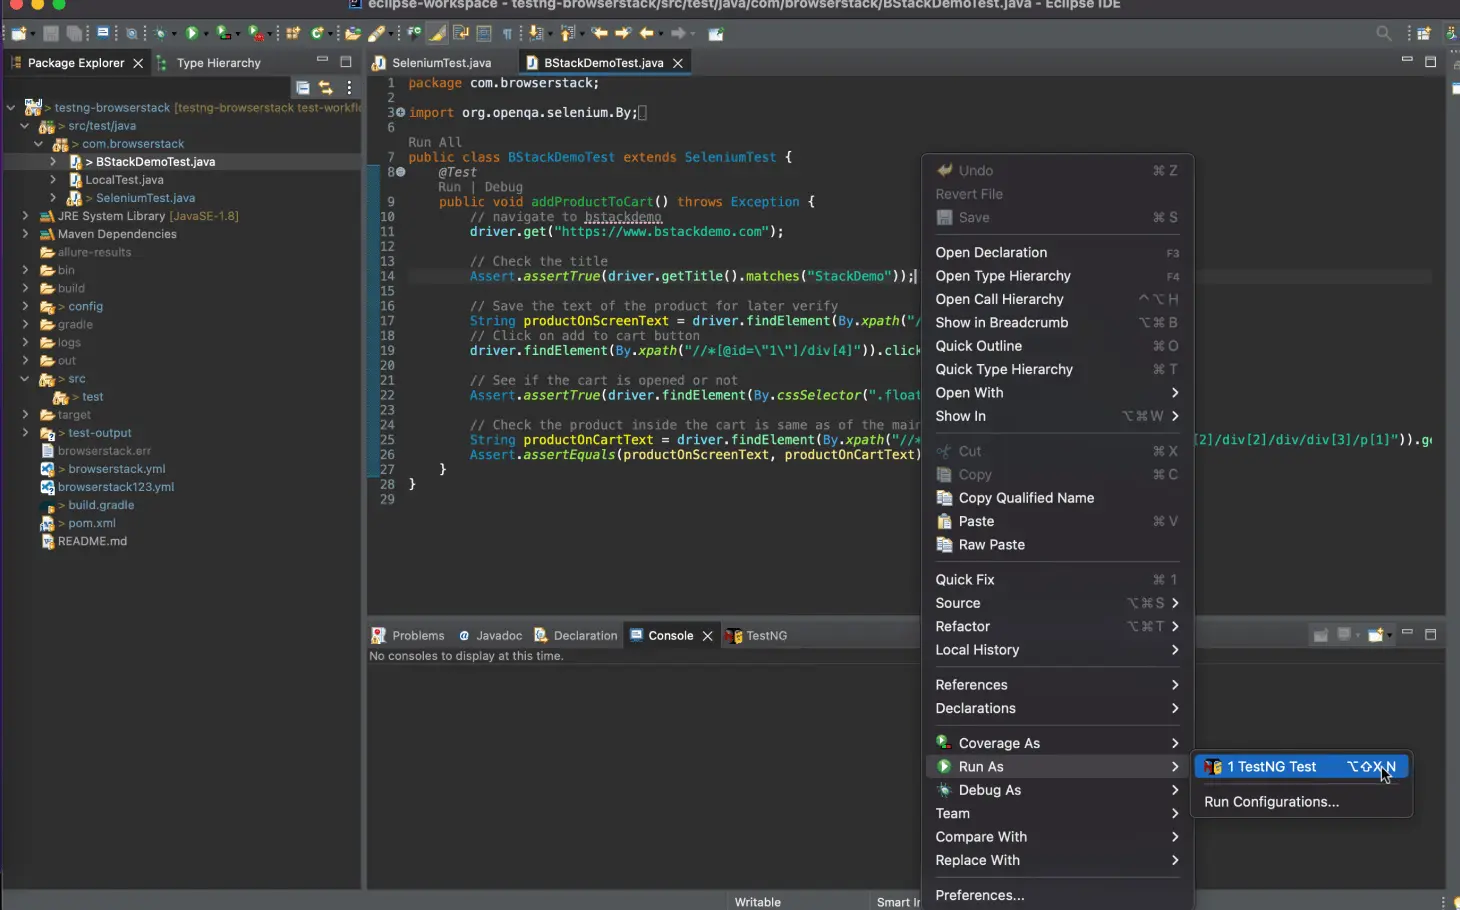
- Right-click anywhere on the file> Run As > TestNG Test.
Please refer to the official documentation at Selenium with TestNG for more details.
Step 4. Setting Up XML Validation in BrowserStack Pipelines
Integrating XML validation in BrowserStack Pipelines using XMLTest enhances the ability to ensure the integrity of XML files during automated testing.
Note: Please refer to the documentation – Integrate your TestNG Test Suite with BrowserStack Automate for guidance on integrating Selenium and TestNG tests with BrowserStack Automate.
A general overview of Setting Up XML Validation in BrowserStack Pipelines can be enumerated below.
1. Create a New Java Project: Start by setting up a Java project with Maven or Gradle, ensuring that the necessary dependencies for Selenium, TestNG, and XML validation libraries are included.
2. Define XML Test Configuration: Use an XML file (for example., testng.xml) to specify the test suite and individual test configurations, integrating BrowserStack capabilities.
3. Implement XML Validation Tests: Create a test class (for example., XMLValidationTest) that validates the structure and content of the XML files. Utilize libraries such as JAXP or DOM to parse and verify XML files as part of the test logic.
4. Configure BrowserStack Capabilities: In the test class, set up the DesiredCapabilities object to include necessary BrowserStack parameters, ensuring proper connection to the BrowserStack environment.
5. Run the Pipeline: After configuring the tests, trigger the BrowserStack Pipeline to execute the XML validation tests alongside any other defined tests.adu9xhjk’98ygfcxv
Benefits of BrowserStack Integration for XML Testing
Integrating BrowserStack Automate with XMLTest provides several key benefits for XML validation and testing processes.
- Comprehensive Compatibility: Access 3,500+ browser and device combinations to ensure XML-based applications work seamlessly across platforms.
- Simplified Integration: Use the BrowserStack SDK for quick setup of test suites with minimal configuration effort.
- Parallel Execution: Run multiple XML validation tests simultaneously, reducing execution time and improving efficiency.
- Local Testing Support: Validate XML files for applications hosted in internal environments using secure tunneling for data privacy.
- Real-World Testing: Simulate diverse network conditions and assess application behavior under real-world scenarios.
- Advanced Debugging: Leverage extensive logging tools to analyze test results and identify XML-related issues effectively.
- Enhanced Data Reliability: Ensure thorough validation of XML files, improving the overall quality and reliability of applications.
Conclusion
XMLTest serves as a vital tool for ensuring the accuracy and reliability of XML data, empowering teams to maintain high standards in their software testing and development processes.
Leveraging XMLTest within the BrowserStack environment enhances the validation of XML files and ensures data integrity throughout the testing process. By integrating with BrowserStack Automate’s extensive features—such as access to numerous real devices and browser combinations, efficient parallel execution, and secure testing of internal applications—teams can optimize their XML validation workflows.

