Xcode Previews empower the app development with abilities like real-time feedback and dynamic visualization.
Overview
What is Xcode Previews?
Xcode Previews is a feature introduced in Xcode 11 +, Apple’s integrated development environment (IDE) for macOS. It is used to develop applications for Apple platforms, such as iOS, iPadOS, macOS, watchOS, and TVOS.
When to use Xcode Previews?
- Building User Interfaces
- For Dynamic UI Testing
- Preview Responsive Design
- Rapid Prototyping of UI concepts
- Team Collaboration
In this guide, you will learn Xcode Previews in detail, covering its impact, benefits, implementation, and more.
What is Xcode Previews?
Xcode Previews is a feature introduced in Xcode 11 +, Apple’s integrated development environment (IDE) for macOS, used for developing applications for Apple platforms i.e. iOS, iPadOS, macOS, watchOS and tvOS.
Xcode Previews allows developers to see real-time previews of their user interfaces (UI) and interact with them directly in the Xcode editor without running the entire application as a finalized bundle (.ipa etc.).
With Xcode Previews, developers can create and modify SwiftUI views, which are user interface components, and see the changes immediately in the Preview canvas.
Read More: How to perform UI testing using Xcode
When to use Xcode Previews?
Xcode Previews can be used in various scenarios during the development of Apple platform applications. Here are a few situations where Xcode Previews can be particularly beneficial:
1. Building User Interfaces
- Xcode Previews is excellent for designing, coding, debugging and iterating on user interfaces (UIs).
- It allows developers to see real-time visual representations of their UI components as they make changes.
- This makes it easier to experiment with different layouts, colors, fonts, and other design elements, helping developers create aesthetically pleasing and user-friendly interfaces.
2. Dynamic UI Testing
- Xcode Previews enables developers to simulate different data states within their UI components.
- By providing sample data or dynamically changing data inputs, developers can visualize how their UIs react to different scenarios without running the entire application.
- This is particularly useful for testing edge cases, handling error conditions, or validating UI responsiveness.
- With Xcode Previews, developers can preview their UIs across different devices and screen sizes.
- This allows them to ensure that the UI components adapt well to various screen dimensions, orientations, and safe areas.
- It helps developers identify and fix layout issues early in the development process, saving time and effort in later stages.
4. Rapid Prototyping
- Xcode Previews can be used for rapid prototyping of UI concepts.
- Developers can quickly create and modify SwiftUI views, preview them in real-time, and experiment with different design ideas.
- This facilitates faster exploration of UI options, enabling developers to iterate and refine their designs efficiently.
5. Collaboration
- Xcode Previews provide a visual representation of UI designs, making it easier to collaborate with designers, product managers, and stakeholders.
- It allows for quicker feedback cycles, as stakeholders can visually review and interact with the UI in the Xcode editor.
- This fosters effective communication and alignment among team members.
Xcode Previews enhances productivity, speeds up the development cycle, and improves the overall quality of Apple platform applications.
How to use Xcode Previews?
Here are the ways that you can use to create XCode Previews, Work with the XCode Previews, and variations in XCode Previews.
Creating Previews
To create an Xcode preview you don’t have to perform extra steps.
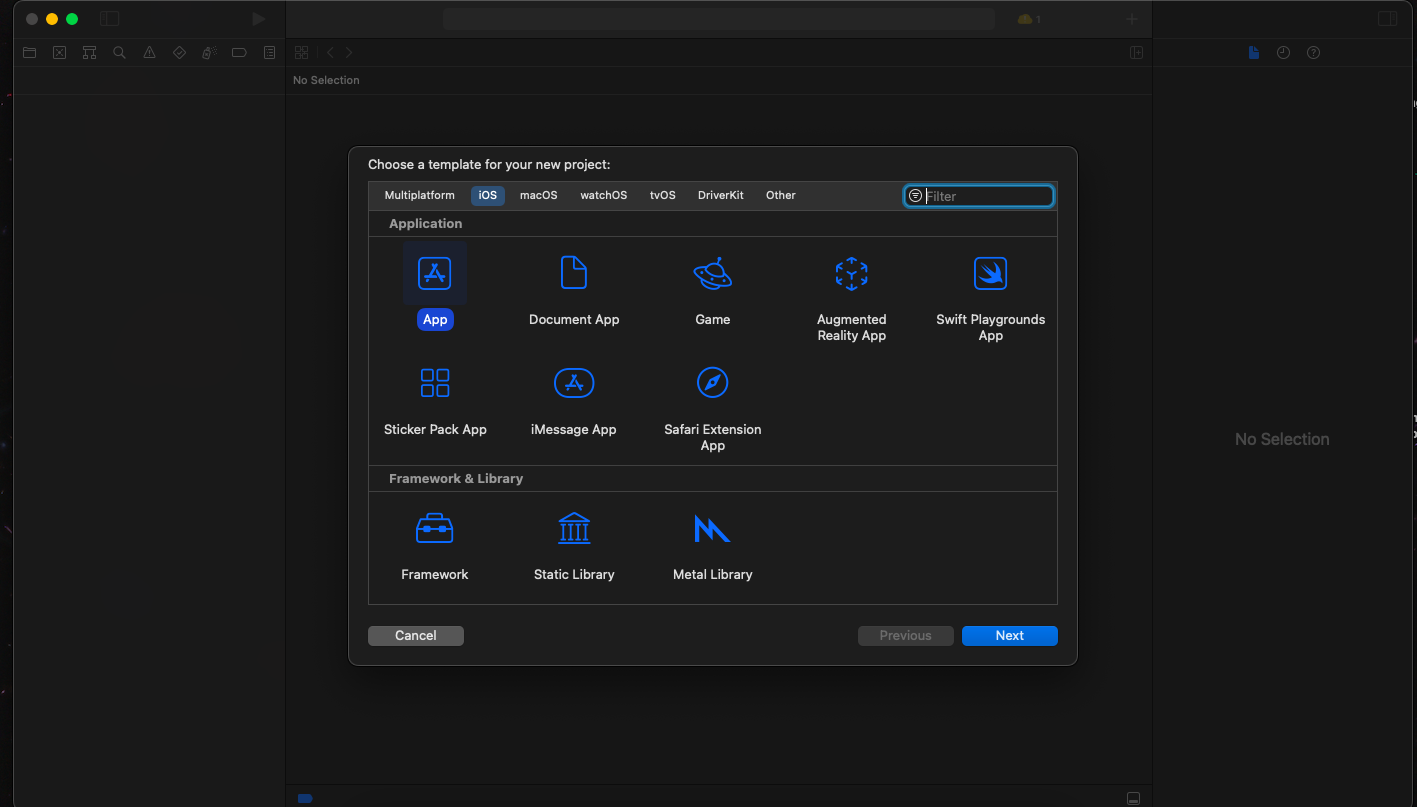
1. Create a new Xcode project, or open an existing one.
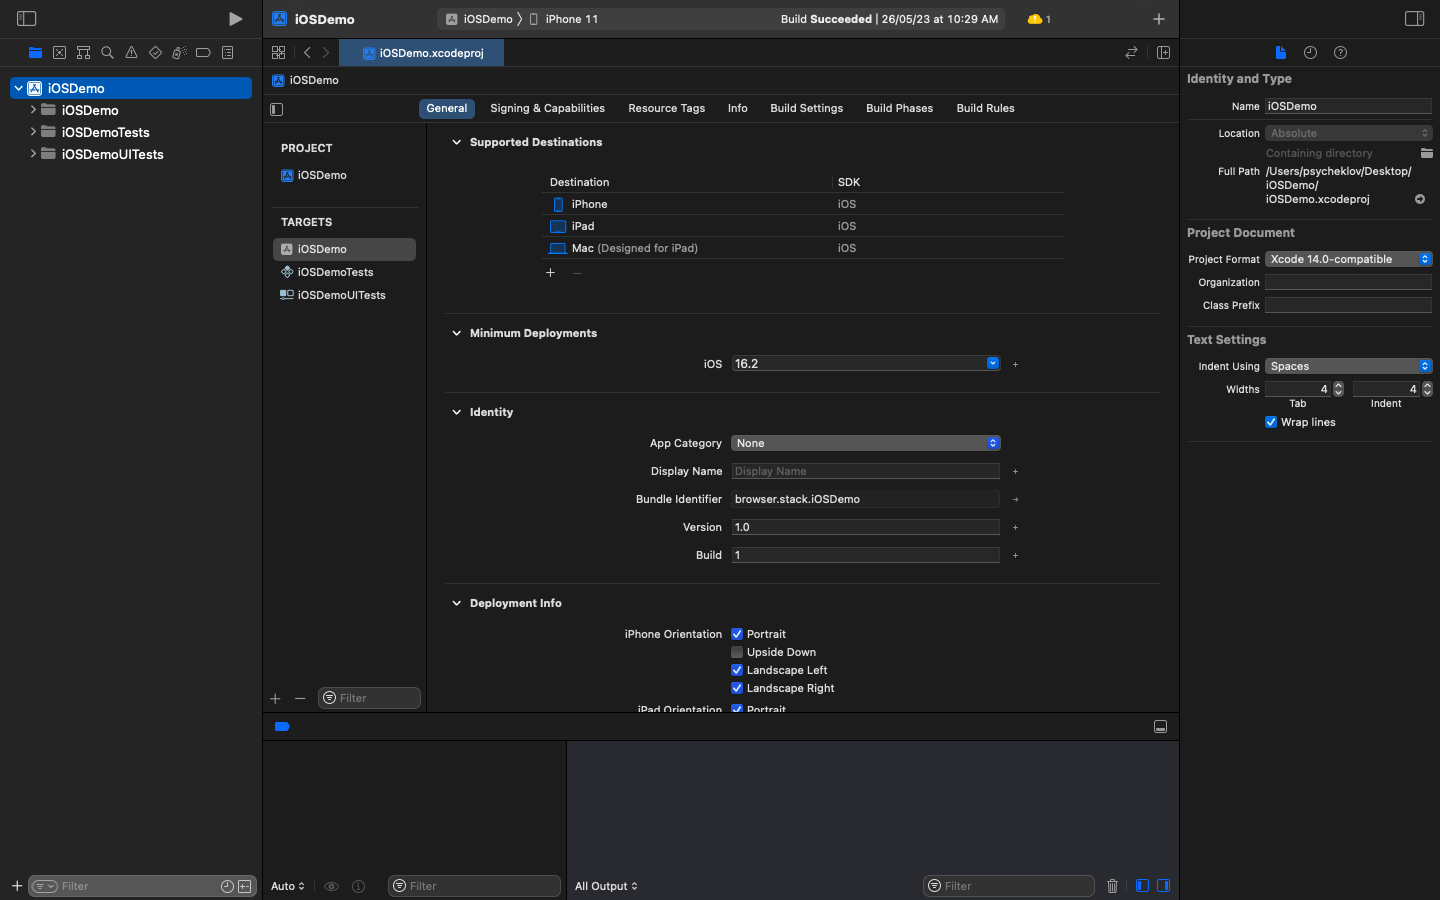
2. The Project configuration window will show up.
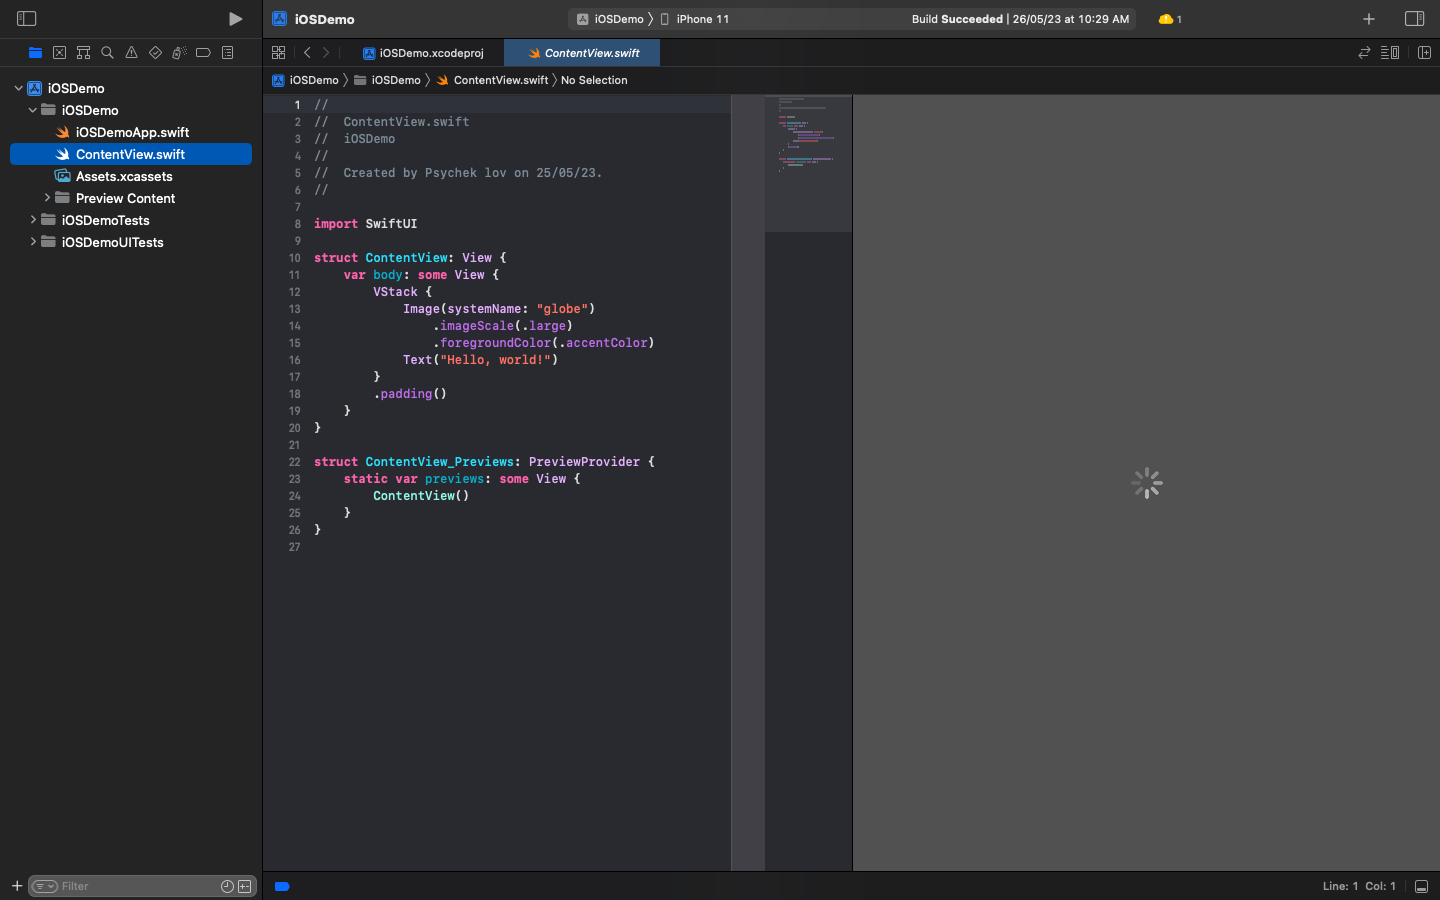
3. Create a new SwiftUI file or open an existing one in Xcode.
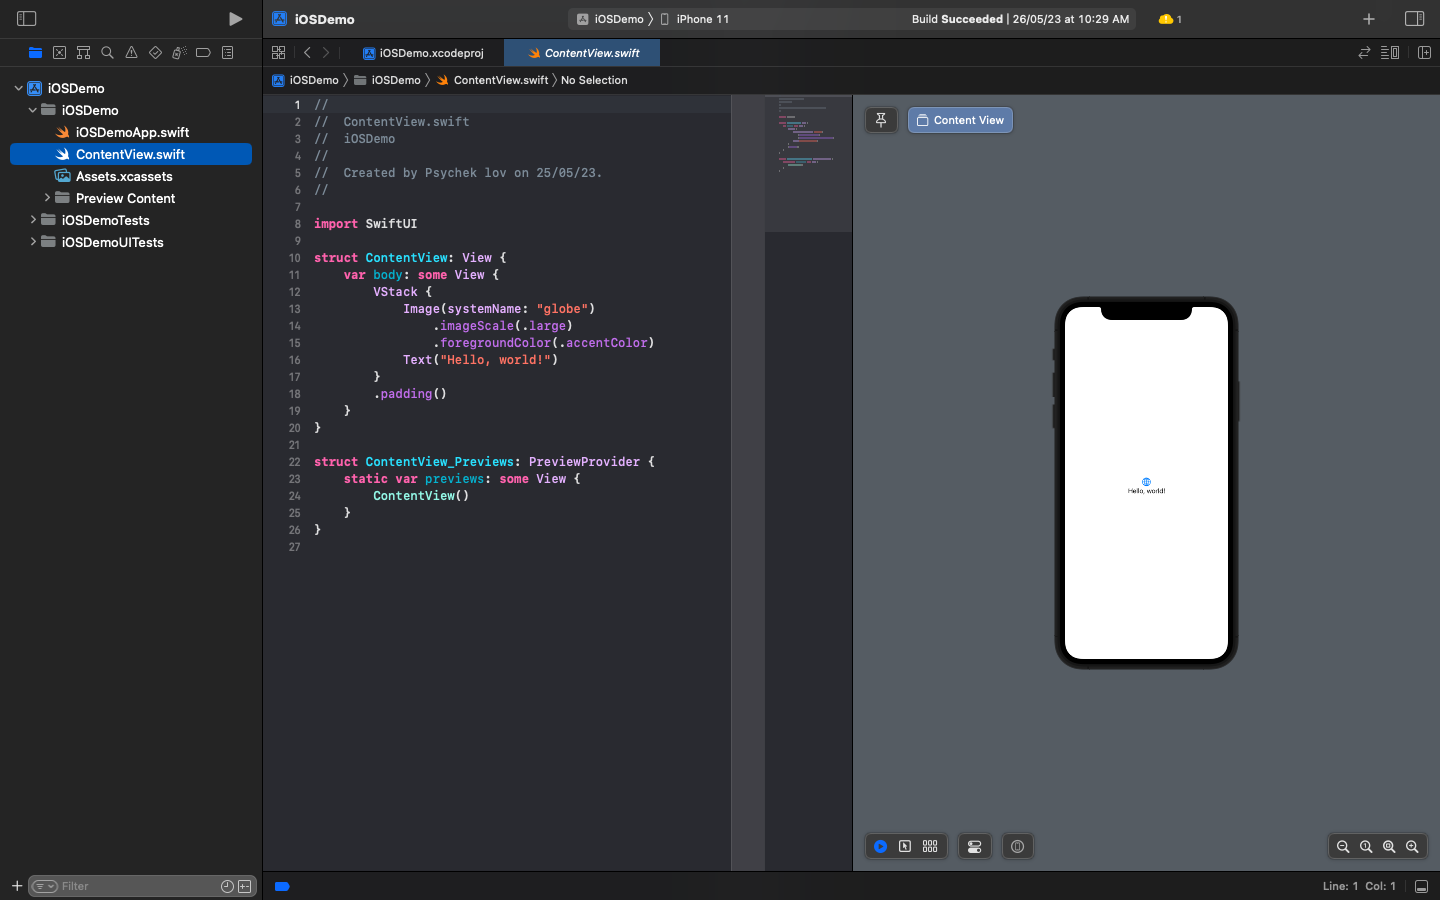
At the bottom of the file, Xcode automatically inserts a preview structure. Configure this structure as needed. For Example, this is the default ‘View’ upon creating a new project inside Xcode:
import SwiftUI


struct ContentView: View {


var body: some View {


VStack {


Image(systemName: “globe”)


.imageScale(.large)


.foregroundColor(.accentColor)


Text(“Hello, world!”)


}


.padding()


}


}


struct ContentView_Previews: PreviewProvider {


static var previews: some View {


ContentView()


}


}
4. Preview can take few seconds or minutes to load, depending on your computer.
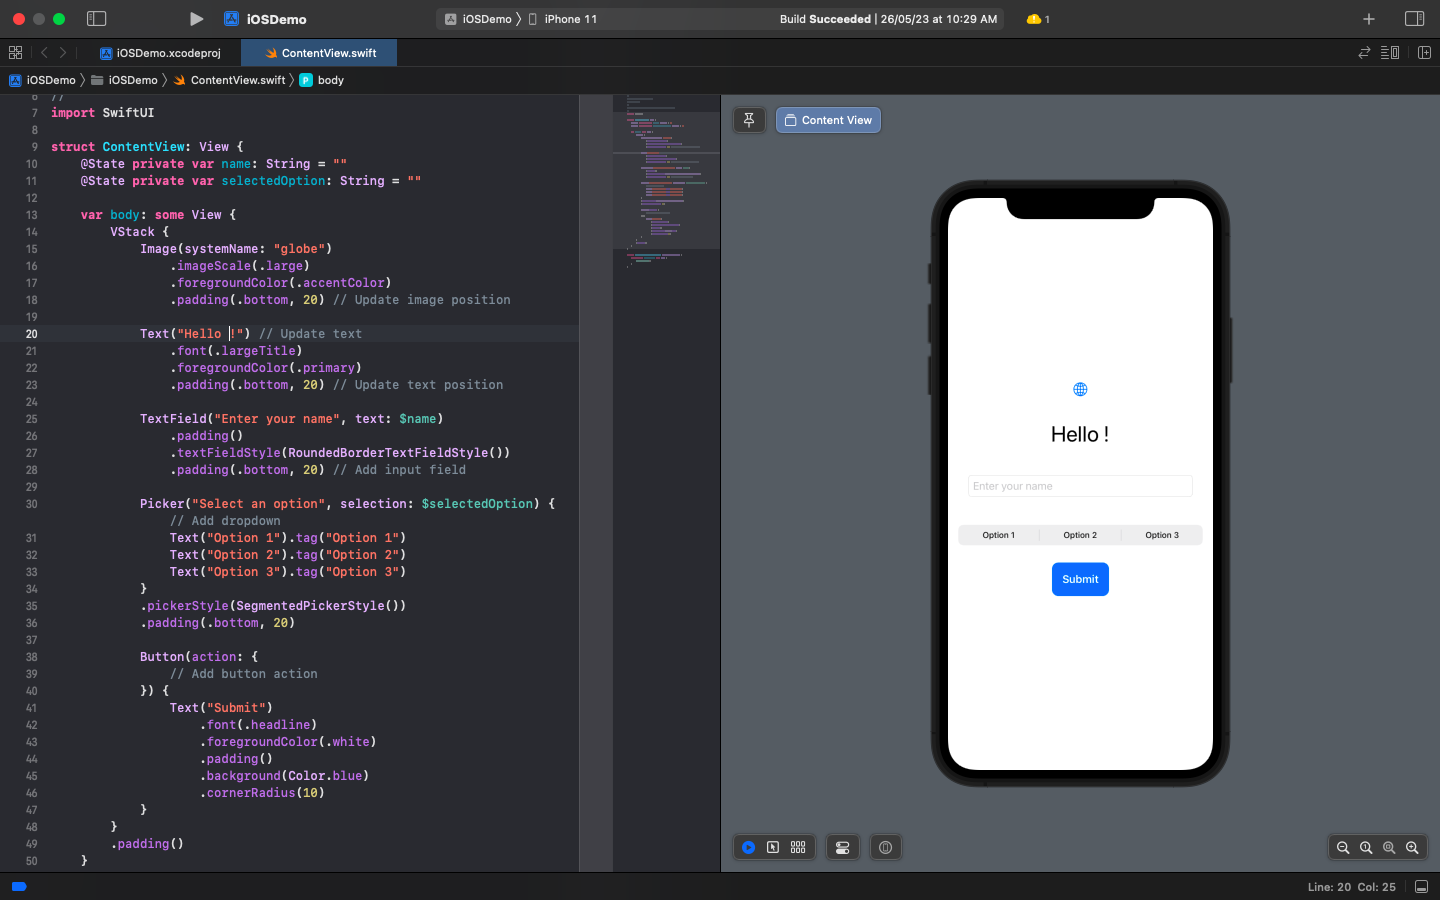
For the purpose of this demonstration, lets add a few UI components:
- A TextField/Input
- A Picker/Dropdown
- A Button
This is just to populate the screen (not worrying about functionality here). Updated ‘View’ becomes:
import SwiftUI


struct ContentView: View {


@State private var name: String = “”


@State private var selectedOption: String = “”


var body: some View {


VStack {


Image(systemName: “globe”)


.imageScale(.large)


.foregroundColor(.accentColor)


.padding(.bottom, 20) // Update image position


Text(“Hello, \(name)!”) // Update text


.font(.largeTitle)


.foregroundColor(.primary)


.padding(.bottom, 20) // Update text position


TextField(“Enter your name”, text: $name)


.padding()


.textFieldStyle(RoundedBorderTextFieldStyle())


.padding(.bottom, 20) // Add input field


Picker(“Select an option”, selection: $selectedOption) { // Add dropdown


Text(“Option 1”).tag(“Option 1”)


Text(“Option 2”).tag(“Option 2”)


Text(“Option 3”).tag(“Option 3”)


}


.pickerStyle(SegmentedPickerStyle())


.padding(.bottom, 20)


Button(action: {


// Add button action


}) {


Text(“Submit”)


.font(.headline)


.foregroundColor(.white)


.padding()


.background(Color.blue)


.cornerRadius(10)


}


}


.padding()


}


}
Working with Previews
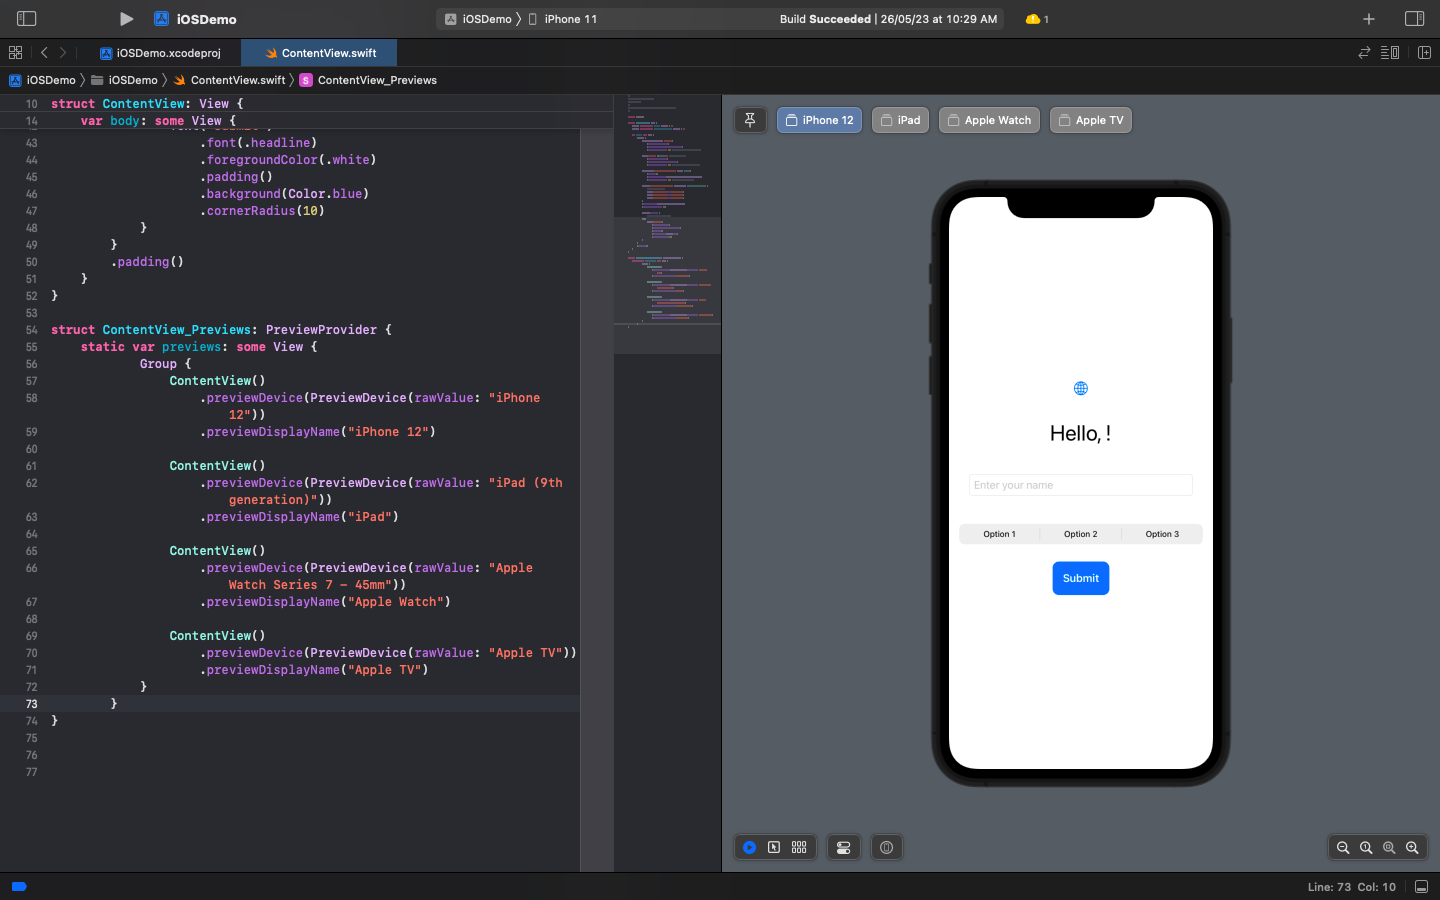
Let’s add the following devices as previews inside our PreviewProvider:
- iPhone 12
- iPad (9th generation)
- Apple Watch Series 7 – 45mm
- Apple TV
Updated ‘ContentView_Previews’ looks like this :
struct ContentView_Previews: PreviewProvider {

static var previews: some View {

Group {

ContentView()

.previewDevice(PreviewDevice(rawValue: "iPhone 12"))

.previewDisplayName("iPhone 12")


ContentView()

.previewDevice(PreviewDevice(rawValue: "iPad (9th generation)"))

.previewDisplayName("iPad")


ContentView()

.previewDevice(PreviewDevice(rawValue: "Apple Watch Series 7 - 45mm"))

.previewDisplayName("Apple Watch")


ContentView()

.previewDevice(PreviewDevice(rawValue: "Apple TV"))

.previewDisplayName("Apple TV")

}

}

}
Please note that in order for these devices to actually work properly as previews, you need to add the right ‘Targets’ and download necessary files.
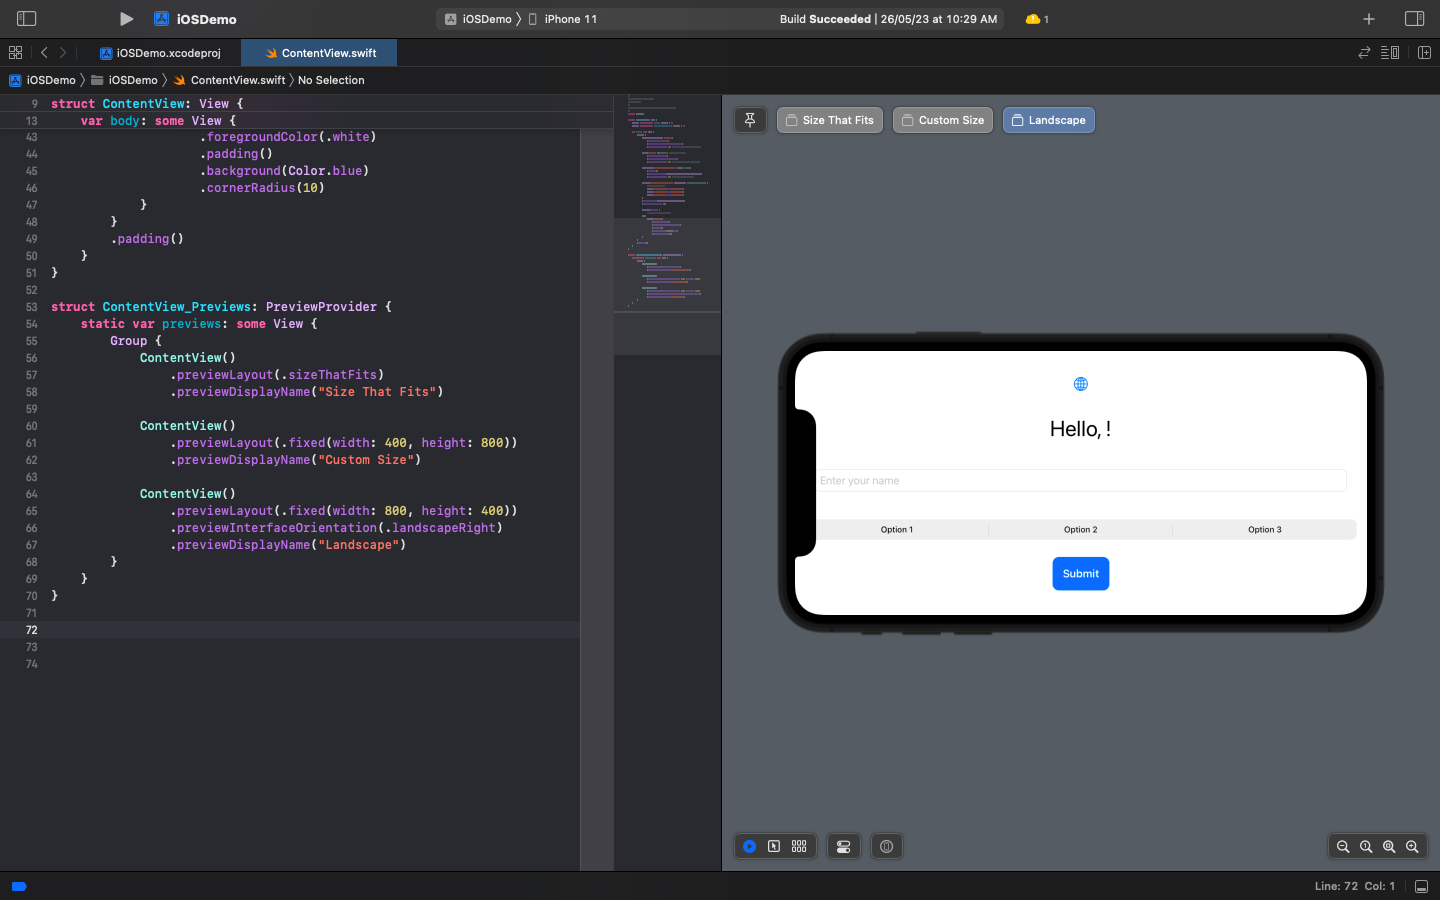
Now consider you want to have views based on custom criteria, not limited to form-factors offered by Apple. For example, let’s add variations to manually adjust the previews for these scenarios:
- Size That Fits: Uses the .sizeThatFits layout to automatically size the preview based on its content.
- Custom Size: Uses the .fixed(width:height:) layout to specify a custom width and height for the preview.
- Landscape: Uses the .fixed(width:height:) layout to specify a custom width and height for the preview and also sets the previewInterfaceOrientation to .landscapeRight to show the view in landscape orientation.
Updated code:
struct ContentView_Previews: PreviewProvider {

static var previews: some View {

Group {

ContentView()

.previewLayout(.sizeThatFits)

.previewDisplayName("Size That Fits")


ContentView()

.previewLayout(.fixed(width: 400, height: 800))

.previewDisplayName("Custom Size")


ContentView()

.previewLayout(.fixed(width: 800, height: 400))

.previewInterfaceOrientation(.landscapeRight)

.previewDisplayName("Landscape")

}

}

}
Variations in Previews
Additionally, here are some commonly occurring iPhone app UI development scenarios and techniques you can use with Xcode previews:
- Handling different screen sizes: To handle different screen sizes, you can use the previewLayout(_:) function to override the size of the container for the preview. For example, you can use .previewLayout(.fixed(width: 375, height: 667)) to simulate an iPhone 8 screen size.
- Simulating different device orientations: You can use the previewInterfaceOrientation(_:) function to override the orientation of the preview. For example, .previewInterfaceOrientation(.landscapeLeft) will display the preview in landscape orientation.
- Testing different color schemes: To test different color schemes, you can use the preferredColorScheme(_:) view modifier. For example, .preferredColorScheme(.dark) will simulate the dark color scheme.
- Handling dynamic type: If your app supports dynamic type, you can test how your views adapt to different text sizes. You can use the environment (\.sizeCategory, .accessibilityExtraExtraLarge) modifier to simulate larger text sizes.
- Previewing different data states: If your app’s UI varies based on different data states, you can use the @State property wrapper to simulate data changes in the preview. For example, you can use @State var isLoading: Bool = true to simulate loading state.
- Testing different localization: To test your app’s UI in different languages, you can use the LocalizablePreview struct. It allows you to preview localized strings by specifying the key and value pairs.
- Simulating different accessibility settings: You can use the accessibility* modifiers to simulate different accessibility settings in the preview. For example, .accessibilityDifferentiateWithoutColor(true) simulates the “Differentiate Without Color” accessibility setting.
- Combining views with Group: If you want to maintain multiple previews but apply a single modifier to all of them, you can use the Group view to wrap your previews.
These techniques will help you handle various scenarios and ensure that your app’s UI looks and behaves correctly on different devices, settings.
Please note that this was just a basic example of using Xcode Previews for iPhone App Development.
How to open Preview in Xcode
You can open Preview in Xcode using two ways:
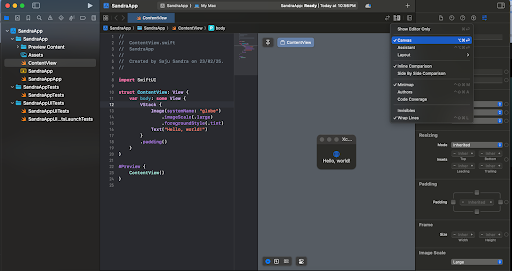
1. Go to the Editor menu in the top bar and select Canvas to display the preview alongside the code.
2. Another option would be to use the keyboard shortcut Command (⌘) + Option (⌥) + Enter to toggle the preview on and off.
Read More: Xcode vs VSCode: Everything you need to know
Functionalities of Xcode Previews
Some of the main functionalities of Xcode Previews include:
- Live UI Updates: Updates UI elements like text, colors, images, and layout quickly as changes are made in the code.
- Device & Orientation Preview: Shows how the UI looks on different Apple devices (iPhone, iPad, Mac) and in various orientations (portrait, landscape).
- Customizable Appearance & Data: Allows adjustments to font sizes, color schemes and data to see how the UI responds to different scenarios.
- State-Based Previews: Supports previewing specific UI states based on data availability or user interactions.
- Multiple Preview Variations: Enables creating multiple preview variations with different data sets and styles.
- Interactive Testing: Allows interaction with buttons, sliders and other UI elements to test their functionality.
- SwiftUI Integration: Seamlessly integrates with SwiftUI, updating previews immediately as properties are modified.
How to Preview an App’s interface in Xcode
Xcode comes with a robust feature that helps in the quick preview of app interfaces across various devices to simplify design changes and iterations. With this preview feature,developers can efficiently test and improve their SwiftUI, UIKit and AppKit views.
1. Adding Previews to Your Views
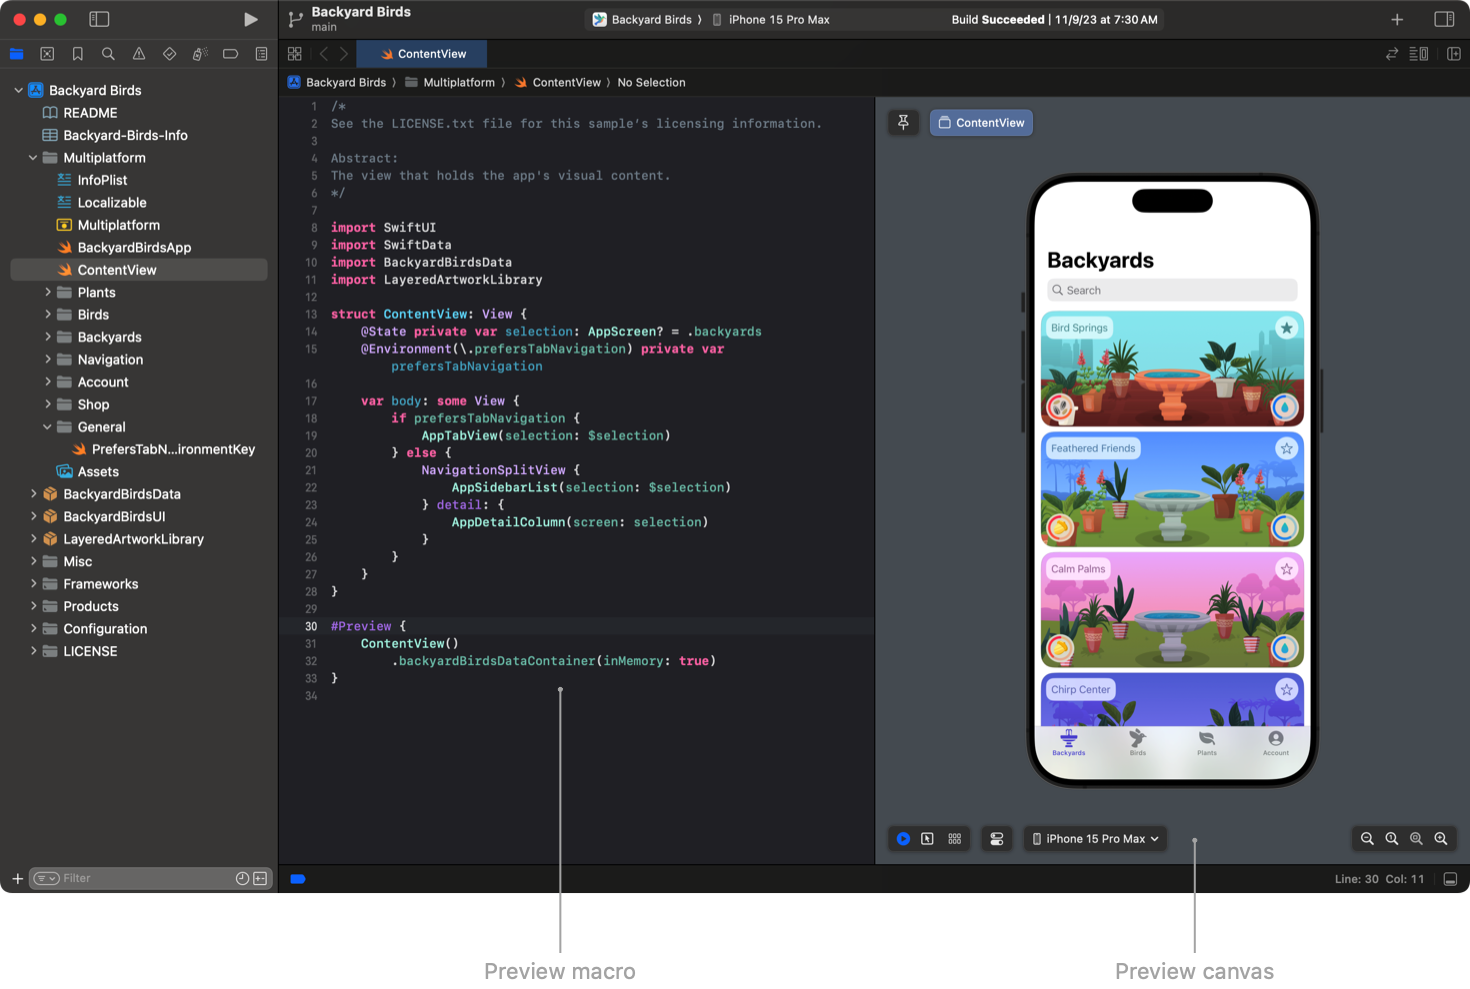
To add a preview for a view in Xcode, the #Preview macro is used. This macro is a snippet of code that configures the view and tells Xcode what to display. The preview can be added to SwiftUI, UIKit and AppKit views.
For SwiftUI:
#Preview {

ContentView()

}
In this example, ContentView() represents the SwiftUI view being previewed.
Here’s how to add a preview to a view:
- Open the source file of the view.
- Use #Preview macro to wrap the view.
- Return an instance of the view within the body of the trailing closure.
Source: Apple Developer
2. Interacting with Live Previews
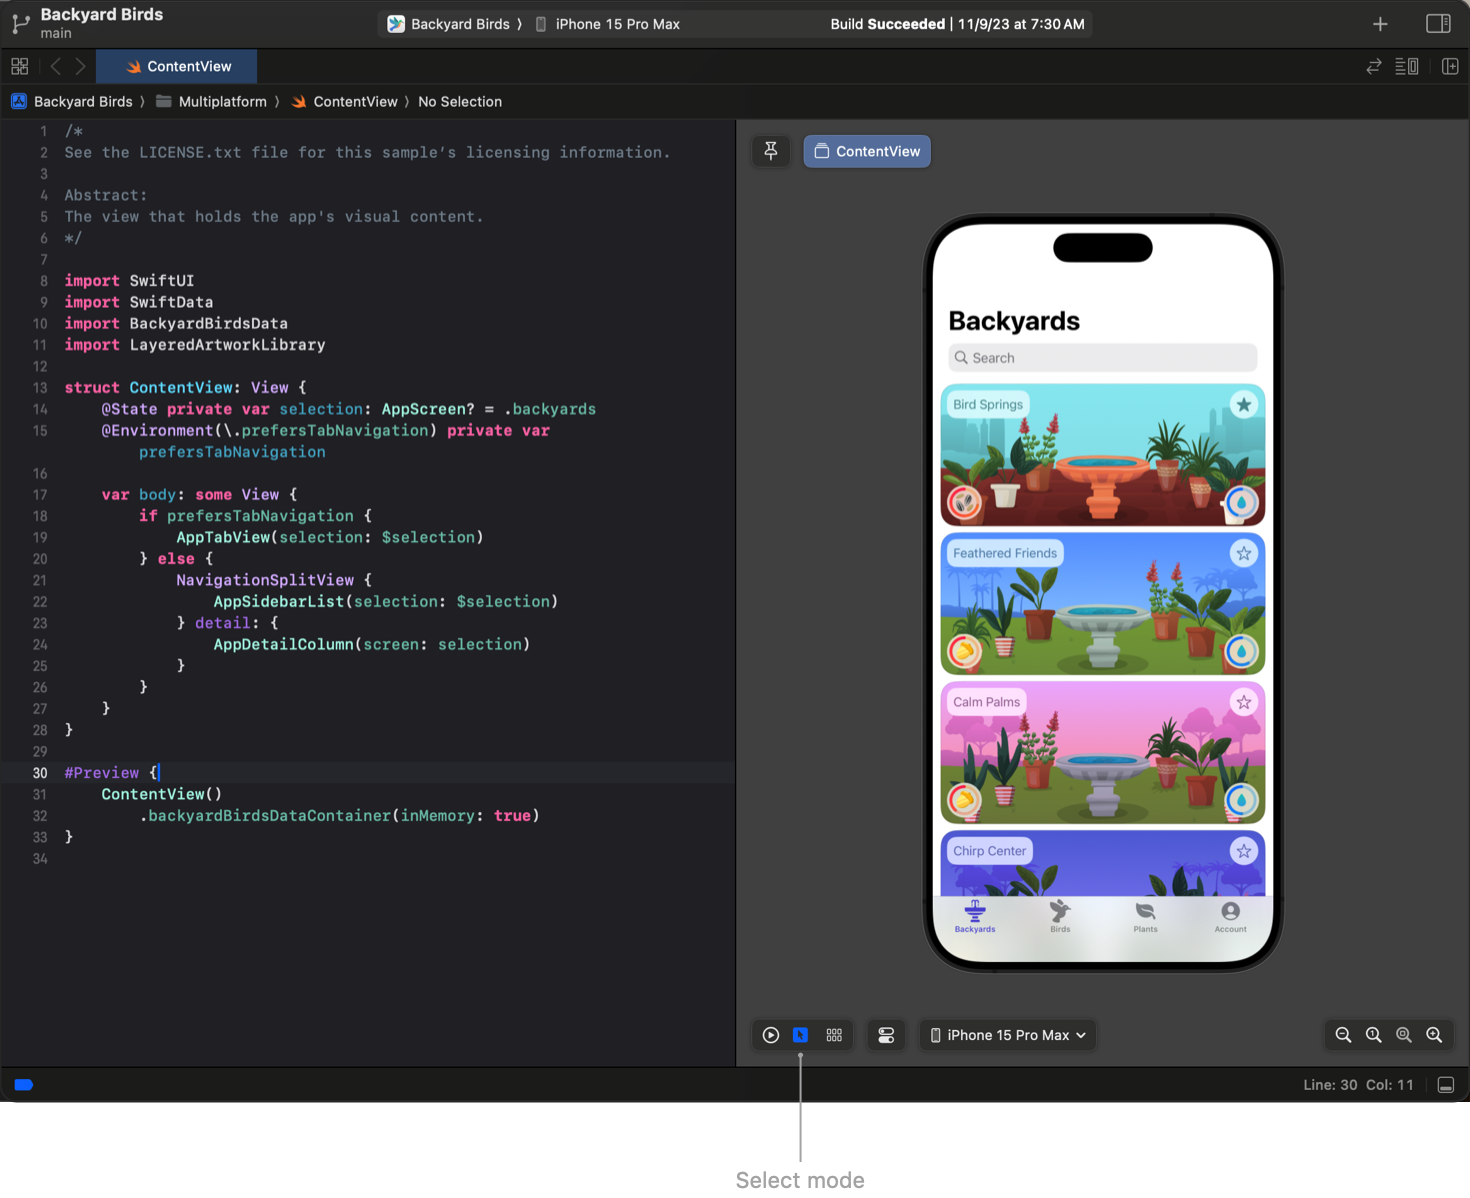
Xcode offers two main modes for interacting with previews namely; the Live Mode and Select Mode.
1. Live Mode: This mode allows interaction with the view in the preview. This makes it behave like it would on a device or simulator. It’s a great option for testing controls, animations and handling asynchronous code.
Source: Apple Developer
2. Select Mode: This mode displays a snapshot of the view enabling interaction with UI elements. It also points out the corresponding line of code when a control is selected in the preview which accelerates the debugging process.
Source: Apple Developer
3. Customizing Preview Display with Device Settings
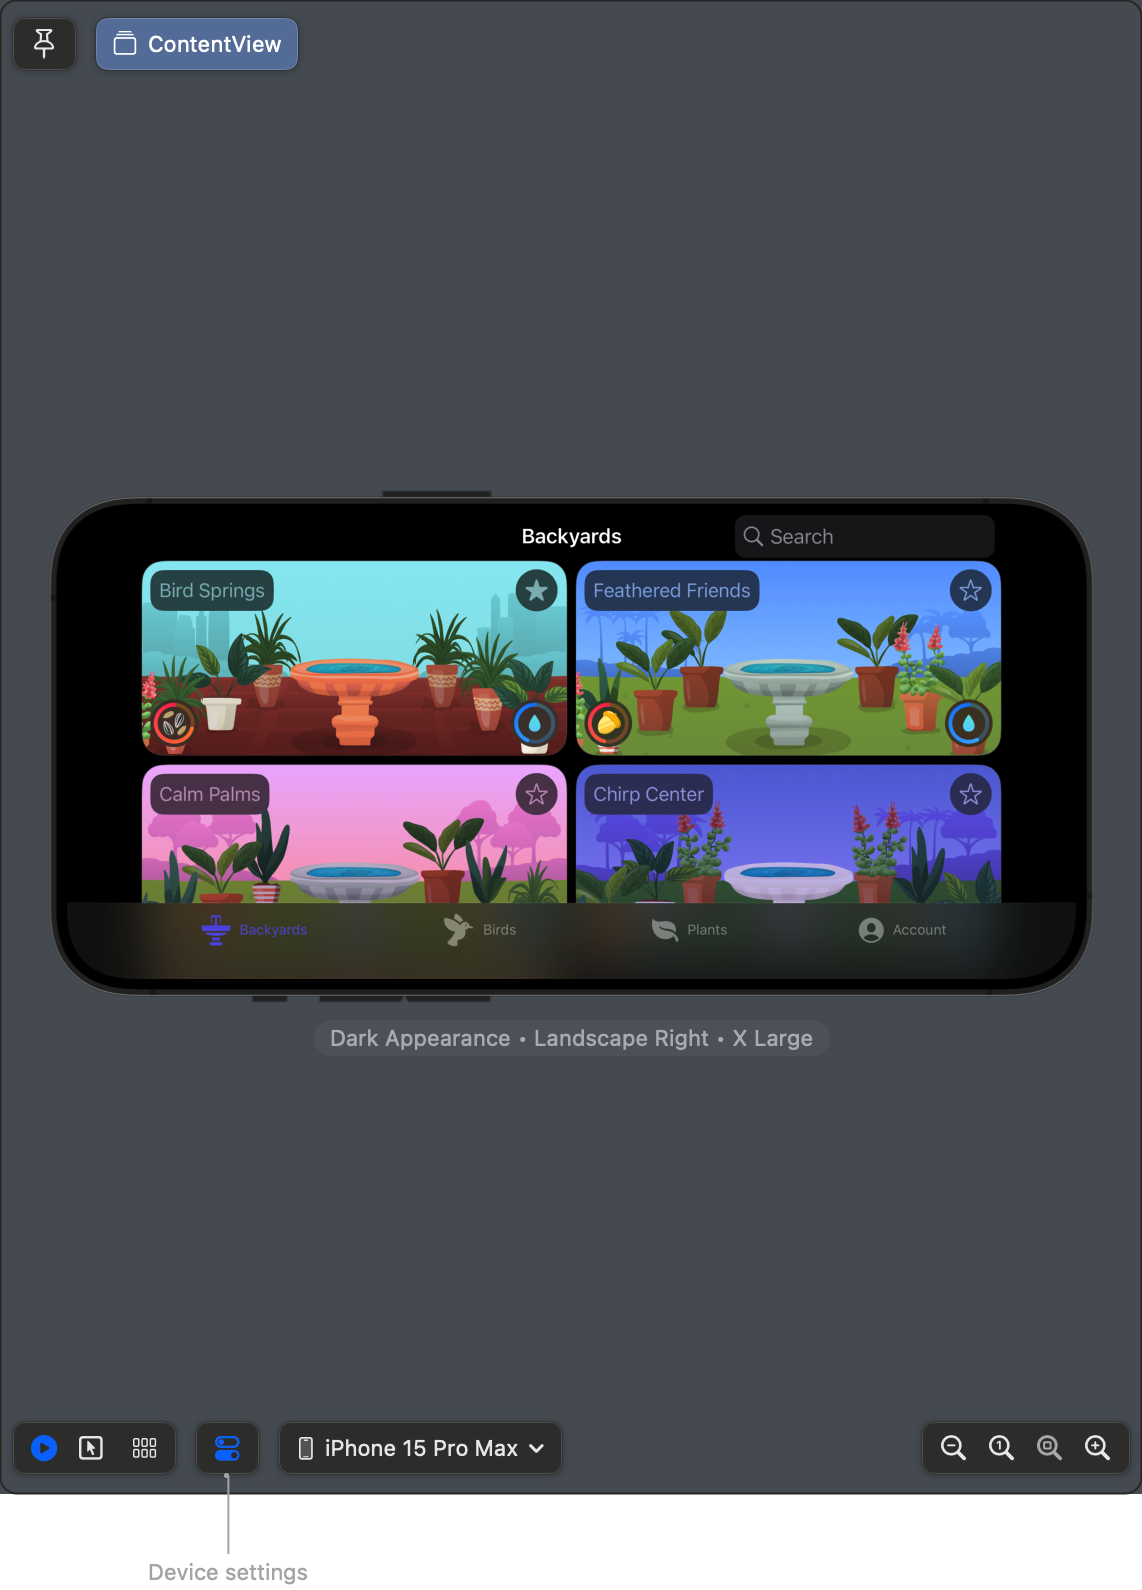
Xcode offers several customization options to preview how the view will appear on specific devices. Device settings can control aspects such as Color Scheme, Orientation, and Dynamic Type.
For example, to preview the view in Dark Mode, in a landscape right orientation and with extra-large text, you can:
- Navigate to ‘Device settings’ at the bottom of the preview canvas.
- Toggle On the Color Scheme .
- Select Dark Appearance under the Color Scheme section.
- Enable the Orientation toggle. Choose Landscape Right under the Orientation header.
- Enable the Dynamic Type toggle, then adjust the Dynamic Type slider to X Large text.
Source: Apple Developer
4. Testing Different View Configurations
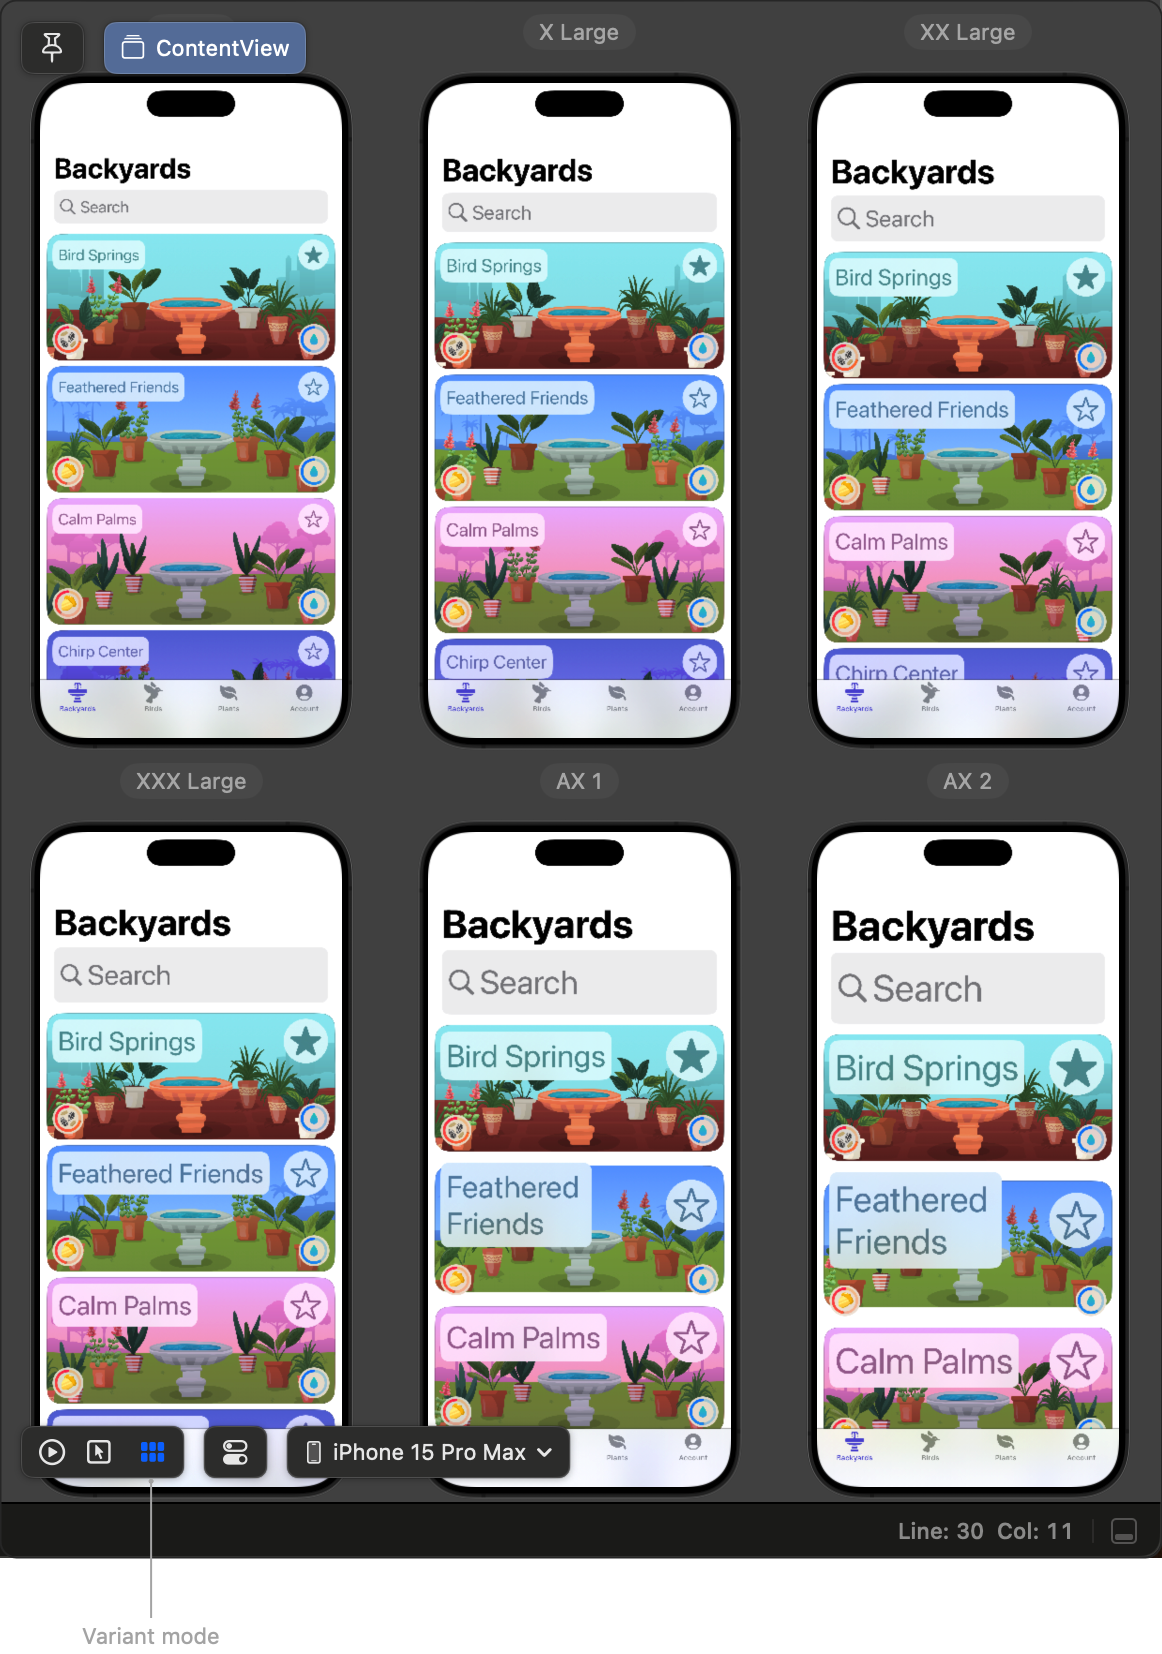
By supporting the Variant Mode, Xcode helps you see how the view behaves under different conditions. This mode allows the display of variations like:
- Color Scheme Variants: View the interface in both light and dark modes.
- Orientation Variants: Test how the app displays in various orientations (portrait, landscape).
- Dynamic Type Variants: Evaluate how text size changes across different accessibility settings.
The example below demonstrates testing accessibility support.
- Select Variant mode from the bottom of the preview canvas.
- Select Dynamic Type Variants.
- Xcode will exhibit the view with different text sizes to help evaluate responsiveness.
Read More: What does webkit-text-size-adjust do
Source: Apple Developer
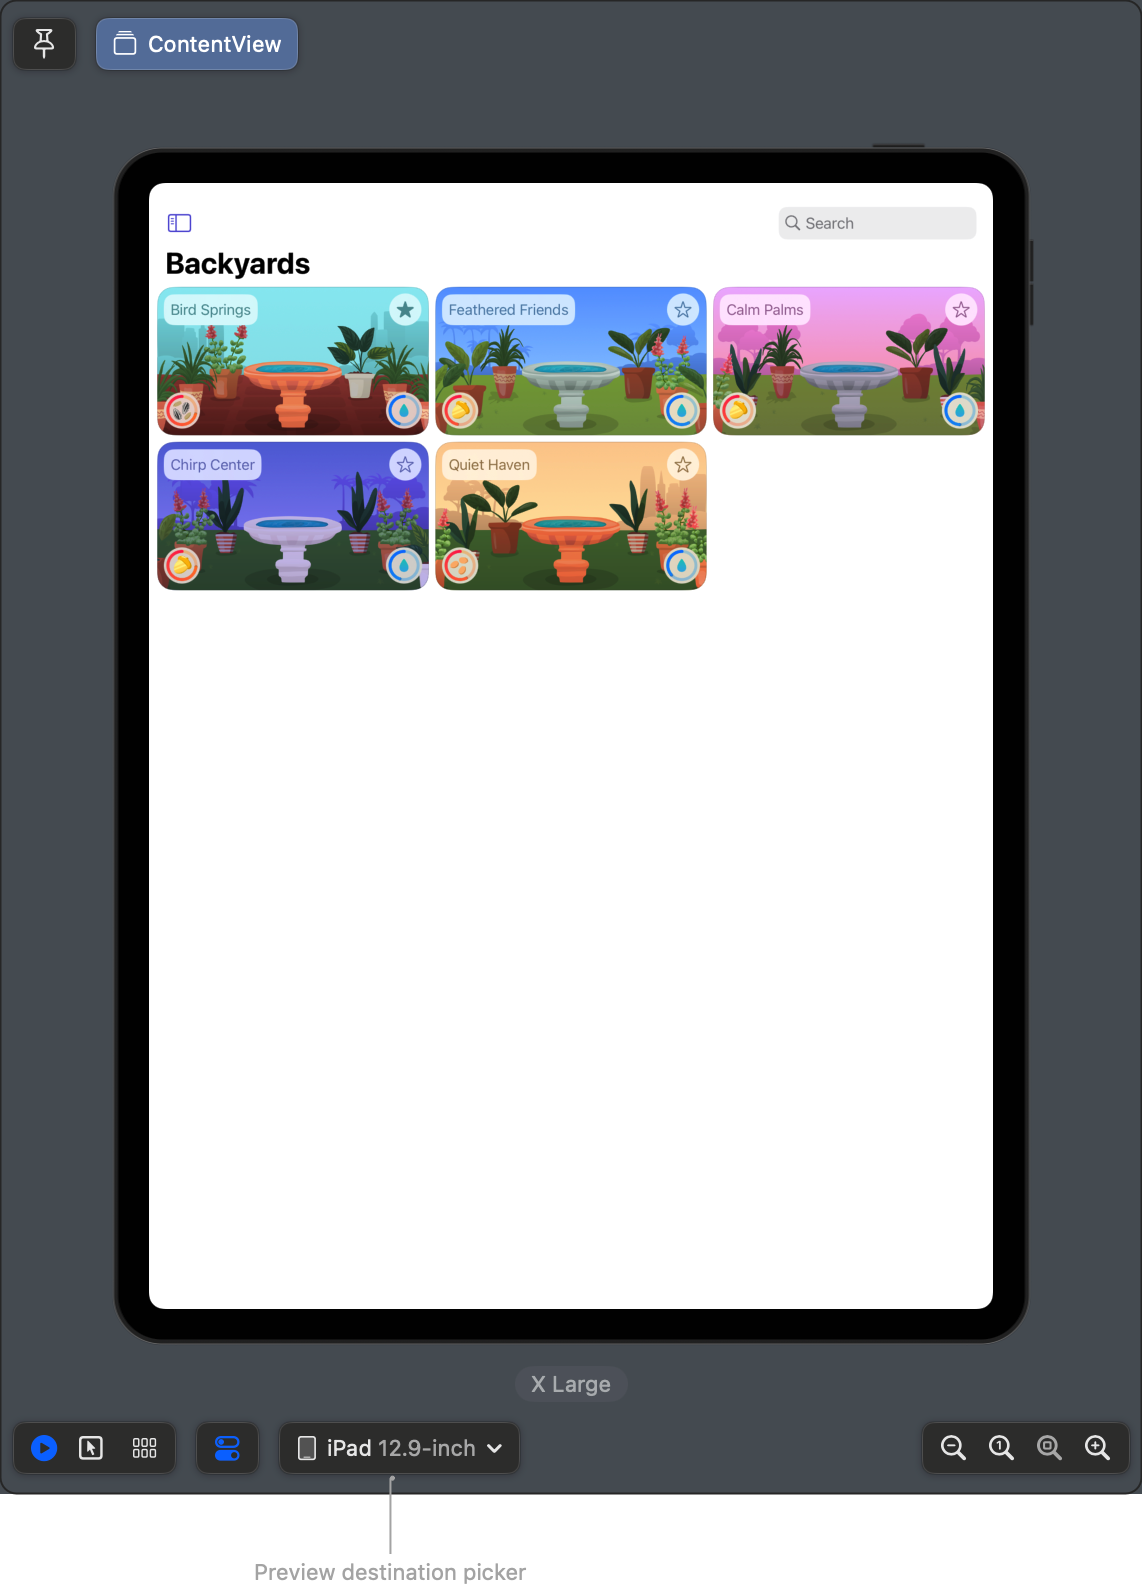
5. Device-Specific View Previews in Xcode
With Xcode, developers can preview their views on specific devices. They can select the exact device for the preview using the Preview destination picker which simplifies the process of assessing the view’s look on different Apple devices such as iPhone, iPad, and Mac.
Source: Apple Developer
6. Customizing Previews Programmatically
In addition to the visual options Xcode provides, developers can customize previews by configuring them in code. For instance, previews can be named for easier identification and tracking within the preview canvas.
#Preview("2x2 Grid Portrait") {

ContentView()

}
Developers can also adjust traits like device orientation or accessibility settings by passing configuration options to the preview macro.
7. Improving Performance with Preview Modifiers
When working with complex or resource-intensive objects, the PreviewModifier protocol can be used in order to make objects reusable across different previews. This is especially useful for objects that require heavy computation, like network calls or disk access. Instead of recreating them for each preview, developers can define them once and pass them into previews using the PreviewModifier protocol.
Here’s an example(swift) of how to use the PreviewModifier protocol to share an object across multiple previews:
@Observable

class AppState {

    var expensiveObject = "Expensive data"

}


// Create a PreviewModifier that shares the expensive object.

struct SharedAppState: PreviewModifier {

    static func makeSharedContext() async throws -> AppState {

        let appState = AppState()

        appState.expensiveObject = "Shared expensive object"

        return appState

    }


    func body(content: Content, context: AppState) -> some View {

        content.environment(\.appState, context)

    }

}


// Apply the PreviewModifier to the preview.

#Preview(traits: .modifier(SharedAppState())) {

    ContentView()

}
8. Using Development Assets
With Development Assets, Xcode lets developers ensure previews efficiently load without increasing app size.
These assets, like images or JSON files, can be included in previews without being shipped with the final app. This is especially useful for testing how assets appear in the app without bloating the final build.
Here’s an example(swift) of using development assets in a preview:
- Add images or JSON files to your development assets in Xcode.
- Use the Image or Data resources directly in the preview without shipping them in the app.
#Preview {

    ContentView()

        .previewImage("example-image")  // Load the image from Development Assets

}
Read More: What is Xcode Cloud and How to use it?
Advantages of using Xcode Previews
Using the Xcode previews feature offers several advantages for developing iOS apps:
- Rapid iteration and feedback: Xcode previews allow you to see the visual representation of your UI components in real-time as you write and modify code.
- Enhanced productivity: With Xcode previews, you can work directly in the preview canvas without the need to constantly switch between the code editor and simulator, providing a focused environment for UI development.
- Isolation and independence: Previews provide a self-contained environment for testing and fine-tuning UI components. They are independent of the app’s runtime environment and dependencies.
- Simulating different configurations: Xcode previews allow you to simulate various configurations, including different devices, screen sizes, orientations, color schemes, accessibility settings, and data states.
- Testing edge cases and states: Previews enable you to test your UI components with different edge cases, such as empty states, error conditions, long text, and large data sets.
- Collaboration and communication: Xcode previews make it easier to share and discuss UI designs with team members or stakeholders. You can generate visual previews of your UI components and share them as images or live previews.
- Documentation and reference: Previews serve as a form of documentation for your UI components. By including previews in your codebase, you create a visual reference that helps you and other developers understand the intended appearance and behavior of the UI components.
- Simplifying UI testing: Xcode previews can be leveraged as a foundation for UI testing. By having well-defined previews, you can write UI tests that validate the correctness of your UI components easily.
Limitations of Xcode Previews
While Xcode previews offer many benefits, it’s important to be aware of their limitations:
- Limited runtime environment: Xcode previews simulate the appearance of your UI components but do not provide a full runtime environment. They may not accurately reflect certain runtime behaviors, such as animations, transitions, or complex interactions that rely on live data or network requests.
- Performance considerations: Previews are primarily focused on visualizing UI components and may not accurately represent the performance characteristics of your app.
- Dependency management: Previews might encounter difficulties when interacting with external dependencies or complex dependency graphs. If your UI components rely on specific dependencies or frameworks, it’s important to ensure that they are properly handled within the preview environment.
- Limited access to device-specific features: Previews do not have direct access to device-specific features, such as GPS, camera, or push notifications. If your UI components rely on these features, you may need to test them on actual devices or even better, BrowserStack Device cloud.
- Limited testing coverage: While Xcode previews help validate the visual aspects of your UI components, they do not replace comprehensive unit tests, integration tests, or end-to-end tests.
- Layout discrepancies: Although Xcode previews aim to simulate various screen sizes and orientations, there may be slight layout discrepancies between the preview canvas and the actual devices or simulators.
- Complex view hierarchies: Previews can become less efficient or slower to render when dealing with complex view hierarchies or computationally expensive layouts.
- Limited platform support: While Xcode previews support iOS, iPadOS, macOS, Mac Catalyst, tvOS, and watchOS, there may be certain platform-specific behaviors or APIs that are not accurately represented in the previews.
Despite these limitations, Xcode previews remain a valuable tool for visualizing and iterating on UI components during development.
It’s recommended to combine previews with other testing techniques to achieve comprehensive coverage and ensure the overall quality of your app.
Also Read: How to enable Xcode Code Coverage?
Testing Xcode Previews on real devices
Testing Xcode previews on real devices could be an expensive and time consuming task. But it is majorly simplified by BrowserStack’s Device Cloud and App Live services. Here’s how it can help teams better manage testing on real devices:
Test on Real Devices with BrowserStack App Live
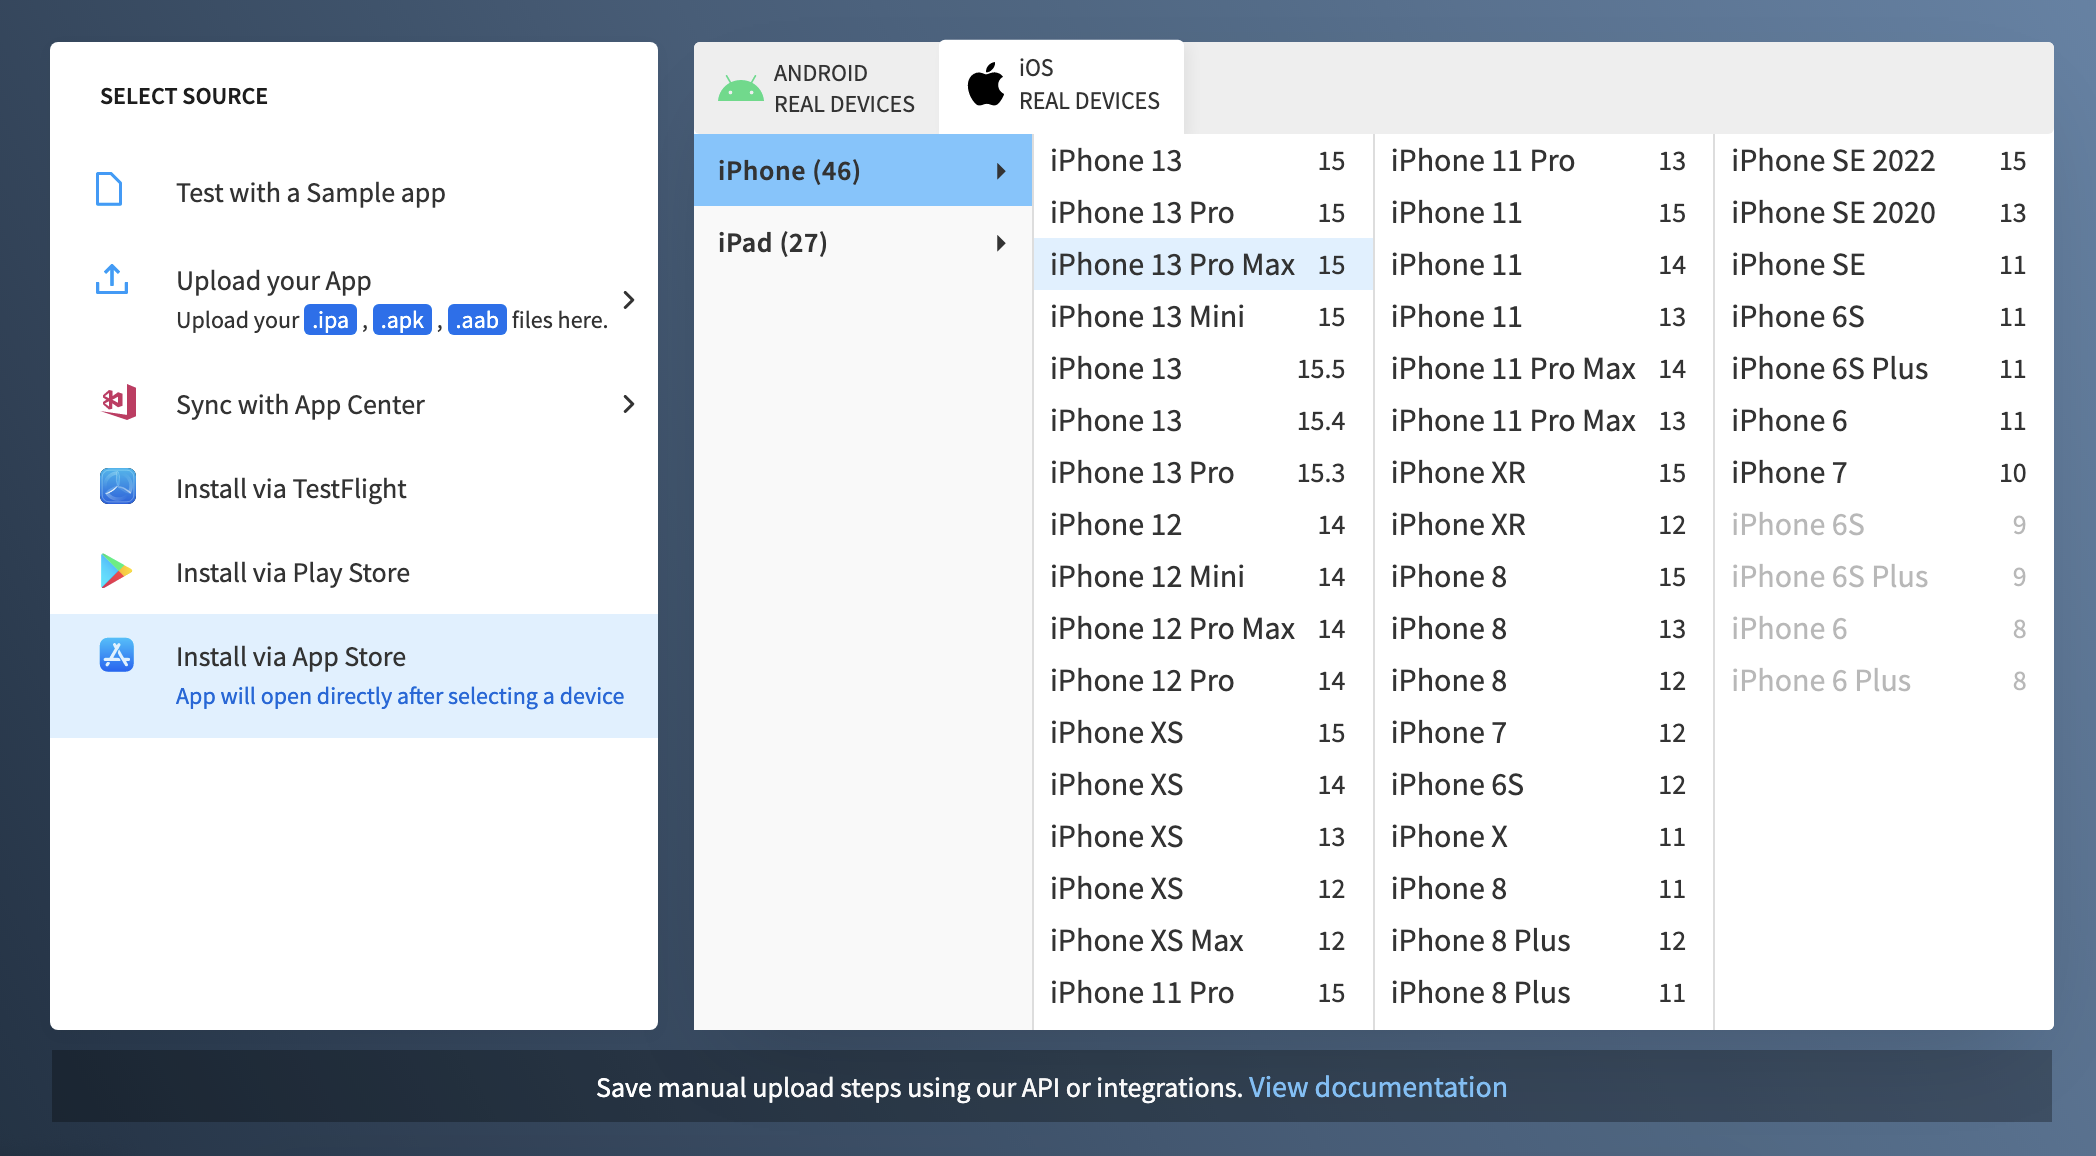
- Setup and configuration: Upload your Application to BrowserStack cloud using one of these options.
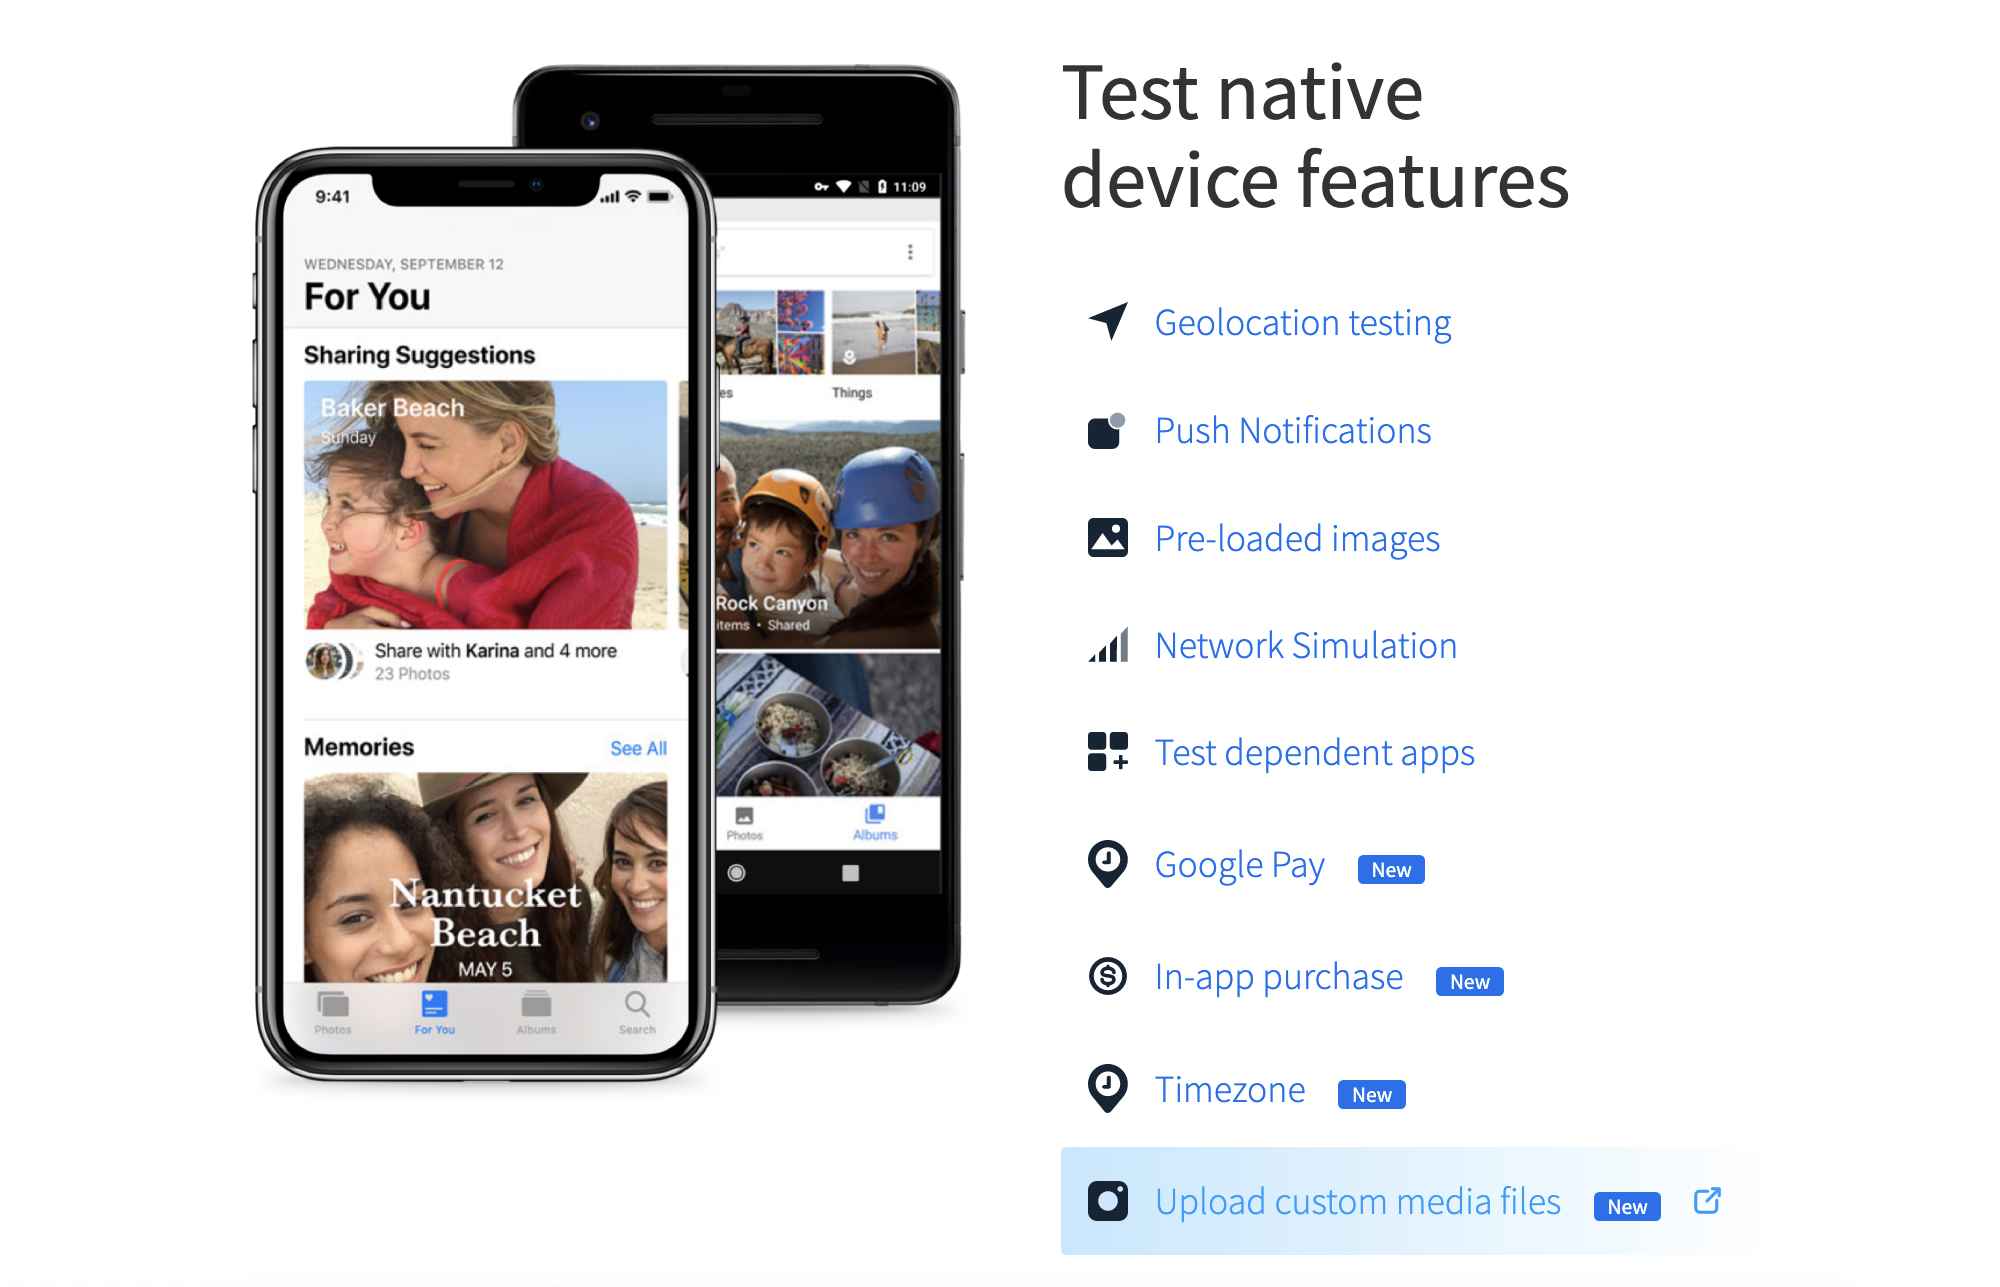
- Device selection: With BrowserStack App Live, you gain access to a wide range of real devices, including iPhones and iPads, running different iOS versions. You can choose the specific device models and iOS versions you want to test your Xcode previews on.
- Interaction and navigation: App Live provides a live, interactive streaming of the chosen real device directly to your browser. This allows you to interact with a real device within your browser.
- Real-time debugging: App Live facilitates real-time debugging of your app UI by providing access to device logs, console outputs, and runtime errors. This helps in diagnosing and resolving any issues or errors that may arise during the testing process.
- Multi-device testing: BrowserStack App Live allows you to test Xcode previews across multiple real devices. This enables you to observe the consistency of your UI components across different devices versions and ensure a seamless user experience across a variety of screen sizes, resolutions, and orientations.
- Collaboration and sharing: With App Live, team members can collaborate effectively by sharing the live device stream with other stakeholders, including designers, developers, and QA testers. This enables everyone to provide feedback, discuss issues, and make informed decisions based on the actual behavior of the app.
- Cloud-based infrastructure: BrowserStack’s cloud-based infrastructure ensures that teams can test their app on a scalable and reliable platform. It eliminates the need for maintaining physical devices, reduces infrastructure costs, and allows for parallel testing across multiple devices, speeding up the testing process.
- Cross-platform testing: In addition to testing Xcode previews on iOS devices, BrowserStack App Live also supports testing on Android devices. This is particularly beneficial for teams working on cross-platform projects or developing web based apps that require compatibility across different operating systems.
Conclusion
Xcode previews offer powerful tools for iOS developers to design, iterate, and test UI. They provide real-time feedback, enhancing productivity. However, they have limitations and should be supplemented with other tests.
BrowserStack App Live helps test previews on real devices, enabling interactive debugging, multi-device synchronization, and collaboration. It offers a scalable cloud-based infrastructure for all your app testing needs.
Ultimately, Xcode Previews and App Live help streamline UI development, improve app quality, and deliver great user experiences on Apple devices.
Useful Resources for Xcode
- What is Xcode: Features, Installation, Uses, Advantages and Limitations
- How to Download, Install and Update Xcode on Mac
- What is Xcode Cloud and How to use it?
- Xcode vs VSCode: Everything you need to know
- Swift vs Xcode: Understanding Key Differences
- Xcode Python: The Ultimate Development Environment for Python on Mac
- iOS Development on Windows: A Complete Guide to Xcode for Windows
- How to test App on iPhone using Xcode?
- How to perform XCode UI testing?
- How to enable Xcode Code Coverage?
- Using Xcode iOS Simulator for Responsive Testing
- All about Working with Xcode Previews
- What is iOS Unit Testing? (Tutorial with Xcode & Swift)
