Visual regression testing ensures that web applications continue to look how they’re supposed to after updates or changes by helping to detect unintended visual discrepancies, like layout shifts and missing elements.
Overview
What is Visual Regression Testing?
Visual Regression verifies that code changes did not affect the UI by comparing screenshots from before and after.
What is WebdriverIO
WebdriverIO, a popular JavaScript automation framework, is commonly paired with tools like Percy for visual regression testing.
Benefits of Running Visual Regression Testing Using WebdriverIO
- Integrated testing capabilities
- Cross-browser compatibility
- Rich plugin ecosystem
- Ease of Use
- Customizability
This guide provides an in-depth overview of performing visual regression testing using WebdriverIO.
What is Visual Regression Testing?
Visual Regression, to be specific, is intended to check that any code changes did not affect the UI by comparing screenshots from before and after. Visual regression tests are significant in identifying whether the visual errors have occurred after making changes to the code. It can be integrated into the existing test framework like WebdriverIO using tools that support visual tests.
Read More: How to run Regression Testing in Agile Teams
Visual Regression Testing with WebdriverIO Framework
WebdriverIO is a JavaScript automation framework for mobile and web applications. It lets you automate browser interactions using Selenium Webdriver or WebDriver protocol and supports a wide range of testing scenarios.
WebdriverIO is an effective tool for performing visual testing as it provides an API for image comparison. It provides services like Wdio-image-comparison-service to compare images in various platforms such as browsers, mobile browsers, and hybrid applications.
Read More: Cross Browser Testing using WebdriverIO
What is Wdio-image-comparison-service?
Wdio-image-comparison-service is a WebDriverIO plugin used to perform visual regression testing. It allows you to compare screenshots of your web application to previously captured baseline images.
If there are differences, it emphasizes the changes. This helps ensure that new code changes don’t unintentionally affect the visual appearance of the application.
It integrates seamlessly with WebDriverIO, a popular automation testing framework for web applications.
Use Cases of Wdio-image-comparison-service
Wdio-image-comparison-service especially useful in agile development environments where frequent updates are made, providing developers with the confidence that their changes haven’t broken the UI. Below are some key use cases where the service provides significant benefits.
- Visual Regression Testing: This is the primary use case. It ensures that UI changes don’t break the layout or visual components of the application. Any visual differences between the baseline and the current screenshots are flagged.
- Cross-Browser Testing: It helps check if the application looks consistent across multiple browsers. The image comparison service can identify browser-specific issues by comparing screenshots from different browsers.
- UI Consistency Verification: As teams develop new features, it’s crucial to check that the UI remains consistent. The Wdio-image-comparison-service can catch any unintended style changes or layout shifts.
- CI/CD Integration: It works effortlessly within a Continuous Integration/Continuous Deployment (CI/CD) pipeline. As developers push updates, automated visual tests can run, ensuring no visual bugs are introduced during deployment.
- Performance Monitoring: Visual changes may indicate potential performance issues like slow-loading images or unoptimized elements. Image comparison can help monitor and report these issues early.
How to Run Visual Regression Test using WebdriverIO
Visual regression testing ensures that the visual appearance of your web application remains consistent across different versions and browsers.
Using WebDriverIO, an automation tool for browser testing, you can easily capture screenshots of your application and compare them to baseline images to detect any visual discrepancies. This approach helps in ensuring UI consistency throughout development cycles.
This guide covers the process of setting up WebDriverIO for visual regression testing, configuring the image comparison service, writing tests, and reviewing the results.
1. Install WebDriverIO and Required Packages
First, install WebDriverIO and the necessary dependencies for visual regression testing:
npm init wdio .
npm install --save-dev @wdio/cli @wdio/local-runner wdio-image-comparison-service webdriverio
2. Configure WebDriverIO
Create or update your wdio.conf.js configuration file to include the image comparison service.
2.1 Add the wdio-image-comparison-service to the services array:
services: ['image-comparison'],
2.2 Configure the imageComparison options:
exports.config = {

    services: ['image-comparison'],

    imageComparison: {

        baselineFolder: './tests/baseline',  // Folder to store baseline images

        formatImageName: '{tag}',  // Format for naming images

        screenshotPath: './tests/screenshots',  // Folder to store screenshots

        savePerInstance: true,  // Save screenshot for every instance

        autoSaveBaseline: true,  // Auto-save new baseline if test passes

        scaleImages: false,  // Set to true if scaling images is needed

        blockOutStatusBar: true,  // Block out status bars in screenshots

    },

};
3. Capture a Baseline Image
Before running tests, you need to capture baseline images for comparison. For this, use the following command:
wdio run wdio.conf.js
This will take screenshots of your web application and store them in the baselineFolder defined in the configuration file.
4. Write a Visual Regression Test
Now, write a simple test script to capture a screenshot and compare it with the baseline image:
describe('Visual Regression Test', () => {

    it('should not have visual discrepancies with the baseline screenshot', async () => {

        await browser.url('https://your-web-app.com');


        // Capture screenshot and compare

        await expect(browser).toHaveScreenshot({

            name: 'homepage'  // Name of the screenshot for comparison

        });

    });

});
5. Run the Test
Run your test script again:
wdio run wdio.conf.js
The test will compare the current screenshot to the baseline image and report any differences.
6. Review Test Results
After the test completes, WebDriverIO will generate a comparison report. If any visual discrepancies are found, they will be highlighted, and the test will fail.
This process will help you set up and run visual regression tests using WebDriverIO.
Functions available in WebdriverIO for Image Comparison
1. browser.saveScreen(“ ”);
This command will save the whole screen that is in the view. It will neither scroll down or up, just capture the current screen.
Example:
await browser.saveScreen("examplePaged");

await expect(await browser.checkScreen("examplePaged"})).toEqual(0);
The first line saves the screen and the checkScreen compares the saved screen in the baseline to the current screen that the framework is capturing.
2. browser.saveElement(“elementId”);
This command will capture and save a particular element that we wish to capture. We pass the locator in the function.
Example:
await browser.saveElement(await $("//input[@name='q']"));

await expect(await browser.checkElement(await $("//input[@name=`q`]")).toEqual(0);
In the above example, the first line saves a screenshot of an element with the given locator. Whereas, the second line expects the saved element and checks using the checkElement command.
3. browser.SaveFullPageScreen();
This command will capture and save the full page. It will scroll down and up to capture everything that is present in the present screen and save them.
Example:
await browser.saveFullPageScreen("fullPage");

await expect(await browser.checkFullPageScreen("fullPage")).toEqual(0);
From the above example, the first line accepts an argument to save the full page screen. The second line checks whether the saved screen and the current screen are equal using the checkFullPageScreen command.
4. browser.saveTabbablePage();
The above command saves a full-page screenshot inclusive of all the tab executions.
Example:
await browser.saveTabbablePage("save-tabbable"});

await expect(await browser.checkTabbablePage("check-tabbable")).toEqual(0);
From the above example, the first line saves the tab executions. The second line captures and compares the tabs in the current page using the checkTabbablePage command.
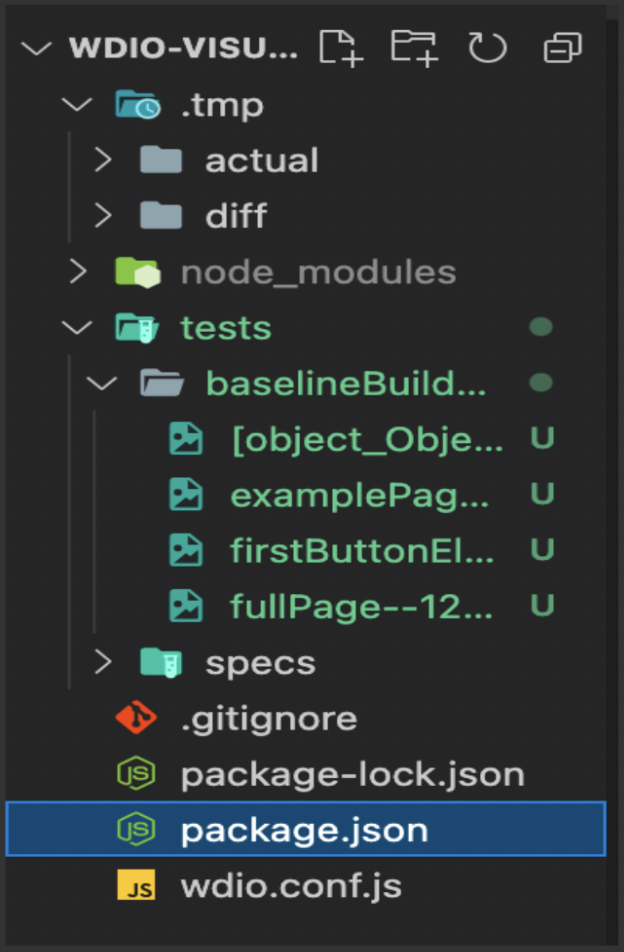
Baseline images are saved in the folder named baselineBuild. The test executed images are captured in .tmp folder which contains both actual and diff folders which compare the actual and different images.
Using Percy tool for Visual Testing
Percy by BrowserStack is visual testing as a service platform. Percy.io enables you to review visual changes in your application and offers a toolkit for you to get started with visual testing in whatever framework you are using.
Setup
- Ensure you have Node.js installed in your computer
- Ensure to have WebdriverIO installed.
- Run the following command from your root work directory to install Percy.
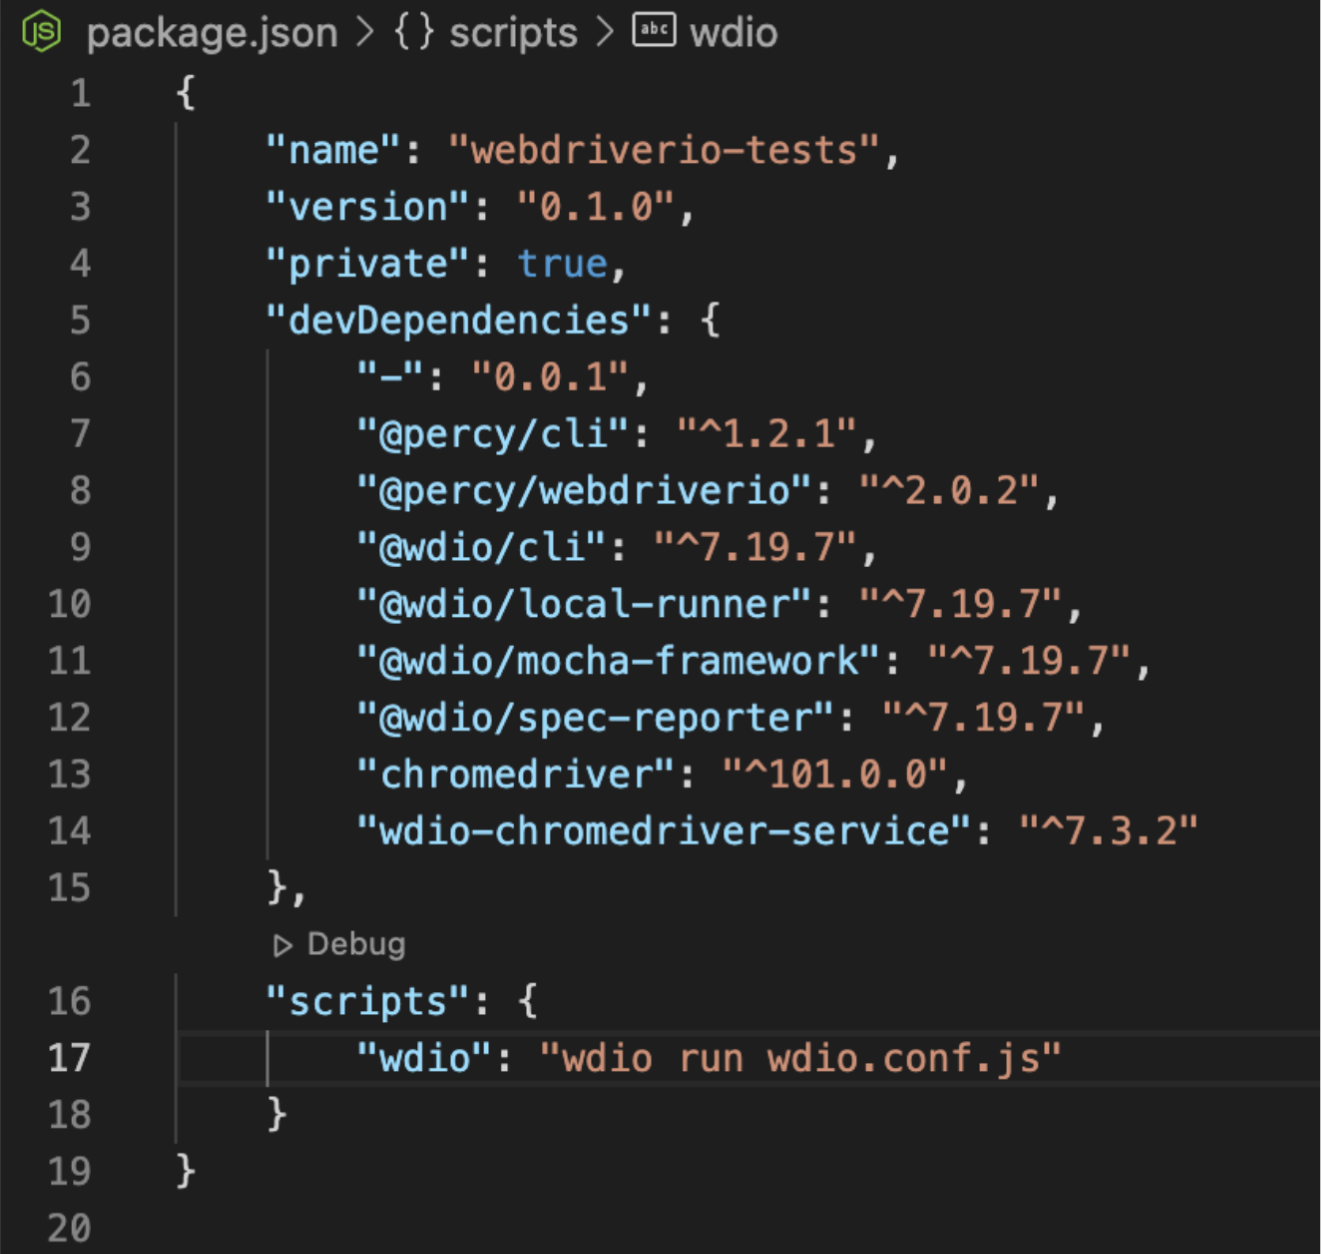
npm install --save-dev @percy/cli @percy/webdriverio
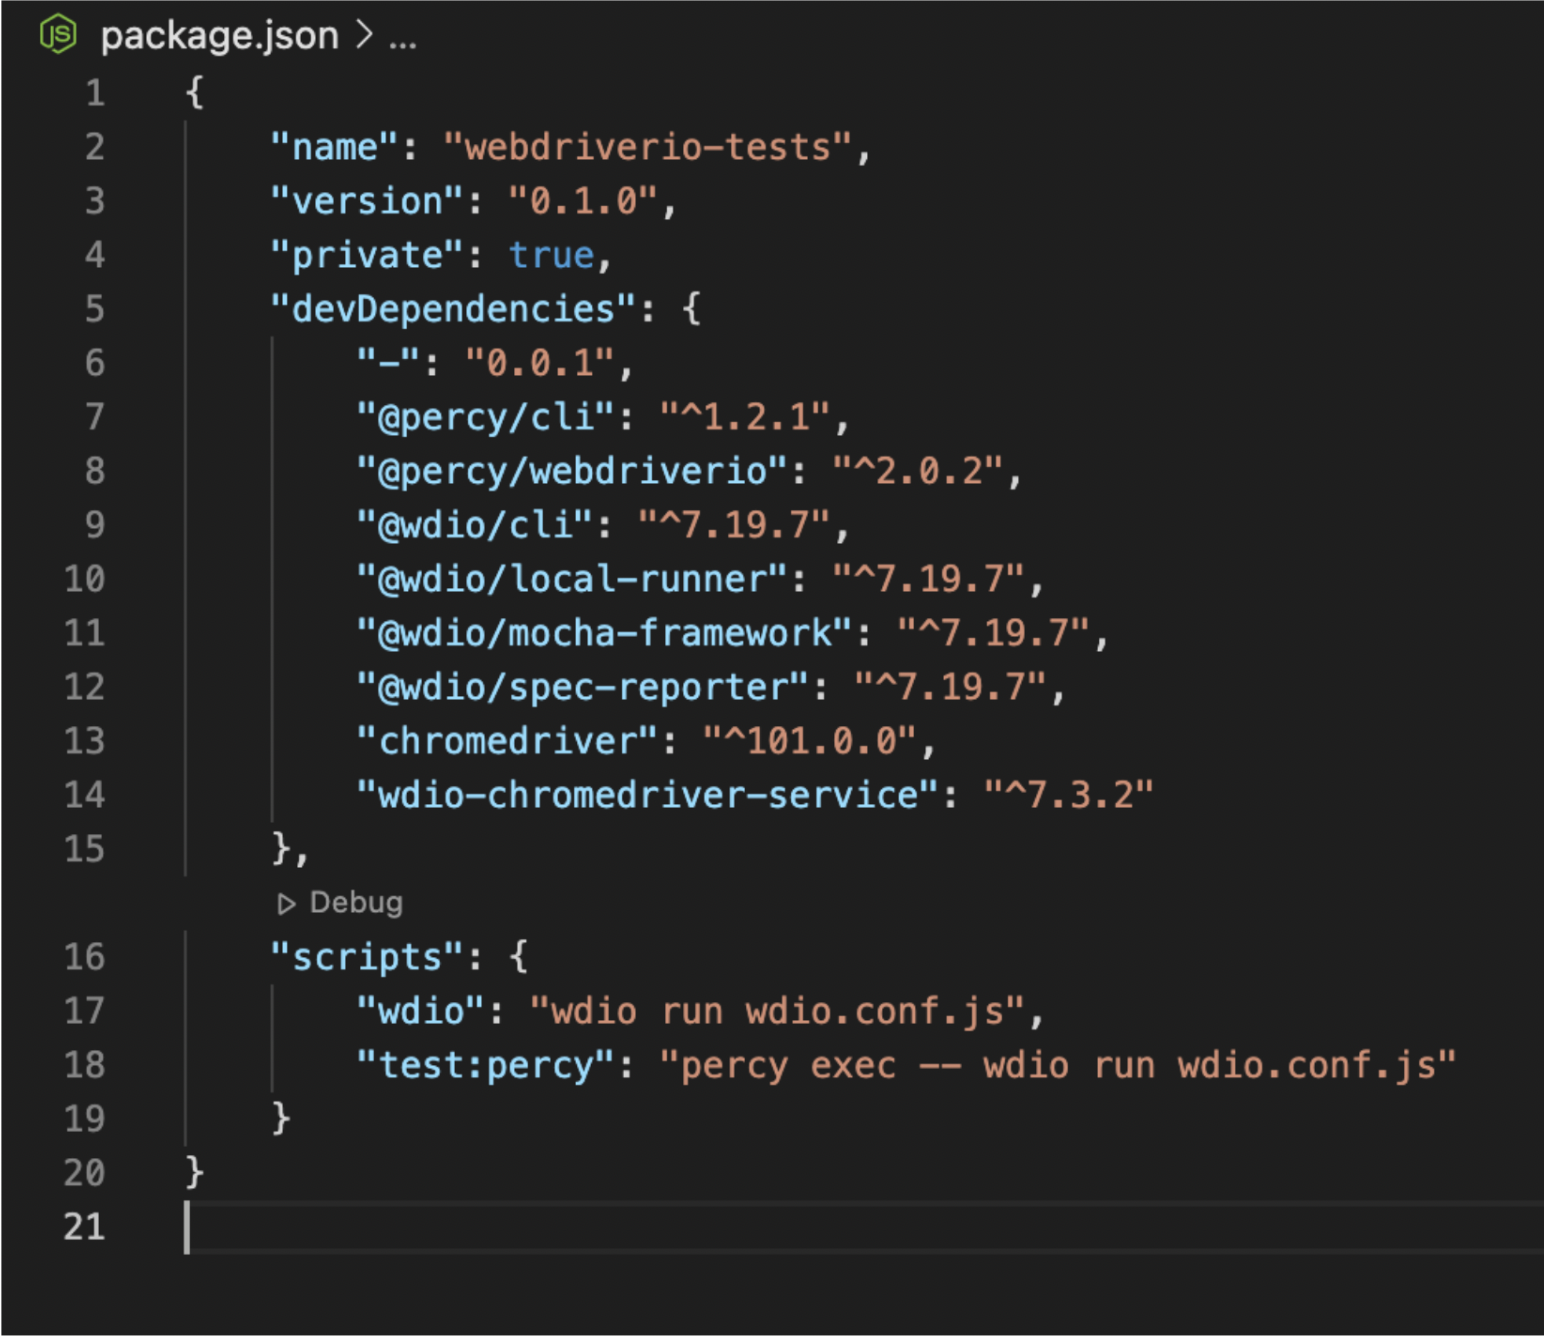
After installing all the packages, your package.json should be something like this.
Performing Visual Regression Testing using WebdriverIO and Percy
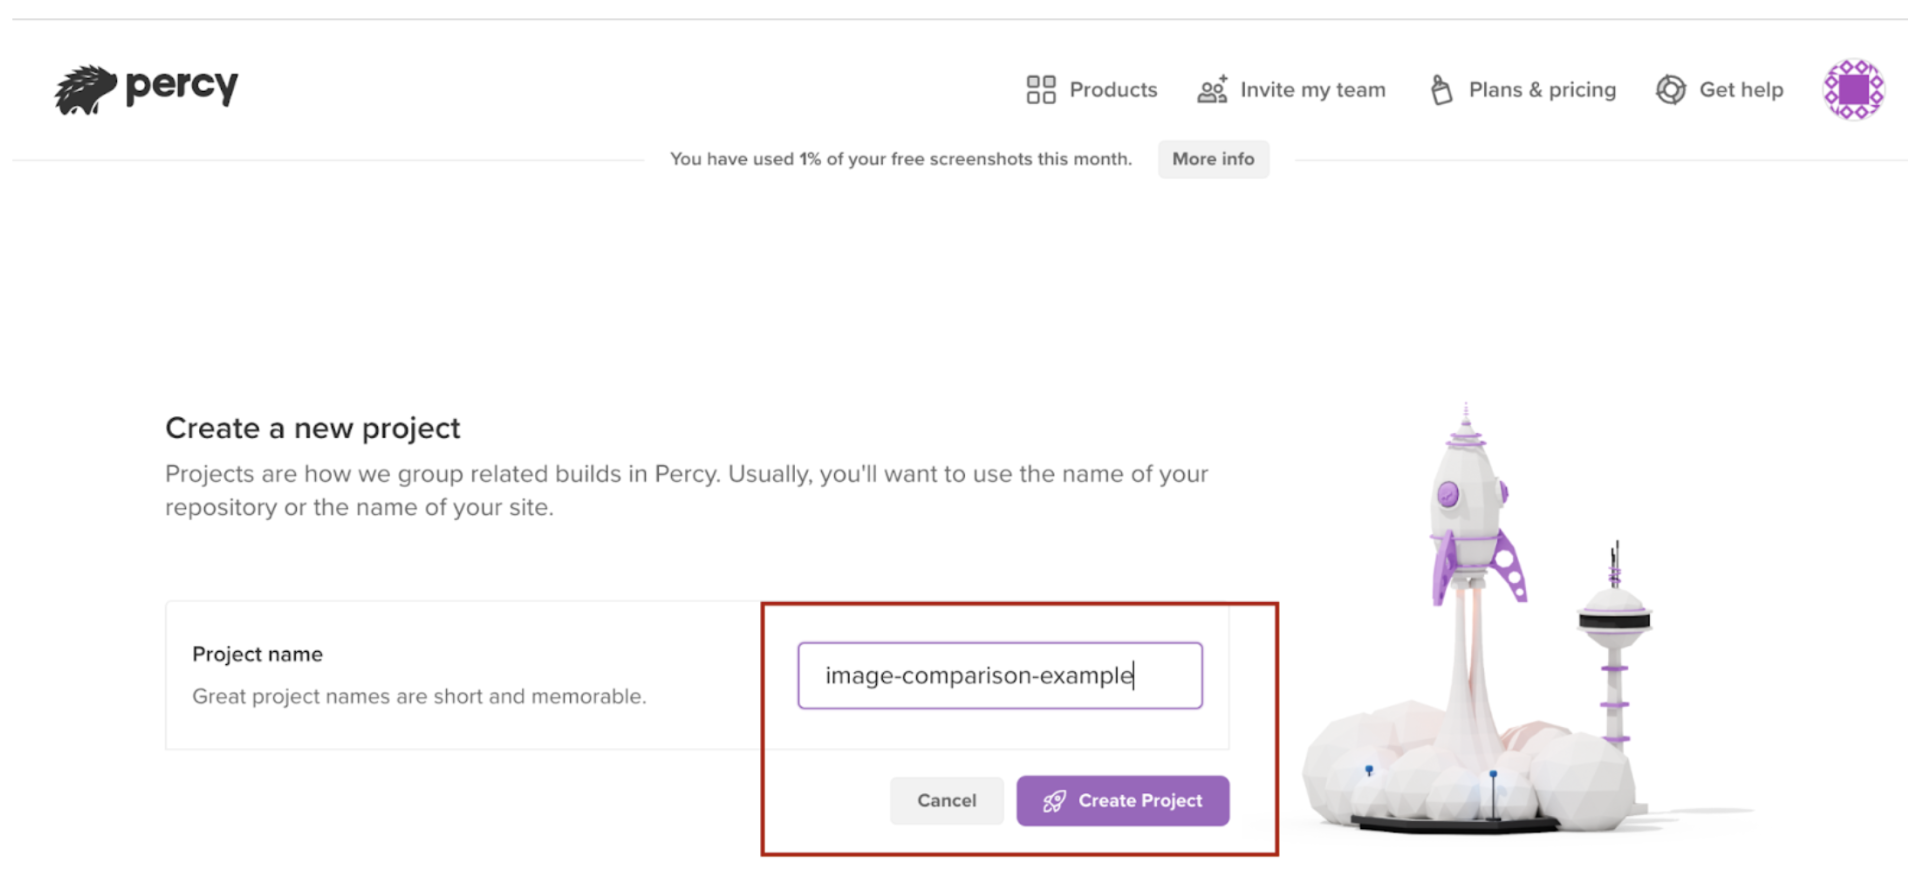
To begin with, we need to create a project in Percy. After logging in with Percy, click on the Create Project and enter the project name.
Once you create the project, you will land on the project dashboard. You will see a unique project token generated. Pass the token in your terminal to integrate the project with Percy.
Writing Tests with Percy
Now, let’s write our test case to compare the screenshots with Percy.
const percySnapshot = require("@percy/webdriverio");

describe('webdriver.io page', () => {
it('should have the right title', async () => {
await browser.url('https://webdriver.io');
await expect(browser).toHaveTitle('WebdriverIO · Next-gen browser and mobile automation test framework for Node.js | WebdriverIO');
await percySnapshot(browser, 'webdriver.io page');
});
});
Initially, we need to require Percy in our test file. We are writing our test case using Mocha with describe and it block. We are navigating to the WebdriverIO URL and expecting the title to have WebdriverIO. With the percySnapshot command, we are capturing the screenshot. percySnapshot accepts three arguments.
percySnapshot(browser, <snapshotName>, <options>)
Running the Test
Now, let us run our Percy test case. For it, we need to configure the command in our package.json file. Add this command under scripts.
"test:percy": "percy exec -- wdio run wdio.conf.js"
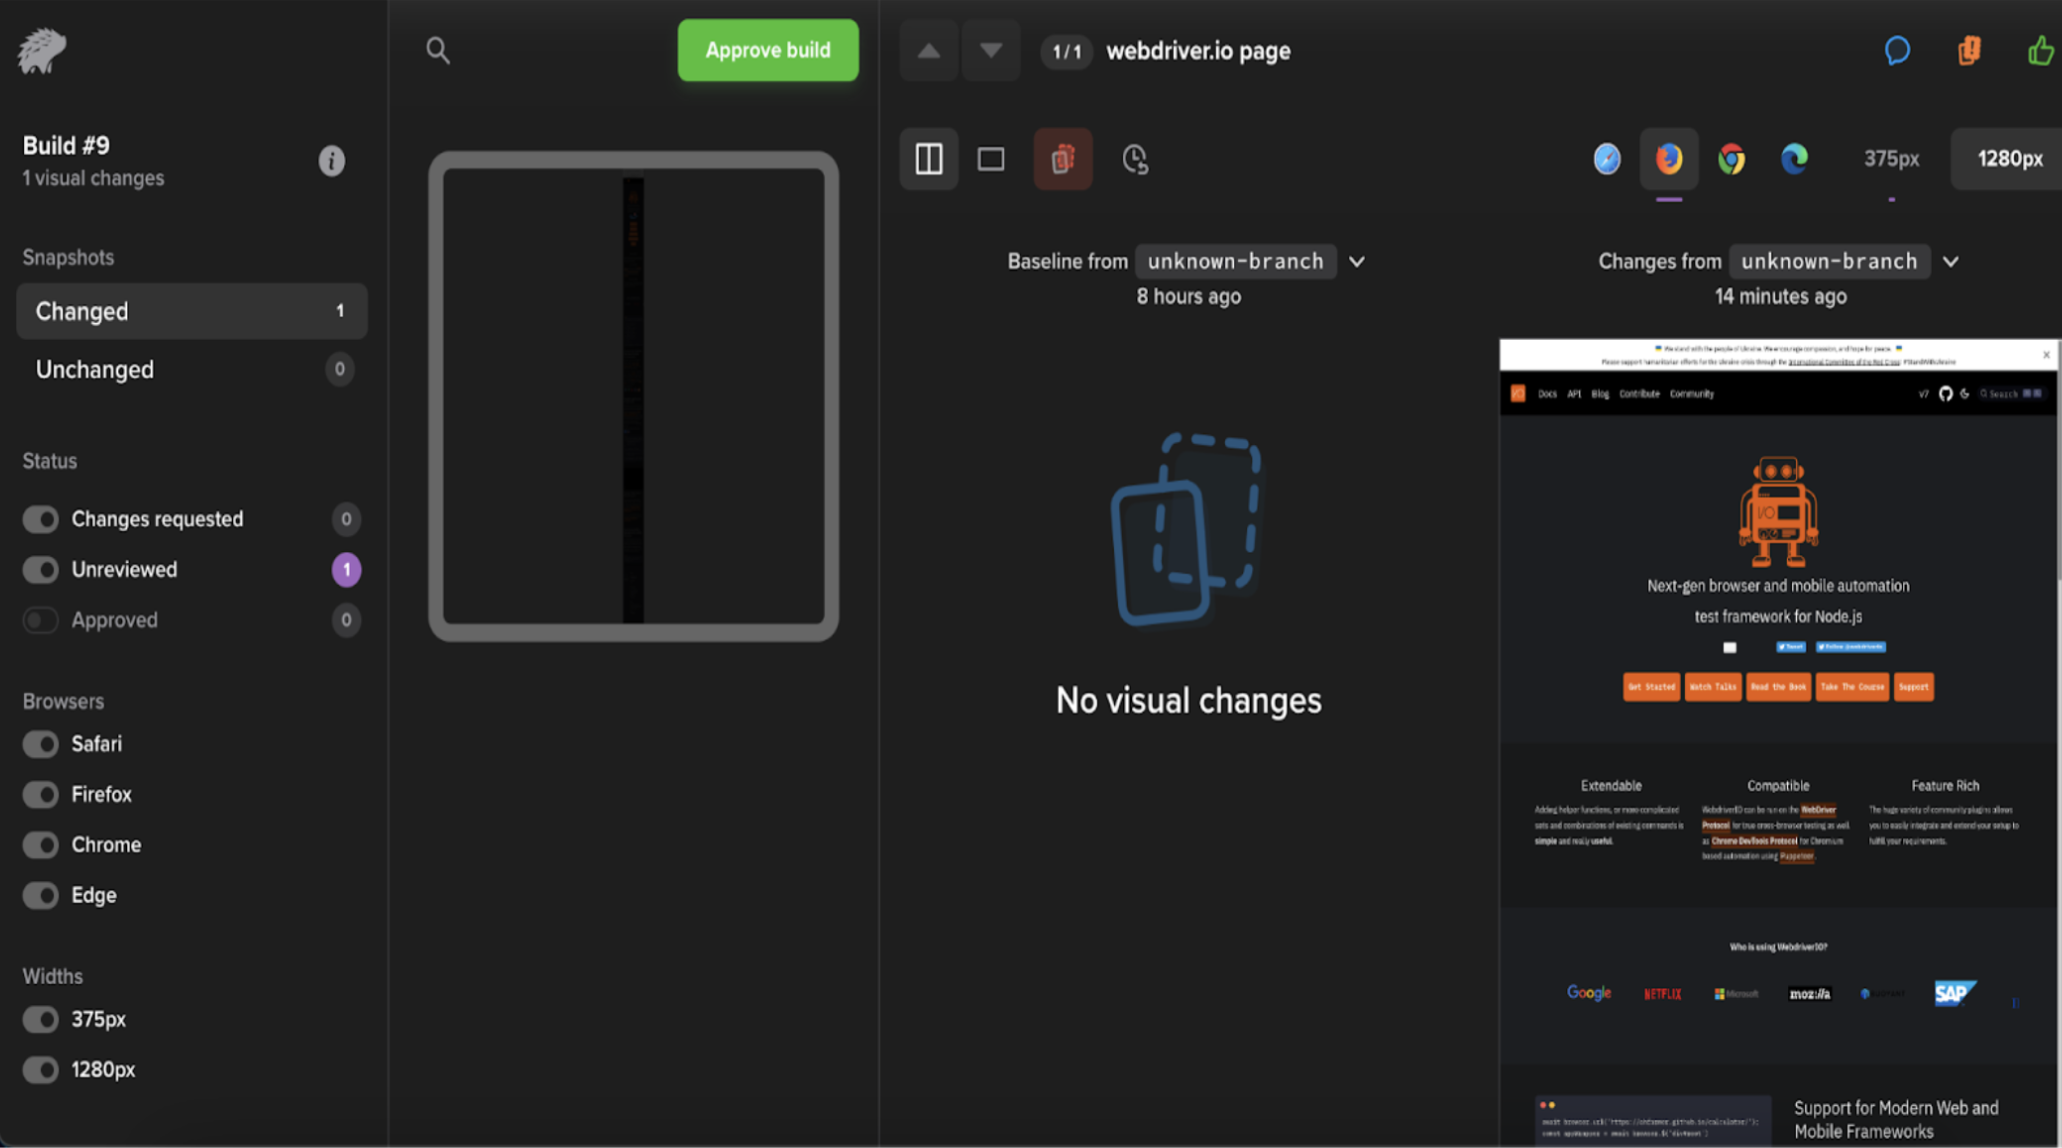
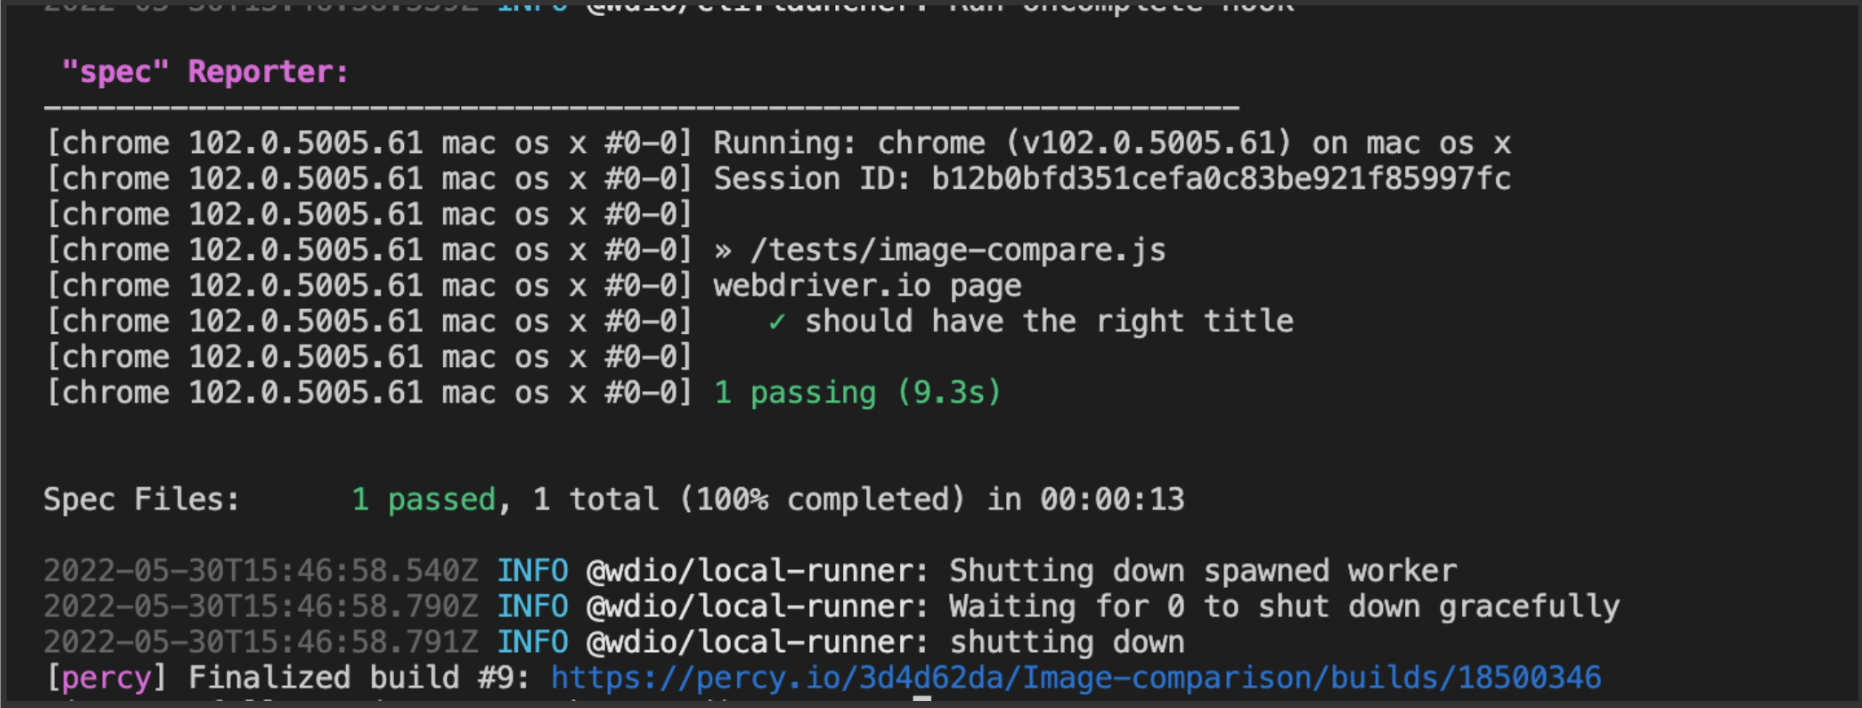
To run the test, pass npm run test:percy command in your terminal. Once you run the test, you should see the Percy running command and generate a link to the Percy.
Why Use Percy for Visual Testing
Percy is a powerful tool for visual testing and review, offering a range of benefits that streamline the process of ensuring UI consistency across applications. Here are the key reasons why you should consider using Percy for visual testing:
- Automated Visual Regression Testing: Percy automatically captures and compares screenshots of your web pages or UI components, making it easy to detect visual changes between different versions of your app. This reduces the risk of unintentional UI issues being introduced during development.
- Seamless Integration with CI/CD: Percy integrates effortlessly with your Continuous Integration/Continuous Deployment (CI/CD) pipeline, allowing automated visual tests to run as part of your development process. As developers push new code, Percy can instantly perform visual tests to detect changes and prevent issues from reaching production. Learn more about the integrations here.
- Cross-Browser Testing: Percy supports visual testing across multiple browsers, ensuring that your application looks and behaves consistently on different platforms. This is essential for identifying cross-browser visual discrepancies that can be overlooked during manual testing.
- Pixel-by-Pixel Comparison: Percy performs pixel-by-pixel image comparisons, highlighting the smallest of visual differences between your baseline and current snapshots. This ensures the precision needed to catch even the most subtle visual regressions.
- Easy Collaboration and Review: Percy provides an intuitive interface that makes collaboration between developers, QA, and designers easy. Visual differences are automatically flagged, and team members can review, comment, and approve changes directly from Percy’s dashboard.
- Supports Dynamic Content: Percy is well-suited for applications that rely on dynamic content. It can handle tests for complex interfaces with animations, scrollable regions, and other dynamic elements, which can often be challenging for traditional visual testing methods.
- Advanced Snapshot Control: Percy allows you to capture snapshots at various points in your application flow, giving you granular control over what parts of your app to test. You can specify which elements to capture, exclude unnecessary sections, or capture multiple views of the same component.
- Visual Testing with Component Libraries: Percy works well with component-based frameworks like React and Vue, where visual regressions are commonly introduced as new components or styles are developed. By integrating Percy into your component library, you can ensure each component remains visually consistent as it evolves.
- Support for Mobile Testing: Percy also supports visual testing on mobile browsers, providing the ability to test your application’s appearance on mobile devices alongside desktop views.
- High-Quality Reports: Percy generates detailed, easy-to-understand reports that highlight visual differences, making it easier to track issues and determine whether visual changes are intentional or need to be addressed.
Overall, Percy makes visual testing faster, more reliable, and easier to scale, especially in complex or large projects. By integrating it into your workflow, you can significantly reduce the chances of visual bugs affecting your users.
Differences in running with WebDriverIO only vs WebDriverIO + Percy
Now, we saw how to perform Visual testing using WebdriverIO and Percy. We’ll compare both the services to understand how they are useful in Visual testing.
WebdriverIO for Visual Regression Testing
Pros
- Service is maintained actively
- Open-source
- Feature-rich (Allows customized testing types)
- Backed by OpenJS Foundation
Cons
- Requires external boilerplate for StoryBook
- The reporting for the WebdriverIO image comparison service is not very clear and it might be difficult to identify the actual and different results.
WebDriverIO + Percy for Visual Regression Testing
Pros
- Actively maintained and updated
- Easy Storybook compatibility
- Owned by BrowserStack
- Compatible with several testing frameworks like Selenium, Cypress, WebdriverIO, NightWatch, NightmareJS, Puppeteer, and many more.
- Clear and excellent reporting ( easy to compare the actual and different results)
- Cross-browser visual testing
Cons
- It is quite expensive when we opt for business-level enterprise
Conclusion
In conclusion, visual regression testing plays a crucial role in ensuring the quality and consistency of web applications. Tools like WebDriverIO and Percy make it easier to automate these tests, helping to catch UI issues early on. WebDriverIO, with its wdio-image-comparison-service offers a flexible solution for integrating visual testing within your existing automation setup. Meanwhile, Percy provides a powerful, scalable tool with seamless integration into CI/CD pipelines, cross-browser support, and advanced comparison features.
By incorporating these tools into your workflow, you can reduce the chances of visual bugs making their way into production, improve team collaboration, and ensure a consistent user experience.
