The Screenplay Pattern is an advanced approach to writing automated tests focusing on clear, business-driven workflows. Unlike traditional testing models, it emphasizes roles, tasks, and outcomes, making tests more understandable and maintainable.
By implementing the Screenplay Pattern with Selenium and Java, you can improve the structure of your tests, making them more flexible and aligned with real-world user interactions.
This article will explore how to effectively implement the Screenplay Pattern using Selenium and integrate it with BrowserStack to run tests across real devices, ensuring comprehensive coverage and reliable results.
What is Screenplay Pattern?
The Screenplay Pattern is a user-centric approach to writing workflow-level automated acceptance tests. This helps automation testers to write test cases in terms of Business language.
Building blocks in Screenplay Pattern
To understand the building blocks better, let’s take an example
- Demouser login into the Application by entering their username and password and clicking on the Sign in button
- Demouser will be taken into the Homepage
- Demouser should see his/her name in the profile section
In the above example
- Demouser is the Actor
- Filling the username and password, then clicking on the button is the Task
Checking if the profile section is displaying the name of demouser is the Question
History of the Screenplay Pattern
The Screenplay Pattern, introduced to JavaScript in 2016 by Serenity/JS, has roots dating back to 2007, evolving through key contributions:
- 2007-2008: Antony Marcano and Kevin Lawrence develop the Roles, Goals, Tasks, Actions model during the AAFTT workshop, inspiring early implementations like JNarrate (Java).
- 2011-2013: Screenplay emerges in Ruby (Cuke Salad) and Java (Screenplay4j, ScreenplayJVM) with blog posts and talks formalizing its concepts.
- 2015-2016: Serenity BDD integrates Screenplay for Java, popularizing it. Key publications and blog posts clarify its principles, and Serenity/JS introduces the pattern to JavaScript.
- 2017-2021: Variants appear in Python (ScreenPy) and .NET (Boa Constrictor), and books like BDD in Action and a blog series further refine their application in testing frameworks.
What is Page Object Model?
The Page Object Model (POM) is a design pattern in test automation where a dedicated class represents each page of an application. This class acts as an interface, encapsulating the page’s elements and interactions. Test scripts then interact with the UI via the methods defined in these classes, promoting code reuse and readability.
The POM was introduced as testing tools like Selenium and WebDriver gained popularity, often among teams with varying levels of programming expertise.
Key Features:
- Each application page has a corresponding class.
- Classes contain methods representing actions that can be performed on-page components.
- As the complexity of a page grows, the class methods also expand.
Challenges:
While POM effectively models page components, it does not inherently align with user roles, actions, and outcomes, essential for capturing business logic and user journeys. Tools like JUnit and TestNG may struggle to express these workflows in terms of business representation clearly.
Elements of the Screenplay Pattern
The Screenplay Pattern models test scenarios using a metaphor inspired by stage performances, framing tests as scripts that describe how actors interact with the system under test to achieve their objectives.
This approach helps define:
- Who is interacting with the system?
- Why is the interaction necessary?
- What actions are required to achieve their goals?
- How are those actions executed?
Core Components of the Screenplay Pattern:
- Actors: Represent users or external systems interacting with the application under test.
- Abilities: Serve as lightweight wrappers around integration libraries that interact with the system.
- Interactions: Represent individual, low-level actions that actors can perform via an interface.
- Tasks: Combine sequences of interactions into meaningful business workflow steps.
- Questions: Allow retrieval of information from the application and testing environment.
Screenplay Pattern Implementation in Selenium
To start implementing Screenplay Pattern, you can use Serenity BDD framework which has inbuilt integration to write our tests in the Screenplay pattern.
Note: Get all the required Maven dependencies as a pre-requisite.
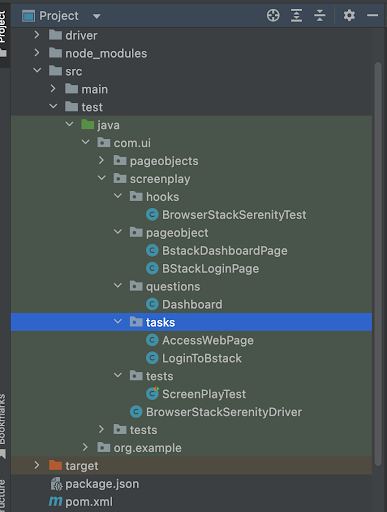
To write Tests, Tasks, and Questions considering Browserstack’s demo application. The structure of the below classes can be seen below.
Here are the steps to implement the Screenplay Pattern approach in Selenium Java:
Step 1: Create PageObject in a refactored and effective manner
Login Page:
import net.serenitybdd.screenplay.targets.Target;
import net.thucydides.core.pages.PageObject;

public class BStackLoginPage extends PageObject {

public static final Target USERNAME = Target.the("Username")
.locatedBy("#username input");

public static final Target PASSWORD = Target.the("Password")
.locatedBy("#password input");

public static final Target LOGIN_BTN = Target.the("Login Button")
.locatedBy("#login-btn");
}
Dashboard Page:
import net.serenitybdd.screenplay.targets.Target;
import net.thucydides.core.pages.PageObject;

public class BstackDashboardPage extends PageObject {

public static final Target SIGNOUT = Target.the("sign out")
.locatedBy(".username");
}
Step 2: Create Tasks for the above created PageObjects
Task to access the webpage
import com.ui.screenplay.pageobject.BStackLoginPage;
import net.serenitybdd.screenplay.Actor;
import net.serenitybdd.screenplay.Task;
import net.serenitybdd.screenplay.actions.Open;
import net.thucydides.core.annotations.Step;

import static net.serenitybdd.screenplay.Tasks.instrumented;

public class AccessWebPage implements Task {
public static AccessWebPage loginPage() {
return instrumented(AccessWebPage.class);
}

BStackLoginPage loginPage;

@Step("{0} access Login page")
public <T extends Actor> void performAs(T t) {
t.attemptsTo(Open.browserOn().the(loginPage));
}
}
Task to Login to the application
import com.ui.screenplay.pageobject.BStackLoginPage;
import net.serenitybdd.core.steps.Instrumented;
import net.serenitybdd.screenplay.Actor;
import net.serenitybdd.screenplay.Task;
import net.serenitybdd.screenplay.actions.Click;
import net.serenitybdd.screenplay.actions.Enter;
import net.thucydides.core.annotations.Step;
import org.openqa.selenium.Keys;

public class LoginToBstack implements Task {

@Step("{0} enter username and password '#username' '#password")
public <T extends Actor> void performAs(T actor)
{
actor.attemptsTo(Enter.theValue(username).into(BStackLoginPage.USERNAME).thenHit(Keys.TAB));
actor.attemptsTo(Enter.theValue(password).into(BStackLoginPage.PASSWORD).thenHit(Keys.TAB));
actor.attemptsTo(Click.on(BStackLoginPage.LOGIN_BTN));
}

private String username;
private String password;

public LoginToBstack(String username, String password) {
this.username = username;
this.password = password;
}

public static Task withCredentials(String username, String password) {
return Instrumented
.instanceOf(LoginToBstack.class)
.withProperties(username, password);
}
}
Step 3: Create a Question to fetch user information from the Profile section of Homepage
import com.ui.screenplay.pageobject.BstackDashboardPage;
import net.serenitybdd.screenplay.Actor;
import net.serenitybdd.screenplay.Question;
import net.serenitybdd.screenplay.questions.Text;

public class Dashboard implements Question<String> {

public static Question<String> displayed() {
return new Dashboard();
}

public String answeredBy(Actor actor) {
return Text.of(BstackDashboardPage.SIGNOUT).answeredBy(actor);
}
}
Step 4: Create a test
import com.ui.screenplay.questions.Dashboard;
import com.ui.screenplay.tasks.LoginToBstack;
import net.serenitybdd.junit.runners.SerenityRunner;
import net.serenitybdd.screenplay.Actor;
import static net.serenitybdd.screenplay.GivenWhenThen.*;
import net.serenitybdd.screenplay.abilities.BrowseTheWeb;
import net.serenitybdd.screenplay.actions.Open;
import net.thucydides.core.annotations.Managed;
import org.hamcrest.CoreMatchers;
import org.junit.Before;
import org.junit.Test;
import org.junit.runner.RunWith;
import org.openqa.selenium.WebDriver;

@RunWith(SerenityRunner.class)
public class ScreenPlayTest {

private Actor demoUser = Actor.named("Demo User");

@Managed
private WebDriver hisBrowser;

@Before
public void demoUserCanBrowseTheWeb(){
demoUser.can(BrowseTheWeb.with(hisBrowser));
}

@Test
public void browseTheWebAsDemoUser(){
demoUser.attemptsTo(Open.url("https://bstackdemo.com/signin"));
givenThat(demoUser).attemptsTo(LoginToBstack.withCredentials("demouser", "testingisfun99"));
then(demoUser).should(seeThat(Dashboard.displayed(), CoreMatchers.equalTo("demouser1")));
}

}
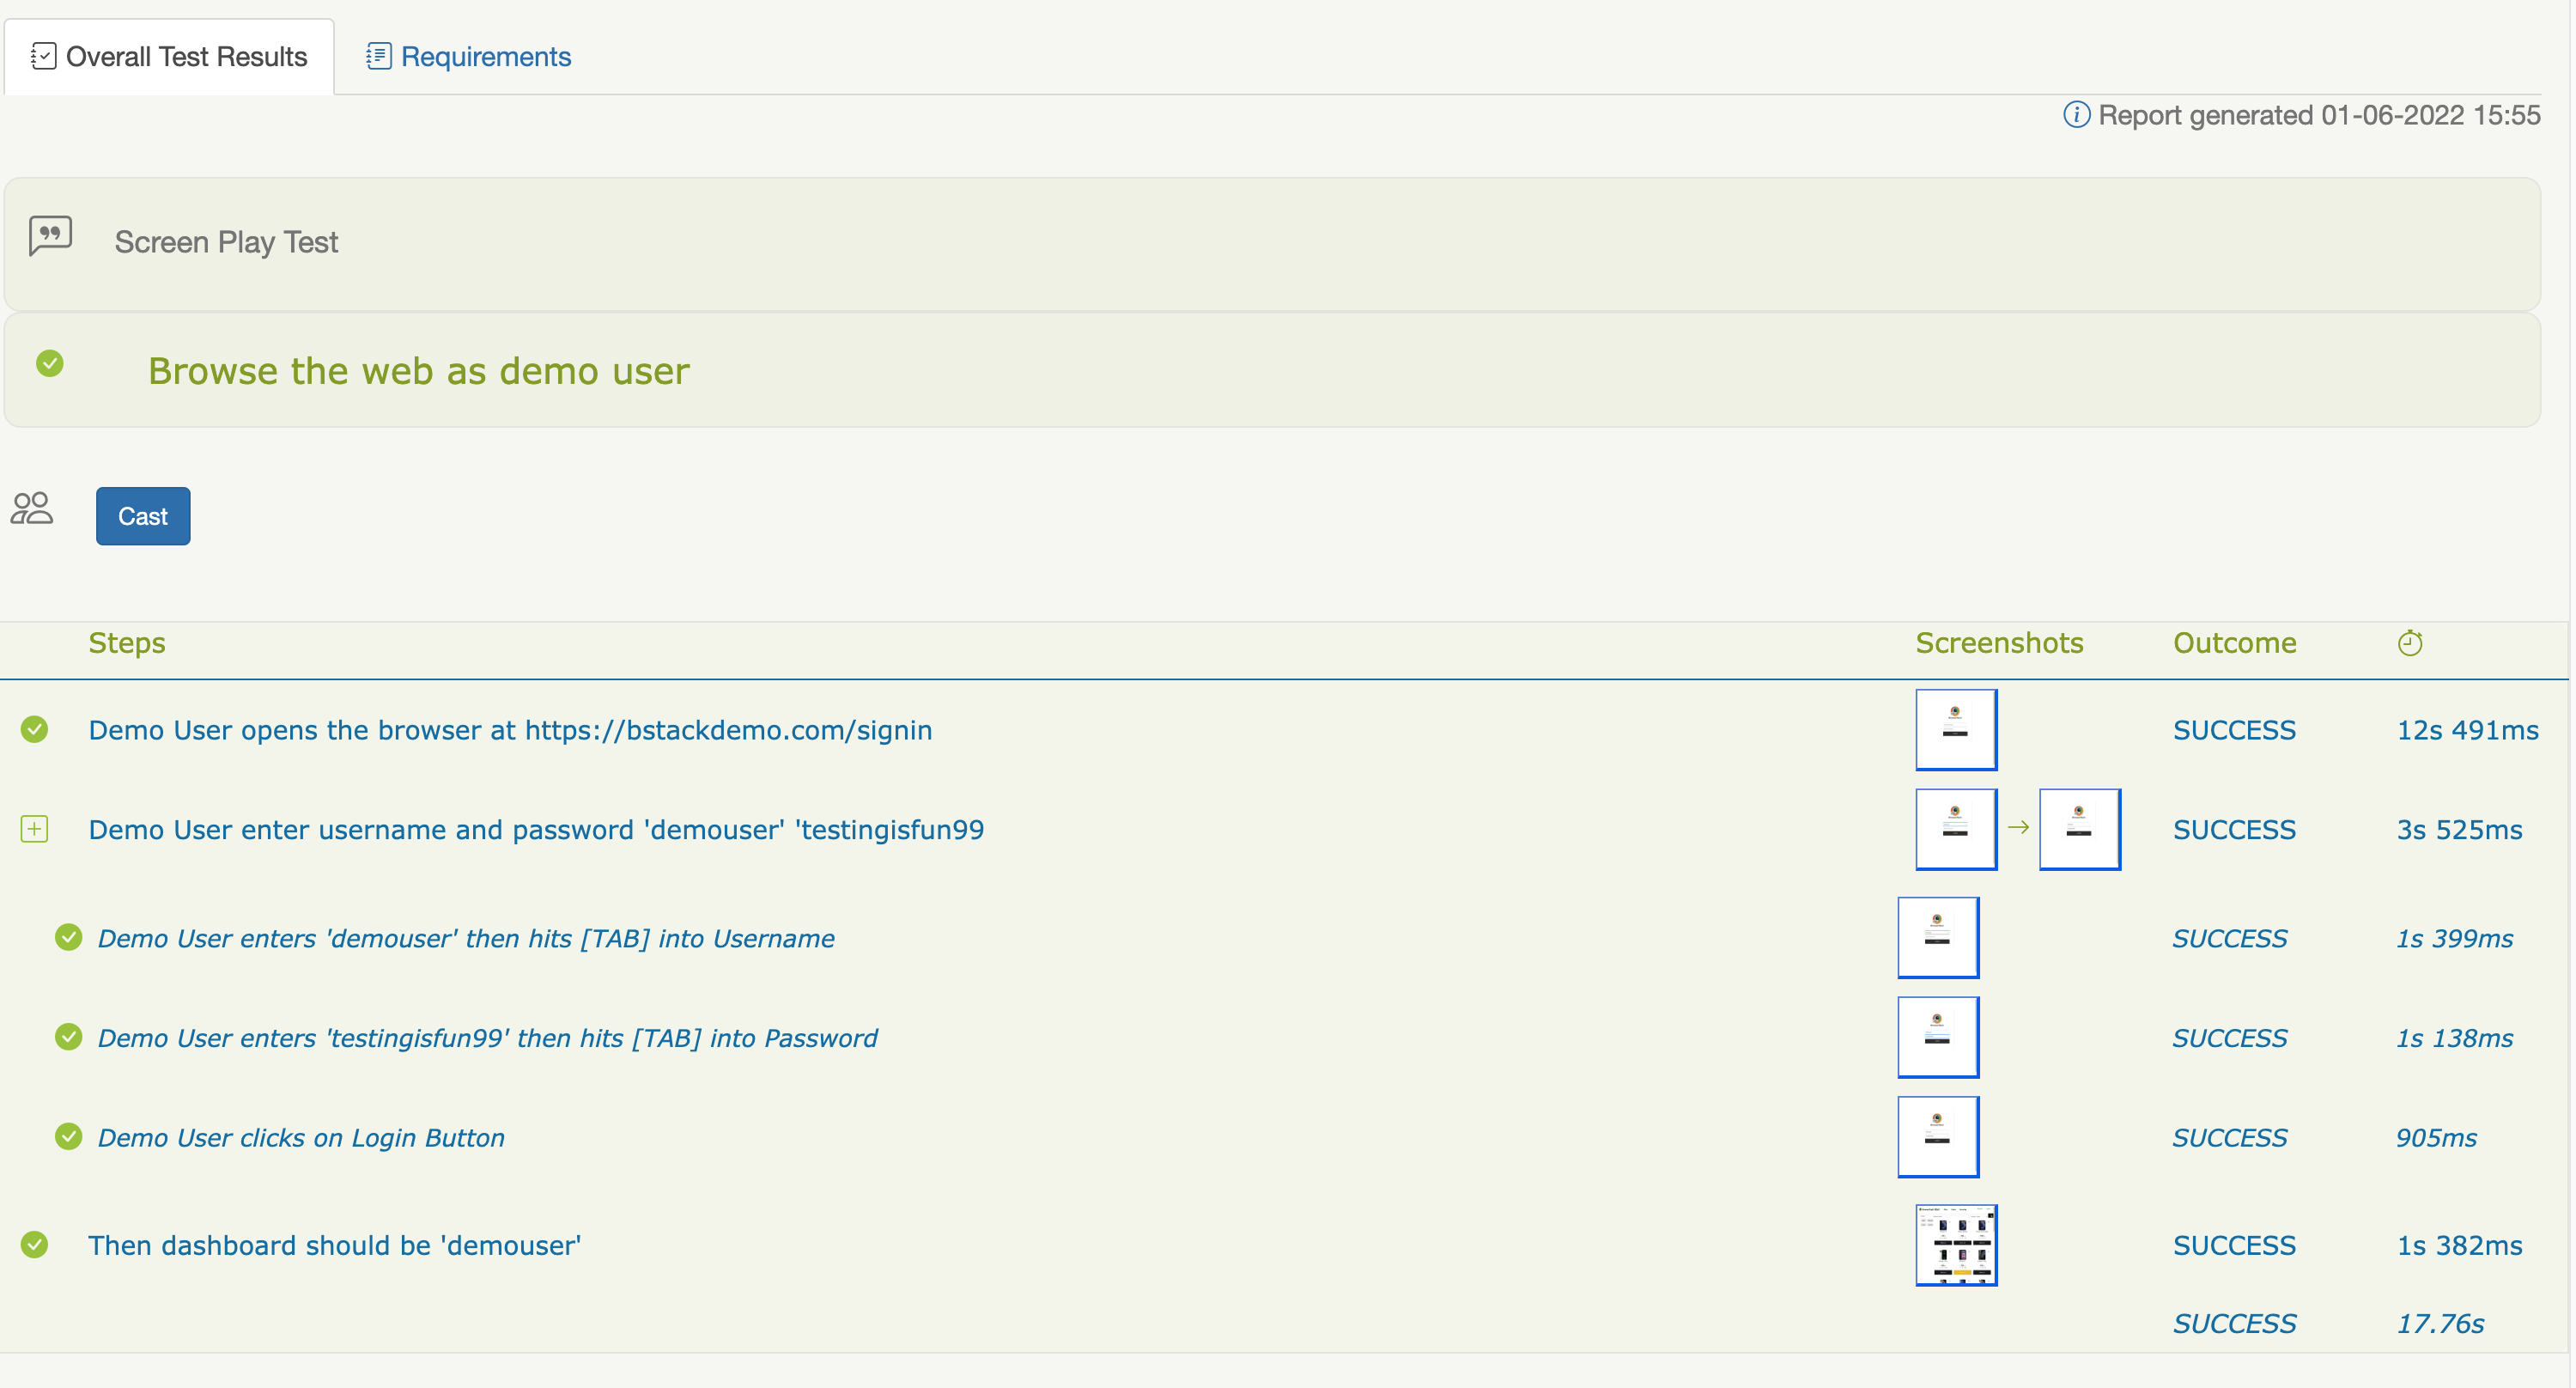
Step 5: Once you run the above test, the report will be generated in the path target > site > serenity > index.html
Screenplay with Serenity BDD not just provides better maintainability and readability of code but also produces an extensive HTML Report as seen above.
Note: One can read the official documentation of BrowserStack to set up Serenity with Selenium.
Running Screenplay tests in BrowserStack Real Device Cloud
To get the optimum benefits of the test automation suite, the key metrics are:
- Stable Tests
- Test Execution Time
- Test Coverage: Running the tests across multiple browsers and devices
It’s not realistic for any organization to run the tests across all the browsers and devices to ensure maximum test coverage. Building an in-house infrastructure means more cost to set up and maintain the infrastructure. With BrowserStack’s real device cloud, it’s now very easy to set up your tests with minimum changes to existing code, and just by making a few configurations, you can run your tests against 3000+ device and browser combinations under real user conditions.
Test on Real Devices & Browsers
In order to run the above Screenplay test against the BrowserStack Cloud environment follow the steps below:
Step 1: Create a New Custom driver provider
import java.net.URL;
import java.util.Iterator;

import org.openqa.selenium.WebDriver;
import org.openqa.selenium.remote.DesiredCapabilities;
import org.openqa.selenium.remote.RemoteWebDriver;

import net.thucydides.core.util.EnvironmentVariables;
import net.thucydides.core.util.SystemEnvironmentVariables;
import net.thucydides.core.webdriver.DriverSource;

public class BrowserStackSerenityDriver implements DriverSource {

public WebDriver newDriver() {
EnvironmentVariables environmentVariables = SystemEnvironmentVariables.createEnvironmentVariables();

String username = System.getenv("BROWSERSTACK_USERNAME");
if (username == null) {
username = (String) environmentVariables.getProperty("browserstack.user");
}

String accessKey = System.getenv("BROWSERSTACK_ACCESS_KEY");
if (accessKey == null) {
accessKey = (String) environmentVariables.getProperty("browserstack.key");
}

String environment = System.getProperty("environment");
DesiredCapabilities capabilities = new DesiredCapabilities();

Iterator it = environmentVariables.getKeys().iterator();
while (it.hasNext()) {
String key = (String) it.next();

if (key.equals("browserstack.user") || key.equals("browserstack.key")
|| key.equals("browserstack.server")) {
continue;
} else if (key.startsWith("bstack_")) {
capabilities.setCapability(key.replace("bstack_", ""), environmentVariables.getProperty(key));
if (key.equals("bstack_browserstack.local")
&& environmentVariables.getProperty(key).equalsIgnoreCase("true")) {
System.setProperty("browserstack.local", "true");
}
} else if (environment != null && key.startsWith("environment." + environment)) {
capabilities.setCapability(key.replace("environment." + environment + ".", ""),
environmentVariables.getProperty(key));
if (key.equals("environment." + environment + ".browserstack.local")
&& environmentVariables.getProperty(key).equalsIgnoreCase("true")) {
System.setProperty("browserstack.local", "true");
}
}
}

try {
return new RemoteWebDriver(new URL("https://" + username + ":" + accessKey + "@"
+ environmentVariables.getProperty("browserstack.server") + "/wd/hub"), capabilities);
} catch (Exception e) {
System.out.println(e);
return null;
}
}

public boolean takesScreenshots() {
return true;
}
}
Step 2: Add BrowserStack Environment setup code in the Before hook
public class BrowserStackSerenityTest {
static Local bsLocal;

@BeforeClass
public static void setUp() throws Exception {
EnvironmentVariables environmentVariables = SystemEnvironmentVariables.createEnvironmentVariables();

String accessKey = System.getenv("BROWSERSTACK_ACCESS_KEY");
if (accessKey == null) {
accessKey = (String) environmentVariables.getProperty("browserstack.key");
}

String environment = System.getProperty("environment");
String key = "bstack_browserstack.local";
boolean is_local = environmentVariables.getProperty(key) != null
&& environmentVariables.getProperty(key).equals("true");

if (environment != null && !is_local) {
key = "environment." + environment + ".browserstack.local";
is_local = environmentVariables.getProperty(key) != null
&& environmentVariables.getProperty(key).equals("true");
}

if (is_local) {
bsLocal = new Local();
Map<String, String> bsLocalArgs = new HashMap<String, String>();
bsLocalArgs.put("key", accessKey);
bsLocal.start(bsLocalArgs);
}
}

@AfterClass
public static void tearDown() throws Exception {
if (bsLocal != null) {
bsLocal.stop();
}
}
}
Step 3: Add Browserstack related configuration keys to Serenity.properties file
webdriver.driver = provided
webdriver.provided.type = mydriver
webdriver.provided.mydriver = com.ui.screenplay.BrowserStackSerenityDriver
serenity.driver.capabilities = mydriver

webdriver.timeouts.implicitlywait = 5000
serenity.use.unique.browser = false
serenity.dry.run=false
serenity.take.screenshots=AFTER_EACH_STEP

browserstack.user=gurudattananthap_jG62JF
browserstack.key=9yV8DdY2CwdWNizFWxqC
browserstack.server=hub.browserstack.com

bstack_build=browserstack-screenplay-build-1
bstack_debug=true
bstack_browserstack.console=verbose

environment.single.name=serenity_single_test
environment.single.browser=chrome
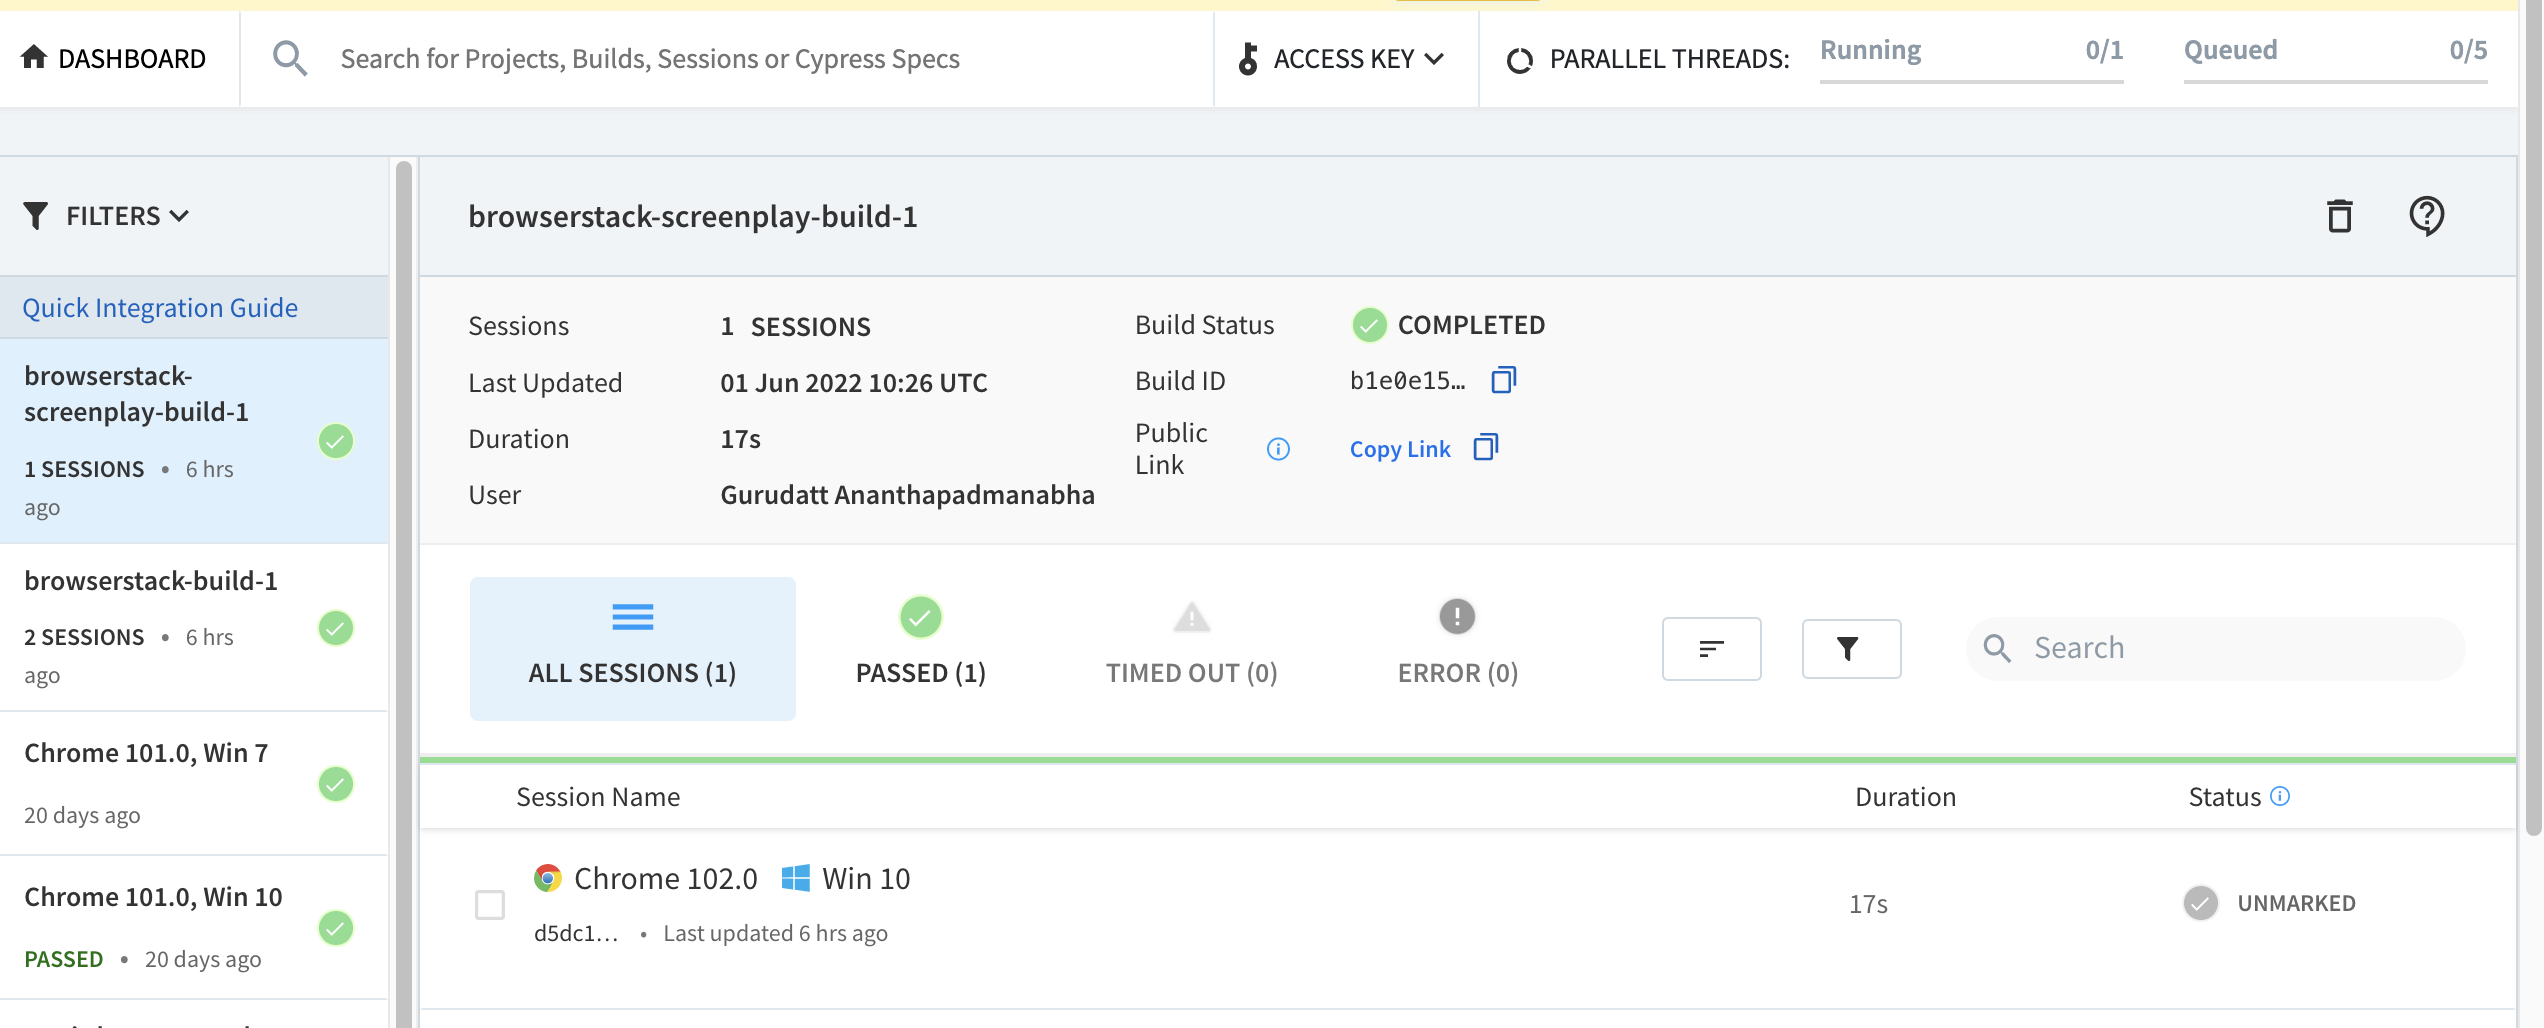
Once you run the test, the execution happens in BrowserStack Cloud. The Execution results, text, video, and console logs can be found in the BrowserStack Automate Dashboard
These tests can be easily shared with the team using Slack, JIRA, GitHub, or Trello integrations on BrowserStack for effective bug reporting.
Percy Integration with Screenplay for Visual Testing
Integrate Percy to implement Selenium Screenplay Pattern Approach in Visual Testing to make it more effective by following the below steps:
Step 1: Add Percy Java Selenium dependency to the project POM.xml
<dependency>
<groupId>io.percy</groupId>
<artifactId>percy-java-selenium</artifactId>
<version>1.0.0</version>
</dependency>
Step 2: Add Package.json file to the root of the Project and run the below command
npm install --save-dev @percy/cli
Step 3: Add Percy Snapshot method to your test like below
import com.ui.screenplay.hooks.BrowserStackSerenityTest;
import com.ui.screenplay.questions.Dashboard;
import com.ui.screenplay.tasks.LoginToBstack;
import net.serenitybdd.junit.runners.SerenityRunner;
import net.serenitybdd.screenplay.Actor;
import static net.serenitybdd.screenplay.GivenWhenThen.*;
import net.serenitybdd.screenplay.abilities.BrowseTheWeb;
import net.serenitybdd.screenplay.actions.Open;
import net.thucydides.core.annotations.Managed;
import org.hamcrest.CoreMatchers;
import org.junit.Before;
import org.junit.Test;
import org.junit.runner.RunWith;
import org.openqa.selenium.WebDriver;
import io.percy.selenium.Percy;

@RunWith(SerenityRunner.class)
public class ScreenPlayTest extends BrowserStackSerenityTest {

private Actor demoUser = Actor.named("Demo User");
private static Percy percy;

@Managed
WebDriver hisBrowser;

@Before
public void demoUserCanBrowseTheWeb(){
demoUser.can(BrowseTheWeb.with(hisBrowser));
percy = new Percy(hisBrowser);
}

@Test
public void browseTheWebAsDemoUser(){
demoUser.attemptsTo(Open.url("https://bstackdemo.com/signin"));
givenThat(demoUser).attemptsTo(LoginToBstack.withCredentials("demouser", "testingisfun99"));
then(demoUser).should(seeThat(Dashboard.displayed(), CoreMatchers.equalTo("demouser")));
percy.snapshot("Bstack Homepage");
}

}
Step 4: Export the PERCY_TOKEN = <Your token>. Refer to the document here to get your Percy token.
Step 5: Execute your maven/java command using Percy CLI
./node_modules/.bin/percy exec -- mvn verify
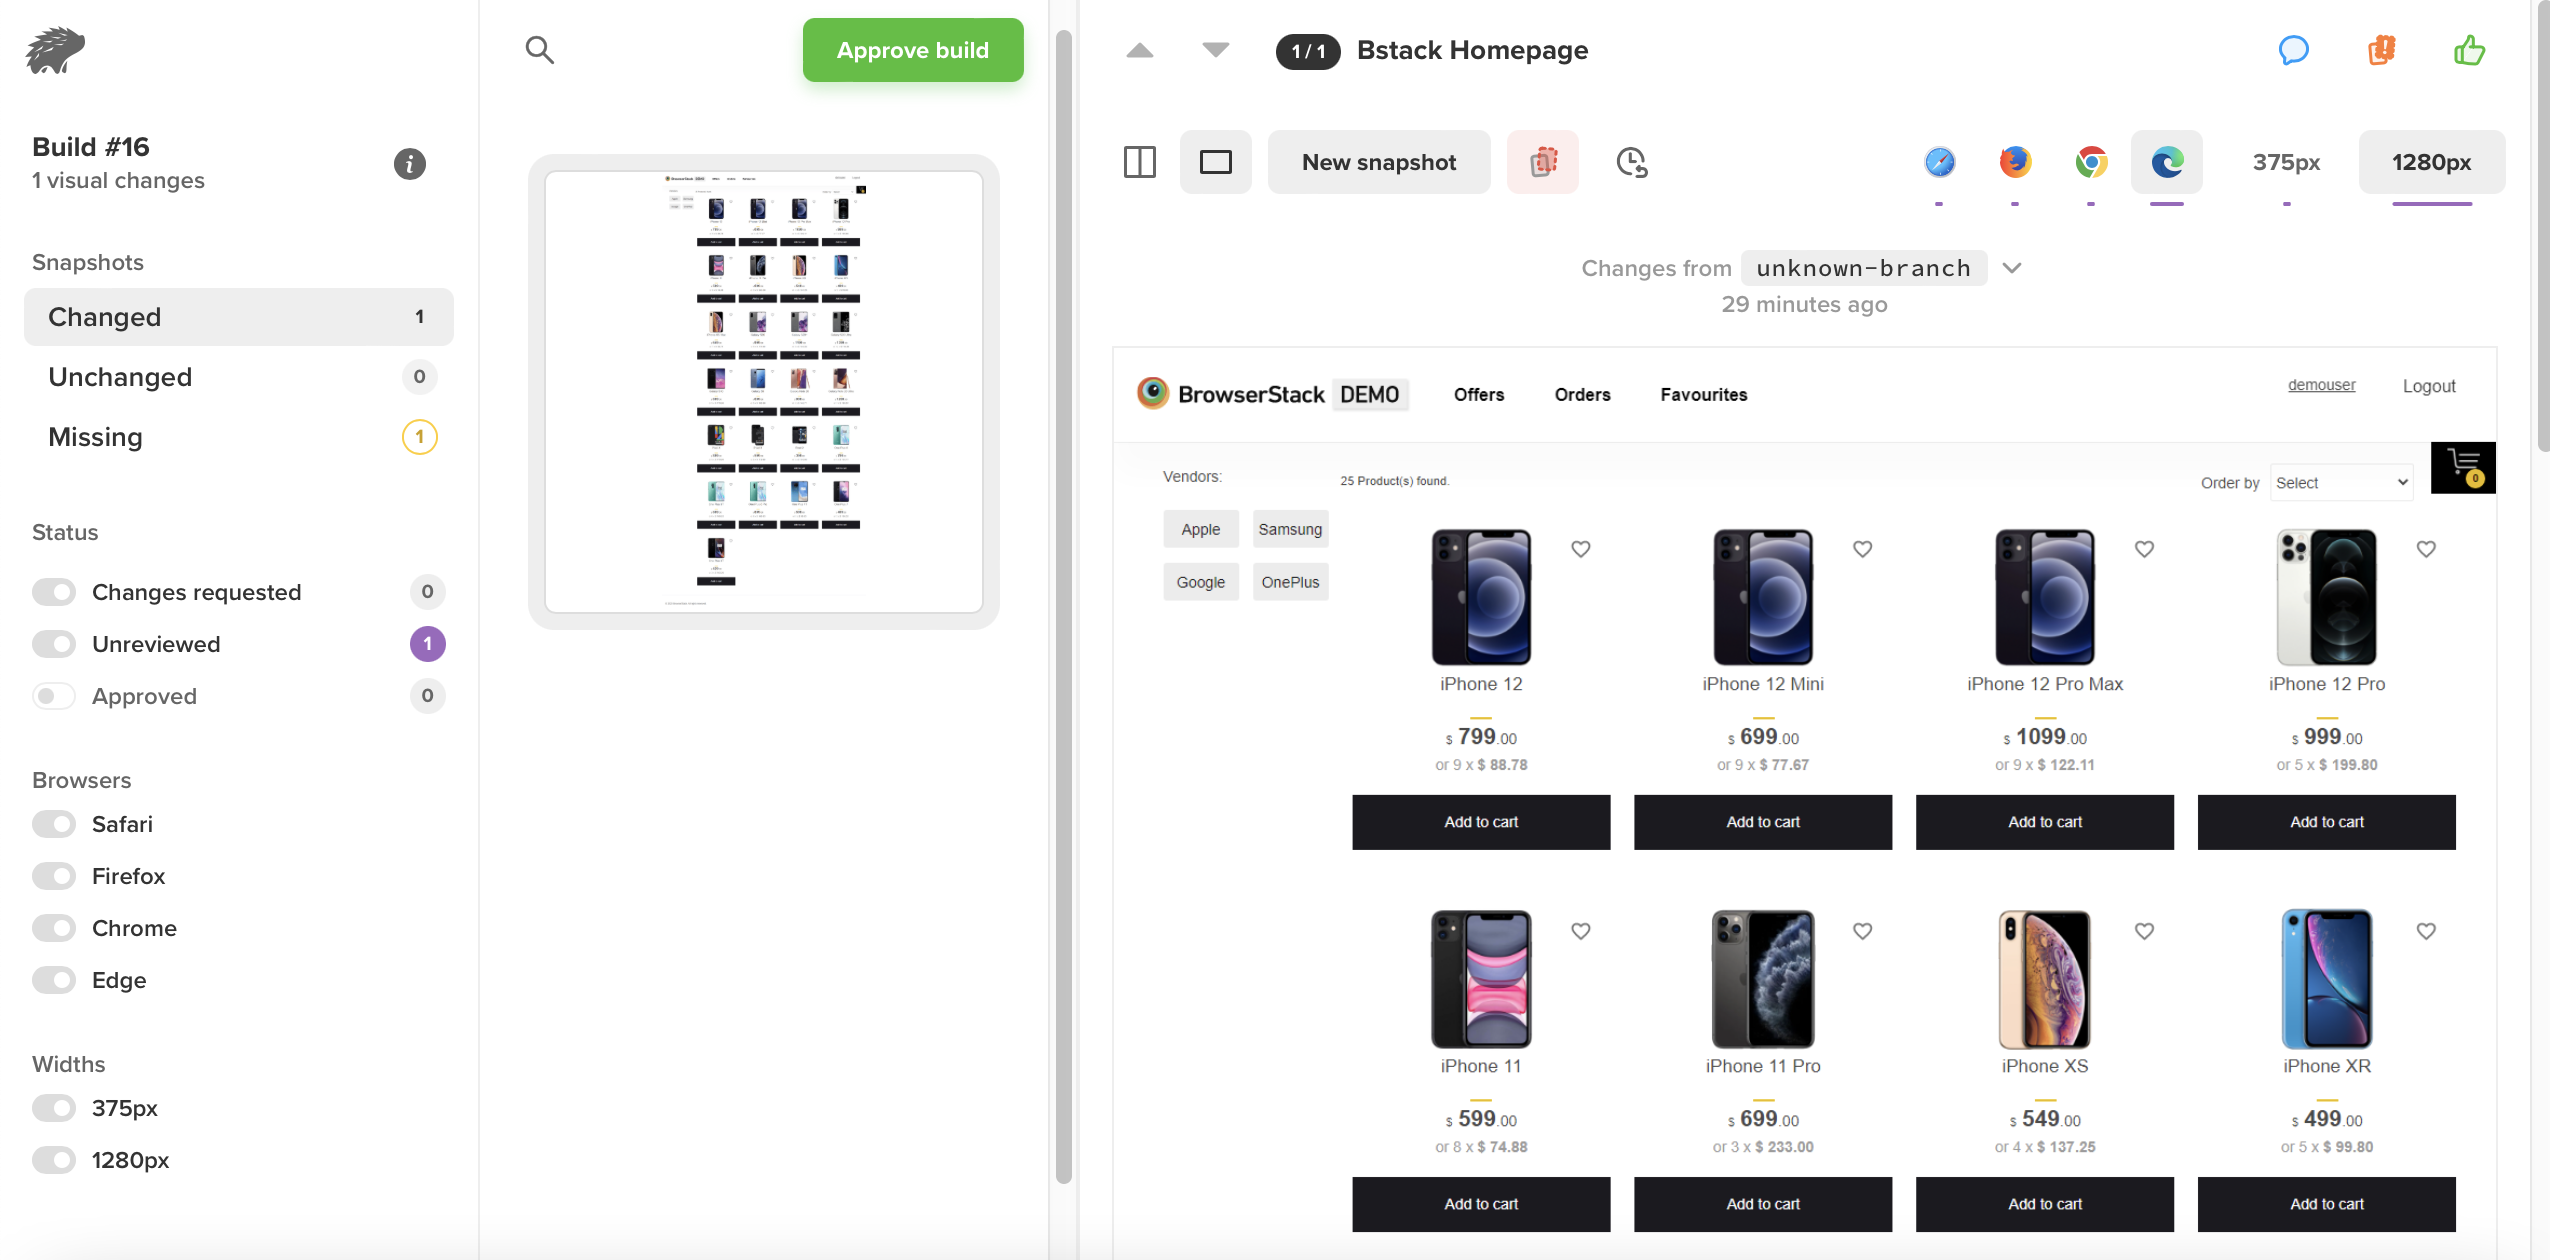
Now the test will run in BrowserStack Cloud along with Percy integration to Capture snapshots and compare the Visual Changes. A new build will be created in Percy under your project where every time you can run a Visual Regression Test.
Conclusion
Screenplay pattern provides an effective way to organize, maintain, and refactor the PageObject classes. As the Screenplay pattern is Integrated with BDD, you don’t need to Maintain driver objects and can leverage inbuilt methods easily and effectively.
Screenplay Serenity BDD produces detailed HTML reports that can also be quickly run in the BrowserStack cloud to test under real user conditions.
