How to run your first Visual Test with Cypress
By Priyanka Bhat & Ganesh Hegde, Community Contributors - October 3, 2022
Cypress is NodeJS-based, open-source automation testing tool. Cypress tests can be created either using Javascript or Typescript. The Cypress brings many features which are required for automating modern web applications. The features such as auto waiting, support for single-page applications (SPA), and easy debugging of tests make Cypress unique in the market.
Cypress automation tool is not limited to only end-to-end testing, it also supports API Testing, Unit Testing, and Component Testing. The Cypress Dashboard is a proprietary tool that helps organizations to view the analytics of the tests. However, in most cases, the open-source version of Cypress is good enough for testing.
The User Interface is the core of any web application. If the user interface is glitch-free and smooth, then there are high chances that the application catches the attention of the user. To make the user interface bug-free one needs to perform Visual Regression Testing. Visual regression testing helps test the User interface in an easy and efficient way. Cypress supports Visual Regression Testing with third-party plugins.
This article explains an easy way to perform Visual Testing using Cypress. In Cypress, the Visual Regression testing can be done in multiple ways. Let us look at the easiest and most popular way.
How to Perform Visual Validation in Cypress Step by Step, Beginner Guide
There are many Visual Testing plugins available for Cypress however since it is a third party, many frameworks are not up to date. For the purpose of this example let us use Cypress image diff plugin.
To get started with this, one needs to ensure that they have a basic Cypress framework setup.
Step 1: Install Cypress Visual Diff Plugin
npm i -D cypress-image-diff-js
Step 2: Configure Diff Plugin
Do keep in mind that:
- There are considerable changes in the Cypress Version 10, this article explains both versions. Follow the instructions considering the version you have. Read What’s new in Cypress 10?
- If you are not sure about the version you are using then use the command npx cypress -–version know the current version.
Version 9 or below
Navigate to cypress/plugin/index.js and enter the commands written below
// cypress/plugin/index.js
module.exports = (on, config) => {
const getCompareSnapshotsPlugin = require('cypress-image-diff-js/dist/plugin')
getCompareSnapshotsPlugin(on, config)
}
Version 10 and Above
Navigate to cypress.config.js file and add the below code.
const { defineConfig } = require('cypress')
const setupNodeEvents = require('cypress-image-diff-js/dist/plugin')
module.exports = defineConfig({
video: false,
screenshotOnRunFailure: true,
e2e: {
setupNodeEvents,
}
})
Step 3: Import and add the Cypress image command
Version 9 or Below
Navigate to cypress/support/commands.js and enter the code written below.
// cypress/support/commands.js
const compareSnapshotCommand = require('cypress-image-diff-js/dist/command')
compareSnapshotCommand()
Version 10 or above
Navigate to support/e2e.js and the below code
const compareSnapshotCommand = require('cypress-image-diff-js/dist/command')
compareSnapshotCommand()
Step 4: Write the Testcase
Let’s write a simple test case to perform the Visual Regression Test on the BrowserStack homepage.
- Navigate to Browserstack Home Page
- Perform Visual Validation Test
Create your first visual test, inside the integration folder.
Note: If you are using Cypress 10 or above use the cypress/e2e folder
//first-visual-test.cy.js
describe('Cypress Visual Testing Demo', () => {
it('Navigate to Browserstack home page', () => {
cy.visit('https://browserstack.com')
cy.compareSnapshot('home-page')
})
})
Step 5: Execute your Cypress Visual Test
Cypress provides two options to execute the tests. You can either use the Cypress Test Runner window to execute the test or use the command line.
Executing Test Using Cypress Test Runner Window
- Open Cypress using the below command
npx cypress open- Click on first-visual-test.cy.js The tests start execution.
Using Cypress CLI
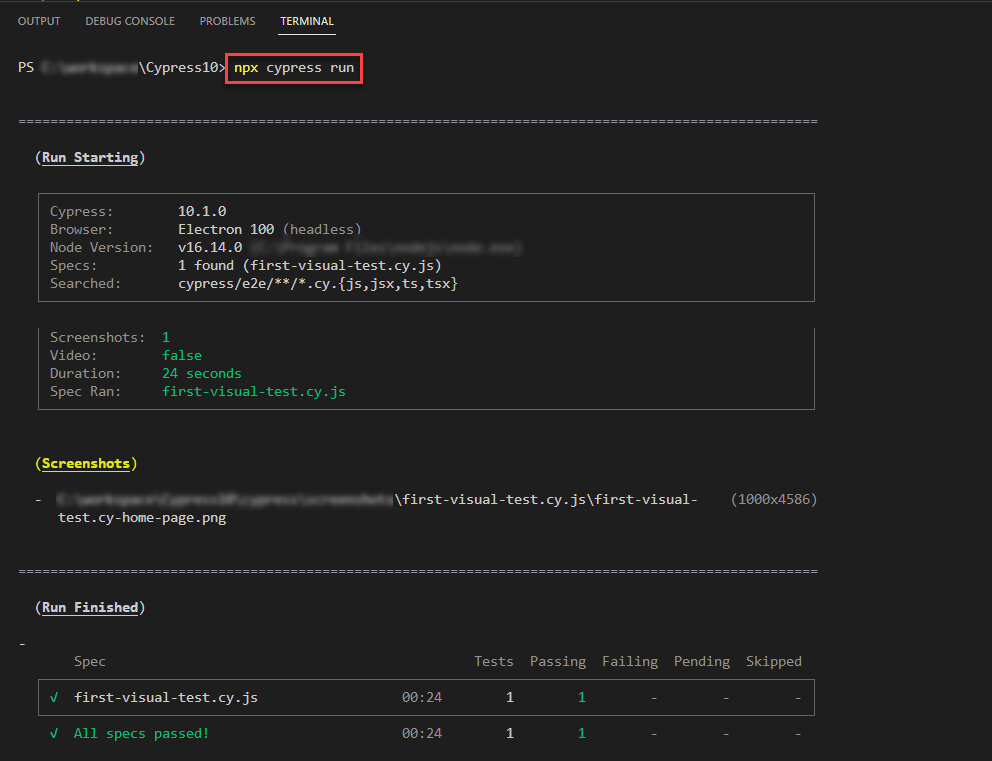
npx cypress runThe above command directly executes your test and gives the results in command line/terminal
Step 6: View the Result
Once the test execution is complete you can see whether the result passes or fail.
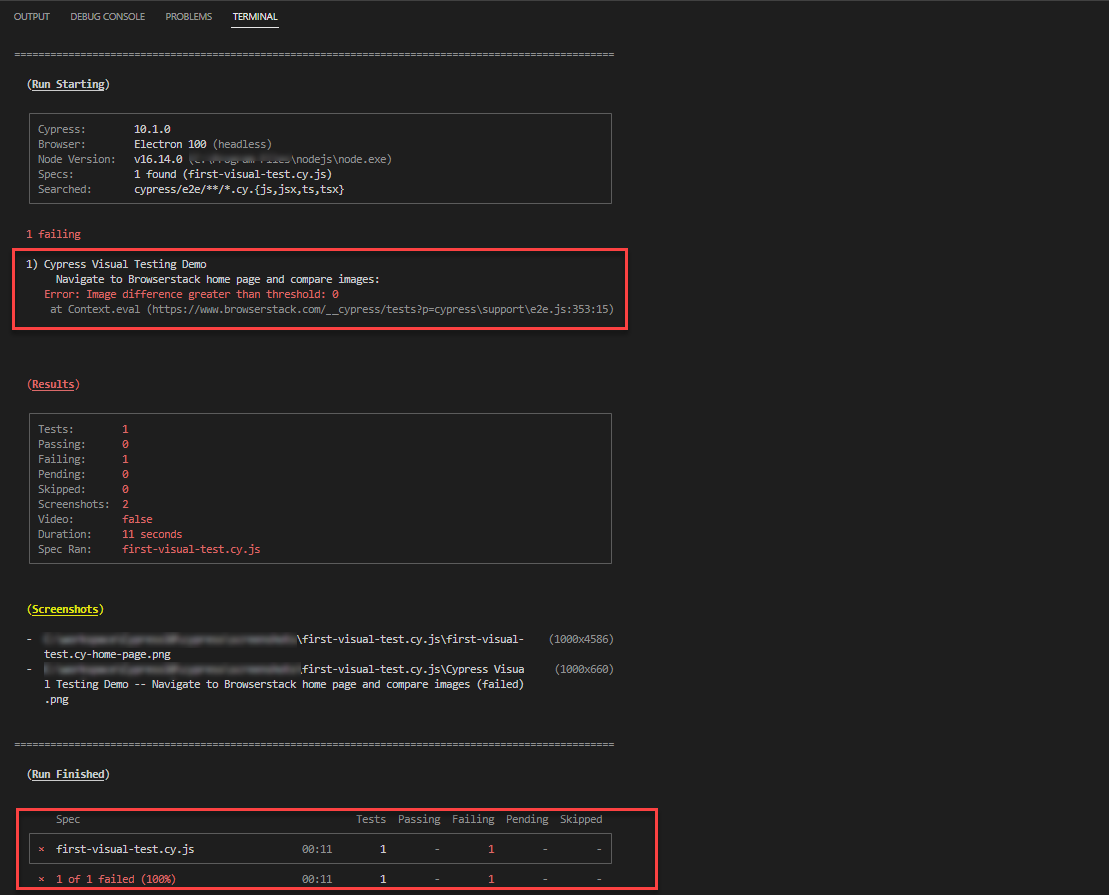
Please note that to see the actual result you need to execute the Cypress test at least two times, this is because the Visual Test compares screenshots, the baseline screenshot is compared against the actual screenshot. The first time when you run the test, the baseline screenshot is captured and the next run will compare them against the baseline screenshot.
If there is no difference in the screenshot, the test is marked as Passed.
If the base and the actual screenshot are different then there is an issue with the user interface so, the test will be marked as a fail.
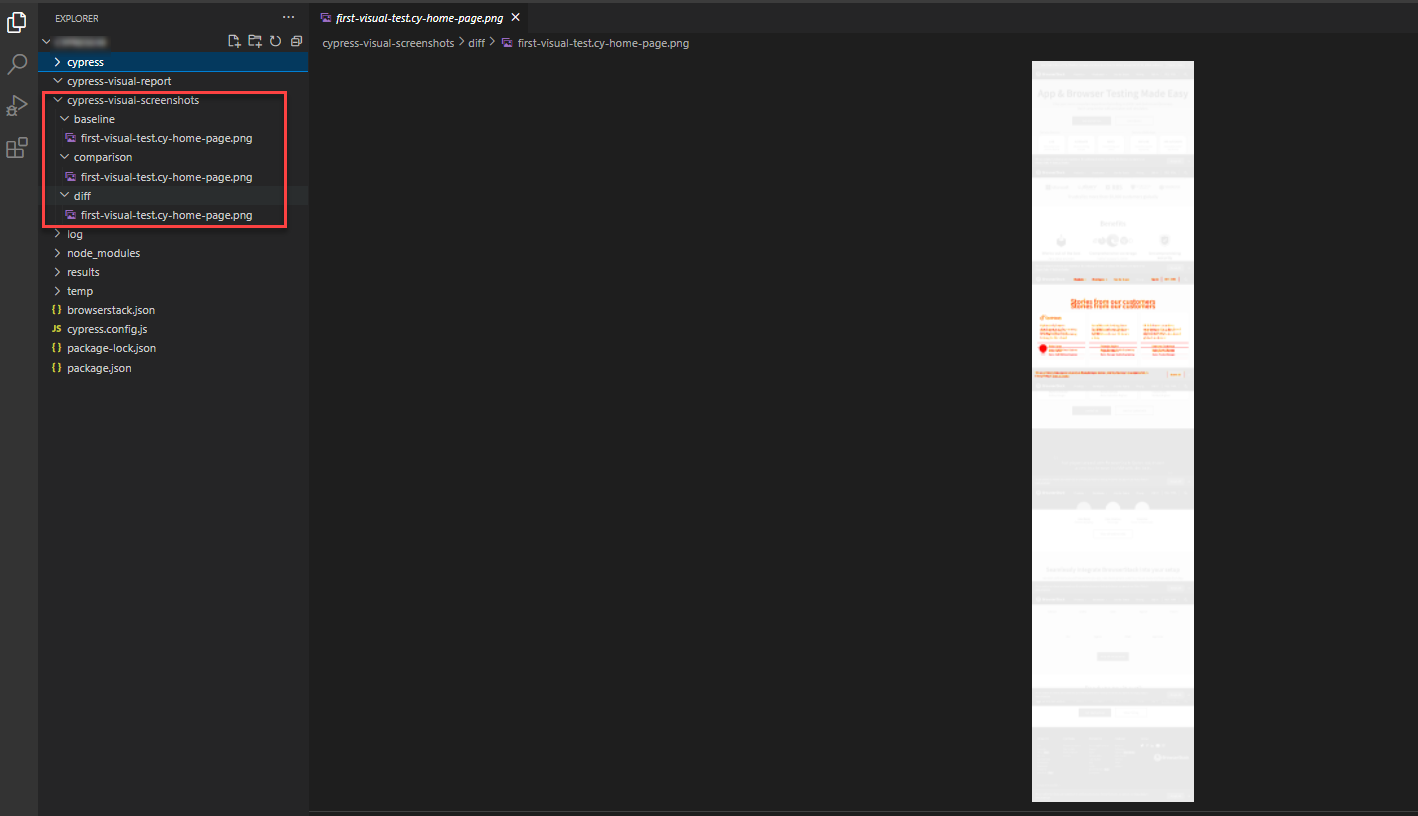
The cypress-visual-screenshots directory created after the test run contains all the images namely, base, actual, and diff. The diff contains the difference in the images between the base and actual.
How to execute the first Cypress Visual Test on Percy
Percy is a cloud-based visual regression testing platform, that allows you to review, accept, reject and validate the visual differences. Percy supports all major automation tools. Cypress visual tests can also be integrated with Percy.
Let’s look at the Percy and Cypress Visual Testing in detail
Step 1: Install required dependency packages for Percy and Cypress
npm install --save-dev @percy/cli @percy/cypress
Step 2: Configure Cypress Support
To integrate Cypress and Percy you need to put some configuration code in the support folder.
Cypress version 9 or below
Navigate to cypress/support/ index.js and add the below command.
import '@percy/cypress';
Cypress Version 10 or above
Navigate to cypress/support/e2e.js and add the below command.
import '@percy/cypress';
Step 3: Write a simple visual validation test
You can use the existing visual test, just modifying the few lines of code. Let’s re-use what we have written above.
 describe('Cypress Visual Testing Demo', () => {
it('Navigate to Browserstack home page and compare images', () => {
cy.visit('https://browserstack.com')
cy.percySnapshot('first-percy-test');
})
})
In the above code, in comparison with the previous script, you can see the only change is line cy.percySnapshot(‘first-percy-test’);, This line takes a screenshot of the current screenshot on the browser and the Percy CLI uploads the screenshot.
Step 4: Set the PERCY_TOKEN environment variable
To Execute Percy Tests with Cypress you need to set the environment variable.
- To get the environment variable
- Login to Percy
- Navigate to Project Settings
- Copy PERCY_TOKEN
- Set the environment variable based on the command line tools you are using.
# Unix
$ export PERCY_TOKEN="<your-project-token>"

# Windows
$ set PERCY_TOKEN="<your-project-token>"

# Powershell
$ $Env:PERCY_TOKEN="<your-project-token>"
Step 5: Execute Percy Cypress Test
To execute the Percy Cypress test you need to run the command
npx percy exec -- cypress run
Note: Run the above command two times at least to view the results, as explained earlier the visual validation works based on the comparison of two images, the first run captures the base screenshot and the subsequent run will compare the screenshot against the base image.
Step 6: View the Results
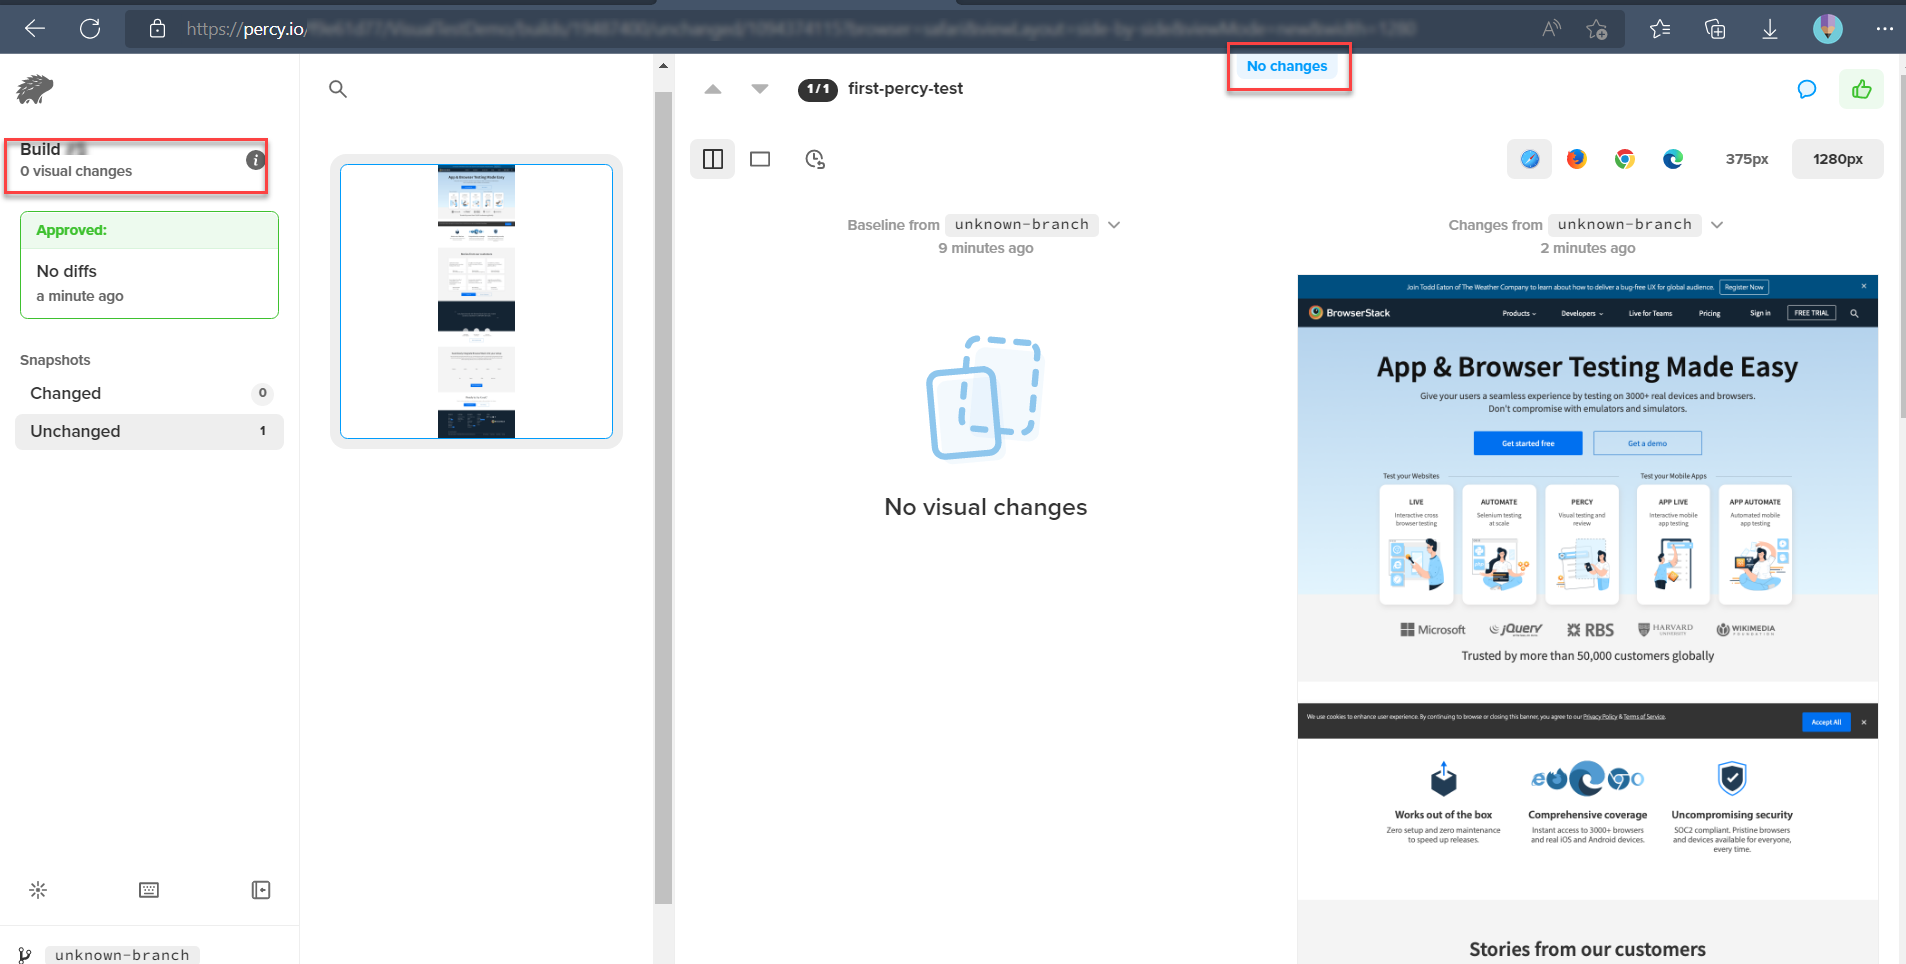
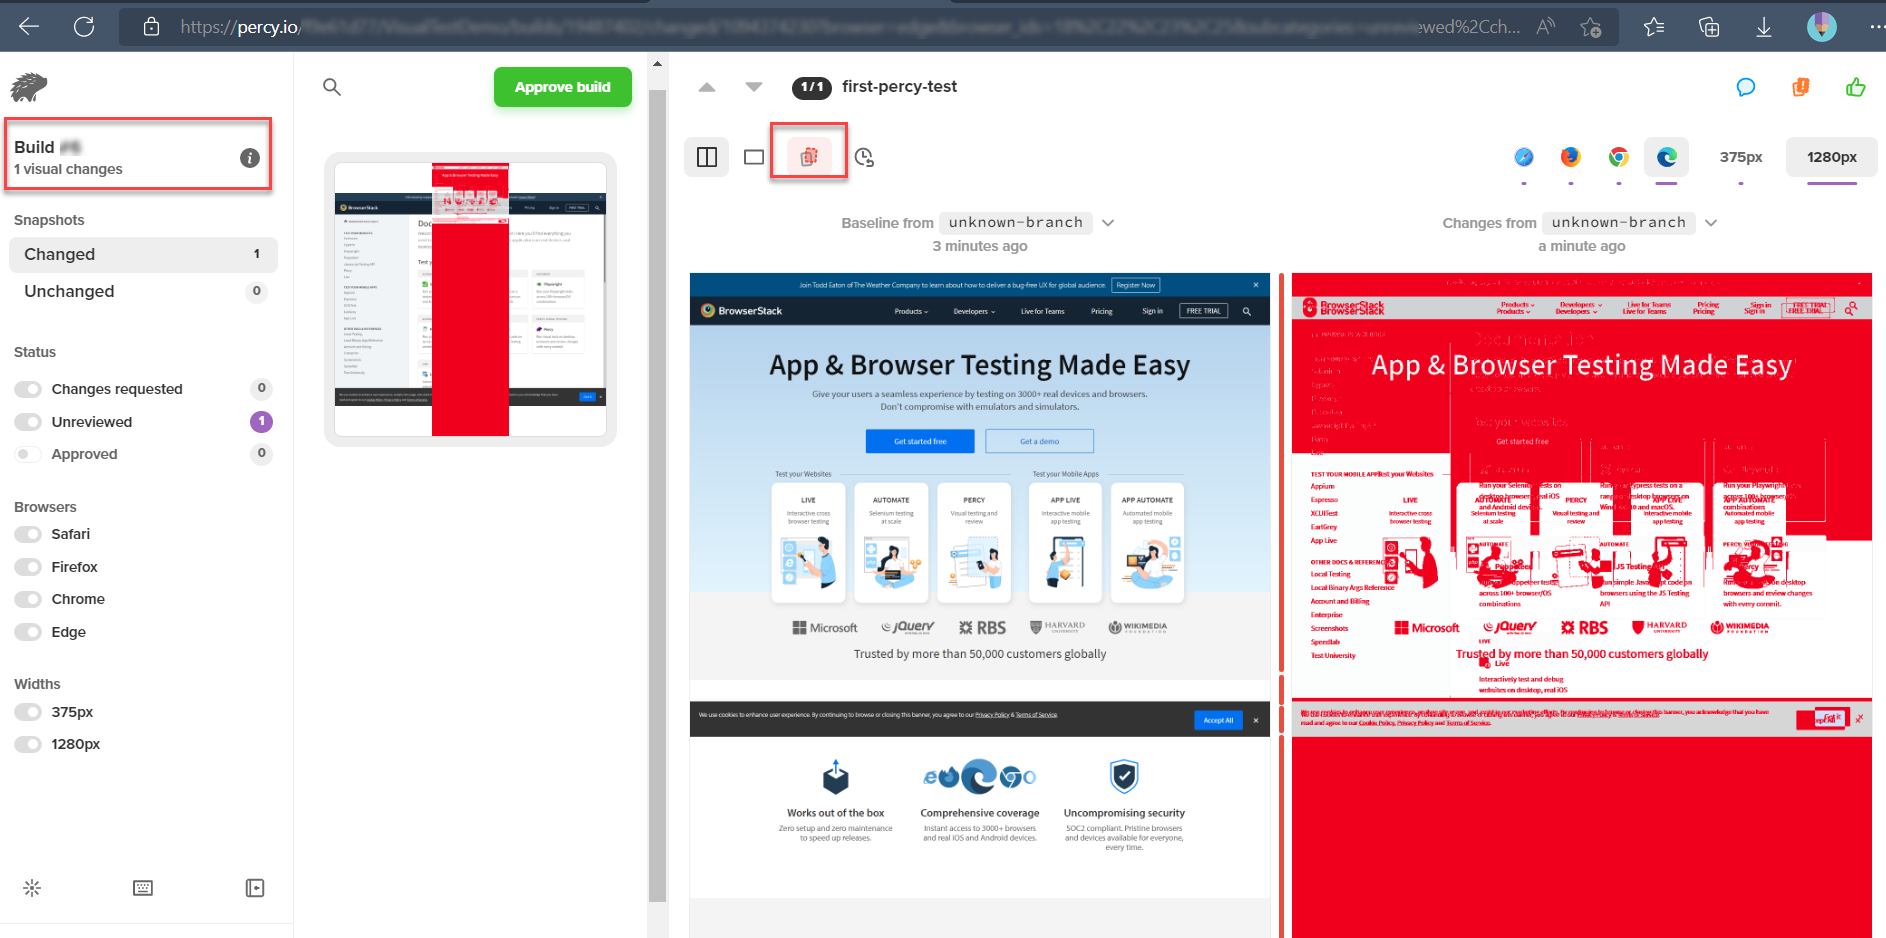
Wait until the execution of the test, once the test execution is complete, you will see the test results with the build URL. The build URL points to Percy’s build, clicking on the URL takes to the current execution build. The build dashboard clearly shows whether there are any differences or not.
Since Percy uploads the screenshots to Percy’s infra, the captured images are available anytime and anywhere, this helps in peer reviews and takes any additional action on issues that are found during visual tests.
If there are no changes in the image Percy shows the message “No changes”
If there are any changes in the screenshots then Percy shows side-by-side difference
Visual Testing is the most popular and recommended approach for User Interface Validation, however, visual regression alone can’t sign off the testing, as Visual Regression doesn’t guarantee the functionality of web applications. Visual testing needs very less coding knowledge and interpreting visual testing results is an easy task. There is no doubt that visual regression helps to catch any regressions at an early stage of development which in turn fastens the development cycle.
Percy helps teams automate visual testing by capturing screenshots, and comparing them with the base. With increased visual coverage, teams can deploy code changes with confidence with every commit.
