Playwright and Cucumber Automation
By GH, Community Contributor - August 26, 2024
The test automation space is evolving and focusing on more than just functional automation. While Selenium was once the industry standard, Playwright has emerged as a powerful alternative. This versatile framework supports various testing types, including component testing, cross-browser testing, responsive testing, etc.
Playwright’s strength lies in its customizability and extensibility. It can be easily integrated with Behavior-Driven Development (BDD) tools like Cucumber. BDD focuses on simplifying test automation results by making them more readable for non-technical users.
This guide enables you to understand how the Playwright Cucumber framework works in detail.
What is a Playwright?
![]()
Playwright is an open-source test automation tool backed by Microsoft. Playwright supports integration with many tools such as Cucumber, Jenkins, Jira, and Cloud Integration with BrowserStack.
It can be used for API testing as well as functional end-to-end testing. Playwright makes debugging easier by providing efficient capabilities for debugging such as trace viewer, loggers, console logs, etc. Playwright provides an option to choose from various supported languages such as Java, JavaScript, C#, and Python.
Additionally, Playwright supports HTML reporters, Allure reporters, and custom reporters. Because of its advanced features, it perfectly fits modern test automation needs, and it has become a popular choice for many organizations.
Read More: Playwright vs Puppeteer
What is Cucumber?
![]()
Cucumber is the most popular test automation tool for Behaviour Driven Development (BDD). It is also open-source and managed by SmartBear. One of the key features of Cucumber is it allows one to write tests in plain English language with a specific format.
Gherkin syntax is used for Cucumber tests which is a plain English-like language for writing test cases. Cucumber also supports multiple languages, and it provides integration capability with many popular test automation frameworks.
Read More: Selenium vs Cucumber
Why should you Integrate and Automate Playwright and Cucumber?
Using Playwright with Cucumber makes the framework simpler, more efficient, and readable, as it can use the power of both Playwright and Cucumber. Playwright provides advanced automation capability by supporting the most advanced React, Angular, VueJS, etc. development frameworks.
On the other hand, Cucumber provides abstraction by hiding all coding complexity. Testers can write the test cases in plain English like language, and non-technical stakeholders can easily understand the test reports.
It also accelerates the automation encouraging non-technical team members to contribute to the automation. Manual testers can easily learn and perform test automation. Understand how to set up the Playwright Cucumber framework with the following step-by-step guide.
Step-by-Step Guide to Set up Playwright Cucumber
Pre-requisite:
Step 1: Set up folders
Create an empty directory of your desired drive and name it (Example: PlaywrightCucumberDemo)
Step 2: Install Playwright
Open the Above created folder by Clicking on File > Open Folder in Visual Studio Code
Open the Terminal by Choosing the Terminal menu and then selecting New terminal
Execute the below command
npm init playwright@latestChoose the language as Javascript when asked in the command line.
Select the appropriate option in CLI as shown below.
After executing the above command, Playwright will automatically install the required packages, browsers, and other components.
Step 3: Install Cucumber
Open the VS Code terminal and use the below command to install Cucumber.
npm i @cucumber/cucumberStep 4: Configure Cucumber
You have installed all required dependencies for Playwright Cucumber, now you need to configure Cucumber.
Create a cucumber.json file in the root of your Project folder. In this case, it is PlaywrightCucumberDemo.
Use the below example code to create a cucumber.json
{

    "default": {

        "paths": [

            "tests/features/"

        ],

        "require": [

            "tests/steps/*.js"

        ],

        "formatOptions": {

            "snippetInterface": "async-await"

        },

        "format": [

            [

                "html",

                "cucumber-report.html"

            ],

            "summary",

            "progress-bar",

            "json:./cucumber-report.json"

        ]

    }

}
The cucumber.json contains the feature file path, step definition file path, reporting options, and output directory. You are free to customize this file as per your requirements.
Step 4: Write a Cucumber tests
Cucumber tests contain two different files: the feature file and the step definition file. The feature file contains the scenarios in Gherkin format that are Given, When, and then format, and the Step Definition file contains the actual code or implementation of test cases.
Read More: Cross-browser testing with Cucumber.
Create two folders, namely features and steps, under the tests folder
Note:
- tests folder is already created by Playwright while installing
- If the test folder contains example tests, delete them to avoid any confusion.
Consider two scenarios.
- Scenario 1: Navigate to Browserstack Homepage and Click on Product. Verify if there is a Web Testing option available.
- Scenario 2: Navigate to Browserstack Homepage and Click on the Pricing section. Verify if all the products are listed in the Left Navigation.
Write the cucumber feature file for the above scenario.
Create a file with the name homepage.feature inside the features folder and write the scenarios as mentioned below
Feature: Homepage Functionality

    Scenario: Verify Product Web Testing

        Given User navigates to the Browserstack Homepage

        When User clicks on Product Menu

        Then It should show Web Testing Product

    Scenario: Verify Pricing Product Lists

        Given User Navigates to Browserstack Homepage

        When User clicks on Pricing Menu

        Then It should Display correct Product lists in left Nav
As you created feature files, now you need to implement them in a step definition file.
Create a file with the name homepage.step.js and write the implementation below.
const { Given, When, Then, Before, After, setDefaultTimeout } = require("@cucumber/cucumber");

const { chromium, expect } = require("@playwright/test");

const { Page } = require("playwright");

setDefaultTimeout(60 * 1000);

let page, browser;

Before(async function () {

    browser = await chromium.launch({ headless: false });

    const context = await browser.newContext();

    page = await context.newPage();

});

Given("User navigates to the Browserstack Homepage", async () => {

    await page.goto("https://www.browserstack.com/");

});

When('User clicks on Product Menu', async function () {

    await page.locator('button[aria-label="Products"]').waitFor();

    await page.locator('button[aria-label="Products"]').click();

});

Then('It should show Web Testing Product', async function () {

    await page.locator('div[aria-label="Products"] button[title="Web Testing"]').waitFor();

    expect(await page.locator('div[aria-label="Products"] button[title="Web Testing"] span').isVisible()).toBeTruthy()

});

Given('User Navigates to Browserstack Homepage', async function () {

    await page.goto("https://www.browserstack.com/");

});

When('User clicks on Pricing Menu', async function () {

    await page.locator('a[title="Pricing"]').click();

});

Then('It should Display correct Product lists in left Nav', async function () {

    var leftNavProducts = await page.locator('div[id="sidenav__list"]').textContent()

    var productArray = await leftNavProducts.split("\n").map((item) => { return item.trim(); });

    expect(productArray).toEqual(expect.arrayContaining(['Live', 'App Live']));

});

After(async function () {

    await browser.close();

})
In the above code, we have implemented two scenarios. The first set of Given, When, and Then belongs to the first scenario, which is “Scenario: Verify Product Web Testing“, and the Second set belongs to the second scenario, “Verify Pricing Product Lists“.
To avoid writing a browser creation and setting up a page each time, we are putting it as a common code inside the Before() function, which executes before each test, and the After() function helps to close the browser after execution of each test.
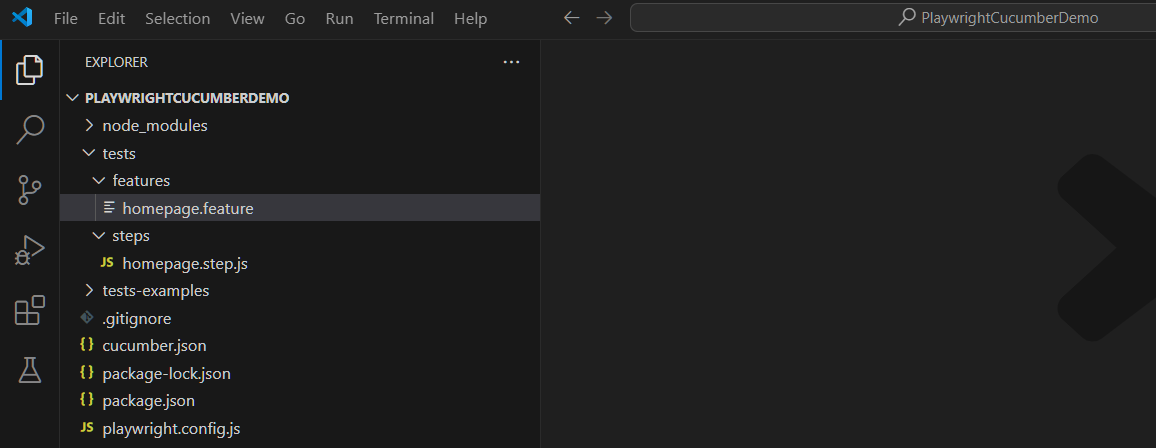
After completion of the above steps, the Project structure looks like below.
Executing Cucumber Playwright Tests
You have configured the Playwright Cucumber framework, and test cases are written in respective files. To execute Cucumber Playwright tests, just enter the below command
npx cucumber-js testOnce you enter the above command, it invokes the cucumber test runner, and progress will be shown in the console. Once execution is complete, the output will be shown in the console.
Test Progress in Console:
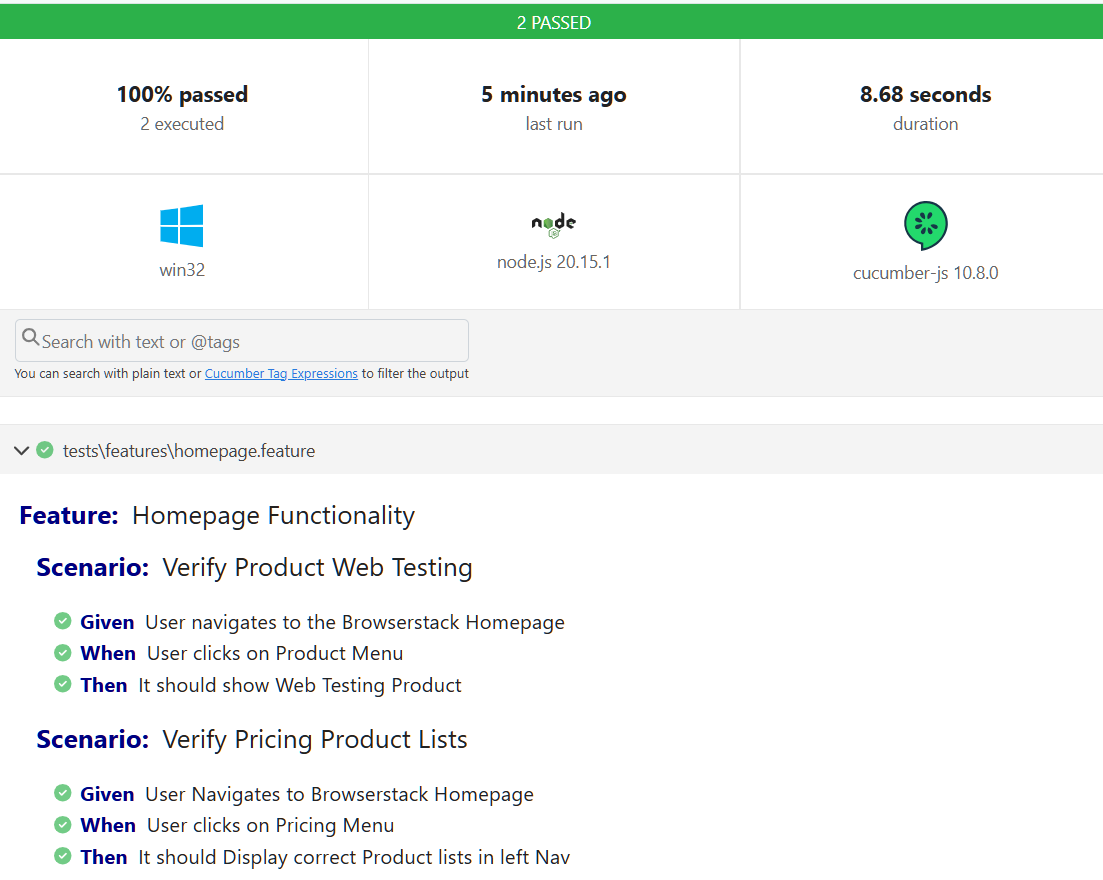
Output:
Reporters in Cucumber Playwright Framework
Cucumber Playwright comes with a default HTML reporter. The configuration is made in the cucumber.json file in the format section (Ref: “format”: [ [ “html”, “cucumber-report.html]]). Once execution is complete, the report will be generated in the root directory with the name cucumber-report.html
How to Run Playwright Tests on BrowserStack?
As mentioned earlier, Playwright provides many advanced capabilities such as cross-browser testing, responsive testing, parallel execution, etc. However, validating across the operating systems and browser combinations in the local environment is practically impossible.
Organizations may look for setting up on-premise servers for test execution environments but that involves a lot of cost and maintenance effort. To overcome such challenges the easiest and recommended approach is using a Cloud execution environment.
BrowserStack is a pioneer in providing the most scalable and customizable cloud execution platform and it provides integration with many test automation frameworks, including Playwright.
To execute Playwright tests in BrowserStack, you must make a minimal configuration as below.
Step 1. Install the BrowserStack node Sdk using the below command.
npm i -D browserstack-node-sdkStep 2. Create the browserstack.yml file.
The YAML file includes configuration details like browser type, operating system access key, username, and other customized settings. For more information on YAML configuration, please visit the BrowserStack Playwright page.
Step 3. Execute Tests on BrowserStack.
To execute Playwright tests on BrowserStack, use the below command
npx browserstack-node-sdk "Your existing command for running your test suite. E.g. <playwright test sample --project=chromium>"After execution, results will be displayed in the dashboard, showing the console logs with details.
Conclusion
Integrating Playwright with Cucumber enables a Behavior-Driven Development (BDD) approach. However, it requires additional configuration, such as setting up feature files and step definition files.
Though the initial setup seems complex initially, reusability will be guaranteed as the framework grows. Additionally, it helps in writing test cases with plain English-like syntax and easy-to-understand reports.
Playwright excels at developing and executing test cases locally, but comprehensive product testing demands a broader approach. To ensure high quality, tests must be run across multiple devices and browsers.
BrowserStack Automate offers a scalable infrastructure that meets these complex demands. With access to over 20,000 real devices, BrowserStack enables thorough validation of various requirements, including responsive design, UI consistency, and functionality across different platforms.
This combination of Playwright’s powerful testing capabilities and BrowserStack’s diverse device lab allows teams to achieve more robust and reliable test automation, ultimately leading to higher-quality software products.


