When choosing a continuous integration (CI) tool, Travis CI and Jenkins are two of the most popular choices. Though both tools serve the same purpose, they differ in key areas.
Overview
Travis CI vs Jenkins
Here are the basic differences between Travis CI and Jenkins:
- Set up and Installation: While Travis CI needs no installation, Jenkins requires installation on a server or local machine.
- Product Type: Both Travis CI and Jenkins are self-hosted.
- Open Source or Commercial: Travis CI is free for open-source projects and paid for private repositories, while Jenkins is an open-source tool but has a higher infrastructure and maintenance cost.
- Customization/Configuration: Travis CI offers limited customization via .travis.yml file while Jenkins is highly customizable.
- Building Pipelines: Travis CI offers built-in support for pipelines, while Jenkins offers the capability to build Custom pipelines with Jenkins Pipeline DSL.
This article explains the differences between Jenkins and Travis CI in detail and which would best fit your needs.
How does the CI Process work?
When a developer commits code in their local system and pushes the changes to the central repository, a webhook triggers the whole CI process through a CI tool. The CI server gets the latest version of the code from the repository, builds the application into a temporary environment within the server and runs the tests. If the build or tests fail, an alert is sent to the development team and optionally the commit may be blocked. If the tests pass, the commit is integrated into the central repository.
Prerequisites for CI Development
To enable CI development in your development cycle, there are two prerequisites:
- The use of version control
- A testing framework
In this post, you can assume the use of Git through its cloud implementation: GitHub. Also assume a simple unit test on Python to run our tests through a CI tool. In this post, we cover two popular CI tools: Jenkins and TravisCI
What is Travis CI?
Travis CI is a popular cloud-based Continuous Integration (CI) and Continuous Delivery (CD) tool that automates software testing and deployment. It was originally designed for open-source projects, but now supports private repositories as well. Written in Ruby, it integrates seamlessly with GitHub and Bitbucket repositories. It also works on Linux, macOS, and Windows (early-stage support) and is free for open-source projects.
Key Features
- Easy Integration: Automatically runs tests when code is pushed.
- Supports 30+ Programming Languages: Works with JavaScript, Python, Java, C++, and more.
- Automated Testing: Run unit, integration, and functional tests before merging code.
- Simple configurations: Configure builds using .travis.yml to define testing and deployment.
- Faster Builds with Build Matrix: Speeds up testing by running tasks in parallel.
- Works on multiple environments: Supports different OS environments (Linux, macOS, Windows).
- Deployment Automation: Deploys to cloud platforms like AWS, Heroku, or Docker after a successful build.
- Notifications & Logs: Provides detailed logs and integrates with Slack, email, and other tools for alerts.
Read More: CircleCI vs Travis CI: Core Differences
Configuration Settings for TravisCI
Travis CI uses a .travis.yml file in the root of your repository to define the build process. Here’s a simple example(yaml) for a Node.js project:
language: node_js  # Define the programming language


node_js:

  - '16'  # Specify the Node.js version


install:

  - npm install  # Install dependencies


script:

  - npm test  # Run tests


deploy:

  provider: heroku  # Deploy to Heroku

  api_key: $HEROKU_API_KEY  # Secure API key (use environment variable)

  app: my-app-name  # Heroku app name
Read More: Top 18 Continuous Integration Tools
What is Jenkins
Jenkins is a popular open-source CI/CD tool that automates software development tasks like building, testing, and deployment. It is written in Java and is known for its flexibility, ease of use, and extensive plugin support. Startups and enterprises prefer Jenkins because it is free, widely supported, and backed by an active community. It runs on multiple platforms, including Windows, macOS and various Unix-based systems like Ubuntu and OpenSUSE. It integrates seamlessly with various version control systems like Git, SVN, and Mercurial.
Key Features
- Open-Source & Free: Available for anyone to use without any licensing cost.
- Cross-Platform Compatibility: Runs on Windows, macOS, and Linux.
- Extensive Plugin Support: Over 1,800+ plugins for integration with tools like Docker, Kubernetes, and AWS.
- Supports Multiple Programming Languages: Works with Java, Python, JavaScript, C++ and more.
- Parallel & Distributed Builds: Executes tasks in parallel across multiple machines to speed up testing.
- Pipeline as Code: Uses Jenkinsfile (written in Groovy) to define CI/CD pipelines.
- Easy Integration with DevOps Tools: Connects with Git, Maven, Gradle, Selenium and more.
- Security & Role-Based Access: Manages permissions and secures sensitive data.
Read More: What are Agents in Jenkins?
Configuration Settings for Jenkins
Jenkins is configured using a Jenkinsfile, which defines the CI/CD pipeline in a structured format. Here’s an example of a basic Jenkins pipeline using a Jenkinsfile (groovy):
pipeline {

    agent any


    stages {

        stage('Checkout Code') {

            steps {

                git 'https://github.com/user/repository.git'

            }

        }


        stage('Build') {

            steps {

                script {

                    sh 'mvn clean install'  // For a Java project

                }

            }

        }


        stage('Test') {

            steps {

                script {

                    sh 'mvn test'

                }

            }

        }


        stage('Deploy') {

            steps {

                script {

                    sh 'mvn deploy'

                }

            }

        }

    }

}
Travis CI vs Jenkins: A Detailed Comparison
Jenkins and Travis CI are popular continuous integration (CI) tools used for automating software builds and testing.
While Jenkins is a self-hosted, open-source automation server, Travis CI is a cloud-based CI/CD tool designed specifically for GitHub and Bitbucket repositories.
Setup and Installation
Jenkins is a standalone Java application that runs on Windows, macOS, and UNIX. Installation involves downloading the Jenkins war file, setting up a directory, and launching it using the java -jar command. Once running, Jenkins is accessed via a web browser for further configuration.
Travis CI does not require installation. Developers need to sign up using GitHub, enable repository testing from the Travis settings page, and add a .travis.yml file to the repository. Travis automatically runs test suites upon code changes.
Verdict: Jenkins requires a more manual setup, whereas Travis CI is simpler for GitHub users.
Usage
Jenkins focuses more on functionality than usability, offering powerful features and flexibility. Configurations are stored in XML files, allowing administrators to quickly apply updates across multiple projects by editing files directly. While it may have a steeper learning curve, it provides detailed control over complex CI/CD pipelines.
Travis CI, on the other hand, is known for its ease of use and seamless GitHub integration. It allows independent testing of branches and pull requests, with test results displayed directly within GitHub. Its simple interface makes it ideal for teams looking for user-friendly CI/CD, particularly in open-source projects.
Verdict: Travis CI is easier to use, but Jenkins provides more customization options.
Parallel Execution
Jenkins supports parallel testing using the Parallel Test Executor Plugin. However, since multiple builds share the same environment, there can be issues when accessing shared resources like the filesystem. Proper configuration is needed to ensure smooth execution.
Travis CI makes parallel testing easier with its build matrix feature, allowing tests to run across multiple virtual machines. By modifying the .travis.yml file, builds can be executed in parallel. Travis CI also supports build stages, which run jobs in parallel within a stage, though stages themselves run sequentially.
Verdict: Both support parallel execution, but Travis CI offers a more seamless experience.
Applications and Plugin Ecosystem
Jenkins, being open-source, has a massive plugin ecosystem with over 1,500 plugins for automation, deployment, and testing. Its strong community support makes it highly customizable and extensible.
Travis CI supports 21 programming languages, including C, C++, Java, PHP, Python and JavaScript (Node.js). It also offers various community-developed apps and tools for mobile development, command-line utilities, and libraries.
Verdict: Jenkins is the clear winner in terms of plugins and community support providing extensive customization when compared to Travis CI.
Community Support
Jenkins, being open source, has strong community support for troubleshooting, knowledge sharing, documentation, and reviews. The Jenkins Community Blog is also regularly updated, making it a valuable resource for users.
Travis CI has dedicated sections for enterprise, deployment, discussion, languages and environments. However, its community is less active compared to Jenkins, and support for plugins and extensions is not its strongest point.
Verdict: Jenkins offers better community support with a more active user base and extensive resources, making it a stronger choice for troubleshooting and collaboration.
Cloud and Third-Party Integrations
Travis CI is a cloud-based CI/CD tool that allows repositories from other servers (besides GitHub and Bitbucket) to be added as sub-modules. It is free to use for public repositories. It also offers built-in plugins for cloud providers like AWS, Azure, and Google Cloud, making it easier to integrate new GitHub projects with existing ones and automate builds based on GitHub events.
Jenkins also supports cloud integration through plugins, allowing it to connect with platforms like Google Cloud, Amazon EC2, Digital Ocean, and Microsoft Azure. These integrations help in managing builds and deployments across different cloud environments.
Verdict: Both tools support cloud integration, but Travis CI offers a simpler, built-in approach, while Jenkins provides more flexibility through its extensive plugin ecosystem.
Hosting
Jenkins offers both cloud-based and on-premise hosting options. Since it is free, the only cost for an on-premise setup is the infrastructure investment. It is a flexible choice for teams looking for a scalable CI/CD solution.
Travis CI’s free version is entirely cloud-based, while its Enterprise edition allows on-premise hosting on private servers or cloud platforms like AWS, Google Compute Engine, VMware, OpenStack, and Azure. Travis CI Enterprise provides teams with more control over their build processes.
Verdict: Jenkins is a great free option for both cloud and on-premise setups, while Travis CI is better suited for open-source projects, with its Enterprise version offering additional flexibility for self-hosting.
Extended Customization
Both Travis CI and Jenkins offer RESTful APIs for customization. Travis CI’s latest API version, V3, was released in 2017, but V2 is still in use for its web front-end applications. The Travis CI Ruby Library is also based on API V2.
Jenkins provides remote access APIs for XML, Python, and JSON, allowing users to trigger builds, create jobs, and more. Jenkins’ extensive documentation makes it easier to integrate these APIs into projects.
Verdict: Both tools offer customization options, but Jenkins provides more flexibility with multiple API formats and extensive documentation.
Release Cycle
Jenkins follows a structured release cycle with Long-Term Support (LTS) and weekly releases. The LTS versions provide stability, while weekly releases bring new features and updates. Changelogs for both release types are available for reference.
Travis CI does not follow a traditional release cycle. Instead, it relies on dependency installations. To set up Travis CI, a simple YAML file (.travis.yml) needs to be added to the repository’s root directory, which manages dependencies automatically.
Verdict: Jenkins offers a more structured update process with regular releases, while Travis CI keeps things lightweight by managing dependencies through configuration files.
Differences Between Travis CI vs Jenkins: A Summary
| Feature | Travis CI | Jenkins |
|---|---|---|
| Open Source or Commercial | Free for open-source projects; paid for private repositories | Free (open-source) |
| Product Type | Self-hosted/On-Premise (Travis CI Enterprise for on-premise) | Self-hosted/On-Premise |
| Setup and Installation | No installation required | Requires installation on a server or local machine |
| Ease of Use | Easy to use with a simple, user-friendly interface | Customizable with plugins |
| Official Support | Official support via the Travis CI Forum | Community-based (IRC, Blogs, Forums) |
| Apps & Plugins | Fewer plugins and apps available | 1500+ plugins |
| Parallel Execution | Yes | Yes (Partial) |
| Build Pipelines | Built-in support for pipelines | Custom pipelines with Jenkins Pipeline DSL |
| Cloud Integrations | Built-in support for AWS, Azure, Google Cloud | Amazon EC2, Google Cloud, VMware, etc. via plugins |
| GitHub Integration | Built-in integration with GitHub and BitBucket | Supported via plugins |
| Customization/Configuration | Limited customization via .travis.yml file | Highly customizable |
| Private Project Support | Requires a paid plan for private repositories | Supports private repositories without extra cost |
| Technical Expertise Required | Easy to use with a user-friendly GUI | Requires technical expertise for setup and customization |
| Costs Involved | Free for open-source projects; paid for private repos. | Free to use, but hosting costs may apply. |
Which is More Popular: Jenkins or Travis CI?
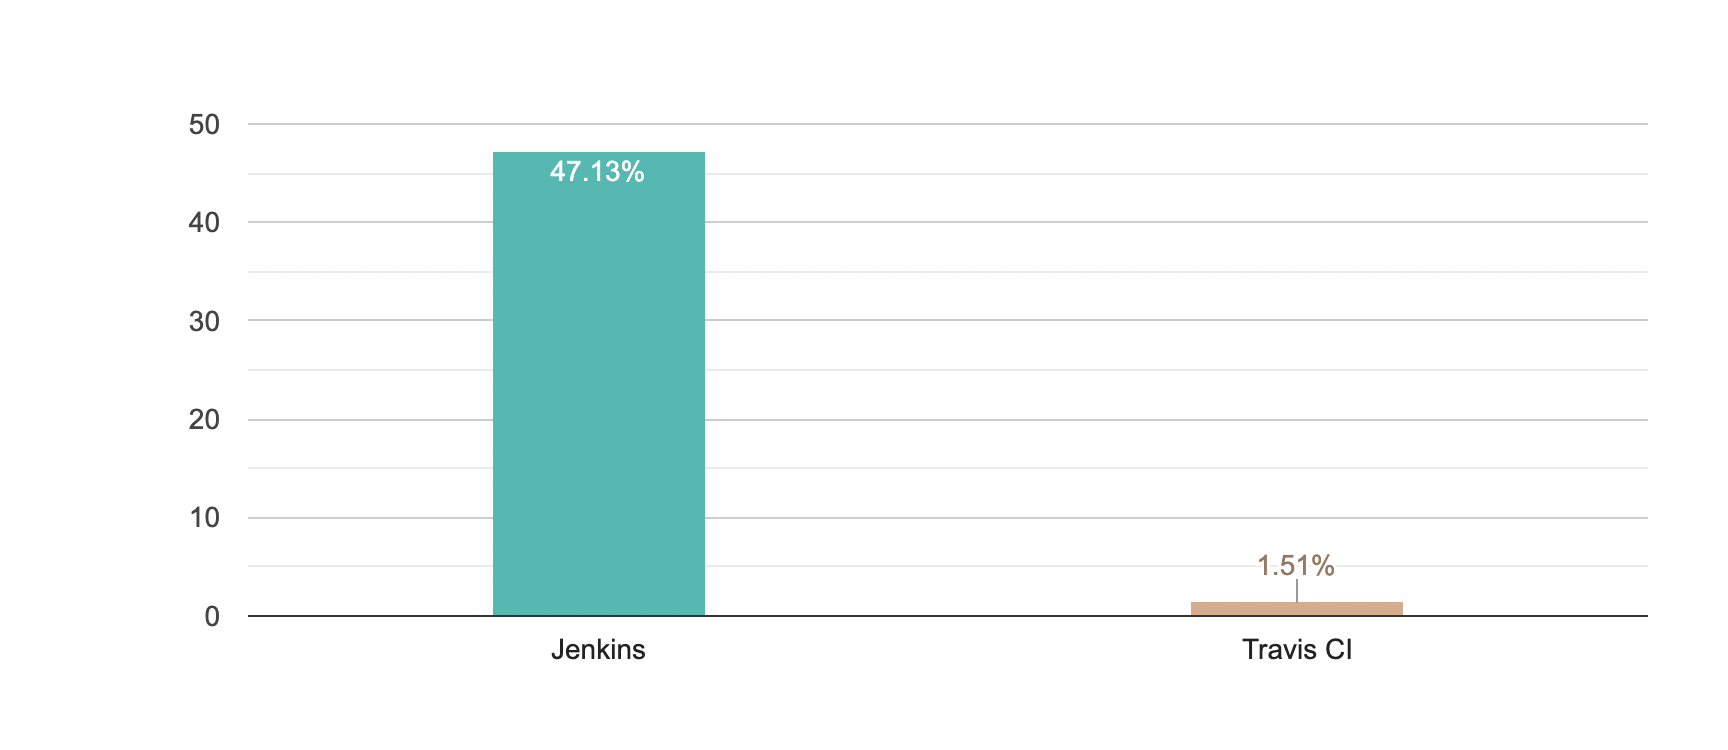
Jenkins has been around for a long time and is widely used by both startups and large enterprises. Its flexibility and large plugin ecosystem make it the top choice for many, with a market share of 47.01% in the CI/CD space.
Travis CI, while newer, is particularly popular among teams using GitHub due to its seamless integration. It’s easy to use and works well with GitHub, giving it an edge for teams already on the platform. However, it holds a smaller market share of 1.53%.
Overall, Jenkins leads in popularity due to its long-standing presence and wide adoption. But Travis CI is quickly growing, especially among GitHub users. The best choice depends on your team’s needs and existing tools.
Read More: CICD with Jenkins
Conclusion
The process of testing is relatively similar in these two popular CI tools, though their implementation is very different.
- If you have a repository hosted on GitHub or would like minimal fuss in setting up your testing framework, you should go ahead with Travis CI.
- However, if you have a self-hosted repository and would like complete control over your CI tool, you should go ahead with Jenkins CI.
Additionally, both tools can be integrated with BrowserStack seamlessly to run automated tests across real devices and browsers.


