How often have you found yourself buried in test data, struggling to summarize and present results in a way that’s both clear and actionable for stakeholders? You’re not alone—many teams face the challenge of communicating testing outcomes effectively.
A well-structured Test Summary Report is key to overcoming this challenge. It transforms hours of testing and debugging into concise, insightful information that guides critical release decisions.
By delivering a clear, actionable report, teams ensure that the insights gained from testing can drive improvements, minimize risks, and support informed decision-making moving forward.
This guide covers the essentials of writing a Test Summary Report, from key metrics and best practices to how tools like BrowserStack can streamline the process.
What is a Test Summary Report in Software Testing?
The definition of a Test Summary is as simple as the name suggests. It is also known as a Test Closure Report. It provides the relevant stakeholders with a detailed account of the overall test results and defects. It aims to summarize the results of the entire testing process formally.
Test Summary Report is an important document that is prepared at the end of a Testing project, or rather after the Testing cycle has been completed. The prime objective of this document is to explain the details of the Testing activities performed for the Project, to the respective stakeholders like Senior Management, Clients, etc. It also portrays the overall quality level of the application.
While the Daily Status Reports only deliver the daily test status and results to the stakeholders, Test Summary Report on the other hand provides a consolidated report on the overall testing activities performed in the cycle.
Read More: How to set goals for Software Quality
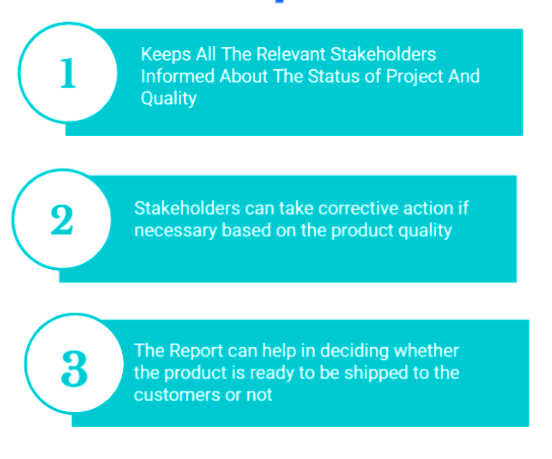
The typical benefits of a test report include:
Importance of Having a Well-written Test Summary Report
A Test summary report gives a clear idea of all the testing efforts and acts as a bridge between the testers, developers, project managers, and stakeholders. Therefore, getting a well-written test summary report is of paramount importance. Here are other reasons that reflect its importance:
- Clear Visibility: A test summary report gives a comprehensive view of the entire testing process. It defines what was tested, how testing was done, the environments used, and the outcomes. This helps both the technical and non-technical teams understand the testing efforts.
- Informed Decision Making: A well-made test summary report gives factual reasons to go or not go for releases. It emphasizes the unresolved errors, coverage gaps, risks and more to help the stakeholders take an informed decision.
- Promotes Transparency: A good test summary report talks about which tests passed or failed, who performed them and when. This promotes accountability and seamless and transparent tracking of test progress within the QA process.
- Improves Communication: In cross-functional teams, everyone may not be aligned. A test summary report helps overcome this challenge by compiling all the complex data in a structured and intuitive format.
- Historical Record: Test summary reports act as a knowledge base or record for future releases and audits. These reports can be referred to for post-release review, audits etc. so that teams get a better idea of the product evolution. This makes it even necessary to create a good test summary report.
Read More: How to set up a Bug Triage Process?
Before creating a Test Summary Report, it’s crucial to ensure your tests run smoothly and effectively. If scaling, maintaining, or optimizing your test automation feels challenging, our experts are here to help. Connect with them to overcome common testing hurdles, streamline your automation workflows, and achieve precise, actionable results.
Get Expert QA Guidance Today
Schedule a call with BrowserStack QA specialists to discuss your testing challenges, automation strategies, and tool integrations. Gain actionable insights tailored to your projects and ensure faster, more reliable software delivery.
Pillars of a good Test Summary Report in Software Testing
The pillars of a good test summary report are:
- Specification: You don’t need to write a very long test summary report. It should have all the test result specifications concisely and to the point.
- Standard: The test summary report should follow a standard template as it is easy for stakeholders to review and understand.
- Clarity: The information captured in the test report should be clear. The report should reflect brevity and clarity.
- Detail: The report should provide detailed information about the testing activities wherever necessary. The information though concise should not be abstract as it won’t help the stakeholders in drawing a clear picture of it.
When to create a Test Summary Report?
A test summary report is ideally created at the end of testing cycles, so it can also include details about regression tests. However, there should be enough time after submitting the report and before the product is shipped to the customers. The intention here is to help the client and the stakeholders with the information on the overall health of the testing cycle and the application being tested so that any corrective action can be taken if necessary.
What to include in a Test Summary Report?
An informative test summary report should be concise and relevant. Several examples of Test Summary Report templates are available online, but all of them might not be applicable in your case. Therefore, it is vital to customize our report according to the nature of our test project after doing a proper analysis.
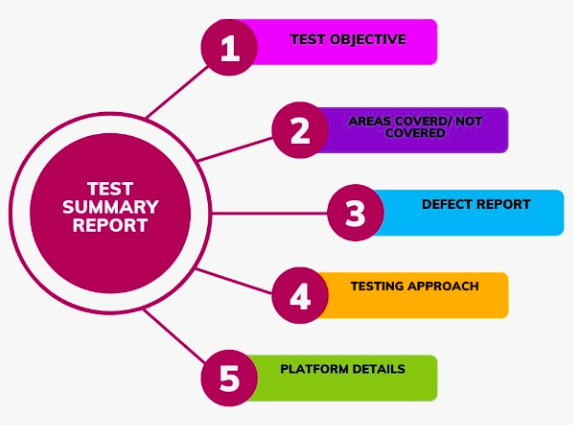
Below is a list of what should be included:
- Test Objective – Include the purpose of the testing, this shows that the test object and the requirement were clear with the testing team.
- Areas Covered – Include the regions and the functionalities of the product that were covered in testing. It need not capture every test scenario in detail but should cover all the areas at a high level.
- Areas Not Covered – It is essential to capture the product areas that were not covered in testing. Any areas not tested can raise the alarm at the client’s end, so you should ensure that anything left untested is noted and expectations around it are set accordingly. Also, ensure that each point has an associated reason, for example, limitation of access to the availability of devices.
- Testing Approach – This is important to cover since it indicates what and how the testing was performed. Ensure to provide details of the steps taken and the testing approaches adopted to achieve the task.
- Defect Report – Though it usually gets captured already in the bug report, including it in the test summary report can give an additional advantage to your report.
- Platform Details – Nowadays, products are tested across multiple platforms. With the growing demand, testing is not just limited to multiple devices or browsers but different versions. So, let’s include details of every platform and environment on which the product was tested.
- Overall Summary – This section is mainly for us to provide feedback on the application’s overall status under test. It should inform the client about the critical issues discovered and how many are still open so that they can estimate how close they are to shipping the product to the customer.
Read More: Test Case Prioritization: A Detailed Guide
Key Metrics To Include in Test Reports
Here are the key metrics to include in Test Reports:
- Total Test Cases Executed: Number of test cases executed during the testing cycle. This is to get an idea of the test coverage and efforts.
- Passes Test Cases: Number and percent of successfully passed tests. This helps in assessing the stability of the product.
- Failed Test Cases: Number and percent of failed tests. This metric highlights the unstable parts of the product.
- Blocked/Skipped Test Cases: Number of test cases that weren’t executed due to roadblocks like environment issues or incomplete features. Helps understand testing bottlenecks.
- Defect Density: Number of defects detected per module or per line of code. This metric helps assess the quality of individual components.
- Defect Status Distribution: Breaks down defects by status like ‘Open’, ‘In Progress’, ‘Fixed’, ‘Retested’, ‘Closed’. This helps understand the progression of defect resolution.
- Defect Severity and Priority: Group defects based on their business impact and resolution priority. This is to analyze the business-critical areas.
- Test Coverage: Percentage of requirements/features covered by test cases. This shows how much of the product has been tested.
- Test Execution Timeline: Time taken for test planning, execution, and defect fixing. Helps in future sprint planning.
- Test Environment Details: Details on hardware, software, browser versions, and configurations leveraged during testing. This metric is vital for reproducing issues or verifying fixes.
Steps to create a Good test Summary Report [With Examples]
Now that you have learned about Test Summary reports, Try to create a sample test report.
You will create a sample test report on ‘XYZ online travel company’.
Step 1: Capture the purpose of the document
In this step, briefly describe the document’s purpose.
For Example, This document captures the various activities performed as part of Testing the ‘XYZ’ online travel company application.
Step 2: Capture an overview of the product in test
In this step, briefly capture an overview of the application tested.
For Example, ‘XYZ online travel company’ is an online travel services application that offers services for booking airline tickets, domestic and international holiday packages, hotel reservations, rail, and bus tickets. Several modules like Registration, Booking, Payment, and Reports are integrated to fulfill the purpose.
Step 3: Capture the Testing Scope
In this step, you should capture the testing scope of the application, which means the areas/modules that are In Scope, Out of Scope and also the areas that were not tested due to any constraints or dependencies.
For Example, You can capture the areas of the product as shown below.
1. In-Scope: Functional Testing for the following modules are in Scope of Testing
- Registration Of Users
- Booking of Tickets
- Booking of hotel packages
- Payment
- Registration confirmation
2. Out of Scope: Concurrency and multi-tenant user testing are out of scope in this release.
3. Areas not tested: The user registration page with the field values in mixed cases e.g., XYZ and cancellation of multiple tickets together, could not be covered due to known issues.
Step 4: Capture the Metrics
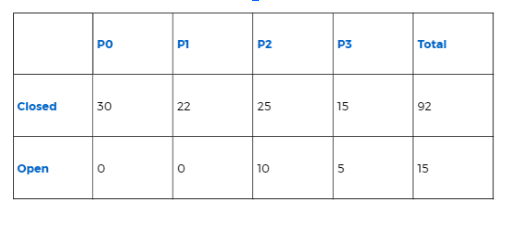
Test Metrics help us to understand the test execution results, status of the cases as well as defects, etc.
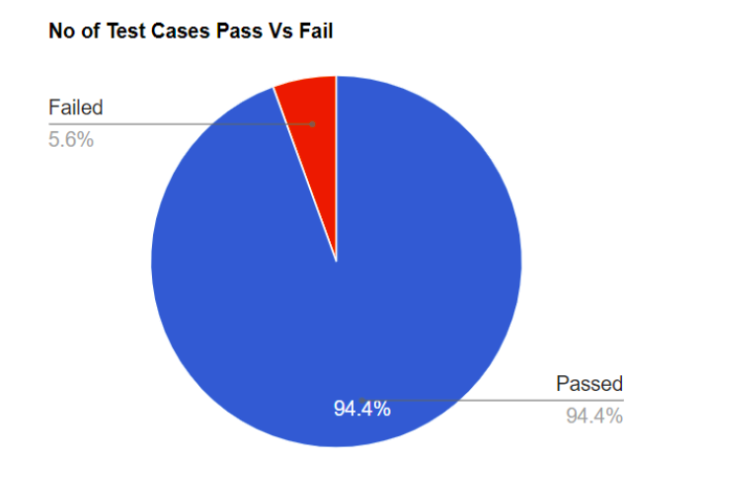
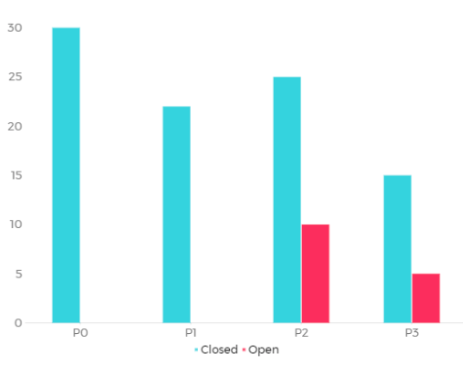
Also, Charts or Graphs can be attached for better representation to capture Defect distribution- function or module-wise, or severity-wise.
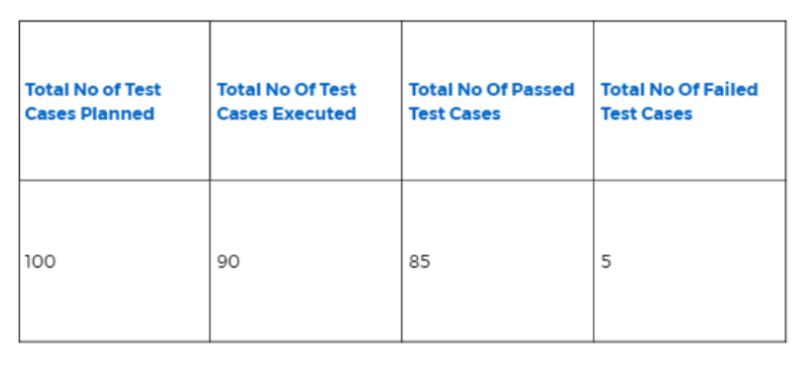
In the below chart, you have captured the total no of cases that were planned, the no of cases that were executed, the no of passed and failed cases, the no of defects identified, etc.
- No. of test cases planned
- No. of test cases executed
- No. of test cases passed
- No. of test cases failed
- No of defects identified with their Status & Severity
Step 5: Capture the types of testing performed
In this step, capture the various Testing types performed for the product. This ensures that the application is being tested properly. You can also capture the details if multiple rounds of testing are done. For example,
For Example,
Smoke or Sanity tests were performed whenever a new build was deployed into the test environment to ensure that the major functionalities of the application are working fine. If the test results were up to mark, the build was accepted and promoted to other test environments for the QA team to start testing.
Regression Testing
- Regression Testing was done once the smoke results were good on any new build deployed in the test environments.
- Regression Results were analyzed to ensure that the entire functionality works fine with the new build deployed.
- Regression Runs also covered the new test cases that were added for the newer areas in the test or any defect fixes that went in.
Integration Testing
This was performed to ensure that the entire application, integrated with all other functionalities, works as expected as intended without any errors.
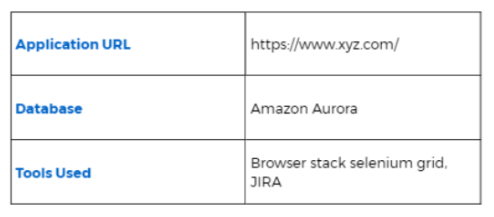
Step 6: Capture the Test Environment and the Tools used
In this step, capture the details about the Test Environment in which the testing activities mainly were carried out, Application URL, Database version, etc. Also, capture the details of any tools used for Bug Management, like JIRA or Selenium for automation.
For Example,
Also Read: Best Test Management Tools For Jira
Step 7: Learnings during the test activity
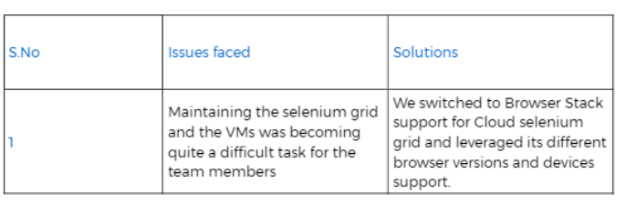
Utilize this section to describe the critical issues faced and the solutions implemented to get past those problem areas during the testing. These learnings made will help during the next Testing phase, and hence it is important to capture the details about them.
For Example,
Step 8: Recommendations or Suggestions, if any
In this section, You can mention any recommendations or suggestions for the relevant stakeholders. These suggestions can help plan for the next cycle and help the involved teams.
For Example,
- Administrator user details could be shared with the team across all time zones, so there is no dependency on the Onsite counterparts of the testing team for their usual day-to-day activities.
- The Development Team should conduct demos for any new feature introduced in the application to the entire Test team. This will help them to get an overview of the feature before the testing starts.
Step 9: Exit Criteria
Exit Criteria is defined as Test Completion when certain conditions are fulfilled like
- All test cases that were planned are executed successfully
- All critical issues are closed
- Any other open issues have an action planned and are targeted for the next release cycle.
Step 10: Sign Off
This section captures whether the Testing team gives a Green Signal for the application to Go Live and if the Exit Criteria were fulfilled. Suppose the Exit Criteria are not fulfilled completely. In that case, the relevant areas of concern can be highlighted and the decision can be left further with the Senior Management and other stakeholders if the application can Go Live or not.
Test Summary Report: Sample Template
Here is a sample test summary template:
1. Project Name: Add the project or application’s name here
2. Test Cycle Duration: Enter the Start Date and End Date
3. Prepared By: Name of the Tester
4. Objective: Describe the purpose of testing (example: bug fix verification, regression testing, etc.)
5. Test Environment: Mention test environments like:
- Operating System:
- Browser/Device:
- Software Version:
- Test Tools Used:
6. Test Summary:
| Metric | Count/Percent |
|---|---|
| Total Test Cases Planned | XX |
| Total Test Cases Executed | XX |
| Test Cases Passed | XX (XX%) |
| Test Cases Failed | XX (XX%) |
| Test Cases Blocked/Skipped | XX |
| Defects Raised | XX |
| Defects Closed | XX |
| Defects Open | XX |
| Test Coverage | XX% |
7. Defect Summary:
| Defect ID | Description | Severity | Status | Remarks |
|---|---|---|---|---|
| DEF-001 | Issue summary | Medium | Closed | Waiting for dev fix |
| DEF-002 | Issue summary | High | Open | Verified and closed |
8. Key Observations: Mention the major findings and observations, highlight critical defects and roadblocks, and highlight deviations from planned tests.
9. Risks & Mitigations: Detect potential risks during testing and provide mitigation suggestions.
10. Recommendations: Mention whether the build is recommended for release, and suggest improvements.
How to share test summary reports within the team?
Once the test summary reports are designed, it is essential to share them with the stakeholders and clients and the team. With the test summary report, the team members will get an overview of the entire testing cycle which will help them in improving further. The reports can be of great help for newcomers as well.
You can leverage BrowserStack integration with Slack to share these test summary reports daily within the team in an automated way. Integrating Slack with BrowserStack can help you to debug your failed tests directly from Slack and obtain a summary of all your builds executed during the day.
Features Needed in Test Automation Tools to Create Test Summary Reports
Here are the key features required in test automation tools to build test summary reports:
- Automated Test Case Logging: The tool should be able to log the results (pass/fail/skip) of every test case automatically without manual input.
- Built-in Reporting and Dashboards: The automation tool should include real-time dashboards, customizable reports, and a visual display of key metrics.
- Defect Tracking Integration: With the tool, you should be able to automatically link or export failed test cases to defect management systems like Jira, Bugzilla etc.
- Test History: It should store historical test runs and keep comparing reports periodically.
- Environment and Configuration Capture: It should auto-capture OS, browser, device, and network configurations, and make reports reproducible and more complete for debugging.
- Integration with CI CD Pipelines: The tool should seamlessly integrate with CICD tools like Jenkins, Circle CI, etc., and after each build, test reports should be automatically triggered.
The aforementioned were the features required in test automation tools to create test summary reports. Ensure you look for these features in your test automation tools before selecting one. Tools like BrowserStack Automate would be a good option if you are looking for built-in dashboards for cloud test sessions.
Why choose BrowserStack to create Test Summary Reports?
BrowserStack Test Reporting and Analytics streamlines the creation of test summary reports by aggregating comprehensive test data into a single, easily accessible dashboard.
It automatically collects detailed logs, screenshots, and performance metrics from every test run, enabling teams to quickly identify trends, pinpoint failures, and understand overall application quality.
Key benefits include:
- Centralized Data Collection: All test artifacts, from error logs to video recordings, are consolidated. It allows for a complete picture of test executions without manual data gathering.
- Real-Time Insights: With immediate visibility into test outcomes, teams can generate up-to-date summary reports that reflect current testing health. It makes it easier to communicate findings to stakeholders.
- Actionable Diagnostics: Detailed contextual information helps in diagnosing issues faster. It ensures that critical defects are highlighted in the test summary reports for prompt remediation.
- Seamless Integration: The Test Reporting and Analytics platform integrates with CI/CD pipelines, and enables automated report generation that reduces manual overhead and improves reporting accuracy.
Best Practices for Writing a Test Summary Report
Here are some best practices you should follow while writing a test summary report:
- Ensure the objectives are stated clearly. Start with ‘why’ the testing was done (example: feature validation)
- Focus on key metrics like total tests, pass/fail counts, defects, and coverage, etc. in clear tables.
- Summarize defects by highlighting defect IDs, severity, and status. Ensure that the critical issues are mentioned separately.
- Report unresolved bugs or roadblocks that could impact release decisions.
- Use non-technical, clear, and understandable language with clean formatting.
What Are the Challenges Associated with Test Reporting in Continuous Testing?
Test reporting in continuous testing comes with it challenges too. This can occur when multiple test cases have different outcomes. Some common challenges include:
- Data Overload: When comprehensive test reports are generated in large-scale projects, a huge amount of data is also generated. This can pose a challenge for stokeholders when it comes to extracting relevant insights.
- Report Precision: A test report’s accuracy depends on the credibility of the data. If the test data has errors or is incomplete, then the whole reporting process gets affected.
- Interpretation: If the reports are not presented in a clear, understandable manner, non-technical stakeholders might find it difficult to add their contributions.
- Time-consuming: Creating detailed test reports can consume a lot of time, especially because of short and frequent testing cycles.
Conclusion
A test summary report clearly outlines what was tested, what issues were found, and what still needs attention. It helps teams quickly understand the results and make better decisions. Using tools like BrowserStack Test Reporting and Analytics can simplify this process, making it easier to create effective and informative reports.

