Mocha Test Report provides a comprehensive insight into various build runs during Mocha test automation. It is useful in identifying bugs, analyzing them, and resolving and improving test coverage.
In this article, you will explore how to generate Mocha test reports using default reporter, Mochawesome, and Test Observability.
What is Mocha?
Mocha is a simple and extensible JavaScript test framework that runs on Node.js and in the browser. It makes it easier to write unit tests, and End-to-End (E2E) automated tests for APIs, web UI and performance tests.
Mocha makes asynchronous testing simple. Mocha tests have a high rate of accurate reports as it maps undetected exceptions to the correct test cases. Popular test frameworks like WebDriverIO, Cypress and Selenium WebDriver supports Mocha as their standard style of writing tests.
Read More: Top 9 JavaScript Testing Frameworks
How to Generate Test Reports with Default Mocha Reporter
Mocha has a built-in default reporter called Spec. Spec generates reports as hierarchical views nested based on the test cases. Defaut Mocha reports are adjusted for the Windows terminal.
The following is a step-by-step guide to generating a report using the default report:
Step 1: Start a Node.js project by running this command npm init in your project root directory.
Step 2: Install mocha as a development dependency with this command:
npm install –save-dev mocha
Step 3: Create a .js file (test.js).
Step 4: Write and save the following sample test code in your test.js file.
```js

const assert = require('assert');


describe('Array', function () {
     describe('#indexOf()', function () {
 it('should return -1 when the value is not present', function () {
 assert.strictEqual([1, 2, 3].indexOf(4), -1);
});


it('should return the correct index when the value is present', function () {

  assert.strictEqual([1, 2, 3].indexOf(2), 1);

});

     });
});


describe('Math', function () {
 it('should return 9 when multiplying 3 by 3', function () {
 assert.strictEqual(3 * 3, 9);
});


it('should return -8 when multiplying -2 by 4', function () {
 assert.strictEqual(-2 * 4, -8);
     });
});


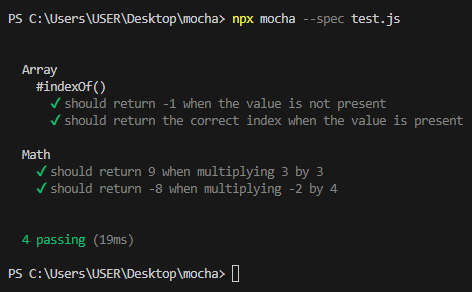
```Execute your test using this command: npx mocha –spec test.js
Your result should look like what you have in the image below
The –spec flag specifies the use of Spec as the default reporter.
Read More: How to Test Selenium Node.JS with Mocha
Limitation of Default Mocha Reporter
While the default reporter is useful and has a simple mocha test reporter approach, it lacks sufficient data for tests. When running a large set or complex set of tests, the default test reporter is not always the best option.
Reports are expected to visualize the test details, failures, screenshots, time for execution, logging details, and more. However, the default Mocha test reporter does not meet these important needs.
Here are some of the Default Mocha Reporter limitations:
- Reports are limited to terminal window
- It lacks detailed analytics
- It lacks visual representation
- It is inefficient in reporting complex test cases
What is Mochawesome?
Mochawesome is a custom mocha reporter. It runs on Node.js and works in collaboration with Marge to generate standalone HTML/CSS reports to visualize mocha tests. It is supported on all the leading test frameworks that support the Mocha style of writing tests.
Test reports from Mochawesome have a visual appeal that is lacking in the default Mocha test report. Mochawesome uses chartJs as its visualization library.
Developers using Mochawesome can understand the flow of their test as it displays lifecycle hooks (before(), beforeEach(), after(), and afterAll()).
Using Mochawesome, developers can access stack trace logs and error messages associated with test cases. This gives developers enough information to handle test cases. Mochawesome is designed to be responsive and mobile-friendly
How to Generate Mocha Test Reports with Mochawesome
Generating a report with Mochawesome involves creating a project and adding Mochawesome to it. To use Mochawesome in your project, follow the steps below:
Start a Node.js project by running the command npm init in your project root directory.
Step 1: Install mocha as a development dependency with this command:
npm install –save-dev mocha
Step 2: Install mochawesome as development dependency using this command:
npm install –save-dev mochawesome
Step 3: Create a .js file (test.js).
Step 4: Write and save the following sample test code in your test.js file.
```js

const assert = require('assert');


describe('Array', function () {
     describe('#indexOf()', function () {
 it('should return -1 when the value is not present', function () {
 assert.strictEqual([1, 2, 3].indexOf(4), -1);
});


it('should return the correct index when the value is present', function () {

  assert.strictEqual([1, 2, 3].indexOf(2), 1);

});

     });
});


describe('Math', function () {
 it('should return 9 when multiplying 3 by 3', function () {
 assert.strictEqual(3 * 3, 9);
});


it('should return -8 when multiplying -2 by 4', function () {
 assert.strictEqual(-2 * 4, -8);
     });
});


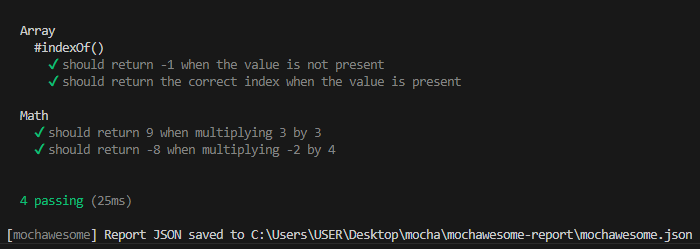
```Run this code using the –reporter mochawesome flag, as shown below:
npx mocha test.js –reporter mochawesome
Your result should look like what you have in the image below
Using the –reporter mochawesome flag specifies that you are using the reporter option and Mochawesome report generator instead of the default Mocha reporter.
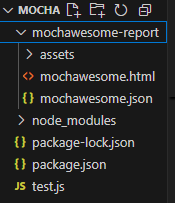
Running the above command also created a mochawesome-report folder in your project.
As shown in the image above, mochawesome generated two reports (JSON and HTML).
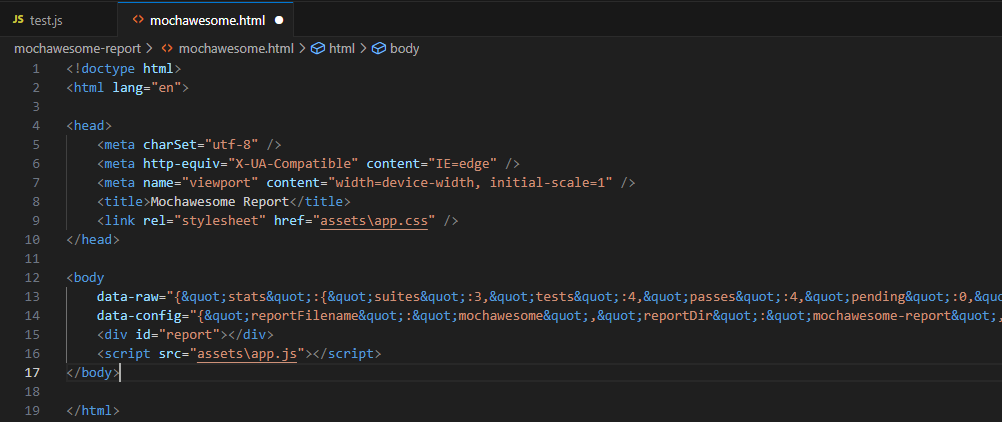
Mochawesome Report in HTML
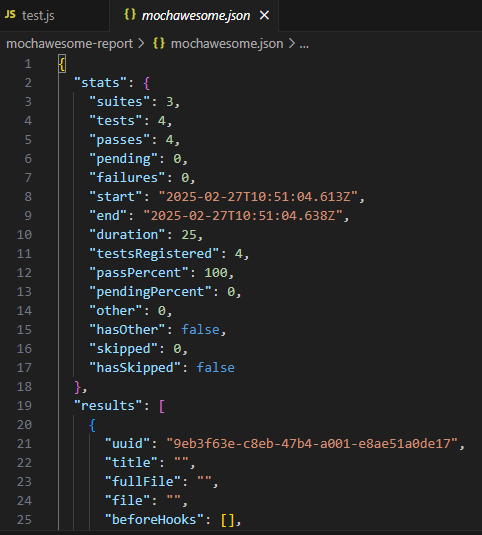
Mochawesome Report in JSON
Read More: Unit testing for NodeJS using Mocha and Chai
How to Get Mocha Test Report with Test Observability
BrowserStack Test Observability enhances test reports by providing a centralized dashboard for detailed insights, analytics, and debugging capabilities. It integrates seamlessly with Mocha and fetches reports for every build run with detailed insights and custom view, making it easier to analyze test results, identify failures, and improve test coverage.
To integrate with BrowserStack Test Observability, you need to have a BrowserStack account and a MochaJs test suite.
The following steps illustrate how to get Mocha test reports with BrowserStack Test observability
Step 1: Install the latest version of the browserstack-node-sdk-npm package. Run this command to install the sdk package:
npm install browserstack-node-sdk@latest
Step 2: Create a browserstack.yml file in the root folder of your test suit if it doesn’t exist. The yaml file should look something like this:
userName: YOUR_USERNAME

accessKey: YOUR_ACCESS_KEY

buildName: "Your static build/job name goes here"

projectName: "Your static project name goes here"

CUSTOM_TAG_1: "You can set a custom Build Tag here"

# Use CUSTOM_TAG_<N> and set more build tags as you need.

…
Step 3: Run your test with BrowserStack Test Observability. Prepend browserstack-node-sdk to the existing command you use to trigger a run, and data will automatically start getting sent to BrowserStack Test Observability. Your command should look like this:
npx browserstack-node-sdk "Your existing command for running test suite. E.g. <mocha mocha/specs/e2e/*/bdd/*.e2e.js --timeout=60000>"
Note: Do not use double quotes (“ “) in your command.
After the build run completion, you will see the build URL for Test Observability on your console.
Why Use Test Observability for Mocha Test Reports?
Using Test Observability helps developers keep track of every Mocha Automation build run by creating a detailed Mocha Test Report on the Observability Dashboard with all historical data.
The following are some of the reasons developers use Test Observability for Mocha Test Reports:
- Detailed Test Build Insight: With Test Observability, you can access comprehensive test build insights like performance, build stability, run summary, and more.
- Historical data and Trends: Test Observability allows developers to get comprehensive historical data and identify trends for re-run and merged runs of test build for a better understanding of recurring issues.
- Support End-to-End Visibility: It provides complete end-to-end visibility into automation metrics for all teams.
- Track Performance and Failure Rate: It helps developers know the performance of each test build and track the failure rate of tests, flakiness, and average failure rate to keep an eye on the health of the test suite.
- Team Collaboration: Test Observability allows for better team collaboration, by facilitating the seamless download and sharing of test reports.
Conclusion
Generating test reports is an important aspect of test debugging and analysis. Mocha default test reporters and custom reporters like Mochawesome provide basic capabilities. By integrating with tools like BrowserStack Test Observability, you can keep track of every Mocha Automation build run by creating detailed, reliable, and easily shareable Mocha Test Reports.
