Jira enables teams to create, manage, and execute test cases while maintaining a structured testing workflow. It provides built-in capabilities for organizing test plans, tracking execution, and integrating with automation tools for seamless quality assurance.
Overview
Jira Test Case Management Options
Jira allows you to manage test cases as individual issues or structured test plans.
- Test Cases as Issues: Jira allows you to create test cases as standard issues, where you can define test steps and expected outcomes and link them to user stories or requirements for better traceability.
- Test Plans: Group related test cases into structured test plans to ensure comprehensive coverage and systematic execution of test scenarios.
Benefits of Using Jira for Test Case Management
Jira enhances test management by linking cases to development, centralizing test data, integrating automation, and tracking defects.
- Agile Work Management: Link test cases to user stories, sprints, and releases for real-time visibility into testing progress.
- Centralized Test Repository: Store all test cases, executions, and results in one place to ensure project consistency.
- Automated Test Integration: Connect with automation frameworks like Selenium, Cypress, or BrowserStack for efficient test execution.
- Defect Tracking & Reporting: Identify, log, and track defects directly from test executions to streamline bug resolution.
This guide explains how to create and manage test cases in Jira, best practices for organizing test plans, and how to integrate Jira with BrowserStack Test Management.
What is Jira
Jira is a leading agile project management tool developed by Atlassian. Launched in 2002, it was initially designed as an issue-tracking and project-management tool for software teams to manage bugs. Over time, it has evolved into a versatile solution that supports Agile frameworks like Scrum and Kanban.
Jira offers significant customization options, which can be especially valuable for test case management. Teams can configure workflows, issue types, and fields to tailor Jira to their specific project needs, including tracking test cases, bugs, and other tasks in the software development lifecycle.
Read More: How to integrate Jira with Selenium
Can you do test case management in Jira?
Yes, Jira supports test case management, but it does not have built-in features like dedicated testing tools. You can manage test cases in Jira by:
- Using Jira Issues: Create test cases as Jira issues, add test steps and expected results, and link them to user stories or requirements.
- Organizing with Test Plans: Structure test cases into test plans for better execution and tracking.
- Automating Tests: Connect Jira with automation frameworks like Selenium for efficient test execution.
Why you need a dedicated Test Management for Jira?
Here are a few reasons why you need dedicated test management for Jira:
- With Jira, test cases can be managed in a centralized platform to manage all the testing activities. It allows to create test plan, test cases, test suites, and test cycles which can be accessed easily by all the team members.
- Test management tools can be smoothly integrated with Jira. Hence a single platform can serve project and test case management capabilities. With this integration, it is possible to link the testcase with the Jira issue directly thereby ensuring traceability and visibility across the SDLC.
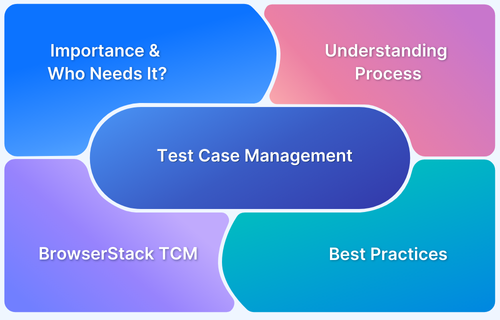
Read More: Understanding Test Case Management
- With all the testing activities in a single space, it helps to improve and strengthen team collaboration. Testers can easily communicate regarding different test artifacts, activities, test execution and test results being in the same space.
- Test coverage, test execution details like Pass/Fail/Skipped, and every other detail regarding test execution can be found and accessed from a common space. This provides a hassle-free environment for the testers and other stakeholders to collaborate, identify problems and make informed decisions based on the testing status.
Advantages and Disadvantages of Using Jira For Test Case Management
Managing test cases in Jira can be convenient, especially if your team already uses it. However, it may not always be the best fit for structured testing. Here’s a breakdown of its strengths and limitations.
Benefits of Jira for Test Case Management
Jira’s ability to integrate testing with development processes offers clear advantages, especially for teams seeking a cohesive, flexible solution for managing their test cases.
- Agile Work Management: Jira supports Scrum and Kanban boards and helps teams break down complex projects into manageable sprints while visualizing workflows to maximize efficiency.
- Adjustable Workflow: Jira allows you to customize workflows for different issue types to ensure flexibility and meet project needs.
- Centralized Issue Tracking and Management: Jira provides a single platform for creating, assigning, prioritizing, resolving issues, and tracking progress while logging hours.
- Alignment to Organization’s Goals: Jira offers visibility into project status and helps teams prioritize tasks to stay aligned with broader organizational objectives.
- Teamwork and Communication: Jira enables team collaboration by allowing team members to comment, mention colleagues, create sub-tasks, and assign tasks within the platform.
- Inbuilt Reports: Jira offers pre-built dashboards and reports for real-time insights to help teams plan sprints and track project progress.
Limitations of Jira in Test Case Management
While Jira can handle test cases, it lacks dedicated testing features, which may require workarounds or additional tools. Here are some disadvantages of it.
- No Native Test Case Management: Plugins like Xray or Zephyr are required for full testing functionality.
- Limited Test Execution Tracking: Lacks built-in test execution tracking and result analysis.
- Manual Overhead: Creating and managing test cases as issues can be time-consuming.
- Complex Customization: Requires admin-level configuration to set up efficient test workflows.
What is Test Case lifecycle?
Test case life cycle defines the various stages a test case has to go through to accomplish its purpose. The different stages are as follows:
- Creating Test Cases: Test cases are created by referring to the requirements and specifications of the System Under Test (SUT). Initial draft of test cases is created to verify specific functionality, feature or scenario for the SUT.
- Reviewing Test Cases: Test Cases are reviewed by other testing team members/ QA Lead/ Product Owners or other stakeholders to ensure that all the requirements are addressed in the form of a test case. Test Cases with review comments need to be updated and moved to review state once again.
- Executing Test Cases: Test cases need to be executed at this stage by following the preconditions, test steps and comparing actual with expected result.
- Recording test case execution: Once the execution is completed, a test case is marked as either Passed or Failed. Testing team documents the whole execution process for all the test case execution and also adds any additional observation, logs, screenshots to support the reporting document.
- Reporting bugs: During execution if any test case fails, a bug is logged with all the relevant details such as steps to reproduce, priority, severity, screenshot, logs, and other necessary details. A bug report should be a comprehensive recording of all the relevant data as it will be referred by the developers to fix it.
- Updating test cases: As the system under test (SUT) progresses, some test cases may require some changes or deletion. It may also arise the need to write more test cases to cater new features. Therefore, test cases should be updated timely to be effective and comprehensive.
Read More: Fundamentals of Writing Good Test Cases
How to Set Up Jira for Test Cases?
To effectively set up Jira for managing test cases, follow this step-by-step process:
- Create a Dedicated Jira Project: Create a dedicated Jira project specifically for test cases to keep them separate from other tasks and customize the project template for testing purposes.
- Add Custom Issue Types for Test Cases: Navigate to Jira Settings > Issues > Issue Types and create a custom issue type called Test Case to distinguish them from other Jira issues.
- Customize Workflows: Go to Jira Settings > Issues > Workflows and customize the workflow to match the lifecycle of a test case, with stages such as Draft, Ready for Testing, In Progress, Pass, and Fail.
- Create Custom Fields for Test Case Details: Navigate to Jira Settings > Issues > Custom Fields to add fields like Test Steps, Expected Results, and Test Priority for better test case management.
- Set Up Screens for Test Cases: Go to Jira Settings > Issues > Screens to configure screens that display custom fields when creating or editing test cases.
- Set Up Permissions: Adjust user access levels by navigating to Jira Settings > System > Permissions to manage who can create, view, and edit test cases.
- Link Test Cases to User Stories: Use Issue Linking to connect test cases to related user stories or requirements for traceability and alignment with project goals.
How to Create Test Case Management Workflow in Jira?
A well-structured workflow ensures that each test case progresses smoothly through all necessary stages. Follow these steps to set up a test case management workflow tailored to your needs in Jira.
- Define the Stages of the Workflow: Begin by identifying the key stages in your test case management process, such as Draft, Ready for Testing, In Progress, Pass, Fail, and Retest.
- Create Custom Workflow Transitions: After defining the stages, establish custom transitions between them. For example, a test case may move from Ready for Testing to In Progress once execution begins or from Fail to Retest if the test case requires re-execution.
- Assign Workflow Conditions: Set conditions that determine when transitions can occur. For instance, a test case may only move to “Pass” if the execution result is marked as successful.
- Set Up Validators: Use validators to ensure that essential fields, such as Test Steps or Expected Results, are filled before a test case can transition to the next stage.
- Add Post Functions: Configure post functions to automatically trigger actions when a transition occurs, such as sending notifications to the team or updating the test case status.
- Map Workflow to Test Case Issue Type: Link the newly created workflow to the custom issue type for test cases to ensure that only test cases follow this workflow.
- Publish and Test the Workflow: After setting up the workflow, publish it and test it by running test cases through the stages to ensure it functions as expected.
Read More: Test Case Templates with Example
How Do You Write Test Cases in Jira Step by Step?
Writing test cases in Jira requires creating detailed and structured issues that ensure all aspects of testing are captured and easily traceable. Follow these steps to write effective test cases in Jira.
- Create a Test Case Issue: Create a new issue in your dedicated test case project, selecting the custom issue type for test cases.
- Enter Test Case Summary: Write a concise and clear summary of the test case, describing what it will verify or test.
- Add Test Case Description: Provide a detailed description of the test case, including its purpose, prerequisites, and relevant background information.
- Define Test Steps: List the steps to be followed in executing the test, ensuring they are clear and actionable. Include inputs, actions, and expected results for each step.
- Specify Expected Results: Clearly state the expected result for each test step to provide a benchmark for comparison during execution.
- Set Test Case Priority: Assign a priority to the test case, indicating its importance and urgency in the testing cycle.
- Link to Relevant User Stories or Requirements: Use Jira’s linking issues feature to connect the test case to the relevant user story or requirement for traceability.
- Attach Supporting Files or Documents: If necessary, attach any supporting files such as screenshots, test data, or documents that are relevant to the test case.
- Set Assignee and Due Date: To ensure timely execution, assign the test case to the appropriate team member and set a due date.
- Save and Review: Save the test case and review it to ensure all fields are correctly filled out and the steps are clear.
Jira Test Case Management Best Practices
Here are best practices to help you get the most out of Jira for test case management.
- Use Clear and Consistent Naming Conventions: Establish a standardized naming convention for your test cases to filter and identify them as your test suite grows easily.
- Leverage Issue Types for Test Cases: Treat test cases as distinct issue types in Jira to improve tracking, reporting, and customization specific to testing.
- Link Test Cases to User Stories or Requirements: Linking test cases to user stories or requirements helps maintain traceability, ensures alignment with business objectives, and improves visibility into test coverage.
- Automate Test Case Execution Tracking: Integrate Jira with automation tools or CI/CD tools to automatically update test case statuses (pass/fail) and reduce manual effort while ensuring accurate, real-time results.
- Reuse Test Scripts for Consistency: Reuse existing test scripts whenever applicable to reduce redundancy, ensure consistent testing, and save time in future testing cycles.
Read More: Test Case Vs Test Script
- Focus on Edge Case Scenarios: Ensure edge cases are adequately tested to uncover unexpected behavior and ensure your application works well in real user conditions.
- Use Versions and Labels: Categorize test cases using versions or labels to distinguish between different iterations or releases. This makes it easier to track changes and ensure proper test management.
How to Create and Manage Test Cases in Jira and BrowserStack Test Management?
BrowserStack is popularly known for its cloud-based platform leveraging testing of mobile/web services by providing 3K+ devices, browser and operating-systems. However recently they have come up with a new product called Test Management, which is worth trying! It can be easily integrated with Jira which helps to create, manage, and track the test cases and test runs from within Jira.
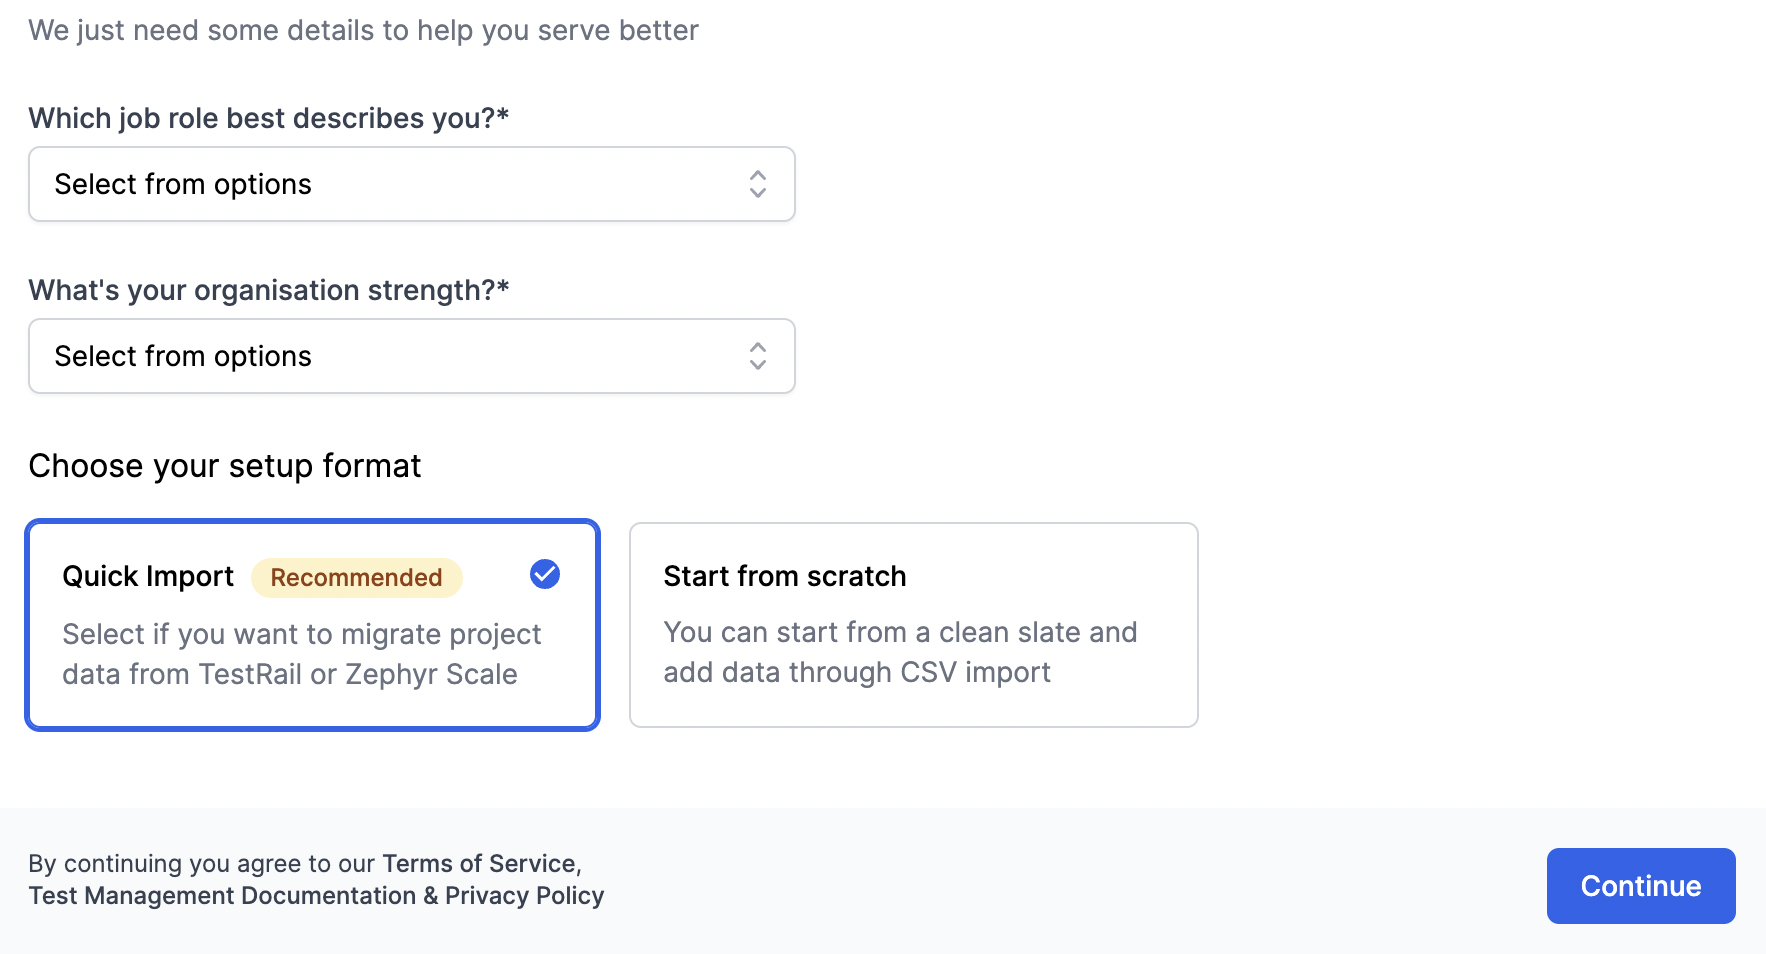
With BrowserStack’s Test Management you can quickly import data (test cases) from the following two tools:
- Test Rail
- Zephyr Scale
You can also import from CSV files if you wish to.
On the contrary, you can also create test cases on BrowserStack’s Test Management and link them in Jira. Below steps will help you perform this integration.
Try BrowserStack Test Management for Free
1. Have an Atlassian user account for Jira and create a project.
2. Integrate Test Management with Jira.
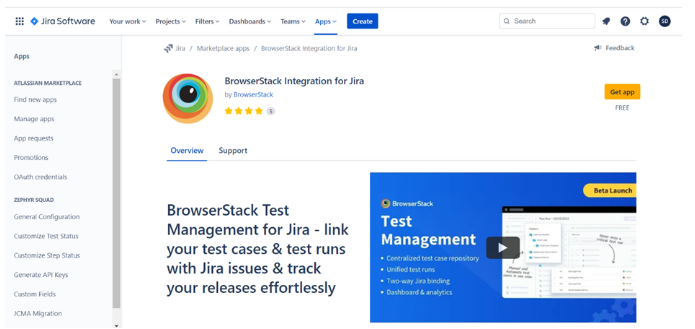
3. Add BrowserStack Test Management App in Jira from Atlassian marketplace- Open Jira, click on Settings icon >> Apps. Search for the BrowserStack App and click on the Get App button to install it.
4. After the app is installed, go to the created project.
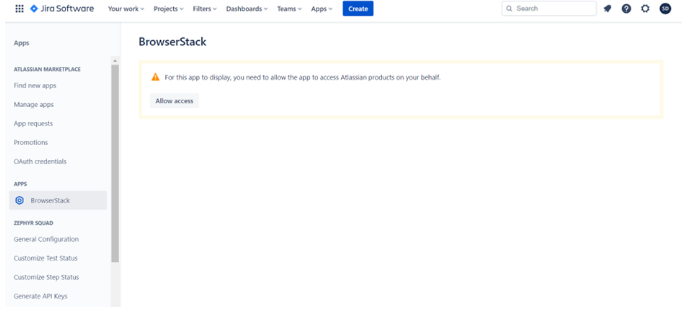
5. Click on Settings icon >> Apps >> click on BrowserStack from Apps section.
6. Next you need to authorise the BrowserStack app to access Jira. Click on the Allow Access button.
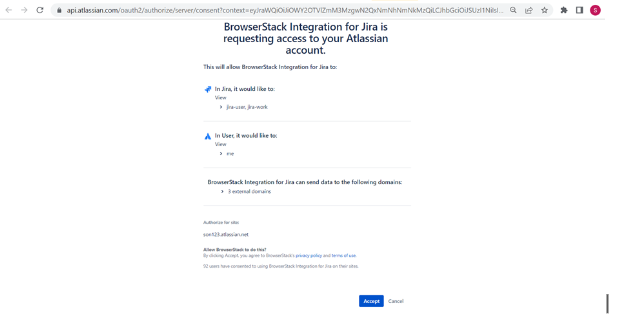
7. This will redirect to another tab, click on the Accept button.
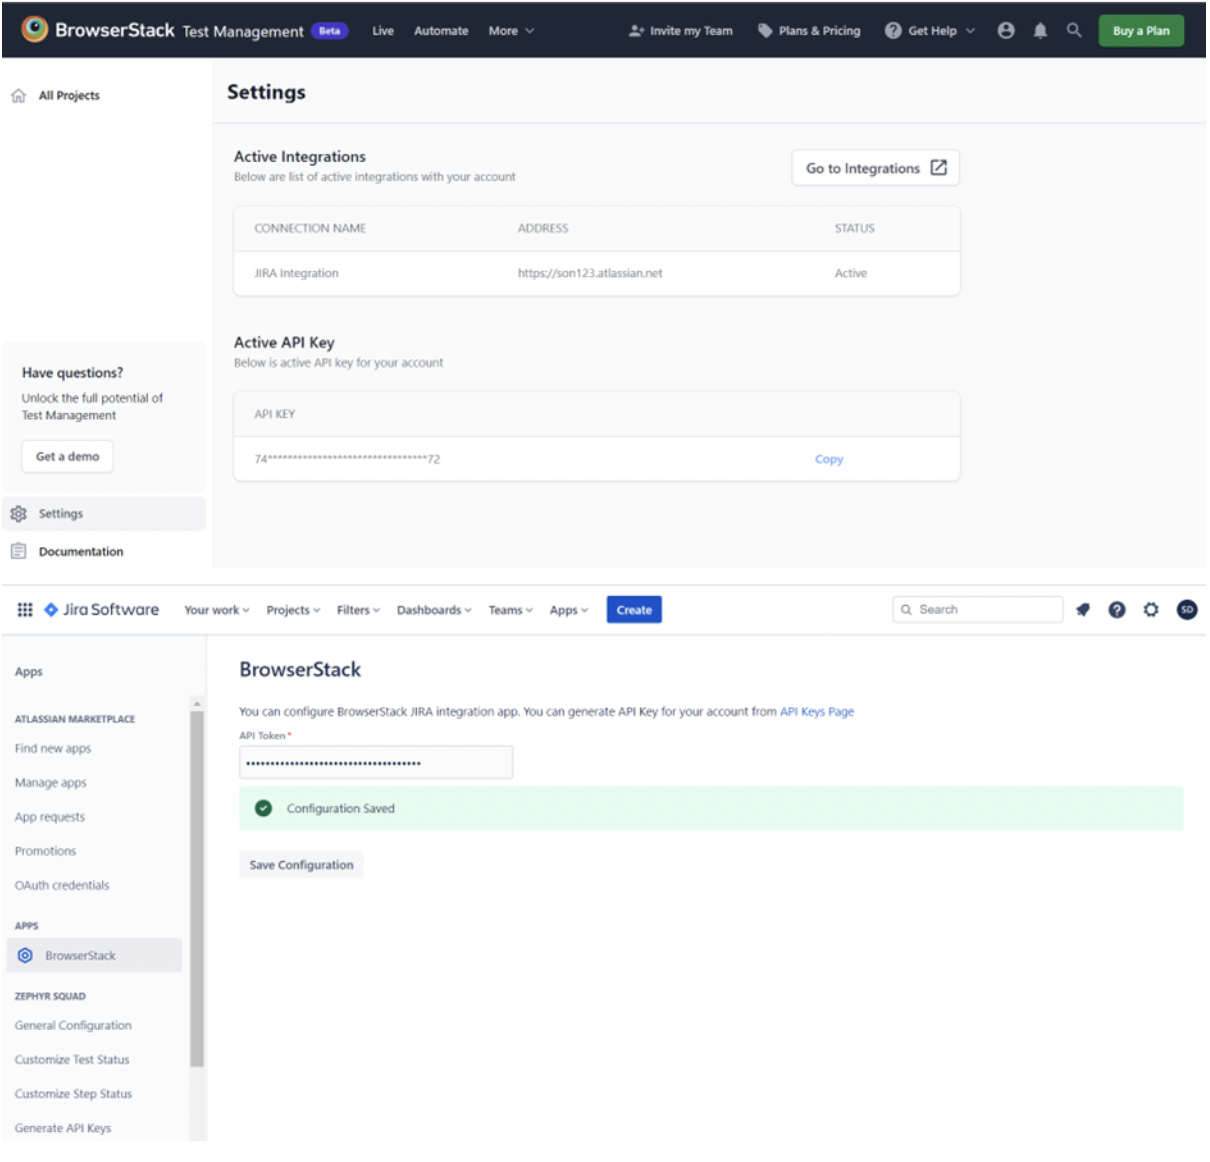
8. Add the BrowserStack API key from the API key page and save the configuration.
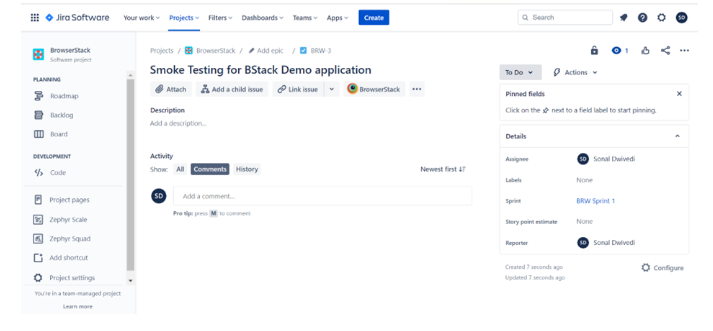
9. In Jira, create a task under the created project and add all the required details for the task. Observe that now the BrowserStack button should be available.
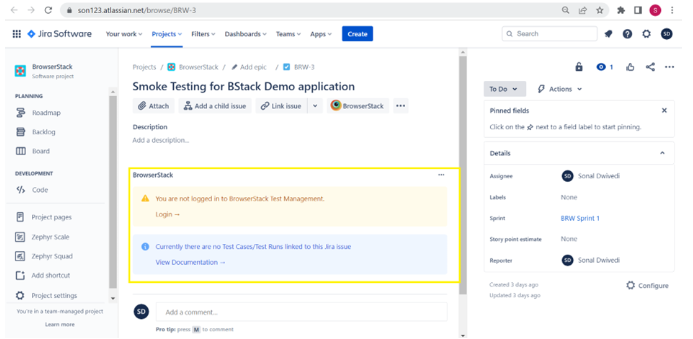
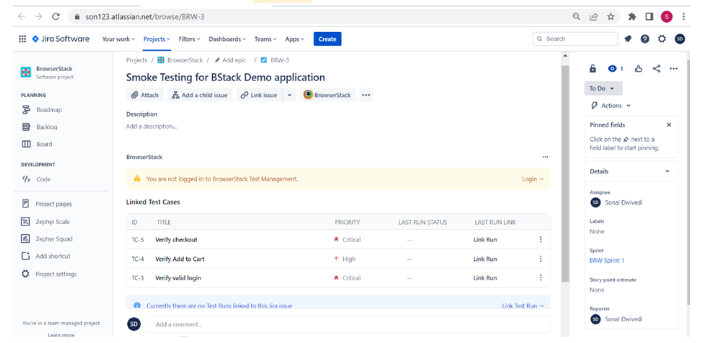
10. As this would be a fresh task and nothing is associated with BrowserStack yet, you would see 2 messages as below.
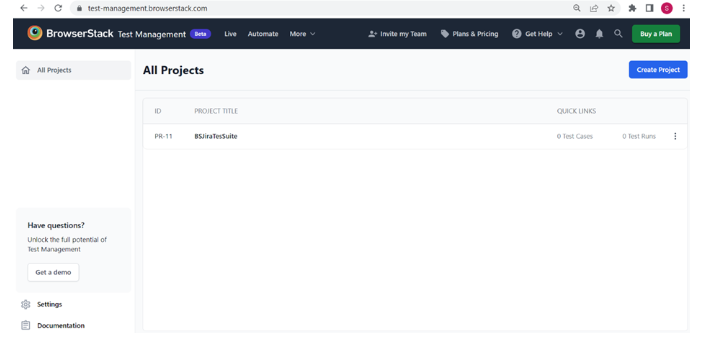
11. Navigate to BrowserStack’s Test Management and create a project for the test suite by clicking on the Create Project button. Created project should be displayed with Project Id, Title, Test cases count and Test Runs count. (Initially, it will be 0)
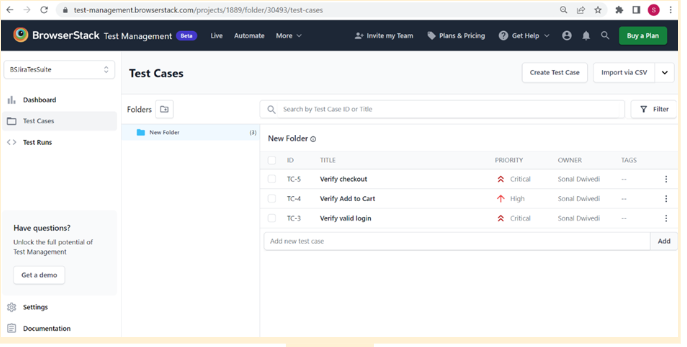
12. Enter some test cases with all the required details and mark relevant priorities to the test cases.
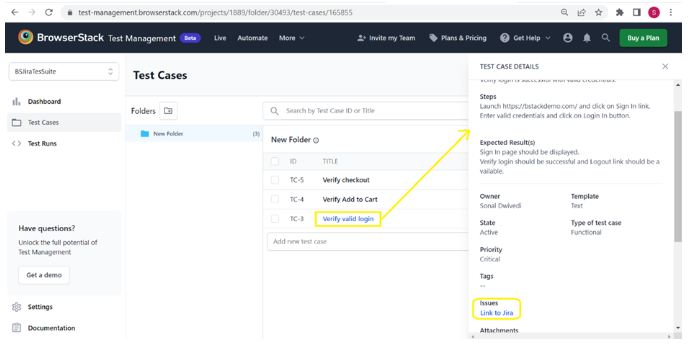
13. Click on the Test case title and click on Link to Jira.
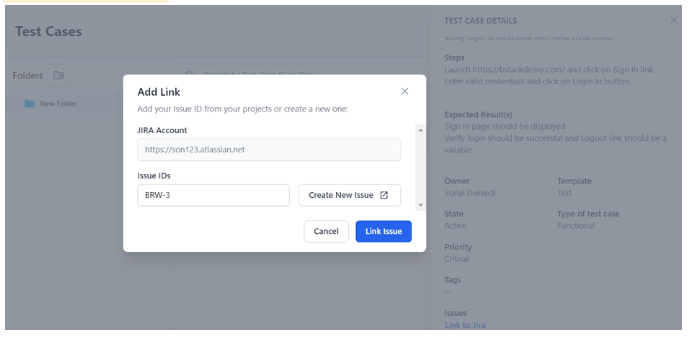
14. Add the Jira Id created and click on the Link Issue button.
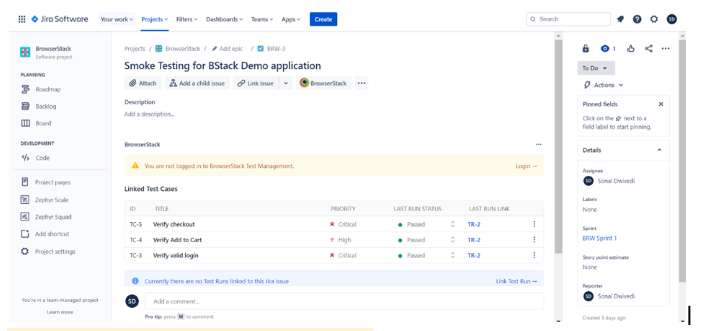
15. Now, refresh the Jira ticket to see all the testcases you had linked with Jira on BrowserStack Test management platform.
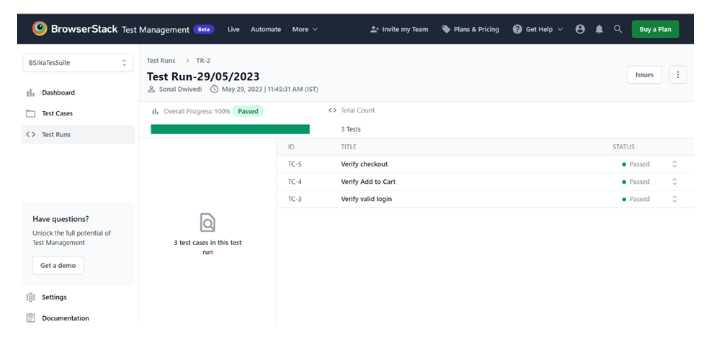
16. Additionally, you can also execute test cases on BrowserStack Test Management and see the linked test run results on Jira platform by simply refreshing the page.
Test Run on BrowserStack’s Test Management
Test Run linked in Jira ticket
BrowserStack Test Management tools helps you create and manage Test Cases smoothly. You can also connect it with Jira and get comprehensive reports on detailed dashboard.
Conclusion
Jira offers a robust solution for managing test cases and helps teams organize and track tests while ensuring efficient execution. Customizable workflows, integration with other tools, and real-time project tracking ensure testing happens at the right stages of development.
To get the most out of Jira, follow best practices like using clear naming conventions, automating test execution tracking, and grouping test cases for better test coverage. Additionally, use BrowserStack Test Management tools to create and manage test cases smoothly. You can also connect it with Jira and get comprehensive reports on the dashboard.
