Azure is a Microsoft cloud platform that provides services in computing, storage, networking, databases, AI, and DevOps. It enables users to manage systems and applications in the cloud with flexibility and scalability.
Azure DevOps is a set of tools that helps teams automate and manage the software development lifecycle. It supports Continuous Integration and Continuous Deployment (CI/CD) pipelines, integrates with Azure services, and manages different environments for deployment.
This article explains the role of environments and variables in Azure DevOps pipelines, including how they define deployment strategies, customize builds, and automate tasks within the pipeline.
What are Azure DevOps Environments?
Azure DevOps Environments are used to define and manage the infrastructure and deployment targets for CI/CD pipelines. These environments help organize deployment resources, such as Kubernetes clusters, virtual machines, or other services, across different stages like development, testing, and production.
By structuring multi-stage deployments, Azure DevOps Environments simplify the process of defining, securing, and tracking application releases. They are logical entities representing the specific targets where applications are deployed.
For example, an environment named “Prod” could be linked to an Azure Kubernetes Service (AKS) cluster, where the production application runs. After passing tests and approvals, Azure DevOps Pipelines can deploy to this environment, ensuring a controlled and systematic release.
Read More: What is a DevOps Pipeline? How to Build One
Azure Pipelines Environment Benefits
The key benefits of Azure DevOps Environments include consistent deployments, improved visibility, stronger security, and scalable solutions for CI/CD pipelines. Below is a detailed explanation of its advantages.
- Consistency and Reliability: Azure DevOps Environments ensure consistency across deployment stages such as development, testing, and production. Each environment is specifically configured for its stage. This prevents environment-specific issues and leads to predictable and reliable software releases.
- Enhanced Visibility and Tracking: Azure DevOps tracks deployments in detail, including the status, initiator, and changes made. This allows teams to monitor deployments effectively. The system also maintains deployment logs, simplifying troubleshooting and helping teams track progress through the pipeline.
- Integration with Azure Pipelines: Azure DevOps Environments work with Azure Pipelines to control deployments across different stages. Teams can enforce approval workflows, gates, and security policies to ensure code moves through testing, staging, and production in a structured manner.
- Approvals and Checks: Azure DevOps Environments support both manual approvals and automated checks to ensure secure and quality deployments. Manual approval processes give authorized personnel control over deployments to critical environments, while automated checks ensure deployments meet predefined conditions before proceeding.
- Resource Management: Azure DevOps Environments connect to physical and virtual resources like Kubernetes clusters, virtual machines, and on-premises servers. This ensures that infrastructure matches deployment needs. Teams can also define environment-specific configurations and variables and customize each environment for its intended role.
- Security and Permissions: Role-based access control (RBAC) restricts deployment or modification permissions to authorized users. Moreover, sensitive data, such as connection strings and API keys, is securely stored and managed through Azure Key Vault, protecting critical information during deployments.
Also Read: What is API Testing? (with Examples)
- Compliance and Governance: Azure DevOps Environments help enforce organizational policies and standards by maintaining audit trails of all deployment activities. This simplifies compliance audits and reporting and ensures all deployment processes align with regulatory and internal requirements.
- Scalability and Flexibility: Azure DevOps Environments support scalable deployments and can accommodate projects of any size. They offer flexible deployment strategies like blue-green deployments, canary releases, and rolling updates, which allow teams to adapt to different project requirements and deployment needs.
- Monitoring and Diagnostics: Azure DevOps Environments integrate with tools like Azure Monitor and Application Insights to track application health after deployment. These tools provide real-time performance metrics, error logs, and automated alerts to help teams detect failures or degradations before they impact users.
Read More: Top 21 Monitoring Tools in DevOps
Prerequisites for creating Azure DevOps Environments
Before you create and use Azure DevOps Environments, ensure that the following prerequisites are met:
1. Azure DevOps Organization & Project: You need an Azure DevOps account. To define the scope and resources for your environment, create a DevOps project within your organization.
2. Permissions & Role-Based Access Control (RBAC): You must have Project Administrator or Environment Creator permissions to create environments. If you plan to use deployment approvals, set up the correct access policies to authorize the required personnel.
3. YAML or Classic Release Pipeline: If you’re using YAML pipelines, you need to ensure that a valid YAML pipeline exists in your repository. For classic pipelines, you must configure the Release Pipeline to support deployments to the environments you’ve set up.
4. Agent or Deployment Targets (Optional for Certain Environments): Depending on the environment type, follow the appropriate setup:
- Virtual Machines (VMs): Install the Azure DevOps agent on the target VM and ensure it has internet access to communicate with Azure DevOps.
- Kubernetes Environments: Set up a Kubernetes cluster, whether it’s Azure Kubernetes Service (AKS) or another cluster.
- Azure Resources: Create service connections to authenticate deployments. Use managed identities or service principals for secure access.
How to create Azure DevOps Environments?
Below is a step-by-step guide to help you create and manage Azure DevOps Environments:
Step 1: Access Azure DevOps:
Go to Azure DevOps and log in with your credentials. Choose the organization and project where you want to create the environment.
Step 2: Navigate to Environments
In the left-hand menu, click on “Pipelines”. Under the “Pipelines” section, click on “Environments.”
Step 3: Create a New Environment
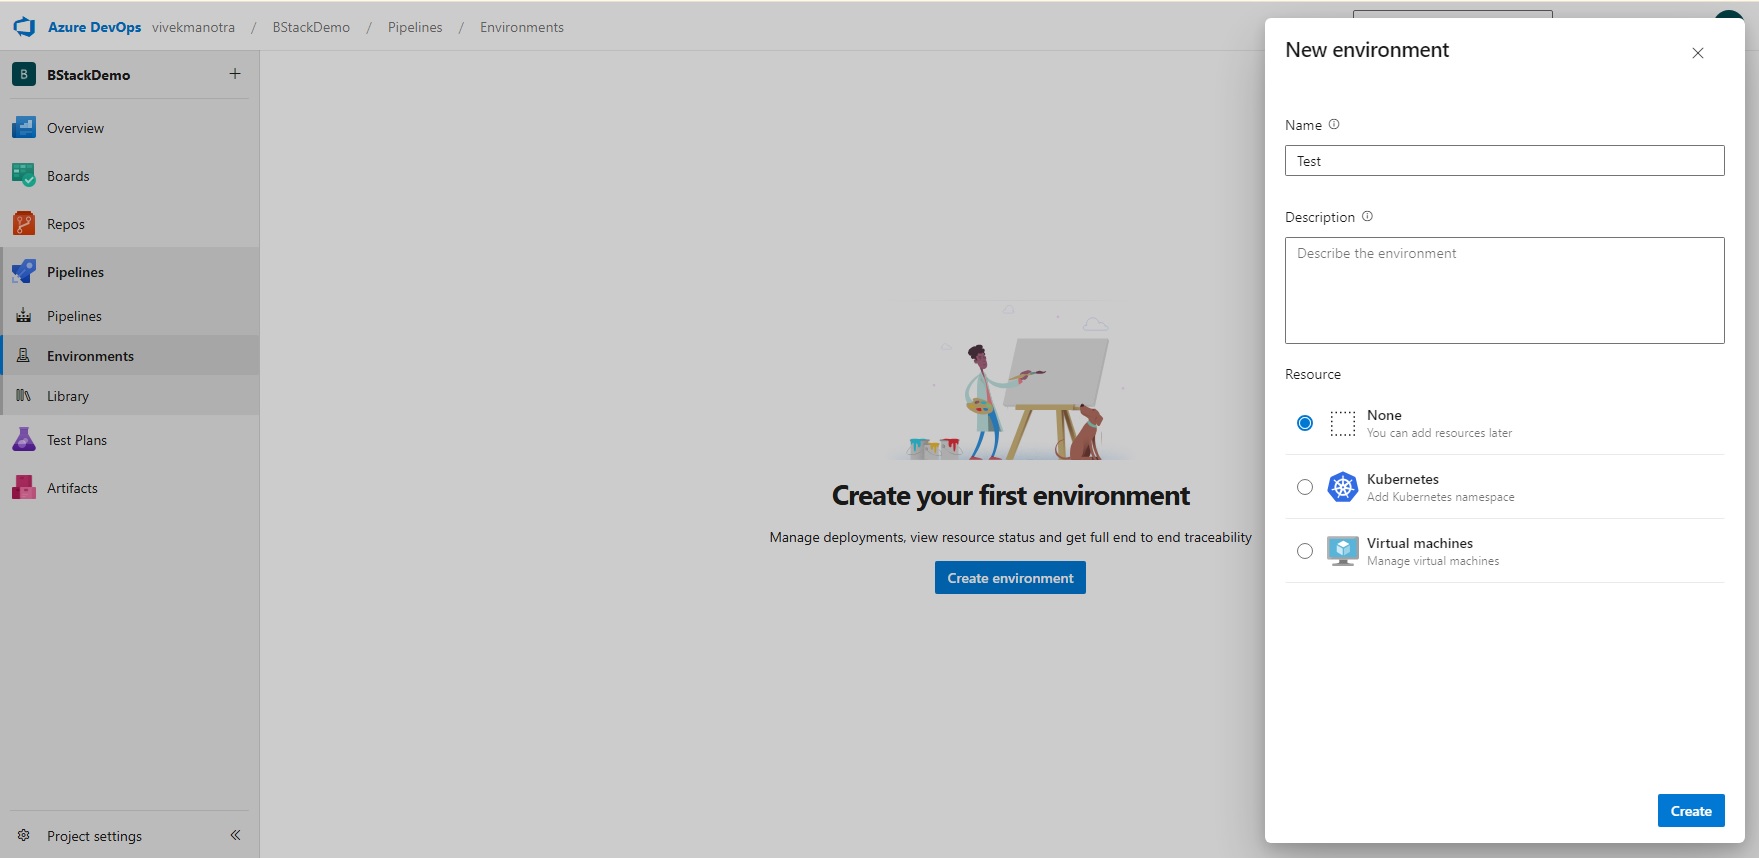
On the Environments page, click on the “New Environment” button.
Enter Environment Details:
- Name: Provide a name for your environment (e.g., “Dev”, “Test”, “Prod”).
- Description: Optionally, add a description to provide more context about the environment.
After entering the details, click the “Create” button to create the environment.
Step 4: Add Resources to the Environment
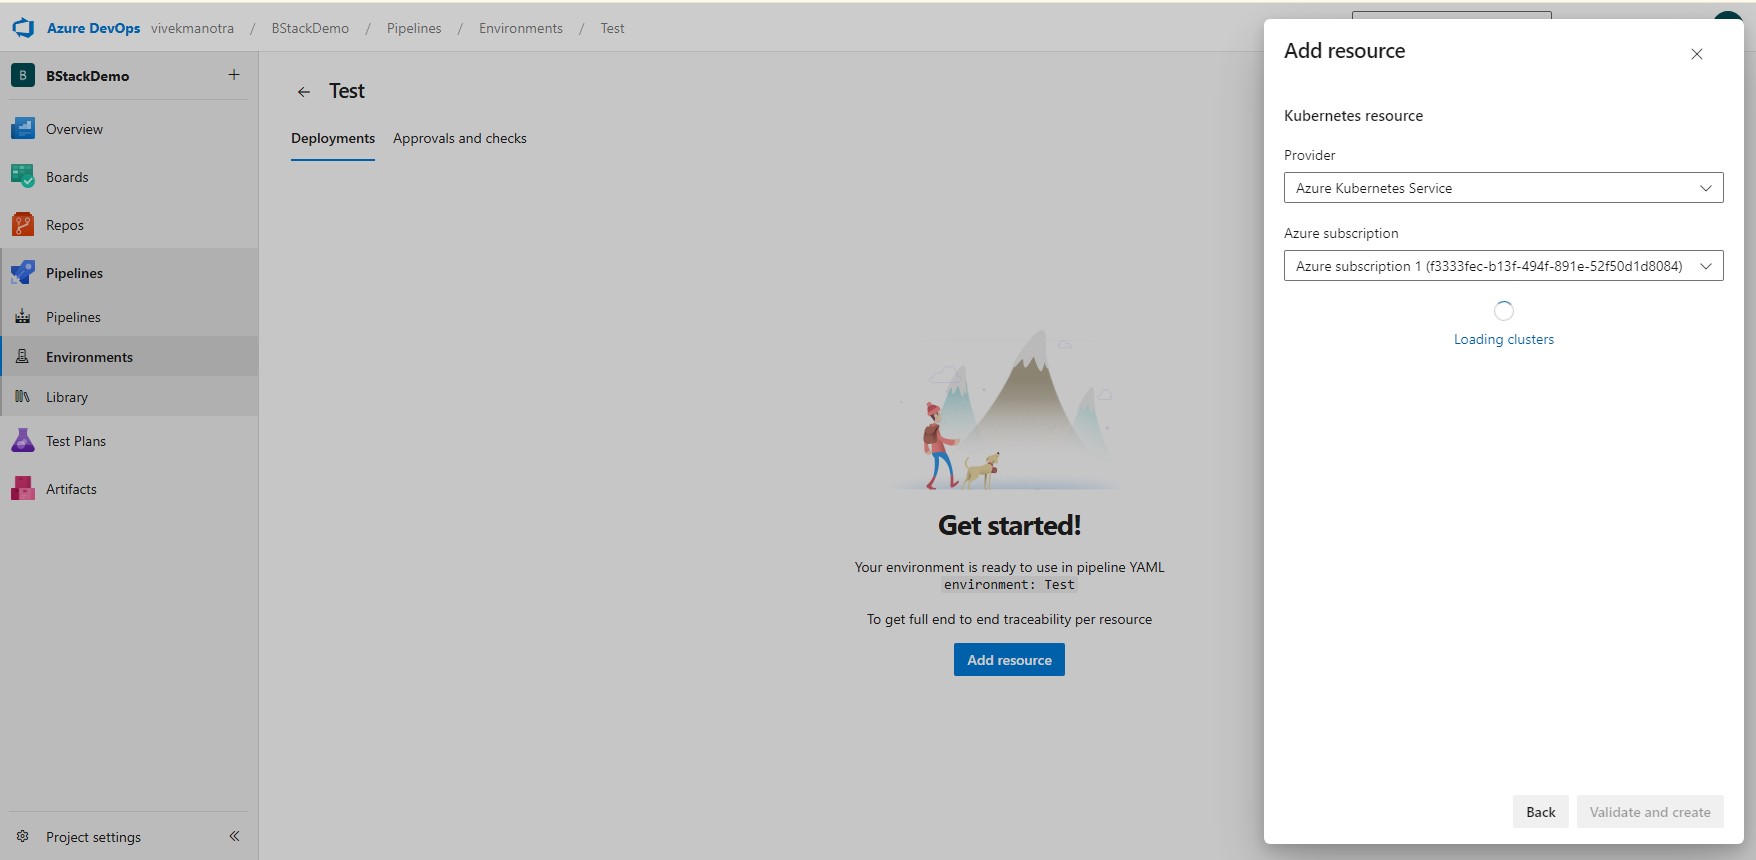
Click on the environment you just created to open its details page.
Add Resources:
- Kubernetes: You can add a Kubernetes resource if you are deploying to a Kubernetes cluster.
- Virtual Machines: For VM-based deployments, you can add virtual machines.
- Other Resources: Depending on your deployment targets, you can add other resources like databases, storage accounts, etc.
Configure Resource Details:
- Select or create a service connection that links to your resource (e.g., Azure subscription, Kubernetes cluster).
- Provide the necessary details for the resource, such as cluster name, namespace, or VM details.
- Validate the resource details and click “Create” to add the resource to the environment.
Step 5: Target Environment from Deployment Jobs
Define the target environment inside a deployment job in a YAML pipeline. Here’s a basic example:
stages:

- stage: Deploy

  jobs:

  - deployment: DeployApp

    displayName: "Deploy Application"

    environment: "Production"   # Target Environment

    strategy:

      runOnce:

        deploy:

          steps:

          - script: echo "Deploying to Production..."
Key Components include,
1. Deployment: Specifies that this is a deployment job.
2. Environment: Sets the target environment for deployment.
3. Strategy: Defines how the deployment should occur.
- The runOnce strategy ensures the deployment runs once per execution.
- Other strategies like rolling or blue-green can be used for advanced deployments.
Step 6: Monitor and Manage Deployments
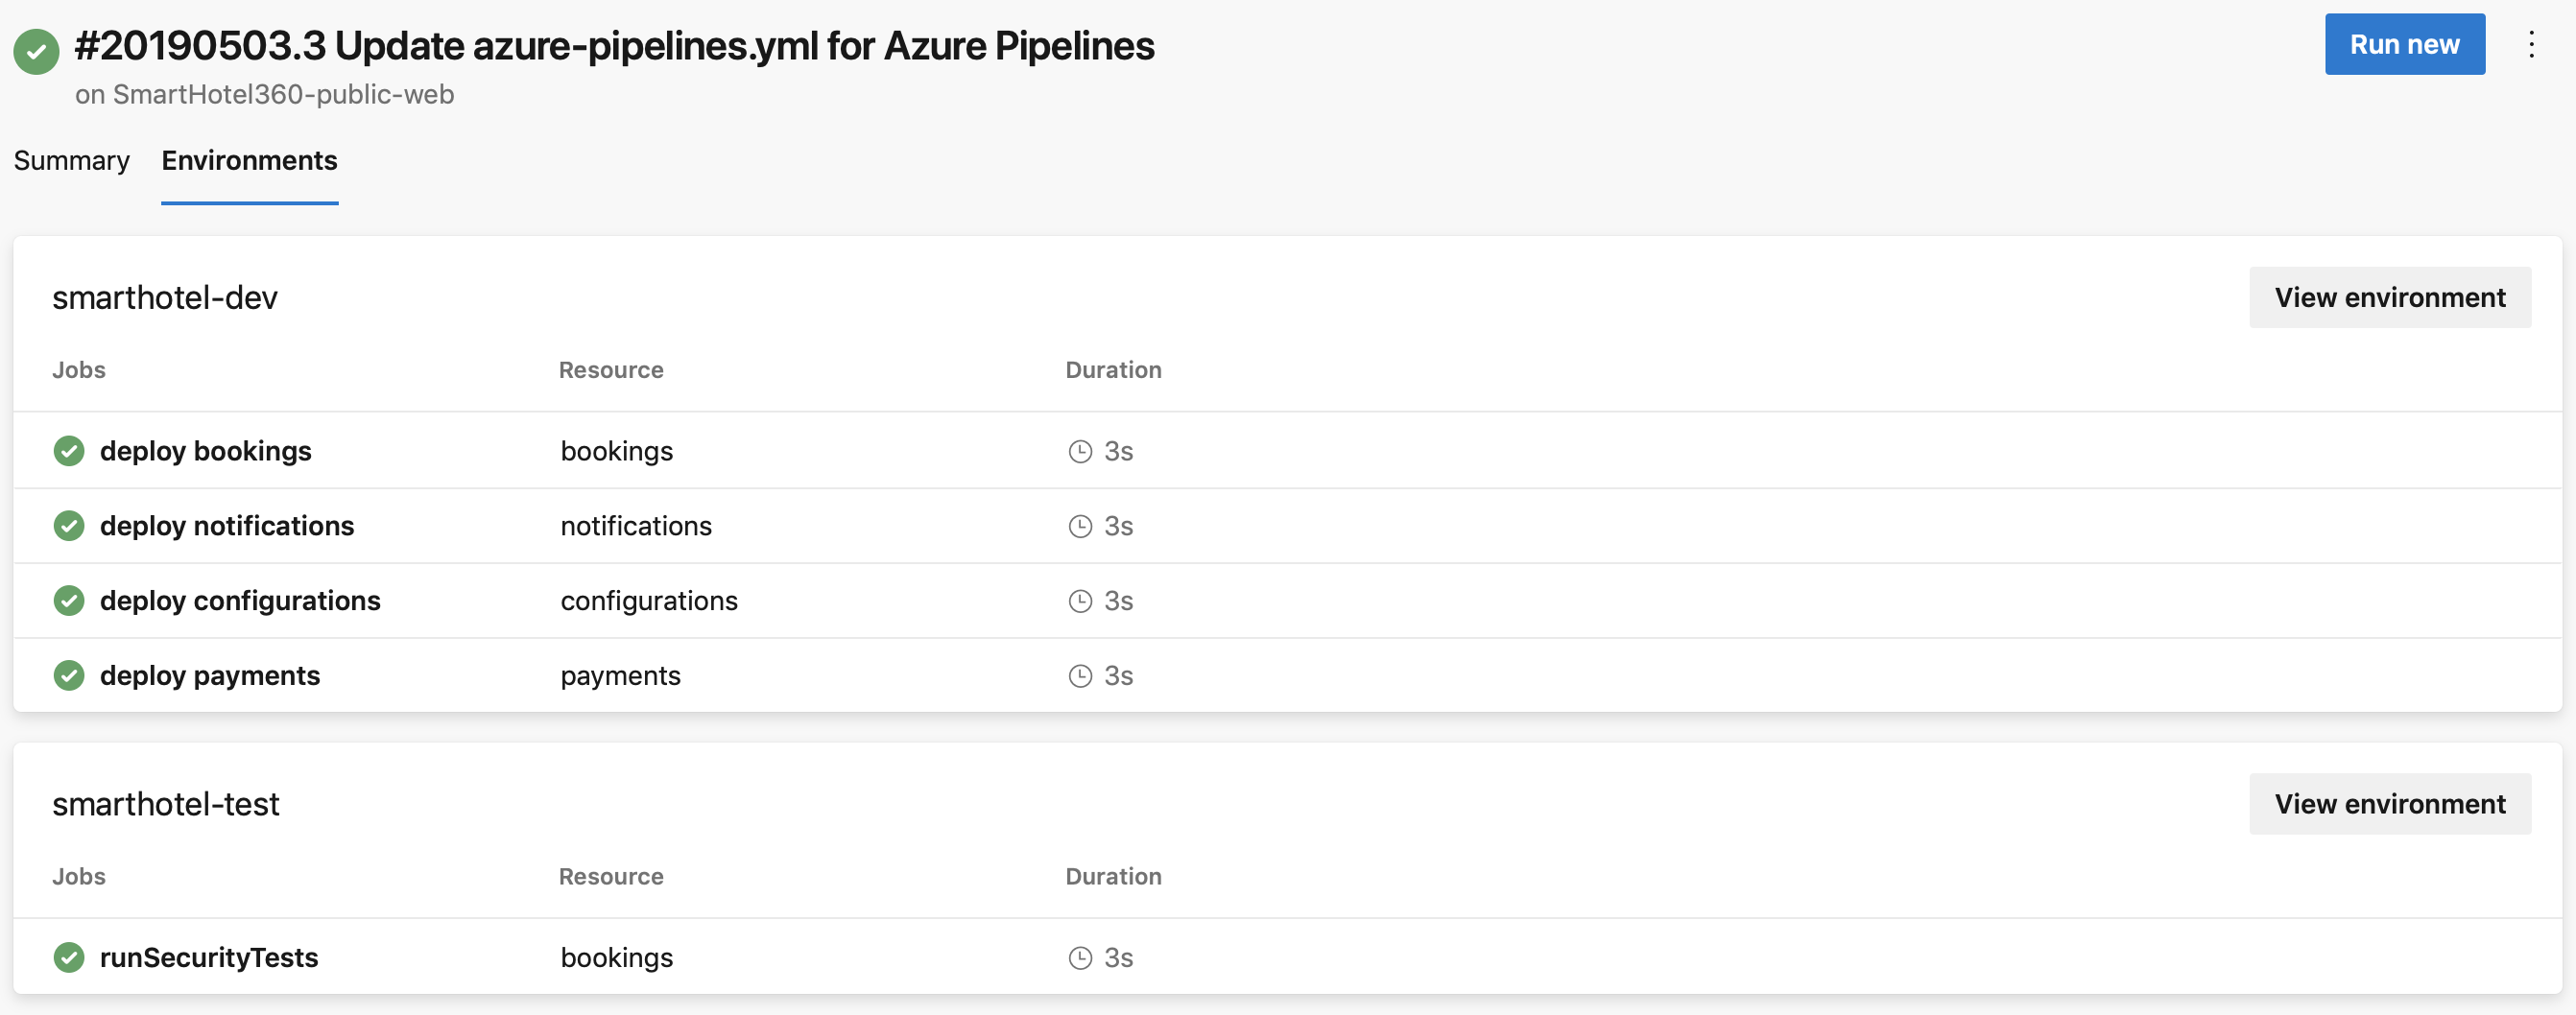
Use the Environments page to monitor the status of deployments, view history, and access logs. Update or remove resources as needed, and adjust configurations to reflect changes in your infrastructure.
Under the Environments tab of the pipeline run details, you can see all environments that were targeted by deployment jobs of a pipeline run.
What are Azure DevOps Variables?
Azure DevOps variables are key-value pairs used to store and manage dynamic values in a pipeline. They allow you to configure builds, releases, and deployments without hardcoding values, making your pipelines more flexible and maintainable.
These variables allow you to externalize settings like connection strings, API endpoints, and feature flags, making your pipelines more flexible and secure. Variables can also store secrets, environment-specific values, and dynamically generated data.
Types of Azure DevOps Variables
- Pipeline Variables: Defined at runtime for builds and releases.
- System Variables: Predefined by Azure DevOps (e.g., Build.SourceBranch).
- Environment Variables: Set within the agent’s environment for external tools.
- Secret Variables: Securely store sensitive data, such as API keys or passwords.
- Variable Groups: Collections of related variables shared across pipelines.
Azure Pipelines supports three different ways to reference variables: Macro syntax, template expression syntax, and runtime expression syntax.
Each syntax serves a different purpose and has unique scoping and evaluation timing. Below is a breakdown of each.
1. Macro Syntax ($(variableName)): Used for most standard variable references in scripts, task inputs, and pipeline settings.
Syntax Example:
variables:

  myVar: "Hello World"


steps:

- script: echo $(myVar)
Evaluated before the pipeline runs (at runtime). Works in scripts, tasks, and parameters.
Limitations:
- Cannot be used for setting variable names dynamically.
- Cannot reference secrets directly in scripts (use secrets instead).
2. Template Expression Syntax (${{ variables.variableName }}): Used inside YAML templates to pass variables dynamically.
Syntax Example:
variables:

  myVar: "Hello World"


steps:

- script: echo ${{ variables.myVar }}
Evaluated at compile time before running the pipeline. Used when expanding templates or expressions.
Limitations:
- Cannot access runtime values.
- Cannot modify variables dynamically during execution.
3. Runtime Expression Syntax ($[variables.variableName]): Used for conditional logic and dynamic variables within jobs and steps.
Syntax Example:
variables:

  myVar: "Hello World"


steps:

- script: echo $[variables.myVar]
Evaluated at runtime, allowing for dynamic behavior. Useful for conditional execution and complex expressions.
Limitations:
- Cannot be used inside templates.
- Must be used in specific places, like condition: statements.
User-defined variables vs System variables vs Environment variables
User-defined variables are custom values set by users to configure application-specific settings while system variables are predefined by Azure DevOps and provide metadata about the pipeline execution. On the other hand, environment variables are linked to the operating system or runtime environment and configure the behavior of tasks and tools during execution.
Each variable serve a distinct purpose in optimizing pipeline management.
1. User-Defined Variables
These are custom variables defined by users in pipelines, variable groups, or environments. Used to store application-specific configuration values, such as connection strings, file paths, or custom settings.
Scope:
- Can be defined at the pipeline level, job level, or task level.
- Can also be defined in variable groups for reuse across multiple pipelines.
Examples:
- Application settings (e.g., appName, apiUrl).
- Non-sensitive configuration values (e.g., environmentType, buildConfiguration).
How to Define:
In YAML pipelines:
variables:

  appName: 'MyApp'

  apiUrl: 'https://api.example.com'
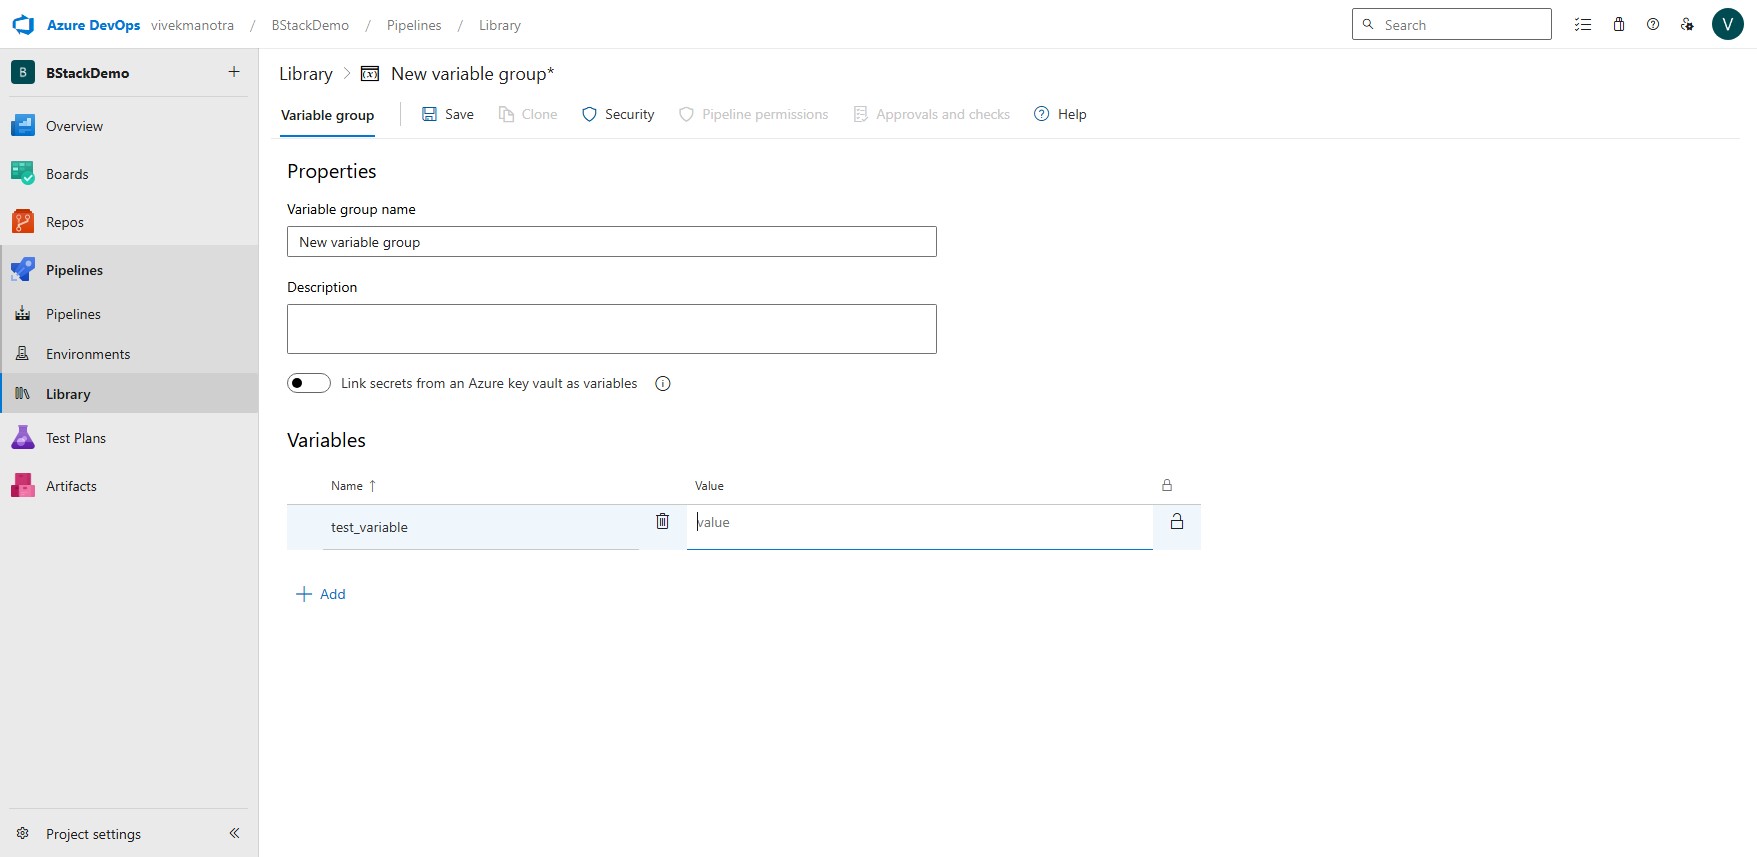
In the Azure DevOps UI (classic pipelines): Go to Pipelines > Library > Variable Groups or define them directly in the pipeline editor.
Usage: Accessed using $(variableName) syntax in tasks or scripts.
steps:

- script: echo "Application name is $(appName)"
2. System Variables
These are predefined variables provided by Azure DevOps that contain information about the pipeline, build, or release process. Used to access metadata about the pipeline execution, such as build ID, pipeline name, or agent details.
Scope:
- Automatically available in all pipelines.
- Read-only (cannot be modified by users).
Examples:
- Build.BuildId: The unique ID of the build.
- Agent.OS: The operating system of the agent.
- Pipeline.Workspace: The working directory of the pipeline.
Usage: Accessed using $(variableName) syntax.
steps:

- script: echo "Build ID is $(Build.BuildId)"
3. Environment Variables
These are variables specific to the operating system or runtime environment where the pipeline tasks are executed. Used to configure the behavior of scripts, tools, or processes running on the agent.
Scope:
- Available to all tasks running on the agent.
- Can be overridden or extended by user-defined variables.
Examples:
- PATH: The system path for executable files.
- JAVA_HOME: The path to the Java runtime.
Usage: Accessed using the syntax specific to the operating system:
Windows: %VARIABLE_NAME%
Linux/macOS: $VARIABLE_NAME
Example in a script:
steps:

- script: echo "System PATH is $PATH"
Using Predefined Variables
Predefined variables in Azure Pipelines are automatically set by the system and provide important context about the build and deployment environment. These variables are read-only and help to avoid hardcoding values in your scripts.
Here are some key points about predefined variables in Azure DevOps Pipelines:
- Read-only Nature: Predefined variables cannot be modified by the user (except a few like Build.Clean and System.Debug).
- No Hardcoding Needed: These variables allow you to reference dynamic values, such as paths and metadata, without manually setting them.
- Classic Pipelines: Insert these variables directly into task editors; they will automatically resolve to their runtime values during execution.
- Combining Variables: You can combine predefined variables with custom-defined variables to construct dynamic values, such as naming artifacts or setting up conditional logic.
- YAML Pipelines: Reference predefined variables by converting the name to uppercase and replacing dots with underscores (e.g., Build.ArtifactStagingDirectory becomes $(BUILD_ARTIFACTSTAGINGDIRECTORY)).
Example Usage in a YAML Script:
steps:

- script: |

    echo "Artifacts are being staged in: $(BUILD_ARTIFACTSTAGINGDIRECTORY)"

  displayName: "Display Artifact Staging Directory"
This script prints out the directory where build artifacts are staged, allowing you to reference the same directory in subsequent tasks without hardcoding its path.
Read More: A Detailed Guide on Automation Scripts
How to Set Variables In Azure DevOps Pipeline?
You can set variables in YAML or Classic pipelines, or through the Azure DevOps CLI. Below are the methods for setting variables across different pipeline types.
1. Setting Variables in YAML Pipelines
You can set variables in YAML pipelines within specific sections, or dynamically during runtime. Here’s how to define them.
A. Define Variables at the Top Level
You can declare variables at the top of your YAML file using a variables: block. This is useful for defining values that remain constant throughout the pipeline run.
variables:

  myVariable: "Hello World"

  buildConfiguration: "Release"
B. Define Variables Inline with a Job or Step
You can also define variables within a specific job or step. These variables are scoped to that particular section.
jobs:

- job: BuildJob

  variables:

    jobVariable: "JobSpecificValue"

  steps:

  - script: echo "Job variable value is $(jobVariable)"
C. Setting Variables Dynamically Using Logging Commands
Within your scripts, you can set or update variables during runtime using logging commands. For example, in a Bash script:
echo "##vso[task.setvariable variable=dynamicVar;]DynamicValue"
After this command executes, you can reference $(dynamicVar) later in your pipeline.
2. Setting Variables in Classic Pipelines
When working with Classic (UI-based) pipelines, you can set variables through the web interface. Here’s how:
A. Access the Variables Tab
- Open your Classic pipeline in Azure DevOps.
- Click on the Variables tab. This displays a table of existing variables.
B. Add or Edit Variables
- Add New Variable: Click on the New Variable button, then provide the variable name and its value.
- Mark as Secret: If the variable contains sensitive data, mark it as a secret by clicking on the padlock icon. This ensures the value is masked in the logs.
- Edit Existing Variables: You can update the value of any existing variable directly in the UI.
Example:
3. Setting Variables Using the Azure DevOps CLI
Azure DevOps CLI lets you manage pipelines and variables from the command line, which can be very useful for automation.
A. Create or Update a Variable for a Pipeline
Use the az pipelines variable create command to add a new variable to a pipeline. You need to provide details such as the variable name, value, and pipeline identifier.
Example Command:
az pipelines variable create --name myVariable --value "Hello World" \

  --pipeline-id 123 --org "https://dev.azure.com/YourOrganization" --project "YourProject"
This command creates (or updates, if it already exists) a variable named myVariable with the specified value in the pipeline with ID 123.
B. Working with Variable Groups
If you need to manage a set of variables together, you can use variable groups. To create a variable group using the CLI, you might use:
az pipelines variable-group create --name "MyVariableGroup" \

  --variables var1=Value1 var2=Value2 \

  --org "https://dev.azure.com/YourOrganization" --project "YourProject
This command creates a variable group named “MyVariableGroup” containing two variables.
How to Integrate Browserstack with Azure Pipelines?
Integrating BrowserStack Automate with Azure Pipelines allows you to run cross-browser and mobile tests on BrowserStack’s cloud infrastructure within your CI/CD workflow. This simplifies the execution of Selenium (or Appium) tests and automatically reports the results to your Azure DevOps dashboard.
Below are the key steps, prerequisites, and configuration details.
Prerequisites
- BrowserStack Account & Credentials: Ensure you have an active BrowserStack account. You’ll need your BrowserStack username, access key, and if using Test Management features, a Test Management API token.
- Azure DevOps Organization & Project: Set up your Azure DevOps project and pipeline.
- BrowserStack Azure DevOps Extension (Optional): Install the BrowserStack extension from the Visual Studio Marketplace to gain dedicated tasks (e.g., BrowserStackConfig and BrowserStackResults) for easier integration from marketplace.visualstudio.com.
- Testing Framework Setup: Your project should be configured to run automated tests (e.g., Selenium or Appium) and be set up to target BrowserStack’s Automate grid.
Once you have met these prerequisites, follow the steps below to integrate BrowserStack with Azure Pipelines:
Step 1: Configure BrowserStack Credentials in Azure DevOps
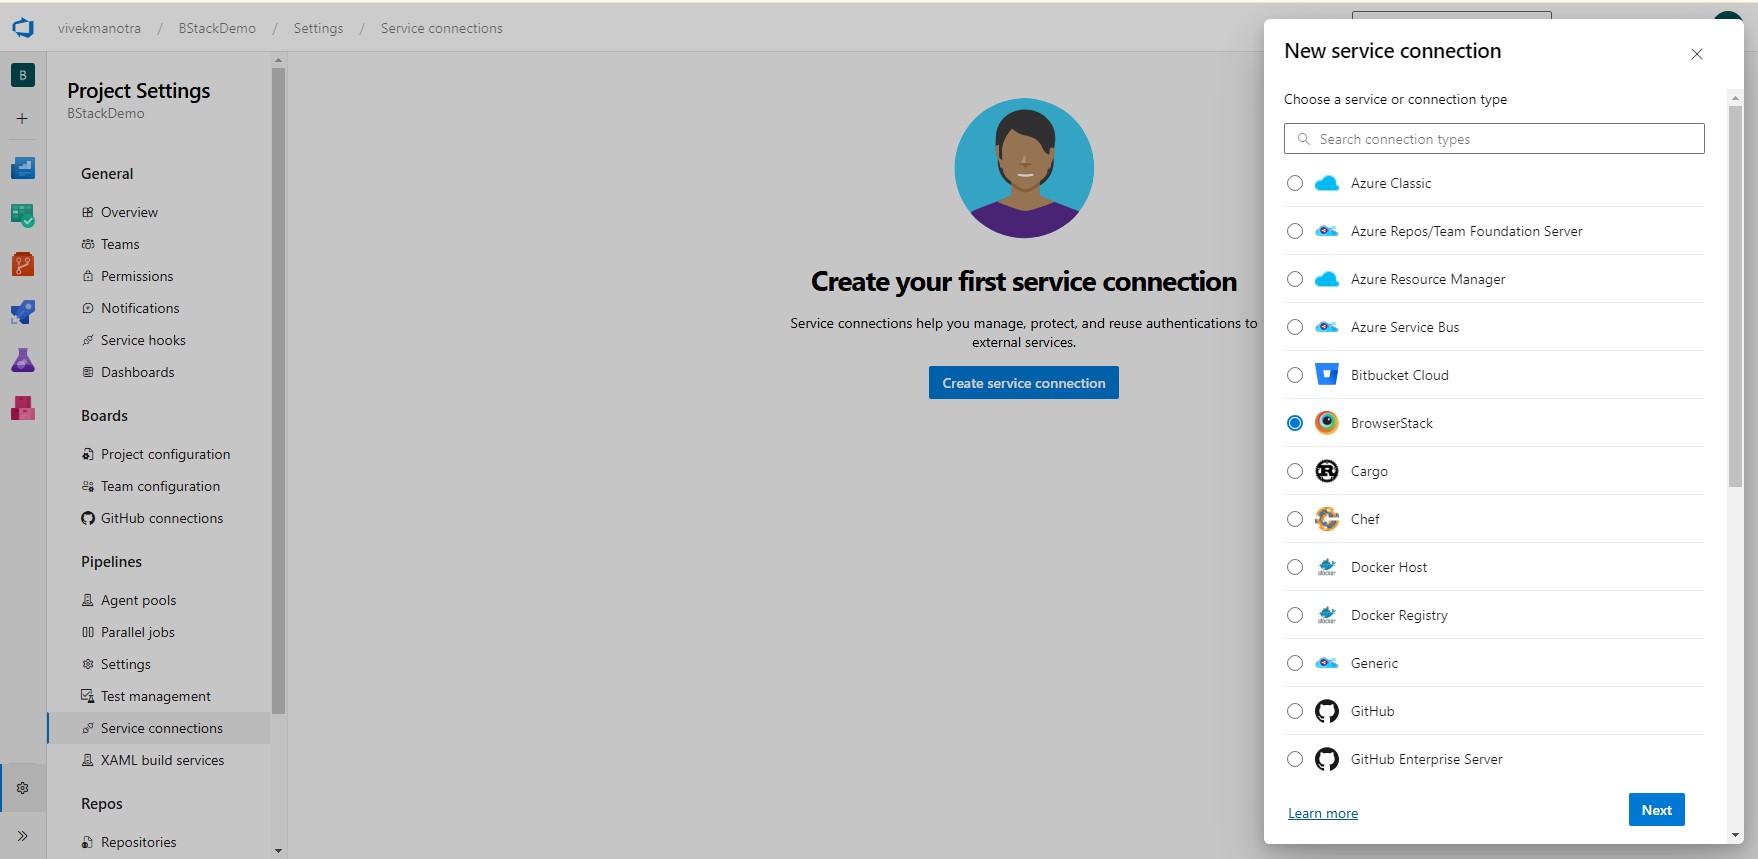
Create secure pipeline variables (or a service connection) for your BrowserStack credentials. For example, define variables like BROWSERSTACK_USERNAME, BROWSERSTACK_ACCESS_KEY, and, if needed, TEST_MANAGEMENT_API_TOKEN.
In the Azure DevOps portal, navigate to Project Settings > Service connections (if using a service connection) or define these as secret variables in your pipeline’s variable tab.
BrowserStack Extension Setup (Optional but Recommended):
Install the BrowserStack Azure DevOps Extension from the Visual Studio Marketplace. This extension adds specialized tasks for configuration and results reporting, reducing the manual scripting needed.
Step 2: Modify Your Pipeline Configuration
To integrate BrowserStack with Azure Pipelines, update your pipeline configuration using YAML, Classic, or the Azure DevOps CLI. Here’s how.
A. Using YAML Pipelines
Update your azure-pipelines.yml file to include BrowserStack tasks. Below is a simplified sample snippet:
trigger:

- main


pool:

  vmImage: ubuntu-latest


steps:

- task: BrowserStackConfig@0

  displayName: 'Configure BrowserStack'

  inputs:

    BrowserStackServiceEndPoint: 'YourBrowserStackServiceConnection'


- task: DotNetCoreCLI@2

  displayName: 'Restore Project'

  inputs:

    command: 'restore'


- task: DotNetCoreCLI@2

  displayName: 'Build Project'

  inputs:

    command: 'build'


- task: DotNetCoreCLI@2

  displayName: 'Run Tests'

  inputs:

    command: 'test'

    arguments: '--filter FullyQualifiedName\!~ReportGeneration'

  env:

    BROWSERSTACK_USERNAME: '$(BROWSERSTACK_USERNAME)'

    BROWSERSTACK_ACCESS_KEY: '$(BROWSERSTACK_ACCESS_KEY)'

    BROWSERSTACK_BUILD_NAME: 'MyBuild-$(Build.BuildId)'


- task: BrowserStackResults@1

  displayName: 'Publish BrowserStack Test Results'

  inputs:

    browserstackProduct: 'automate'

  continueOnError: true


- task: PublishPipelineArtifact@1

  displayName: 'Publish Test Report'

  inputs:

    targetPath: ./Reports/output.html

    artifact: 'Build Report'
Explanation:
- BrowserStackConfig Task: Initializes BrowserStack settings using the service connection or variable values.
- Test Task: Runs your test suite and passes BrowserStack-specific environment variables. Adjust the arguments and test filtering as per your framework.
- BrowserStackResults Task: Retrieves test execution details from BrowserStack to integrate with your pipeline’s reporting.
- Artifact Publishing: Optionally, publish generated reports (HTML, JUnit XML, etc.) for later review.
B. Using Classic Pipelines
Here’s how to modify your pipeline configuration using classic pipelines.
1. Create or Edit a Build/Release Pipeline:
- In your Azure DevOps project, navigate to Pipelines > Releases (or Builds for classic pipelines).
- Add a new task for BrowserStack configuration. If the BrowserStack extension is installed, you will see tasks like BrowserStack Configuration or BrowserStack Results.
2. Add Tasks Sequentially:
- BrowserStack Configuration Task: Configure BrowserStack credentials.
- Build and Test Tasks: Add tasks (e.g., MSBuild, Visual Studio Test) to build your project and run tests. Ensure environment variables for BrowserStack are referenced.
- Publish Test Results: Use tasks such as Publish Test Results to integrate output from your BrowserStack test runs.
3. Define Variables:
- Set your secret variables via the UI by navigating to the Variables tab of your pipeline. Mark sensitive data (like access keys) as secret.
C. Using Azure DevOps CLI
You can also manage pipeline variables and tasks using the Azure DevOps CLI for automation or scripting. For example:
az pipelines variable create --name BROWSERSTACK_USERNAME --value "your_username" \

  --pipeline-id 123 --org "https://dev.azure.com/YourOrganization" --project "YourProject"


az pipelines variable create --name BROWSERSTACK_ACCESS_KEY --value "your_access_key" \

  --pipeline-id 123 --org "https://dev.azure.com/YourOrganization" --project "YourProject"
These commands set BROWSERSTACK_USERNAME and BROWSERSTACK_ACCESS_KEY as environment variables within the pipeline. You can then reference these variables in your YAML or Classic pipelines to ensure sensitive information like access keys is securely stored and used during pipeline execution.
Step 3: Run and Monitor Your Pipeline
Here’s how to run and monitor your Azure DevOps pipeline.
- Trigger the Pipeline: Commit your changes or manually queue a run. The pipeline will use the BrowserStack tasks to start a test run on BrowserStack’s Automate grid.
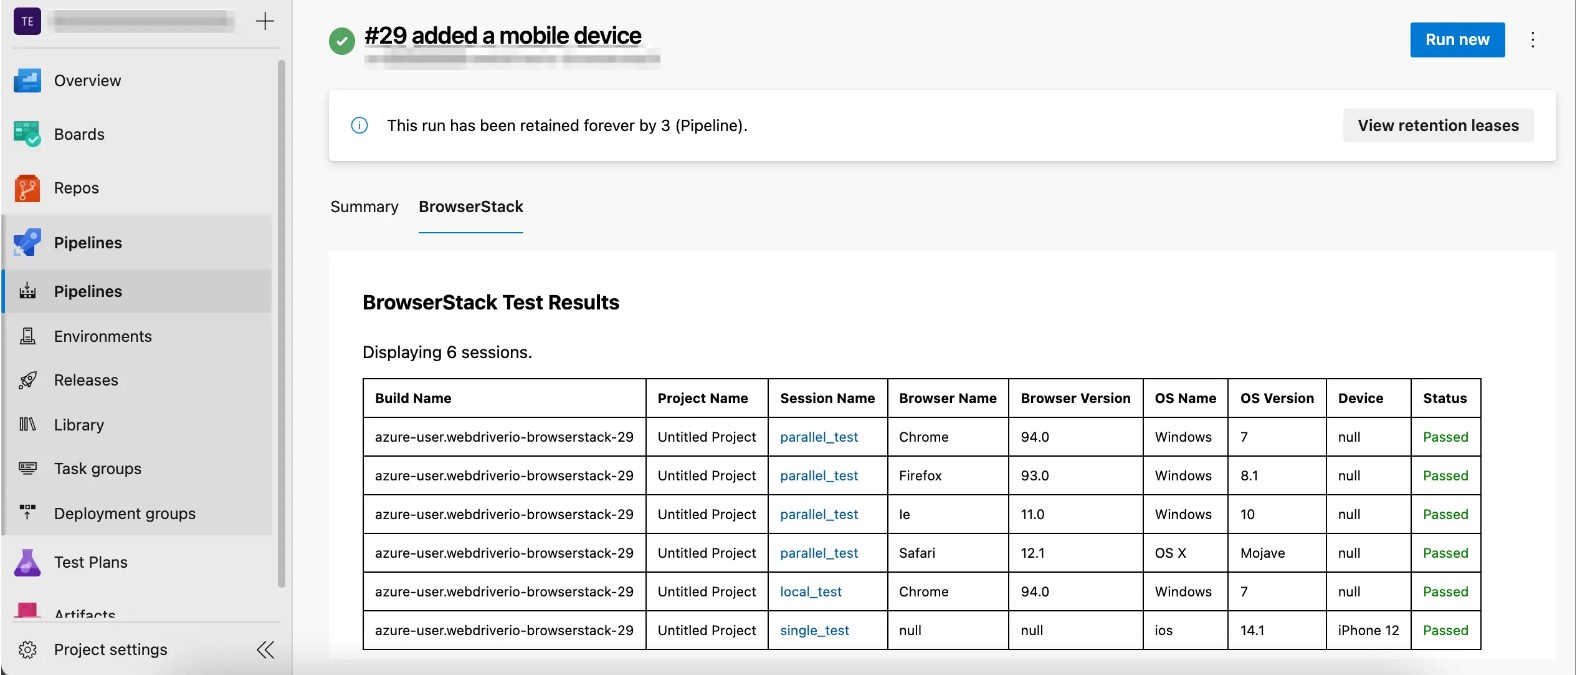
- Monitor Execution: View the logs in Azure DevOps for steps related to BrowserStack. The BrowserStackResults task will pull test status and may include screenshots or video links from BrowserStack.
- Review Reports: Once completed, review the test report artifacts published by the pipeline. You can also cross-check the BrowserStack dashboard to see detailed test session data.
Conclusion
Azure DevOps accelerates software development with continuous integration (CI) and deployment (CD), where environments and variables are key to managing infrastructure and automation. Mastering environment configuration and pipeline management helps businesses build secure, flexible, and automated CI/CD workflows.
The BrowserStack Azure DevOps integration allows teams to run parallel tests across multiple real browsers and devices. It supports secure credential management, integrates with both YAML and Classic pipelines, and provides detailed test debugging with logs, screenshots, and video recordings.
Useful Resources for DevOps
- What is DevOps
- DevOps Shift Left Testing: A Detailed Guide
- What is the ultimate goal of DevOps?
- Benefits of DevOps
- What is DevOps Configuration Management?
- What is Continuous Delivery in DevOps?
- What is a DevOps Pipeline? How to Build One
- What is DevOps Observability (Importance & Best Practices)
- DevOps Testing Strategy
- How to improve DevOps Feedback Loop
- Python For DevOps: An Ultimate Guide
- What is DevOps Automation and How is it Helpful?
- Importance of DevOps Team Structure
- The Role of QA in DevOps
- Top Challenges in DevOps and How to Solve Them
- Top 21 Monitoring Tools in DevOps for 2024
