Jenkins is the most popular and widely used CI/CD tool. Setting up agents in Jenkins can supercharge your CI/CD process.
Overview
What is a Jenkins Agent?
A Jenkins agent is a machine or software instance that performs tasks like running scripts, executing tests, or building components. It receives instructions from the Jenkins Master or Controller system.
How do Jenkins Agents work?
- Jenkins agents are machines or software instances that execute tasks like building and testing.
- They connect to the Jenkins master to receive and run job instructions.
- Agents handle specific tasks and return results to the Jenkins master.
- They can operate in customized environments for different platforms.
- Agents remain idle when no tasks are assigned.
- Multiple agents can be used to distribute workloads and optimize performance.
Key Benefits of Jenkins Agent
- Scalability: Allows adding more machines to handle tasks concurrently, improving system capacity.
- Faster Builds: Parallel execution by agents speeds up build times and increases productivity.
- Resource Optimization: Configures agents with specific environments to maximize resource efficiency.
- Flexibility: Supports multiple operating systems, enabling cross-platform testing.
- Load Balancing: Distributes tasks evenly across agents, preventing overload on the master node.
- Fault Tolerance: Ensures system stability by redistributing tasks if an agent fails.
This guide walks you through configuring Jenkins agents, covering the step-by-step process to ensure seamless setup and optimal performance.
What is a Jenkins Agent?
A Jenkins agent is a machine or software instance that executes specific tasks and commands, such as scripts, test execution, build components, etc. Agents receive commands from the Jenkins Master or Controller systems.
To handle workloads in a distributed system, as there can be any multiple agents the jobs can be executed parallelly and reduce the execution time.
Read More: Jenkins vs Gitlab CI
Types of Jenkins Agents
Jenkins agents can be broadly classified into two types: Permanent or static agents and dynamic agents.
- Permanent or Static agents: Permanent agents are configured manually using the SSH or JNLP technique and connected to the master node. This is useful in handling a consistent, ongoing workload.
- Dynamic agents: Dynamic agents are created on demand based on requirements, usually with the help of cloud providers or container services like Docker or Kubernetes. These dynamic agents are removed automatically after jobs are completed, which allows scalability.
What are the differences between Jenkins Node and Agent?
In Jenkins, a Node refers to any machine that is part of Jenkins setup, whereas an agent is the machine where Jenkins executes the commands or jobs.
Below are the differences:
| Feature | Agents | Nodes |
|---|---|---|
| Definition | An agent is a machine where Jenkins executes tasks such as scripts, test execution, building components, etc. | Node is any machine that is part of Jenkins. This can be either master/controller or agents, or it can have both. |
| Types | Static agents and Dynamic agents are two types of agents | Nodes include the master node and all connected agents. |
| Job | Execute the job delegated by the master. | If it is a controller, it distributes the job. If its agent executes the job |
| Management | Agents require a set of software to execute and it requires a timely update. | If it is a controller, it will be hosted in the central location which will monitor the health check and availability. |
| Example | A system that executes the automation tests | A controller that manages the Jenkin agents or any agent |
Features of Jenkins Agents
Jenkins’s agent helps in different ways. In the modern cloud, these agents can be dynamic and ensure cost savings. Additionally, they can help with parallel execution.
- Parallel execution: Multiple Jenkins agents can be configured to a single Jenkins controller, which can help execute multiple independent jobs simultaneously.
- Scalability: With the dynamic agent’s setup, agents can be brought up or down based on the requirement or demand. Dynamic agents can be automatically added or removed on demand.
- Compatibility: Jenkins can be used with different operating systems, such as Linux and Windows. Based on specific needs, Jenkins can target these.
- Security: The Jenkins agent can be configured in an isolated environment with all security standards, which can help improve security standards.
- Customization: Jenkins agents are highly customizable and can have different types of software and configurations.
Setting up Jenkins Agent
Jenkins agents can be set up in multiple ways. This article guides you through two different methods: using SSH and the JNLP mechanism.
SSH is the most secure method and is widely used. It uses private and public key concepts. Many organizations still use JNLP, however, it is less popular.
Prerequisites for working with Jenkins Agent
To set up a Jenkins agent, you need a few prerequisites:
- Jenkins controller machine with Java installed
- A web browser
- SSH key pair software (if can be git for Windows, Cygwin, or any SSH key pair supported software)
Adding an Agent in Jenkins using SSH
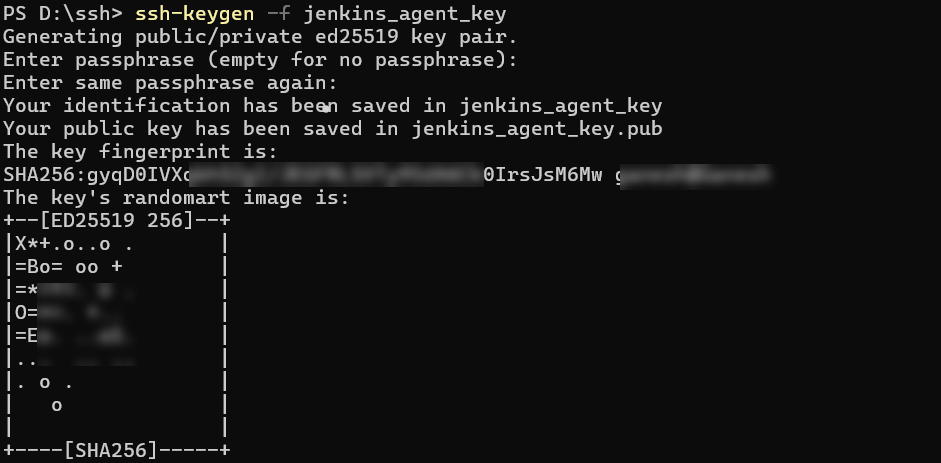
Step 1: Generate SSH Key pair
Navigate to the directory where you want to place the SSH key (ex: D:/SSH)
- Execute the below command to generate the SSH key
ssh-keygen -f jenkins_agent_key
- Use the information below to create the key
- Enter passphrase: <do not provide anything hit Enter>
- Enter the same passphrase again: <do not provide anything and hit Enter>
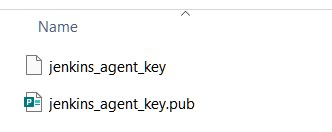
- Once the above command is entered, it generates the two files (private key file and public key file)
Step 2: Create a Jenkins SSH Credential
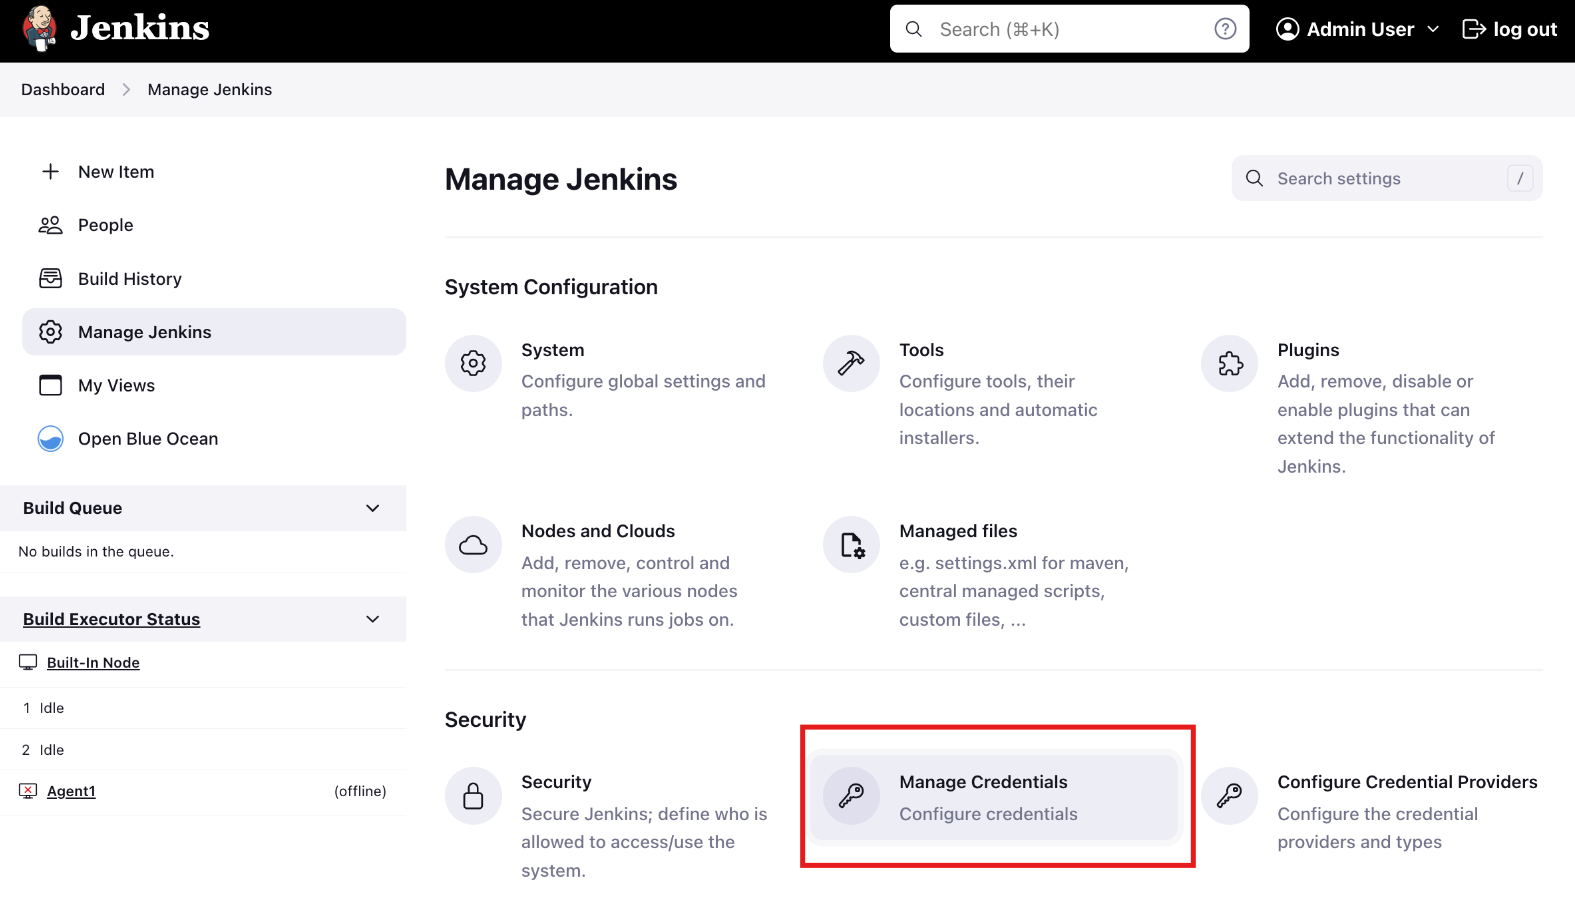
1. Navigate to Jenkins Dashboard and Click on Manage Jenkins
2. Click on Manage Credentials
3. Click on Add Credentials under the Store scoped to Jenkins
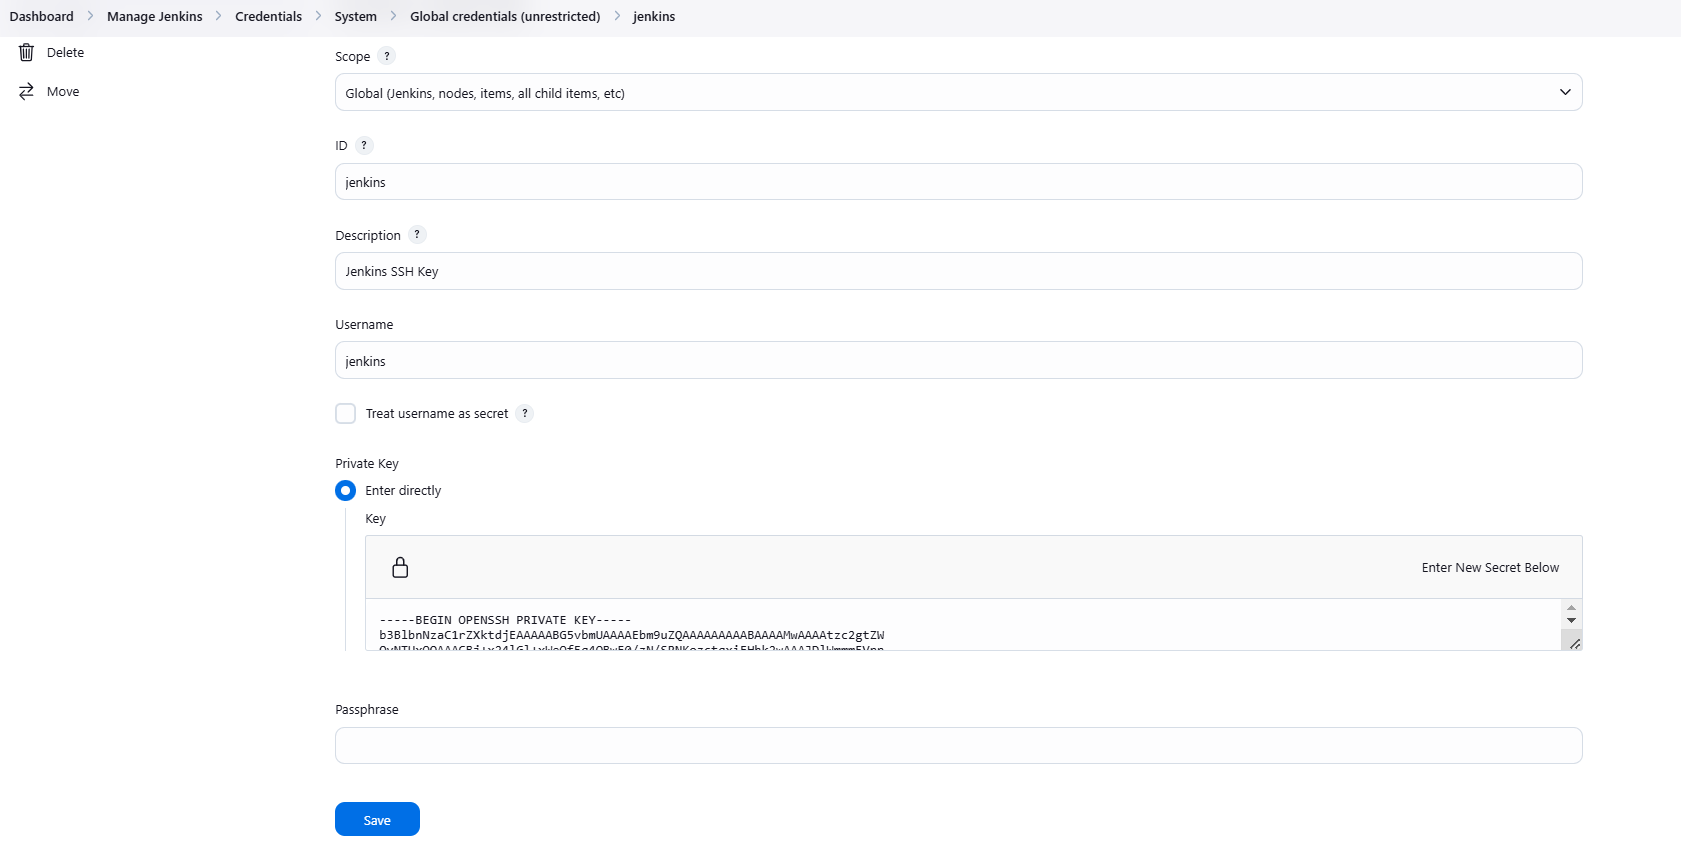
4. Fill in the required details
- Kind: SSH Username with private key
- Id: jenkins
- Description: Jenkins ssh key
- Private Key > Enter directly and Copy-paste the private key from the previously generated file.
- Click on the Create/Save button.
Create a Jenkins Docker Agent with SSH
1. Use the below command to Start the first SSH docker Agent
docker run -d --rm --name=agent1 --network jenkins -p 22:22 `-e "JENKINS_AGENT_SSH_PUBKEY=<YOUR_SSH_KEY_PUBLIC>" `jenkins/ssh-agent:jdk17
The above command uses the docker
- docker run: Starts a new Docker container.
- -d: Runs the container in the background
- –rm: Automatically removes the container when it stops
- –name=agent1: Assigns the container the name “agent1“
- –network jenkins: Connects the container to the “jenkins” Docker network
- -p 22:22: Maps port 22 on the host to port 22 in the container, enabling SSH access from the host.
- -e “JENKINS_AGENT_SSH_PUBKEY=<YOUR_SSH_KEY_PUBLIC>”: Sets an environment variable in the container with the SSH public key
- jenkins/ssh-agent:jdk17: Specifies the Docker image for the Jenkins SSH agent, based on JDK 17
2. Once the above command is complete, it starts the agent1
This can be verified through the following command
docker ps
3. You need the host IP of this container to set this as an agent to Jenkins. To capture the port number execute the below command and keep the IP address saved somewhere.
docker container inspect agent1 | Select-String -Pattern '"IPAddress": "\d+\.\d+\.\d+\.\d+"'
Configure Jenkins Agents
Step 1. From Dashboard, Navigate to Manage Jenkins and choose Nodes
Step 2. Click on New Node
Step 3. Fill in the Agent name: agent1 and select the type Permanent Agent
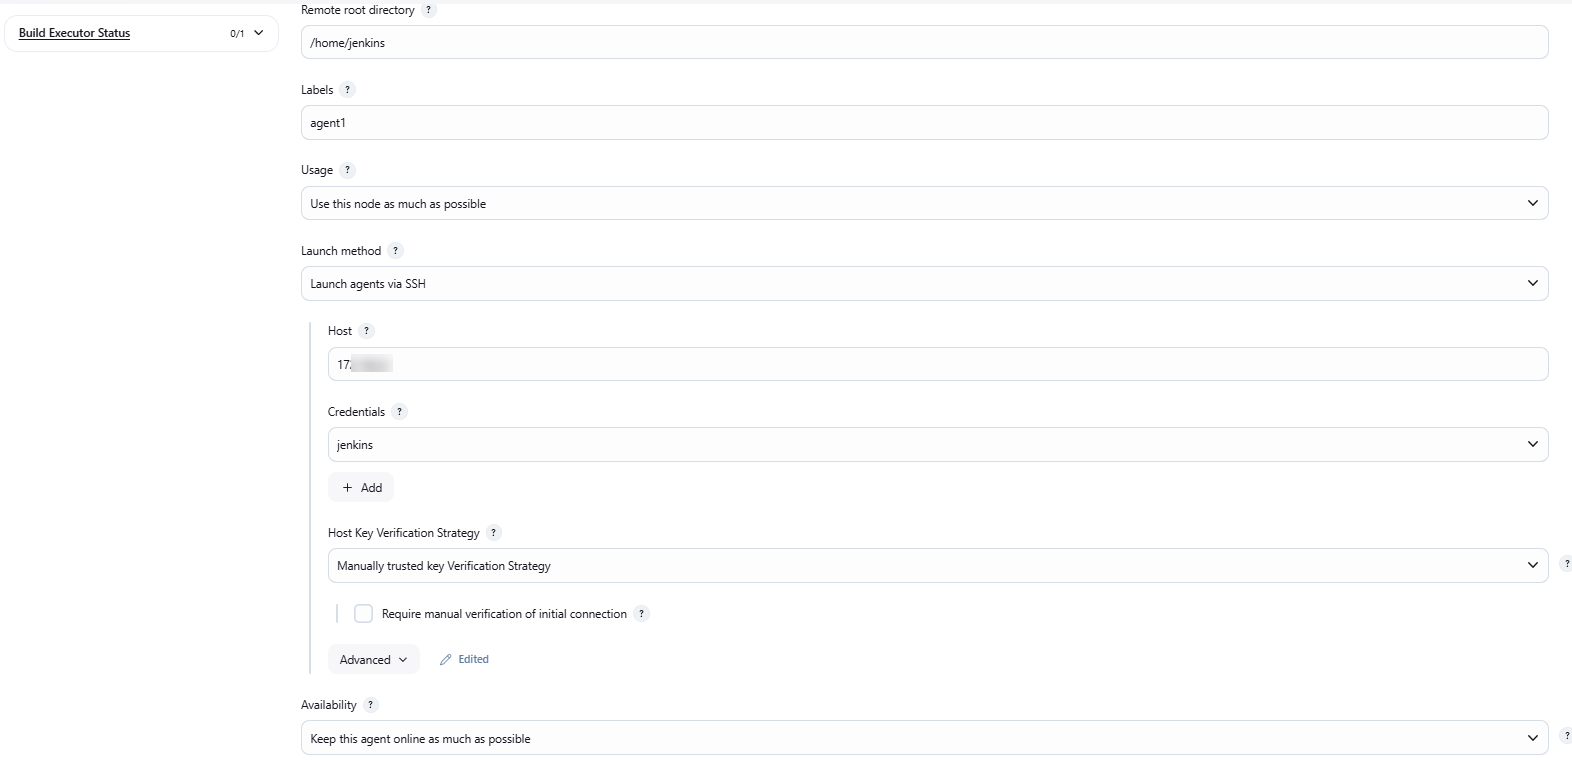
Step 4. Next, fill in the below details
- Remote root directory: /home/jenkins
- Label: agent1
- Usage: use this node as much as possible
- Launch method: Launch agents via SSH
- Host: Mention the hostname copied in the previous step
- Credentials: jenkins
- Host Key Verification Strategy: Manually trusted key Verification Strategy
- Availability: Keep this agent online as much as possible
Node Properties> Check box tick Environment variables
Click Add
Name: home permission1
Value: ENV=/home/dx00926/.kshrc
Step 5. Click on Save and Agent will be registered and launched.
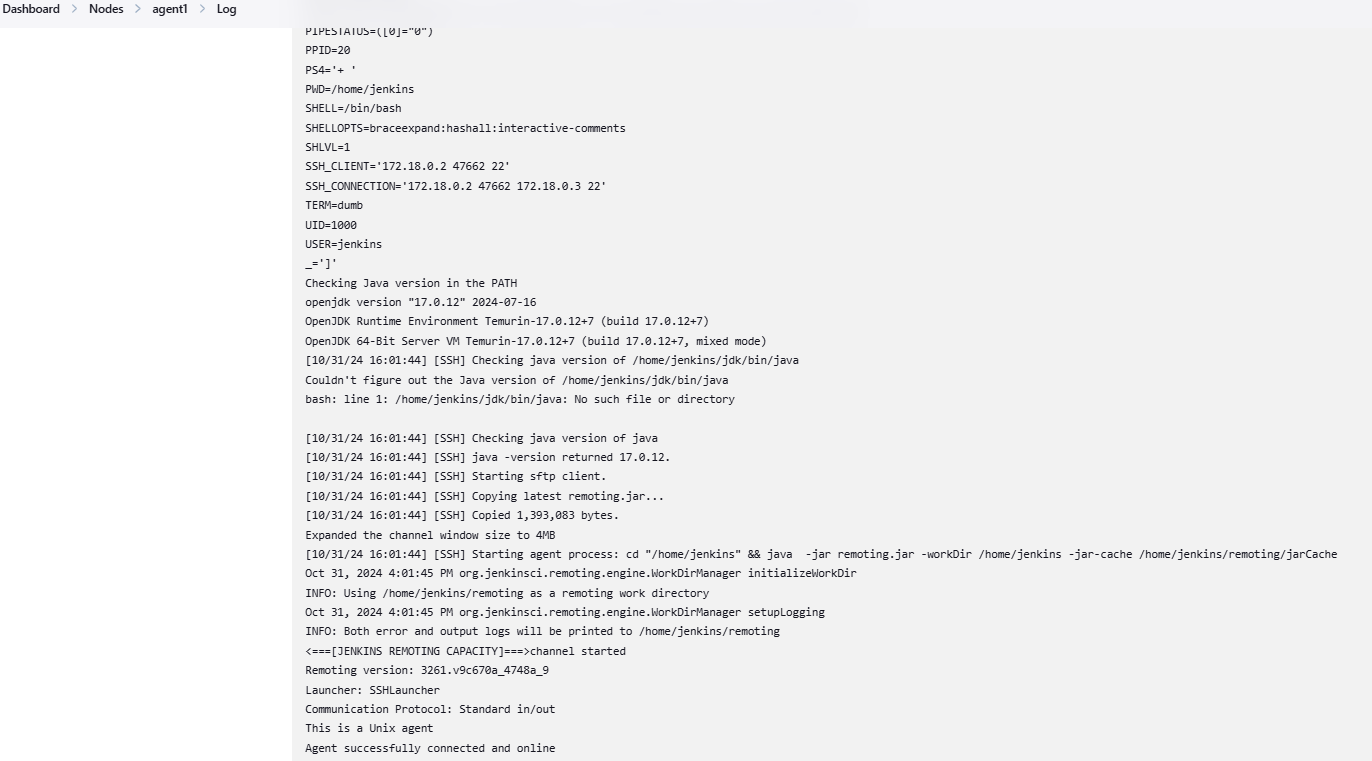
Step 6. Click on the agent1 and Click on logs you should see the below message
Read More: How to set up Jenkins Docker Agent
Execute the first job in the Jenkins SSH agent
Step 1. From the Jenkins dashboard, Click on New Item
Step 2. Enter the name: First Jenkins Job
Step 3. Select: Freestyle project and click OK
Step 4. Check the option: Restrict where this project can be run
Step 5. Fill the field: label with the agent1
Step 6. Select the option Execute shell at Build Section
Step 7. Add below command
echo "Node name is $NODE_NAME"

echo "Job name is $JOB_NAME"
Step 8. Click on Apply and Save
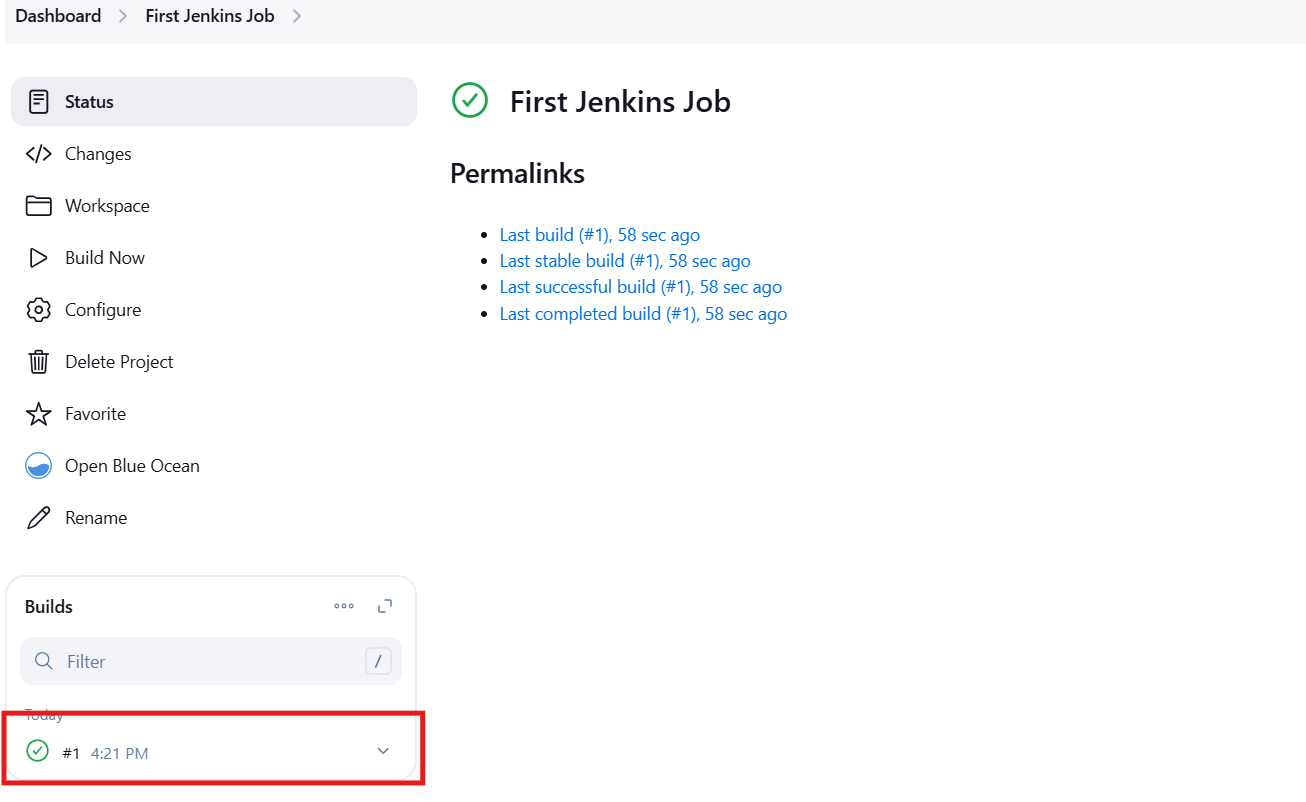
Step 9. Click on the build from the left menu
Step 10. The build will be triggered, and if it completes, you can see it in green
Step 11. Click on build number (ex: #1)
Step 12. Click on console output, and you will see the messages below
Configuring Jenkins Agents using JNLP
JNLP is another method to add the Jenkins agents and requires minimal effort to add the agents
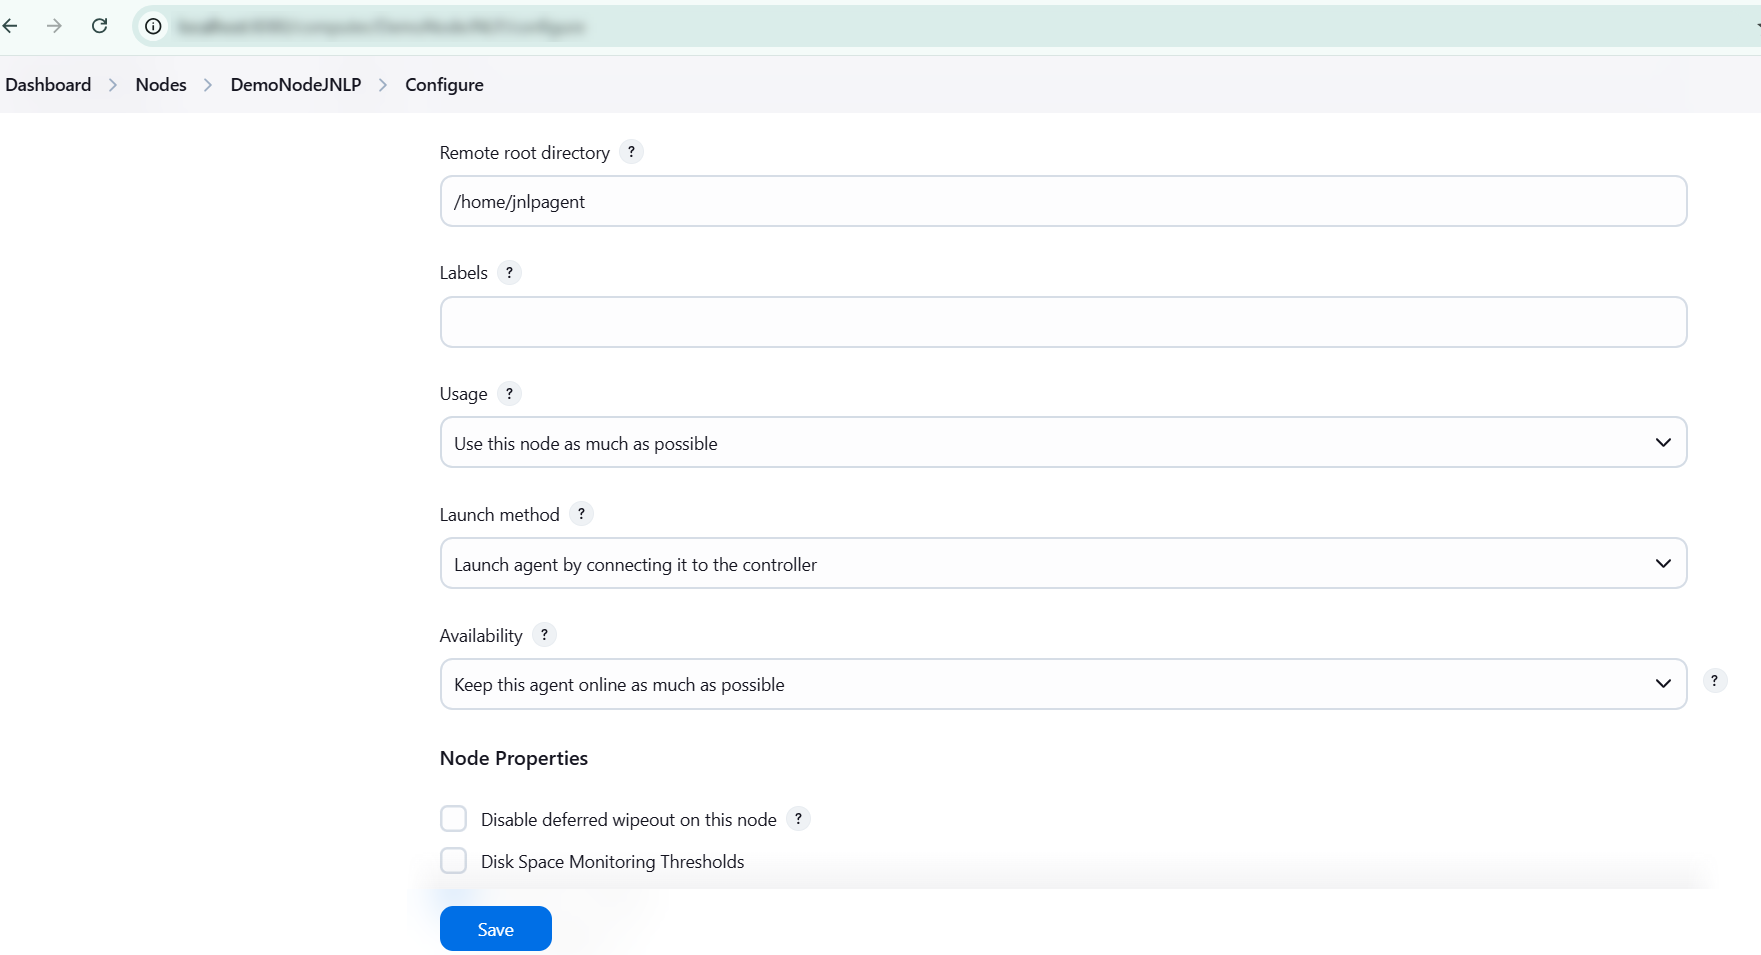
Step 1: Configure the JNLP Node in the Jenkins controller
1. From the Dashboard, Click on Manage Jenkins, Click on Nodes
2. Click on New Node
3. Provide the Node name: ex: DemoNodeJNLP
- Type: Permanent
- Remote root directory: /home/jnlpagent
- Usage: Use this node as much as possible
- Launch method: Launch agent by connecting it to the controller
- Availability: Keep this agent available as much as possible
4. Click on Create/Save
Step 2: Create a directory inside the Jenkins host system
1. Create a new directory in the Jenkins controller machine
2. Using the terminal, enter the below command
docker exec -it -u root <controller_container_id_or_name> /bin/bash
The above command allows you to log into the container as a privileged user
Example: docker exec -it -u root jenkins-blueocean1 /bin/bash
3. Create a new directory with permissions like the one below
mkdir -m 777 /home/jnlpagent
Step 3: Download JNLP Agent
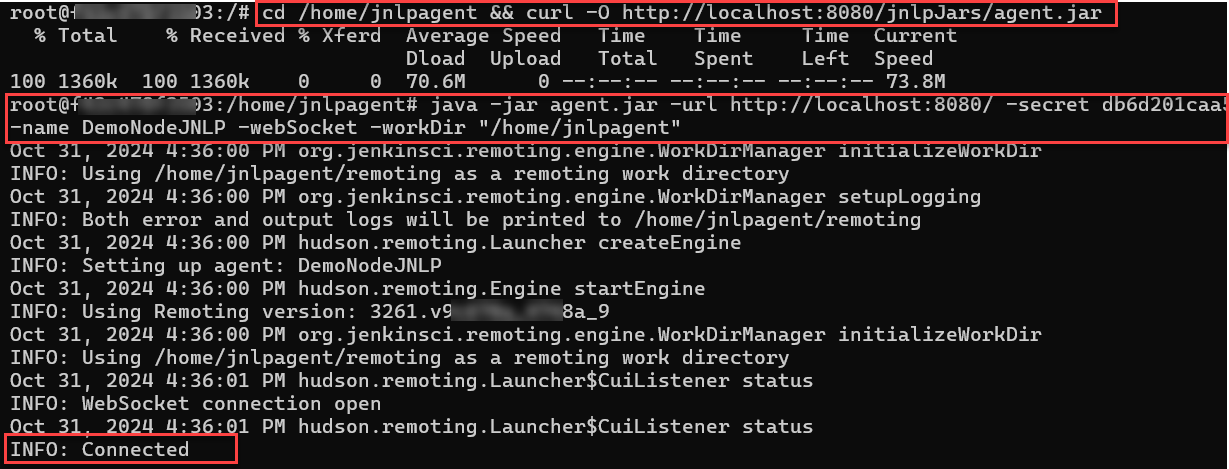
Download the Jnlp agent in the home/jnlpagent folder using the below command.
cd /home/jnlpagent && curl -O http://localhost:8080/jnlpJars/agent.jar
Connect the JNLP agent to the controller using the below command
java -jar agent.jar -url http://localhost:8080/ -secret <secret_key> -name DemoNodeJNLP -webSocket -workDir "/home/jnlpagent"
Note: The secret key can be found by navigating in the Jenkins Dashboard> Nodes > DemoNodeJNLP
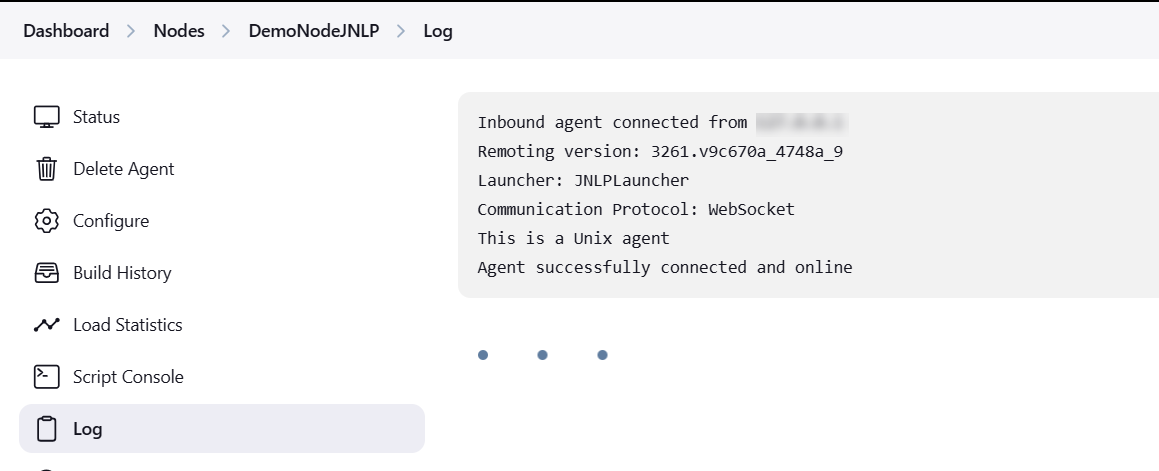
Now, If you navigate to Manage Jenkins > Nodes > DemoNodeJNLP > Log
You should see the below logs
Step 4: Execute the first job in Jenkins JNLP agent
1. Click on New item from the Jenkins dashboard
Enter name: Jenkins first JNLP Job and Choose Freestyle project
2. Click Ok
3. Check on Restrict where this project can be run on the Next screen
Enter the name: DemoNodeJNLP
4. Build step> Add build step > And Choose Execute Shell
echo "Node name is $NODE_NAME"

echo "Job name is $JOB_NAME"
5. Click Apply and Save
6. Click on Build Now
If the build is a success, you should see the build number in the green status
7. Then click on the build number
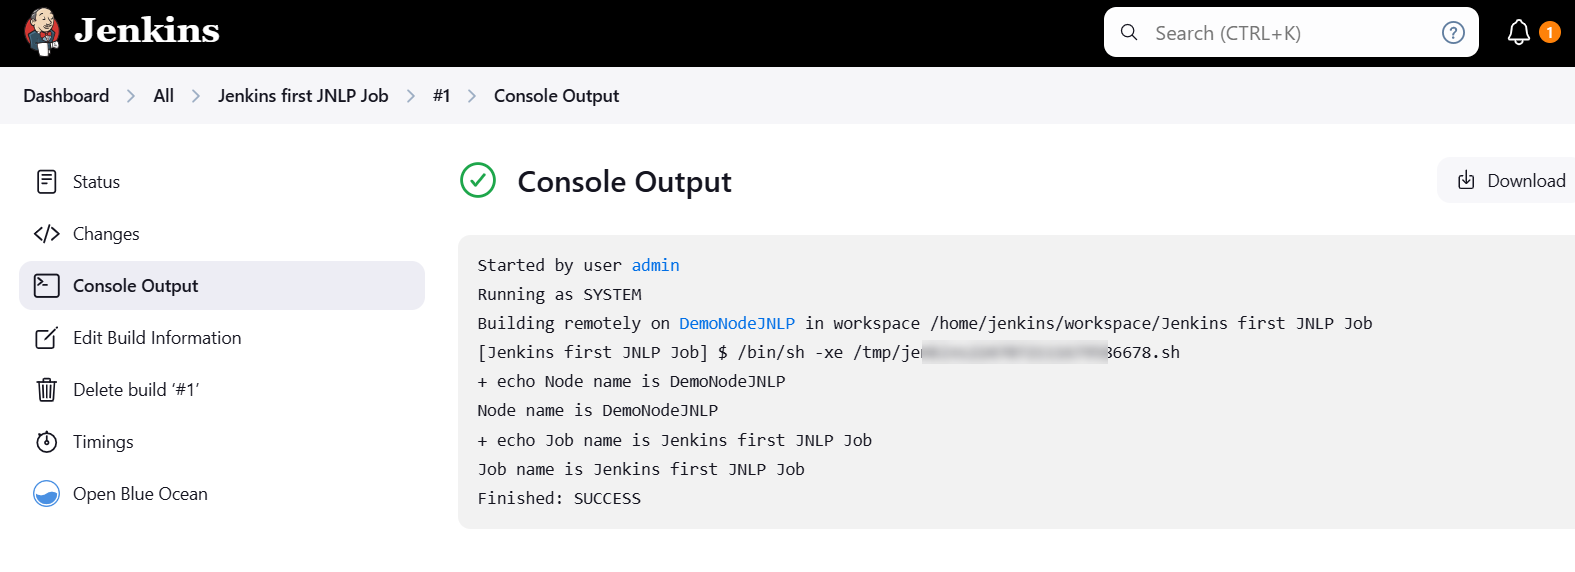
8. Then click on Console Output
You will see the output as given below:
Agent Configuration Options
Jenkins provides many agent configuration options, which helps us to customize the Jenkins agents and their executions, directories, etc. Below are some of the common configuration options that are used.
1. Labels and Node Specifications
Labels (or tags) are used to group multiple agents into one logical group. Labels (or tags) in Jenkins group multiple agents logically, such as using the label “windows” for all Windows agents to ensure a job runs only on them.
Labels can also indicate CPU architecture or specific tools installed. Multiple labels should be separated by spaces (for example, “Windows docker”), and while they can contain any non-space characters, it’s best to avoid special characters like !&|<>(), to prevent conflicts with label expression.
You can easily set this option by navigating to the Node > Configuration section in Jenkins
2. Remote Root Directory
The Remote Root Directory in Jenkins defines the main directory on an agent where all job-related files and artifacts are stored.
It ensures that each agent has its workspace for builds, logs, and resources, allowing for organized file management.
The path can be tailored to the agent’s operating system (for example, /var/lib/jenkins for Linux or C:\Jenkins for Windows). This setup facilitates easier management, clean up, and troubleshooting of jobs on the agent.
You can easily set this option by navigating to the Node > Configuration section in Jenkins.
3. Custom workspace directory
For each job in Jenkins, a unique workspace directory is allocated, which is where the code is checked out and the builds are executed.
Typically, it’s best to allow Jenkins to manage and clean up these workspace directories automatically. However, there are instances where this can be problematic, and in such cases, you can manually specify the workspace location.
One example is when paths are hard-coded, necessitating the build to occur in a specific location. While relying on this approach may not be ideal, it provides a workaround for those situations.
This option is available at the job level, you can navigate to your job name and then click on configuration, and then use the advanced options.
4. Executors and Resource Allocation
Jenkins allows you to configure the maximum number of concurrent builds that Jenkins may perform on one node.
An easy way to set this number is by understanding the CPU cores on the machine. Setting a higher value would cause each build to take longer, but could increase the overall throughput.
Understanding the BrowserStack Jenkins Plugin
BrowserStack is a cloud-based testing platform that supports integration with many tools, including Jenkins. BrowserStack plugin is available on the Jenkins platform and it helps to integrate the automated tests into the Jenkins continuous integration platform.
This plugin can be configured to run automated tests like Selenium or Appium on a continuous testing platform. Integrating Jenkins into BrowserStack enables testing as part of the development deployment platform and faster feedback. Additionally, both Jenkins and BrowserStack allow parallel execution, which reduces execution time.
Additionally, BrowserStack supports integration with automation frameworks such as Playwright, Puppeteer, WebdriverIO, Selenium, Appium, etc. The configuration may change based on the type of automation framework you are using.
You can easily configure it by referring to the BrowserStack detailed Guide on Jenkins Integration with Automation framework.
Benefits of integrating BrowserStack with Jenkins
Integrating BrowserStack and Jenkins has several advantages, including:
- Faster Feedback Loops: Gain real-time insights into test results, allowing quick identification and resolution of issues directly within Jenkins.
- Parallel Testing Across Devices: Run tests simultaneously across multiple devices and browsers, reducing overall test execution time and accelerating the release cycle.
- Comprehensive Cross Browser Testing: Ensure broader compatibility by testing your application on a wide array of real devices and browser versions accessible through BrowserStack.
- Automated Testing on Real Devices: Run tests on actual devices rather than emulators, producing results that better reflect real-world performance and user experiences.
- Enhanced Test Reporting: Access detailed test reports embedded within Jenkins, including videos, logs, and screenshots, making it easier to troubleshoot and refine tests.
- Integration with App Testing: For mobile app testing, BrowserStack App Automate allows you to upload builds directly, providing seamless, accurate app testing across devices.
- Shift-Left Testing in the Pipeline: By incorporating test automation into your development pipeline, you enable shift-left testing, identifying issues early in the development lifecycle and improving code quality before deployment.
Read More: Jenkins for Test Automation
Conclusion
Jenkins helps in enabling the CI/CD approach by providing much customizable and extendable flexibility. Jenkins agents act as the heart of the Jenkins ecosystem by executing the required jobs specified by the Jenkins Master.
However, test automation includes a lot more complex scenarios than just build and deploy. Integrating BrowserStack and Jenkins can enable continuous testing (CT) by allowing automation testing execution seamlessly across multiple devices, operating systems, and browsers.
Additionally, BrowserStack supports many test automation framework integrations with Jenkins, which removes automation framework barriers.


